Working with HAR scripts
In this lesson you will learn how to use HAR scripts to load test a web application.
About HAR
HAR, which stands for HTTP Archive Format, is an archive file derived through interactions within a web browser. The file contains protocol-level GET and POST request logging, as well as performance information and web page load times.
Why HAR
HAR files are quick and simple to produce. When used with Appvance IQ, HAR files provide detailed performance data and load testing capabilities.
How to Generate HAR File
- Open Appvance IQ in your favourite Browser
- Click Global Options.
- Click HTTP Proxy.
- Enter the Mark Step Name.
- Enter the Port number 9095 in the Text Box.(HTTP Proxy Port)
- Click Mark Step.
- Click Start Proxy.
- Open the Firefox browser, click Options → Advanced → Network → Settings
- Click Radio Button Manual proxy Configuration, Provide HTTP Proxy as "localhost" (If you are using client installer you need to provide domain name EX: ec2.xxxx.aws.com) and provide the same HTTP Proxy port and Click Ok.
- Provide some website in Firefox browser which you are going to record as HAR file.
- Verify in chrome browser all the requests are getting captured of that application.
- Click Download HAR Log.
- Click Stop Proxy.
HAR Exercise
- Open Appvance IQ.
- Click Build.
- Select File > New.
The Scenario Test Type is Load Test in Info tab.
Select Test Management.
- Iteration1's Completion Type is specified as Executions Per User, with a Max execution time of two minutes.
Select Test Cases.
- From theTest Casestab, clickAdd a Test Case Execution
- Enter a name for the test case in theTest Case Namebox
- Enter a name for the script in theScript Namebox
- Click theScript Typebox and selectHAR
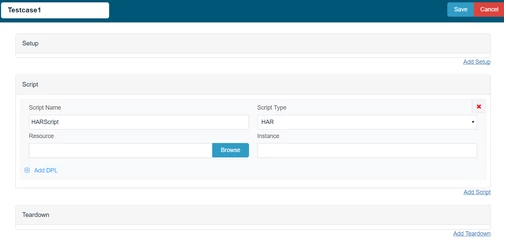
5. ClickBrowse(to the right of the Resource box)
The Open window appears
Iteration1 contains one Test Case, Spree HAR, where the number of Users and Executions to run are specified.
- Click Edit Test Case (pencil icon).
The Script Type is set to HAR, and the test case Resource points to the spreeHAR.har file located in the HAR_example directory.
- Click Cancel.
- Select Resources.
All resources related to the Scenario are summarized, including the test case specified in Test Cases.
- Click Play Scenario to execute the scenario.
- The Scenario loads in a new browser tab.
- As the scenario executes, metrics pertaining to the execution display in Live Reports
- Once the execution completes, indicating a status of Execution Done, select Output and the Click here (within the Output details).
- Select Resource Correlation and/or Resource Usage.
Additional reports listed reveal more information about the scenario executed.
How to convert DS file to HAR:
- Open Appvance IQ.
- Navigate to DS record page.
- Open the DS file in Designer.
- Click Http History.
- Select Start Recording from Action Drop down.
- Navigate to Designer page.
- Run the Designer script.
- Once it is completed, navigate to DS3 HTTP History and click Export as HAR from File drop down.
- It saves as ZIP file
- Unzip the file to get the HAR file.