Attaching an Amazon EBS Volume to an Windows Instance.
You can attach an EBS volume to one of your instances that is in the same Availability Zone as the volume.
Prerequisites
- Determine the device names that you'll use.
- Determine how many volumes you can attach to your instance.
- If a volume is encrypted, it can only be attached to an instance that supports Amazon EBS encryption.
- If a volume has an AWS Marketplace product code:
- The volume can only be attached to a stopped instance.
- You must be subscribed to the AWS Marketplace code that is on the volume.
- The configuration (instance type, operating system) of the instance must support that specific AWS Marketplace code. For example, you cannot take a volume from a Windows instance and attach it to a Linux instance.
- AWS Marketplace product codes are copied from the volume to the instance.
To attach an EBS volume to an instance using the console
1. Open the Amazon EC2 console.
2. Click Volumes in the navigation pane.
3. Select a volume and then click Attach Volume.
4. In the Attach Volume dialog box, start typing the name or ID of the instance to attach the volume to in the Instance box, and select it from the list of suggestion options (only instances that are in the same Availability Zone as the volume are displayed).
5. You can keep the suggested device name, or enter a different supported device name.
Important The block device driver for the instance assigns the actual volume name when mounting the volume, and the name assigned can be different from the name that Amazon EC2 recommends.
6. Click Attach.
7. Connect to your instance and make the volume available.
Making an Amazon EBS Volume Available for Use
After you attach an Amazon EBS volume to your instance, it is exposed as a block device. You can format the volume with any file system and then mount it. After you make the EBS volume available for use, you can access it in the same ways that you access any other volume. Any data written to this file system is written to the EBS volume and is transparent to applications using the device.
Note that you can take snapshots of your EBS volume for backup purposes or to use as a baseline when you create another volume.
Making the Volume Available on Windows
Use the following procedure to make the volume available.
1.Log in to your Windows instance using Remote Desktop.
2. Start the Disk Management utility. On Windows Server 2012, on the taskbar, right-click the Windows logo, and then select Disk Management. On Windows Server 2003/2008, click Start, point to Administrative Tools, select Computer Management, and then select Disk Management.
3. Select the disk that represents the new EBS volume.
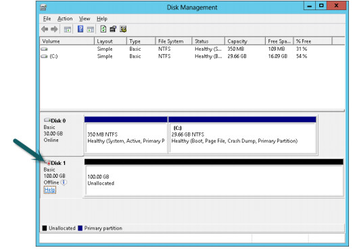
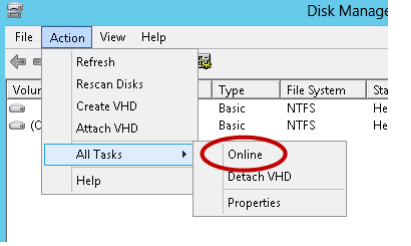
4. On the Disk Management menu, select Action - All Tasks - Online.
5. A new disk needs to be initialized before it can be used.
Caution:
If you're mounting a volume that already has data on it (for example, a public data set), make sure that you don't reformat the volume and delete the existing data.
To initialize a new disk:
a. In the Disk Management utility, select the new EBS volume disk.
b. On the Disk Management menu, select Action - All Tasks - Initialize Disk. Attaching Volume to the instance Page 4
c. In the Initialize Disk dialog, select the disk to initialize, select the desired partition style, and press OK.
Restart your Amazon Instance.