The more natural way to implement Appvance AI using Bamboo is by setting local or remote agents however it is possible performing it with dockers, they are recommended for isolated testing. This guide is oriented to configure execution plan for AppvanceIQ using agents configuration it does not matter if they are local or remote.
Requeriments
The following requirements are the ones that are necessary to have AppvanceRestClient running test over Atlassian Bamboo.
- Java Development Kit JDK, please install as it is required in the related Oracle site depending of the chosen platform https://www.oracle.com/technetwork/java/javase/downloads/index.html.
- Apache Ant build scripting languaje, please follow the installation guide in https://ant.apache.org/manual/install.html, later it will be necessary to reference it in the Bamboo configuration.
- Database driver, Bamboo is natively prepared for H2, Oracle, PostgreSQL, MsSQL to store the builds data so this requirement will be necessary only in the case of MySQL database, it does not matter if the database is installed locally of remotely, it can be obtained in https://dev.mysql.com/downloads/connector/j/, the jar file will be copied to the lib folder of bamboo later.
- git distributed version control, the installation procedure depends of the chosen platform.
- Depending of the build load it could be necessary to have the agents installed on separated machines, so we do decentralize the entire Bamboo build processing, in this case please follow this installation guide https://confluence.atlassian.com/bamboo/bamboo-remote-agent-installation-guide-289276832.html.
Bamboo installation
The package can be downloaded from https://www.atlassian.com/software/bamboo/download choose the platform you are installing, follow the Bamboo installation guide located in https://confluence.atlassian.com/bamboo/bamboo-installation-guide-289276785.html, during the process you will asked for the location of the bamboo files, it is highly suggested to located this folder in a place out of the user folders, so every user logged in the system can access the folder.
JUST IN THE CASE OF MYSQL. Once you have Completed the installation, you will need to copy the MySQL JDBC jar file in the sub folder lib of the Bamboo executables.
Once this has been completed please start Bamboo by issuing BambooConsole script file if you want to run it as desktop application or installAsService script file to run it as a service and then StartBamboo, at this time you will be able to log Bamboo at http://localhost:8085 or http://<dns>:8085 out of the machine, however the first time you will redirected to http://localhost:8085/setup/setupLicense.action where you will be asked for a license key, you can obtain it by clicking in contact Atlassian link under the text box, once you have the key, copy/paste it in the text box and then click Express Installation if you will use the H2 default database that is fine for tests or learning but if this is not the case please click in Custom Installation, in the first page you will be able of changing the instance name and some location file stuff, in the second page you will need to choose from the embedded database (H2) or an external, you will need to choose the database from the combo box as I have mentiones before PostgreSQL, Oracle, MsSQL or MySQL (it is required to have copied the jdbc jar file), the final task will be configuring the driver, this will depend of of the chosen database, please fill the information related to the connections string as per the database jdbc.
There are more details for the installation, but since this document is oriented to how to set Appvance to work with Bamboo, feel free to look for more documentation in the Atlassian bamboo site.
One more thing to configure is install ant as an executable in Bamboo as below.
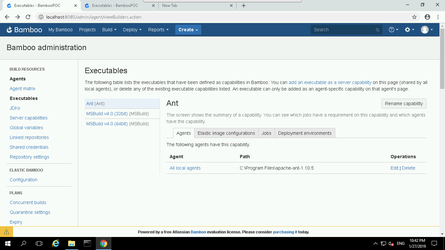
The path is the place where ant has been installed.
Plan Configuration
Native build configuration is based in agents, mainly by its performance and flexibility, Dockers configuration are not covered in the present document
Create Project
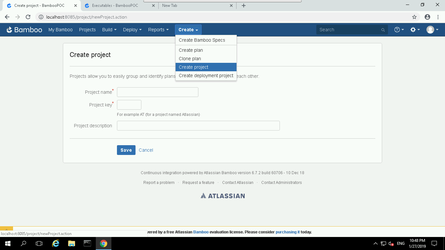
Give the project a name and a key as an acronym, optionally you can fill the description with some relevant info.
Create Plan
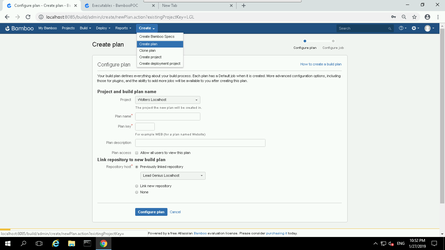
Give the plan a name and a key as a acronym , optionally you can fill the description with some relevant info.
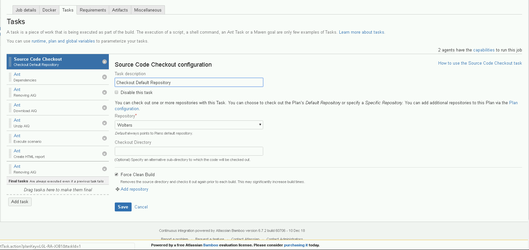
Set the scenario repository
Fill the repository credentials fields and the correct branch and click in the Configure Plan button
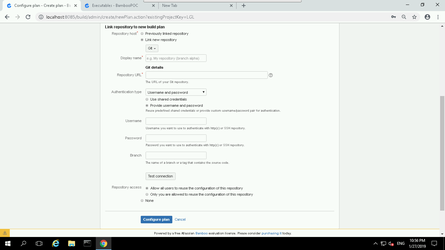
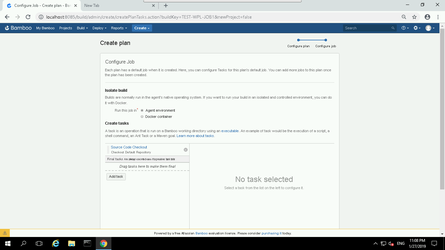
Configuring plan
It will be redirected to this form
All the necessary jobs for the scenario execution have been created as ant tasks, please modify the paths as per the environment you are setting up and create the following tasks in this order
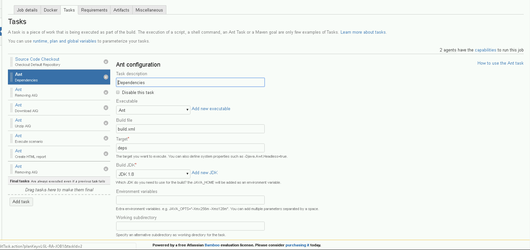
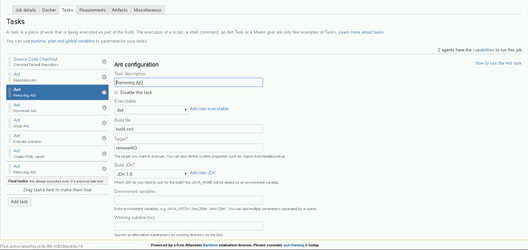
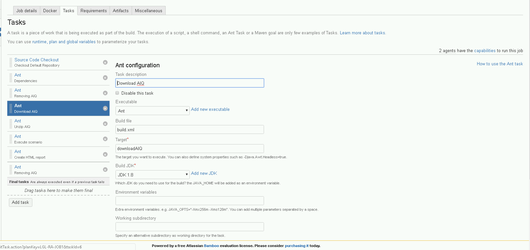
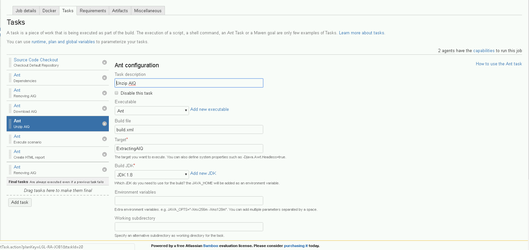
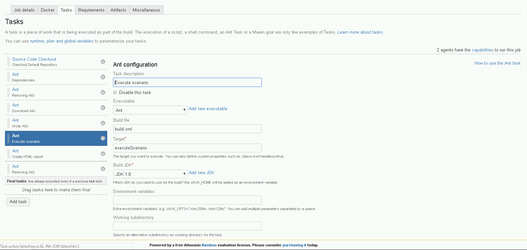
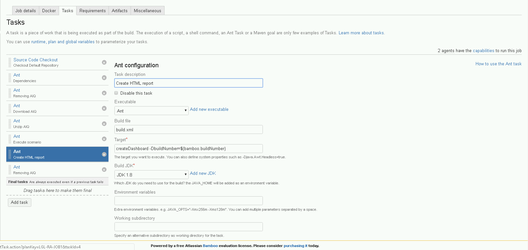

Please take a look to the attached build.xml and crds.json file for a full understanding of the ant targets.
Linux installation (Debian based)
This installation assumes an UBUNTU 16.04 EC2 machine, follow these commands to install a Linux Bamboo agent.
7 zip
sudo apt-get install p7zip-full p7zip-rar
Oracle JDK 8
sudo add-apt-repository ppa:webupd8team/java
sudo apt update
sudo apt install oracle-java8-installer
sudo apt install oracle-java8-set-default
ANT
sudo apt install ant
XVFB, Firefox and Chrome
sudo apt install xvfb firefox
sudo apt install mysql-server
sudo systemctl status mysql
sudo mysql_secure_installation
wget https://dl.google.com/linux/direct/google-chrome-stable_current_amd64.deb
sudo dpkg -i google-chrome-stable_current_amd64.deb
Adding access globally to there packages
cd /etc/profile.d/
vi ant.sh
export ANT_HOME=/usr/local/ant
export PATH=${ANT_HOME}/bin:${PATH}
vi java.sh
export JAVA_HOME=/usr/lib/jvm/java-8-oracle/jre/bin/java
vi xvfb.sh
Xvfb :99 -ac -screen 0 1280x1024x24 &
chmod +766 ant.sh java.sh xvfb.sh
Install Bamboo agent
java -jar atlassian-bamboo-agent-installer-6.7.2.jar http://<dns or ip-address>:8085/agentServer/