Synthetic DPL
During system development and testing, the employment of synthetic data can be very useful. This is because it prevents one from using one's real identity, especially for data like identification numbers, full names, and date of birth, among others. Manually generating synthetic data takes time, hence slowing down the testing process since it is hard to come up with a lot of new data.
Synthetic DPL allows users to generate massive amounts of data for their project use.
It can generate a massive amount of data thereby allowing a developer to push their programs to the limit during testing. Developers can then analyze the data as one would have done in real-life situations and come up with desired decisions.
What type of data does Synthetic DPL generate?
Some examples of data that can be generated include, but are not limited to the below categories:
- Address
- Animals
- Companies
- Commerce
- Dates
- Data types
- Images
- Names
- Time
- And many more…
Synthetic DPL
To navigate to Synthetic DPL, on the left menu, expand Test Data and click Synthetic DPL.
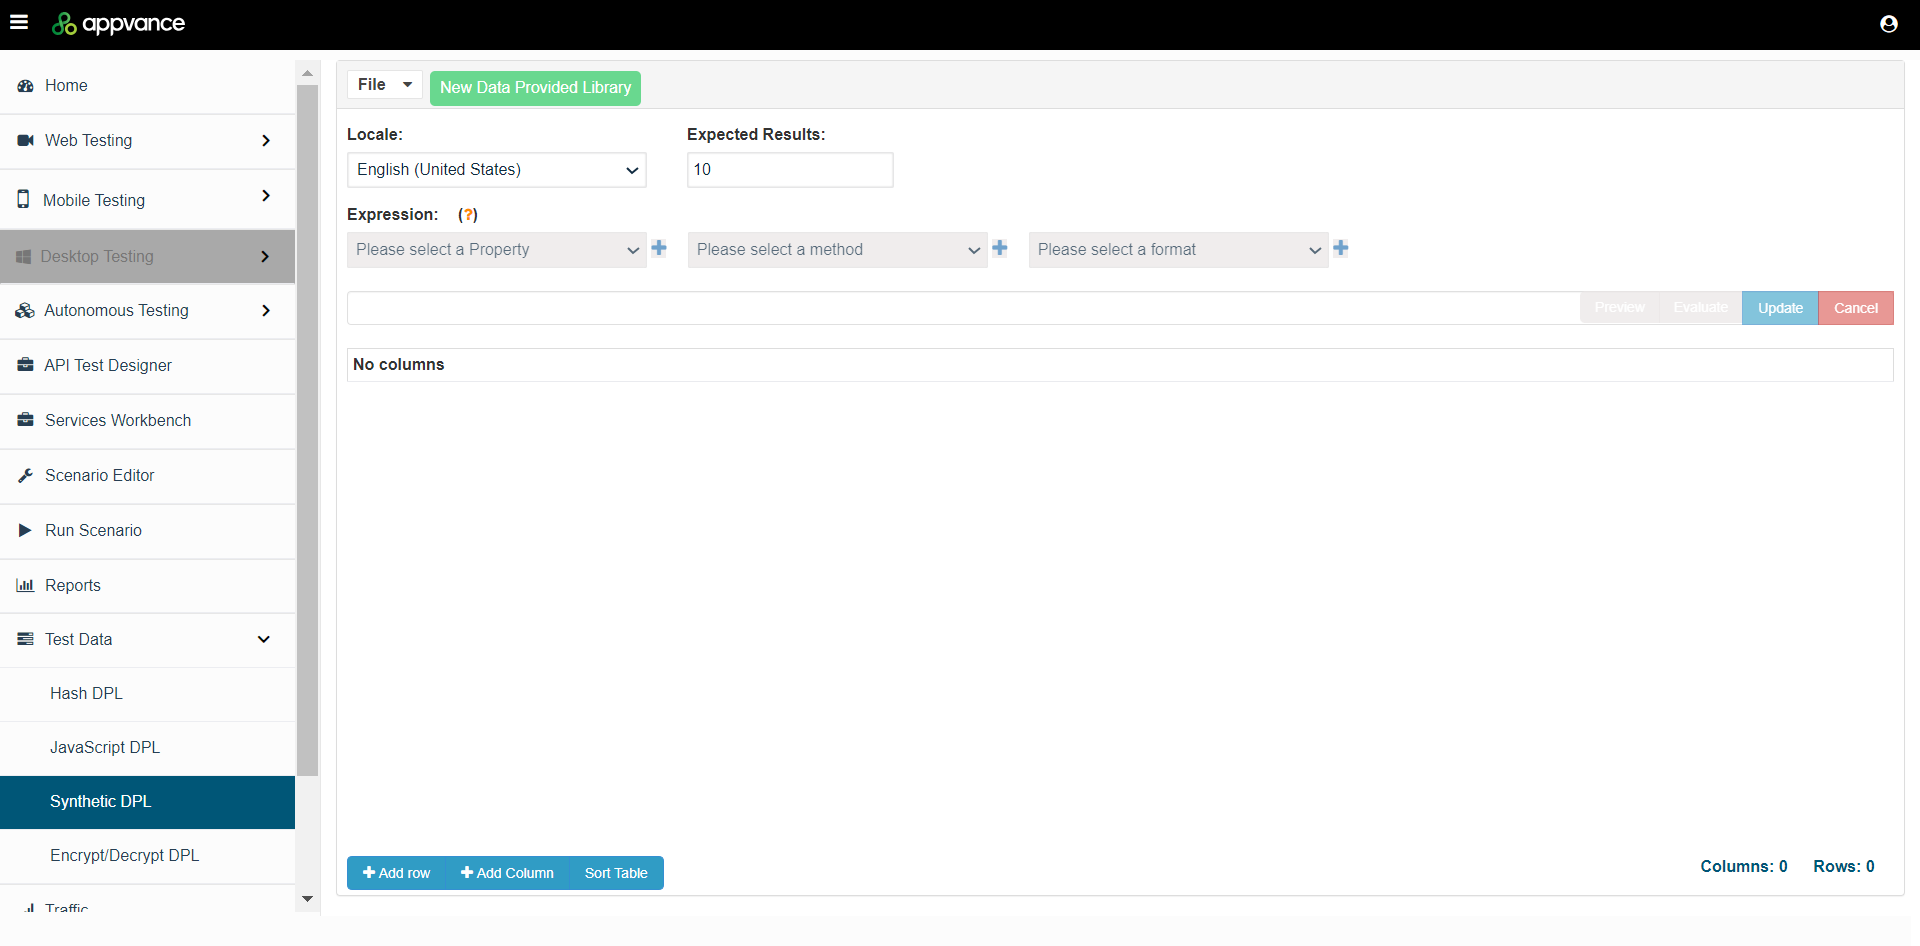
Use File > New to start creating a new Synthetic DPL file.
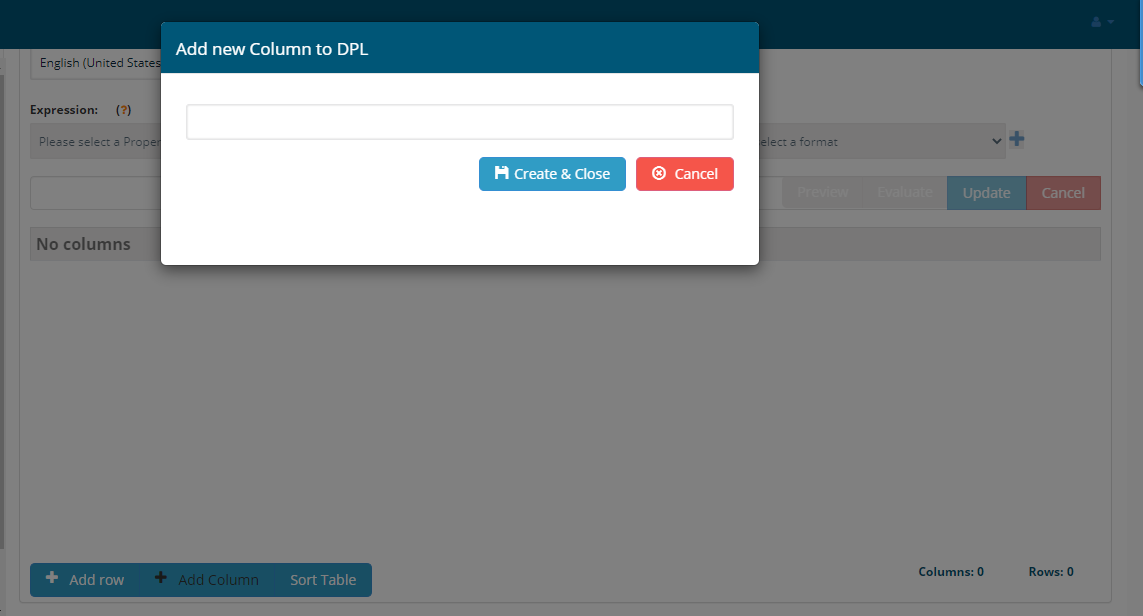
Start by adding a new Column by clicking Add Column button.
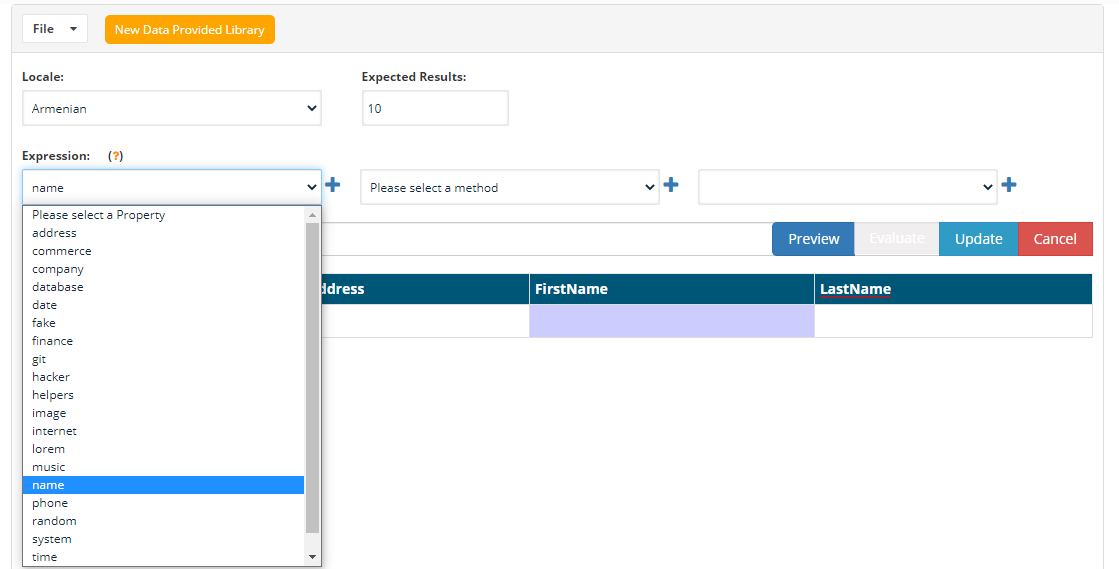
Locale
You can generate data in multiple languages, The default language locale is set to English.
Supported languages are:
- Arabic
- Armenian
- Azerbaijani
- Chinese
- Chinese (Taiwan)
- Croatian
- Czech
- Dutch
- Dutch (Belgium)
- English
- English (Australia)
- English (Australia Ocker)
- English (Bork)
- English (Canada)
- English (Great Britain)
- English (India)
- English (Ireland)
- English (Southern Africa)
- English (United States)
- Farsi
- Finnish
- French
- French (Canada)
- French (Switzerland)
- Georgian
- German
- German (Austria)
- German (Switzerland)
- Indonesian
- Italian
- Japanese
- Korean
- Nepali
- Norwegian
- Polish
- Portuguese (Brazil)
- Portuguese (Portugal)
- Romanian
- Russian
- Slovak
- Spanish
- Spanish (Mexico)
- Swedish
- Turkish
- Ukrainian
- Vietnamese
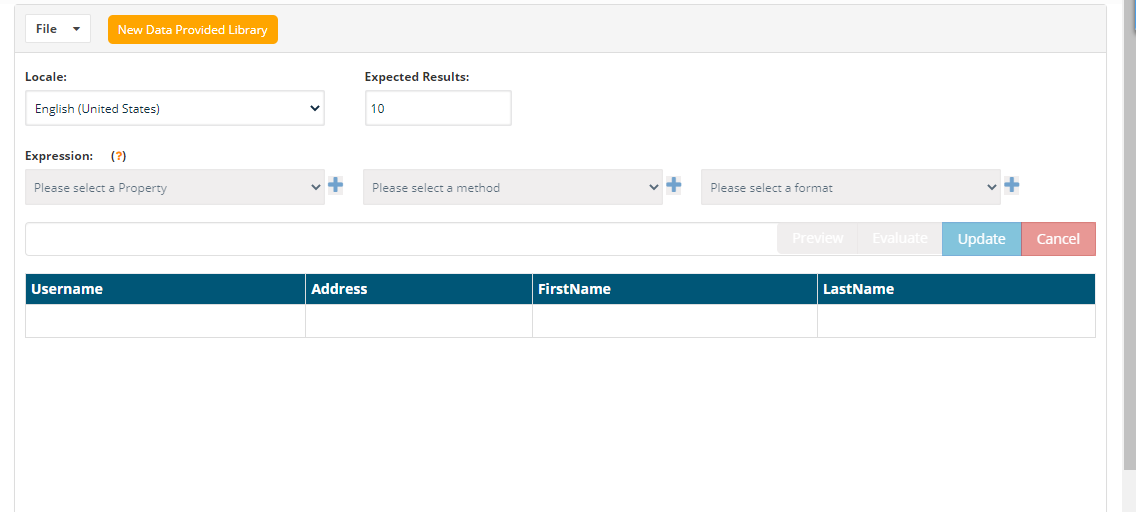
Click a cell to highlight and The Expression would be enabled to choose from the drop-down.
For example, for firstname - Expression could be name
After choosing name, click the + icon to add the name to the expression.
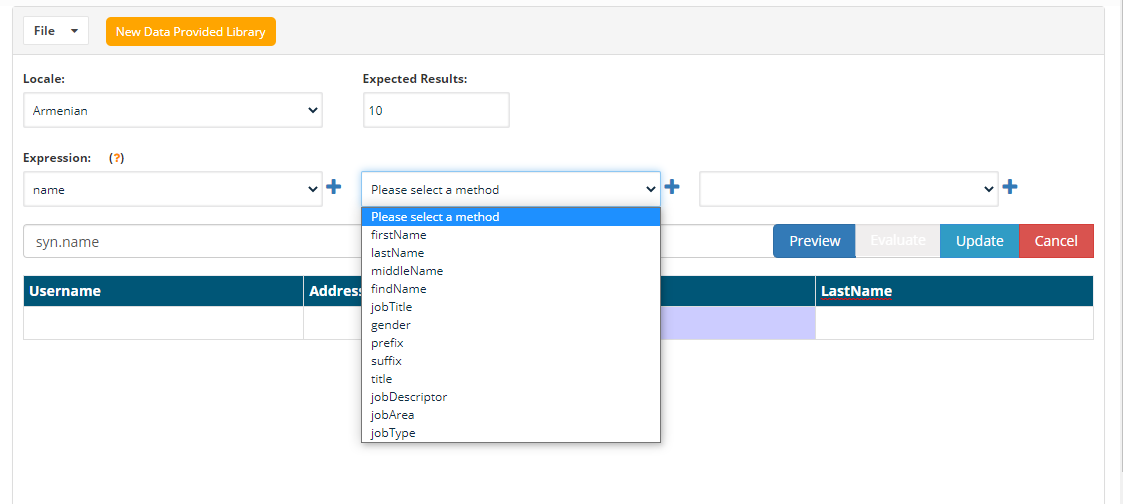
Then choose the method to be firstname and click the + icon.
You can click the Preview button to check the value generated.
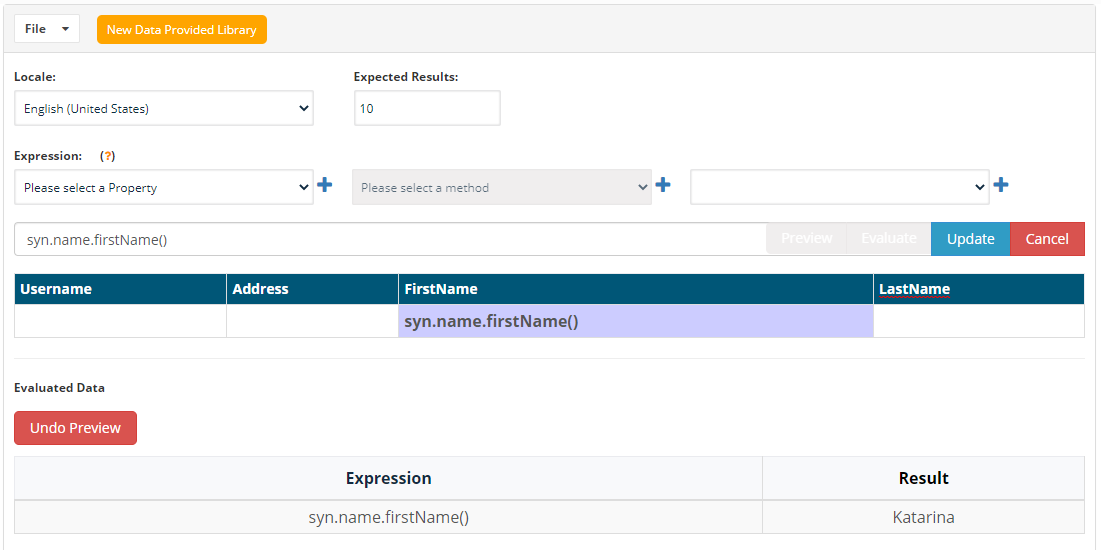
Undo Preview can be used to undo the preview.
After filling all the columns, you can click Evaluate button to generate data, Expected Result text box next to Locale will provide the number of rows of the synthetic data generated.
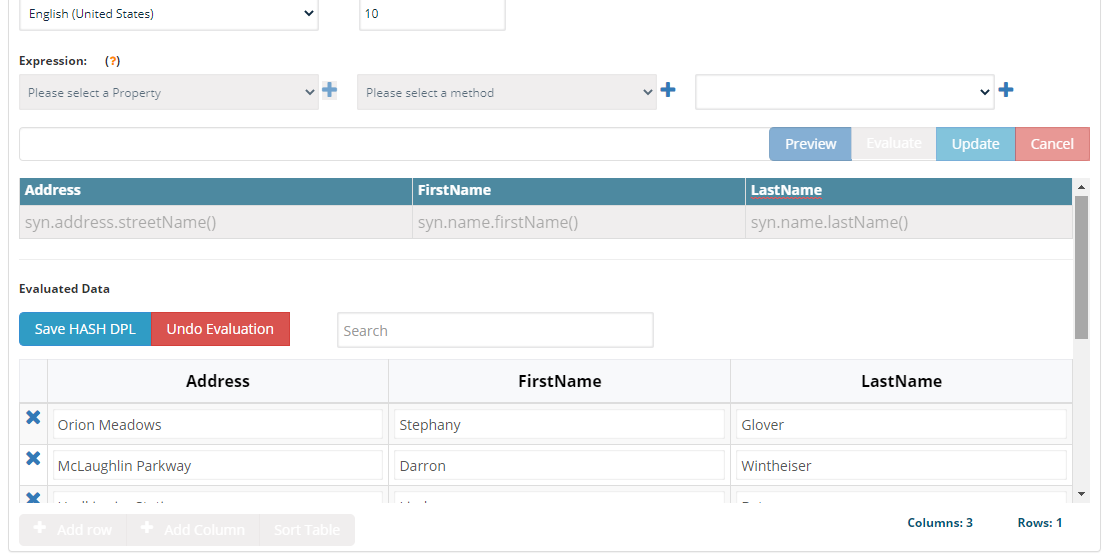
If you want to update the cells, you can use undo evaluation which goes to edit mode and click a cell to change values, and clicking the Update button will take the changed values.
You can download the generated data as HashDPL by using the Save HashDPL button, which will download the CSV file that can be used in the Test Designer, Scenario Editor, or Blueprint.
To remove columns, you can right-click the column name to remove the selected column.
Sort Table button can be used to sort the table.
Some of the Expressions and Methods supported
- address
- zipCode
- zipCodeByState
- city
- cityPrefix
- citySuffix
- cityName
- streetName
- streetAddress
- streetSuffix
- streetPrefix
- secondaryAddress
- county
- country
- countryCode
- state
- stateAbbr
- latitude
- longitude
- direction
- cardinalDirection
- ordinalDirection
- nearbyGPSCoordinate
- timeZone
- animal
- dog
- cat
- snake
- bear
- lion
- cetacean
- horse
- bird
- cow
- fish
- crocodilia
- insect
- rabbit
- type
- commerce
- color
- department
- productName
- price
- productAdjective
- productMaterial
- product
- productDescription
- company
- suffixes
- companyName
- companySuffix
- catchPhrase
- bs
- catchPhraseAdjective
- catchPhraseDescriptor
- catchPhraseNoun
- bsAdjective
- bsBuzz
- bsNoun
- database
- column
- type
- collation
- engine
- datatype
- number
- float
- datetime
- string
- uuid
- boolean
- hexaDecimal
- json
- array
- date
- past
- future
- between
- betweens
- recent
- soon
- month
- weekday
- fake
- finance
- account
- accountName
- routingNumber
- mask
- amount
- transactionType
- currencyCode
- currencyName
- currencySymbol
- bitcoinAddress
- litecoinAddress
- creditCardNumber
- creditCardCVV
- ethereumAddress
- iban
- bic
- transactionDescription
- git
- branch
- commitEntry
- commitMessage
- commitSha
- shortSha
- hacker
- abbreviation
- adjective
- noun
- verb
- ingverb
- phrase
- helpers
- randomize
- slugify
- replaceSymbolWithNumber
- replaceSymbols
- replaceCreditCardSymbols
- repeatString
- regexpStyleStringParse
- shuffle
- mustache
- createCard
- contextualCard
- userCard
- createTransaction
- image
- image
- avatar
- imageUrl
- abstract
- animals
- business
- cats
- city
- food
- nightlife
- fashion
- people
- nature
- sports
- technics
- transport
- dataUri
- lorempixel
- unsplash
- lorempicsum
- internet
- avatar
- exampleEmail
- userName
- protocol
- httpMethod
- url
- domainName
- domainSuffix
- domainWord
- ip
- ipv6
- port
- userAgent
- color
- mac
- password
- lorem
- word
- words
- sentence
- slug
- sentences
- paragraph
- paragraphs
- text
- lines
- mersenne
- rand
- seed
- seed_array
- music
- genre
- name
- firstName
- lastName
- middleName
- findName
- jobTitle
- gender
- prefix
- suffix
- title
- jobDescriptor
- jobArea
- jobType
- phone
- phoneNumber
- phoneNumberFormat
- phoneFormats
- system
- fileName
- commonFileName
- mimeType
- commonFileType
- commonFileExt
- fileType
- fileExt
- directoryPath
- filePath
- semver
- time
- recent
- unique
- vehicle
- vehicle
- manufacturer
- model
- type
- fuel
- vin
- color
- vrm
- bicycle
File Menu
- New - is used to create a new file.
- Open - is for opening an already created file.
- Save - to save the created file, save can be used.
- Save As - to save the opened file with a different name, save as can be used.
- Download Evaluated DPL - This option will help you to download the file locally which is evaluated so it can be used as HashDPL
- Download Raw DPL - This option will help you download the file locally which is a raw file, so it can be used as a Synthetic DPL.
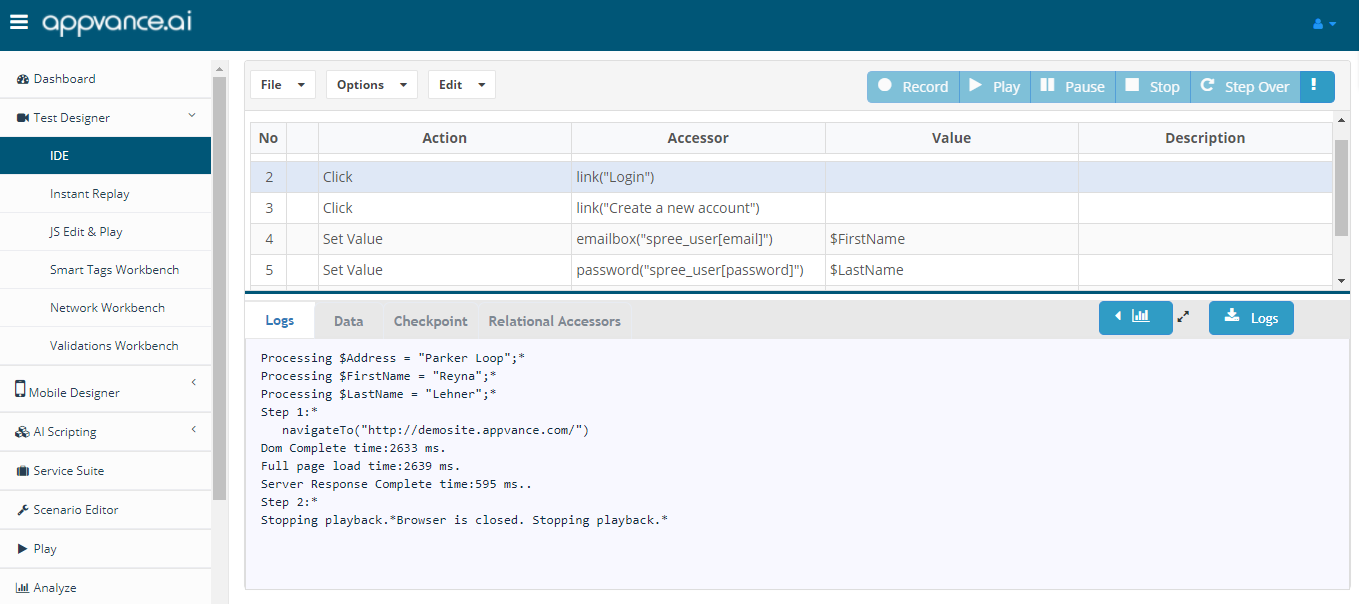
How to use in Test Designer
- Create a synthetic raw DPL using the synthetic DPL feature with the required fields based on the script.
- Open Test Designer script that needs to be data-driven.
- Open the data tab, select Synthetic DPL from the drop-down, Choose locale.
- Browse the raw CSV created using the synthetic DPL.
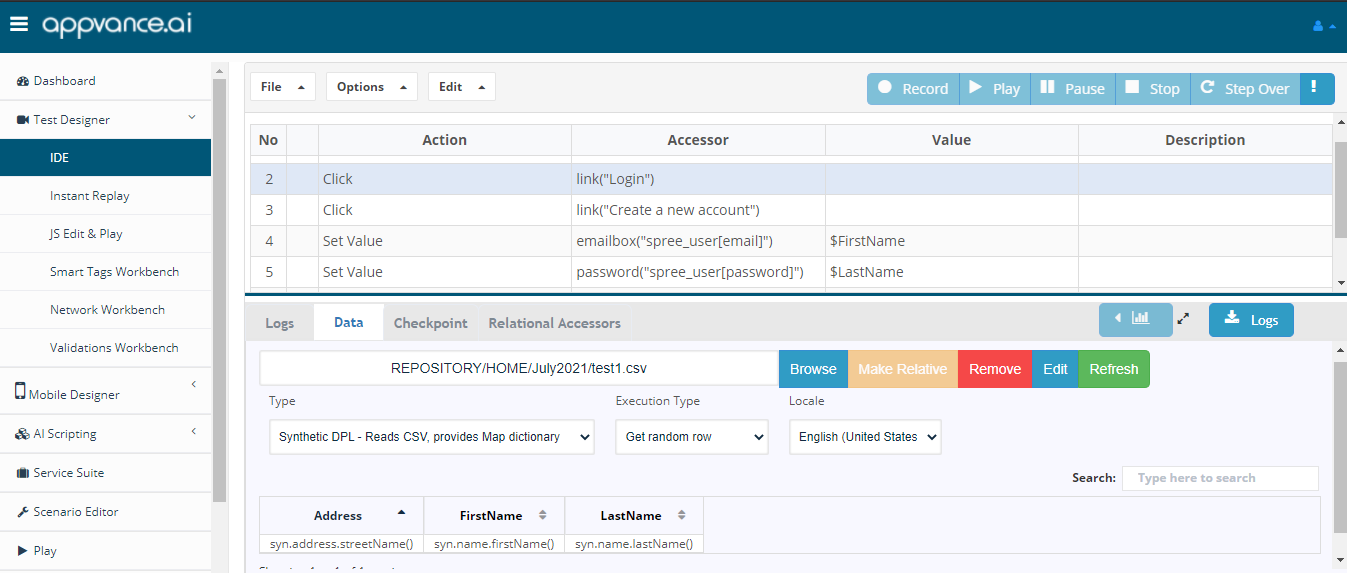
- Drag and drop the values to the respective value or the accessor column to be data-driven
- Play the script to generate the data during run time and use that generated data in the script
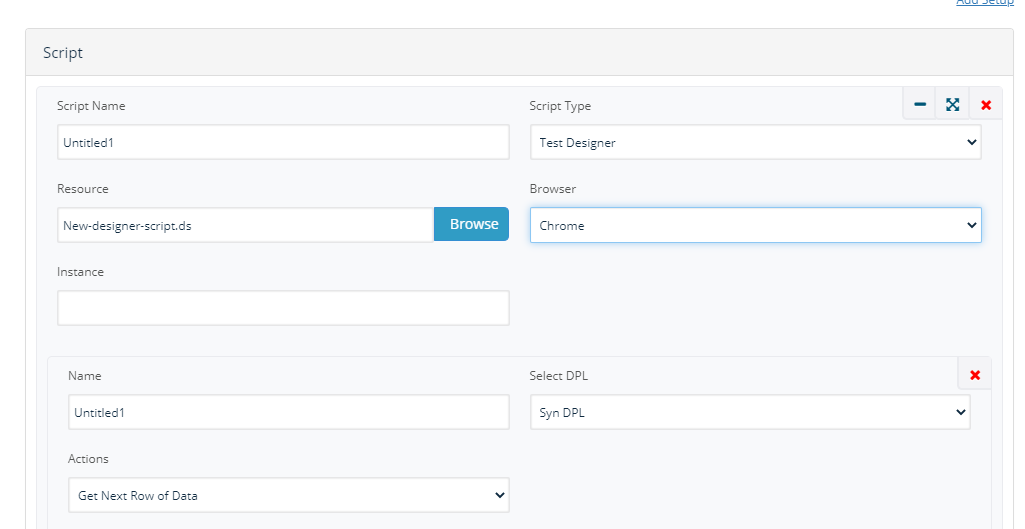
How to use in Scenario Editor
- Open Scenario Editor
- Create functional or performance tests as required and choose the test cases that are data-driven and add them to the test cases tab
- Go to the Resources tab and choose the type to be Synthetic DPL
- Browse the raw CSV file created using synthetic DPL
- Choose the locale depending on the requirement, default to English (United States), and provide a name
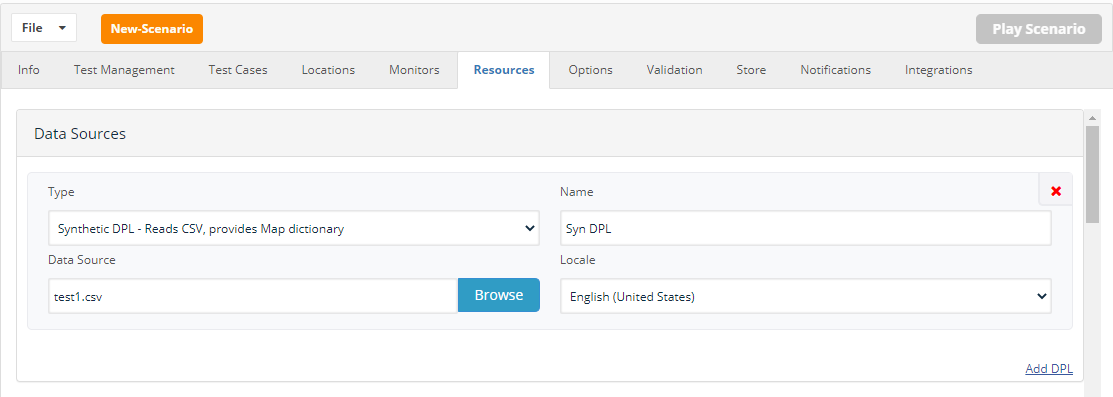
- Go back to the test cases tab, edit, add DPL, choose the created DPL
- Save and play the scenario to run the scenario with newly created synthetic data
How to use AI Blueprint
- Go to Create Blueprint
- Create a Blueprint for your application with any scan type and provide all the required details
- Click Next to open the Create Execution page
- From the Type drop-down, Choose Synthetic DPL, choose locale as preferred
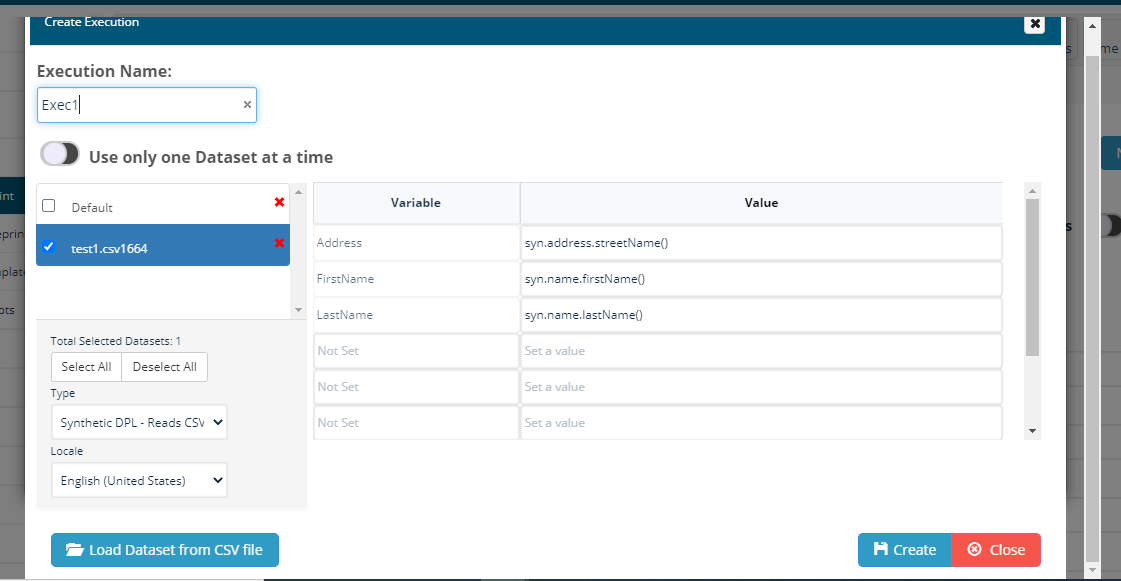
- Click Load dataset from CSV file and choose the raw data file created using synthetic DPL
- Check the check-box of the browsed CSV file
- Click Create and once the pages are found during the Blueprint process, start mapping the defined variables
- Blueprint would be created creating synthetic DPL data every time it is run