SQL Testing with Appvance
Appvance SQL Client
The Appvance SQL Client allows you to perform SQL queries on an existing database and analyze the query data such as query timing (step time) and response data (requests data).
There are four ways to use SQL files in AIQ:
- SQL Scripts
- SQL within Web Designer
- SQL within Services Workbench
- SQL within Mobile Designer
The Appvance SQL Client (processSQL) supports connections to the following:
- MySQL
- Oracle DB
- MS SQL
- Ignite
- Snowflake
- Redshift
- PostgreSQL
The following topic explains how the Appvance SQL Client works and provides you with the basic knowledge about the configuration needed to successfully configure and run a SQL test scenario using the Appvance SQL Client.
It’s important to know that Appvance requires only a “.sql” script to run the test, no additional advanced configuration settings are required from Appvance to run the test. However, this script is the one that must contain basic configuration data needed to connect to the desired database.
This document assumes that you already know SQL syntax. It’s important to mention that each SQL script that you provide to Appvance SQL Client not only must contain the connection settings to perform the queries, but also the proper SQL syntax valid for the SQL database engine that you are trying to reach. I.E: MySQL, SQL Server etc.
Most SQL engines have restrictions on the SQL syntax, this is why it’s important for the user who is creating the script, to know these specific limitations before start creating the script.
Supported SQL statements are UPDATE, INSERT, DELETE, CALL, SELECT, EXECPROC.
In the case that the above supported SQL statements are not enough, you create a stored procedure and then use the CALL command to execute it.
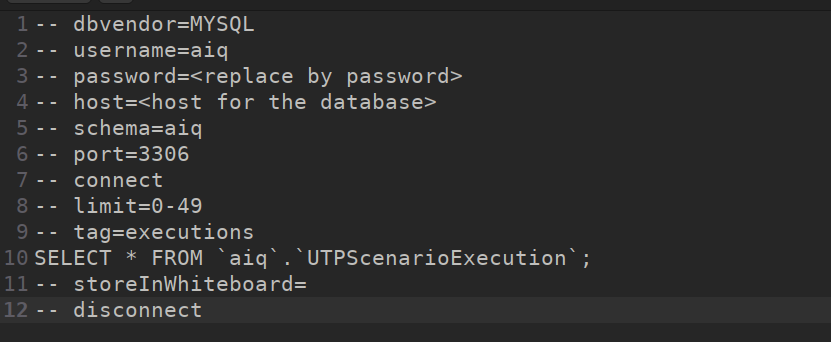
You can use the comment notation to change the database using: -- Database=aiq
You are not limited to use just one ‘commented’ action per .sql script. So for example in a multiple SELECT .sql script you can add several storeInLocker lines, like -- storeInLocker
Adding storeInLocker after the wanted SELECT statements allows you to shared multiple results with other scripts. (edited)
Creating a Valid SQL Script
To create a valid SQL script, you need to understand the basic configuration settings embedded into the script file to create a connection. These settings are based on JDBC to map the database configuration settings correctly the only thing you will need to specify is the following:
-- dbvendor= (MYSQL,ORACLE,MSSQL,IGNITE,SNOWFLAKE,MSSQL,REDSHIFT,POSTGRESQL)
-- username= (User that is owner of the database objects)
-- password= (Related password)
-- host= (dns name for database host)
-- schema= (database or schema)
-- port= (Port for related database vendor or custom port) Defaults: mysql 3306, oracle 1521, MSSQL 1433, IGNITE 10800, SNOWFLAKE 0, REDSHIFT 5439.
-- limit= <initial offset>-<final offset> (Portion of the result set of rows that would depend of the limits established)
-- connect (Connecting to the specified database)
-- disconnect (Disconnecting from the specified database)
-- tag= (Text identifier for the object in The Locker or the Local White Board)
-- storeInLocker= (Storing an object in the locker, if no value is specified the first value will be the first one, must be blank in combination of limit, take a look to Communication Intra-Steps Using TheLocker)
-- storeInWhiteboard= (Storing an object in the white board, if no value is specified the first value will be the first one, must be blank in combination of limit, take a look to WhiteBoard DPL)
-- retrieveFromTheLocker=varName (Retrieve the variable varName from the locker, which can then be use in the sql queries as :varName)
-- warehouse= Parameter required by SNOWFLAKE engine when not provided in URL
-- db= Parameter required by SNOWFLAKE engine when not provided in URL
-- account= Parameter required by SNOWFLAKE engine when not provided in URL
-- role= Parameter required by SNOWFLAKE engine when not provided in URL
-- step= (During de definition of a SQL script testing based testcase, it is possible to establish each sql statement as a step with a name)
The following configuration lines have been deprecated:
-- driver_class= (DEPRECATED) When not provided this will default to com.mysql.jdbc.Driver
- MySQL: com.mysql.jdbc.Driver
- Oracle: oracle.jdbc.driver.OracleDriver
- MSSQL: com.microsoft.sqlserver.jdbc.SQLServerDriver
- Ignite: org.apache.ignite.IgniteJdbcThinDriver
- Snowflake: net.snowflake.client.jdbc.SnowflakeDriver
- Redshift: com.amazon.redshift.jdbc.Driver
-- url= (DEPRECATED) Endpoint containing all needed parameters to make the connection. If this is not available then URL will be constructed out of other options according to each engine specs.
All of these items are required, except for the port token that will have the default port number if omitted, -- connect will use previous information to create a connection to the desired database,-- disconnect would be the token the parser finds to disconnect from the database.
These last six tokens need to be the header of the SQL file and SQL statements must be stated between the "–- connect" and the "–- disconnect" tokens.
SQL Tokens
We are including the most used DML sentences in the set of possibilities as per the necessities of testing, as below.
Select
Performs a select query where a row (can be chosen) of the obtained values can be stored in the locker (later it will be covered in the document)
Update
Performs an update sentence, the status of the operation will be registered in the request.
Call
Execute an Oracle or MySQL stored procedure, the resulted row will be stored in the locker.
ExecQuery
Execute a Microsoft SQL server-stored procedure, resulting row will be stored in the locker.
ExecProc
execute a Microsoft SQL server stored procedure that does not return values, just a status of the result of the operation in the request.
Create
Execute a Microsoft SQL server stored procedure that does not return values just an status of the result of the operation in the request.
Limit
Used to limit the number of results returned by the select query
Creating a new scenario using SQLClient
Now it’s time to create a new Appvance scenario and use it to run a SQL script using SQLClient to execute it. We assume a basic knowledge of the Appvance Scenario Builder system so this document will not go into details about it, we will only set up the Test Case for the test.
-
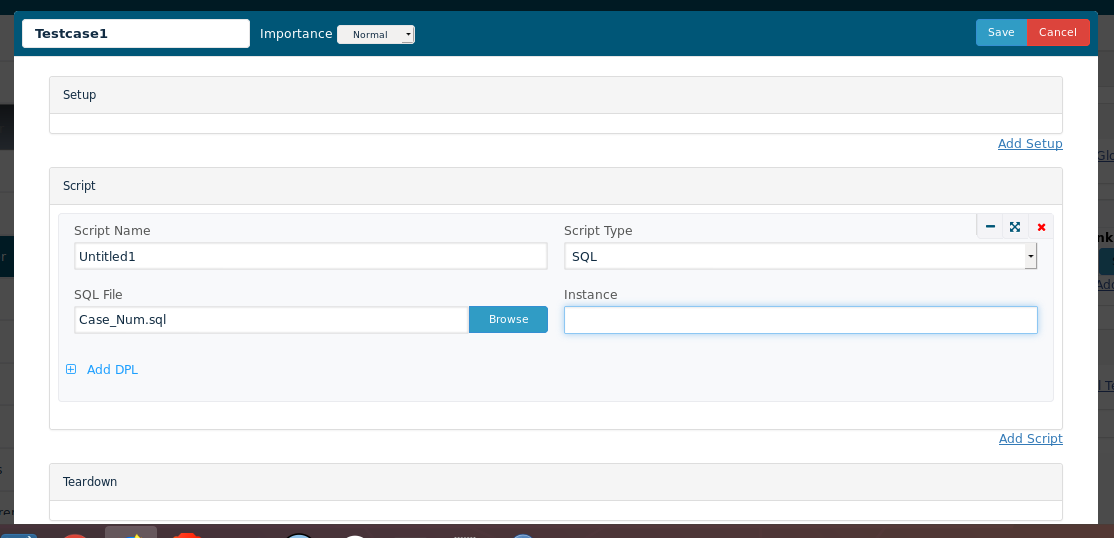
In the Test Case section, you have to select “SQL” from the drop-down menu located next to “Script Type”, this will indicate Appvance to use SQLClient.
-
Then in the “SQL File” you have to click “Browse” and upload the .sql script file you just created in the steps above.
-
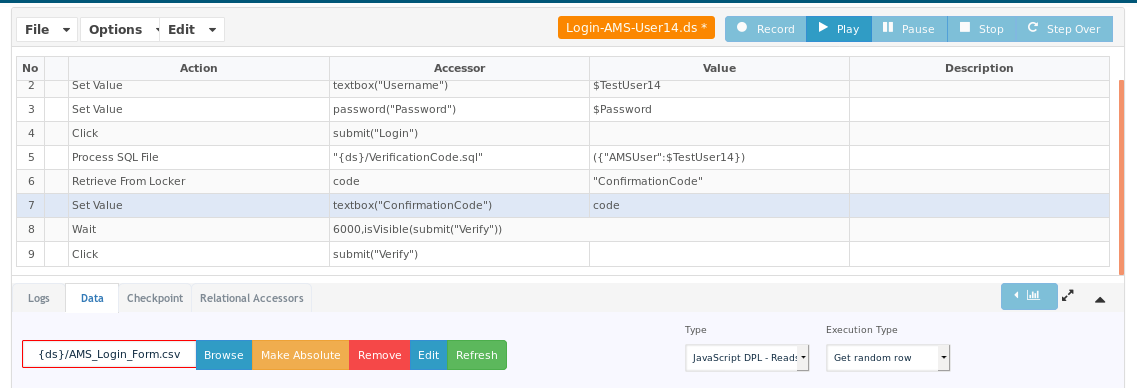
By default, the step name displayed on the results screen is the same name as the request, which is the SQL actions in the script. However, as you can notice, this time the step name is being displayed with a custom name. We can do this by adding some extra lines to the script which will be used to provide a custom step name to ASE.
The way to do this it’s just by adding a new instruction to the script right before the SQL statement with the following syntax: -- step=<Step Name String>.
Where <Step Name String> must be replaced with the custom step name you want to have displayed on the results screen, for example : -- step=Select All . This will display the SQL action as a step with the name “Select All”.
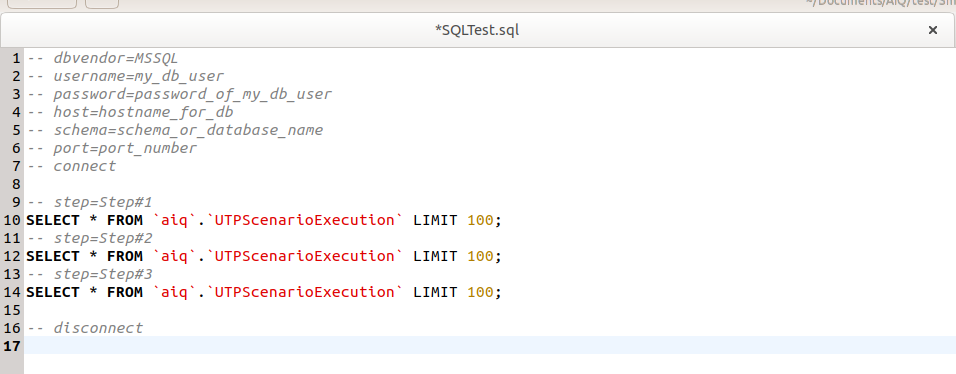
Our .sql script settings for this execution are the following:
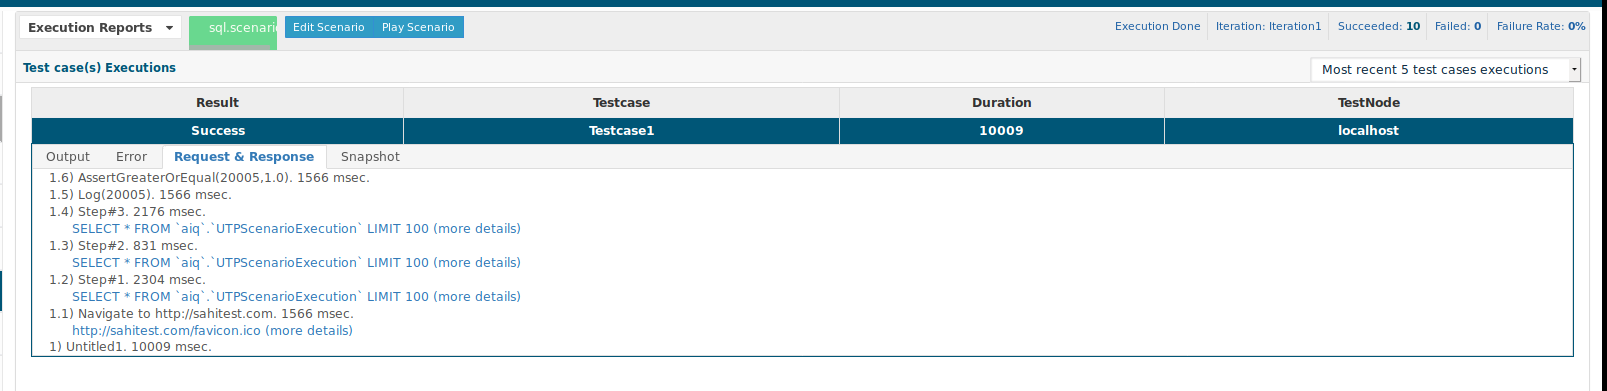
If you’d like to validate the data retrieved from the SELECT action. You can have downloaded the request response for this step. You can do this by navigating to the panel located at the right of the results display screen. Then select “Testcase Executions”, you will see all of the test cases executed on that test, if you have only one then you should see just one registry. Click the “Request & Response” tab and then click the test case execution registry above to have its data displayed.
Once you do this the requests and responses data get displayed in the “ Request & Response” tab. This tab shows the steps requests and responses identified by each step name. If you click the request that belongs to the SELECT statement, this action will download a file named “request”. This is a standard plain text file with no extension, therefor you can open this file with a word processor such as NotePad or Sublime (recommended). When you open this file, you will see all of the records that were retrieved from the SELECT statement from your test case execution. This way you can validate the data contained in your database registries against the test response.
This test just simply inserts a new record into the database and then selects all of the records out of the database. Also, we will see how to validate the data retrieved from the SELECT statements.
After setting up the test case configuration you are ready to go, you just have to click “Play” once the scenario has been created.
SQLClient Test Designer Executions
There are two reasons it is desired to issue SQL scripts, first one is in a testcase to test queries against a specific database (as shown in the previous part) and the second one is when you use SQL scripts to extract data to the locker by performing select sentences or stored procedures or it is required to execute update sentences or execute a stored procedure that performs operations related to the objects of the database, in that case, no result will be stored in the locker.
SQLClient Service Suite Executions
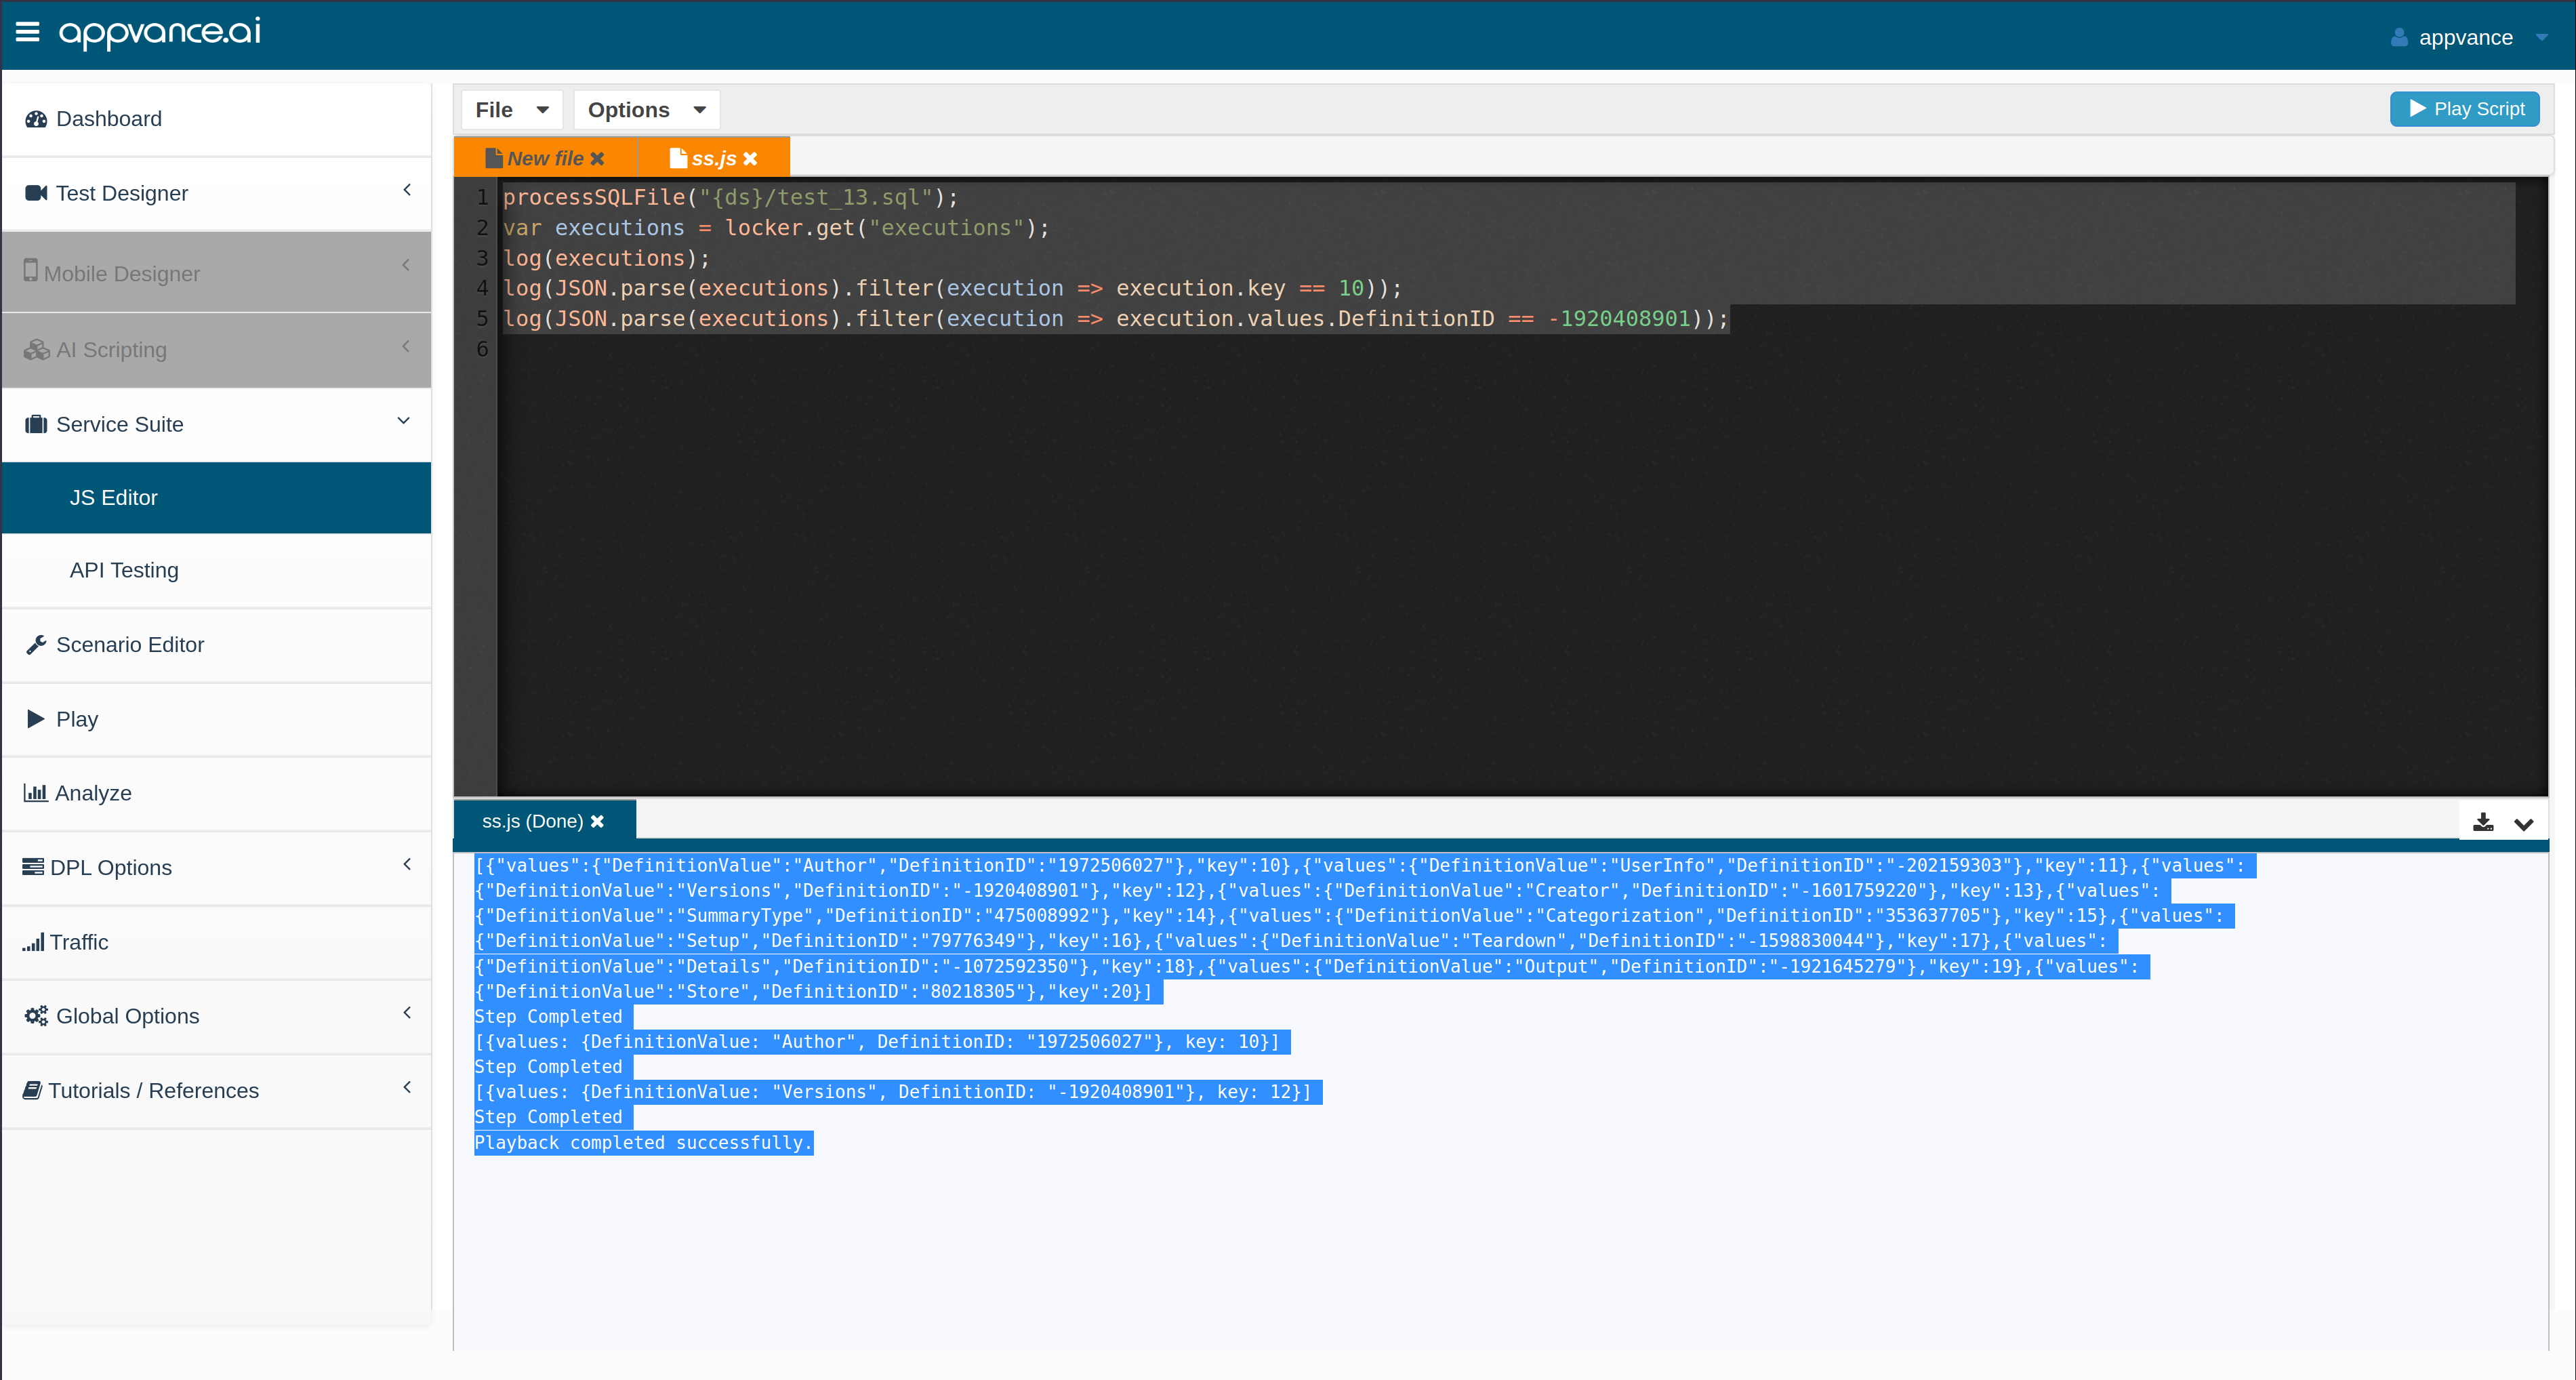
It's related to the processSQLFile service suite call and allows the service suite to extract either a row or a multiple rows by returning a JSONArray of JSONObject as below.
test_13.sql