IP Spoofing and Setup Instructions
IP SPOOFING: IP Spoofing can be achieved by adding multiple IP address to a machine:
*To add multiple IP to local machine follow below mentioned steps:
1. Find the IP address, subnet mask, and default gateway addresses.
Important: At the command prompt, run the following command: ipconfig /all. Review the following section in your output, and note the IPv4 Address, Subnet Mask, Default Gateway, and DNS Servers values for the network interface,If you enter these IP addresses incorrectly, you may lose network connection.
2. Navigate to Control Panel-Network and Internet-Network and Sharing Centre.
3. Click Change adapter settings.
4. Right-click the network interface (LAN connection) and Select Properties.
5. Select Internet Protocol version4 (TCP/IPv4) option and Click Properties.
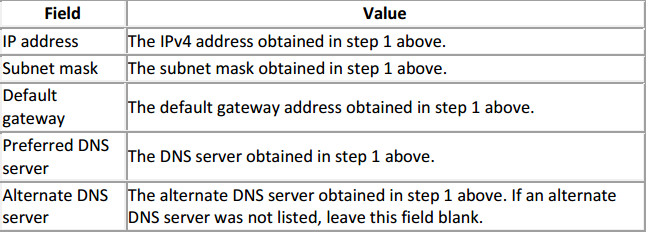
6. Select 'Use the following IP address' radio button and enter the following values, and click OK.
7. Now, Click 'Advanced..' button.
8. On 'Advanced TCP/IP settings 'window,Click Add button.
9. Add IP address, subnet mask values and Click Add.
10. Click Okon 'Advanced TCP/IP settings' window.
11. Click OK on 'Internet Protocol Version 4(TCP/IP ) Properties'.
12. Click Ok and LAN properties window is closed.
13. Run the command ipconfig /all, to confirm that the secondary IP address has been added to the operating system.
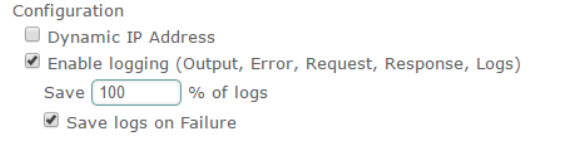
*Open Appvance and create a performance test with 'Dynamic IP Address' enabled under options panel. Give 5-10 per cent logs to see output on controller window.
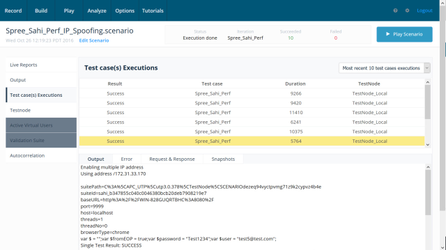
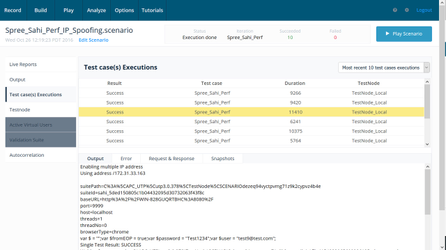
*Play a scenario and controller window is opened in new tab.
*Click Test case Executions tab in a controller window and click each execution status to see the output logs.
*Under output tab user can see a text "Enabling multiple IP address" and with a different IP being used for different user.
To add multiple IP address inEC2cloud machine follow below mentioned steps:*
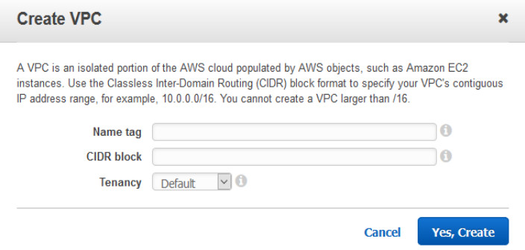
*Create a VPC in ec2 cloud with Name tag and CIDR block (Use the Classless Inter-Domain Routing (CIDR) block format to specify your VPC's contiguous IP address range, for example, 10.0.0.0/16.)
*Create an instance by selecting above created VPC in Network ,see below images:
-Secondary ip address has to be added manually by the user, by clicking on 'Add IP' link.
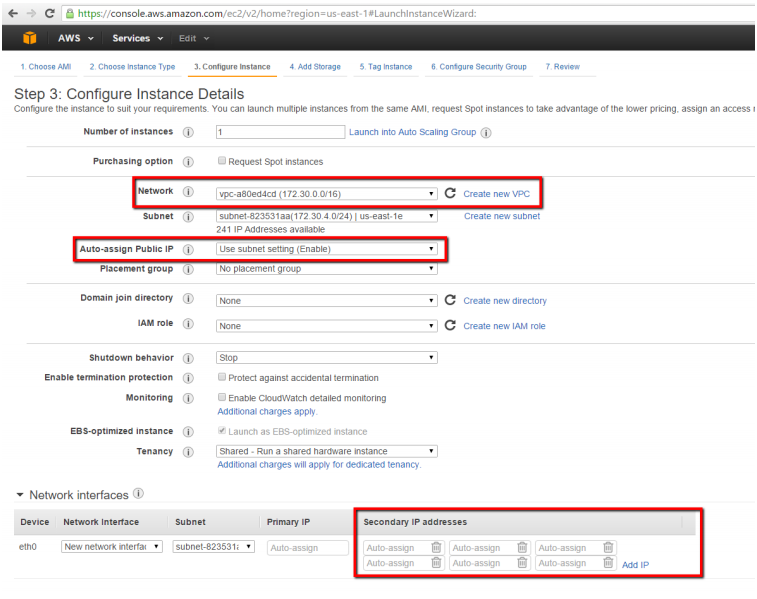
-Select a security group that as Inbound rules as shown in below image:

*Connect to EC2 VPC windows instance.
-
To add Secondary IP address in VPC follow below steps:
i) Step 1: Configure Static IP Addressing on Your Windows Instance
1. Find the IP address, subnet mask, and default gateway addresses for the instance by Performing the following steps:
a. Click Start. In the Search field, type cmd to open a command prompt window, and then press Enter.
b. At the command prompt, run the following command: ipconfig /all. Review the following section in your output, and note the IPv4 Address, Subnet Mask, Default Gateway, and DNS Servers values for the network interface.
2. Open the Network and Sharing Centerand Click Change adapter settings.
3. Right-click the network interface (Local Area Connection) and select Properties.
4. Select Internet Protocol Version 4 (TCP/IPv4) and click Properties.
5. In the Internet Protocol Version 4 (TCP/IPv4) Properties dialog box, select Use the following IP address, enter the following values, and click OK.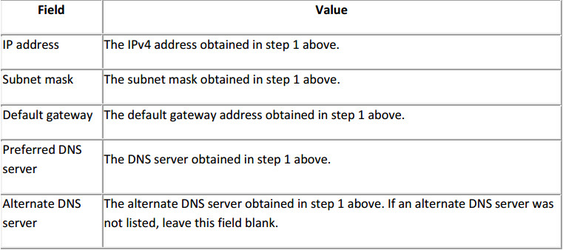
Important:If you set the IP address to any value other than the current IP address, you will lose connectivity to the instance.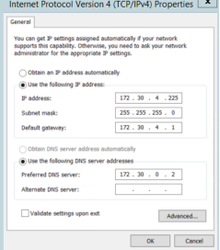
You will lose RDP connectivity to the Windows instance for a few seconds while the instance converts from using DHCP to static addressing. The instance retains the same IP address information as before, but now this information is static and not managed by DHCP.
ii) Step 2: Configure a Secondary Private IP Address for Your Windows Instance
After you have set up static IP addressing on your Windows instance, you are ready to prepare a second private IP address.
To configure a secondary IP address for a Windows instance
1. Open the Amazon EC2 console at https://console.aws.amazon.com/ec2/.
2. In the navigation pane, click Instances.
3. Select your instance.
4. On the Description tab, note the secondary IP address.
5. Connect to your instance.
6. On your Windows instance, click Start, and then click Control Panel.
7. Click Network and Internet, and then click Network and Sharing Center.
8. Click the network interface (Local Area Connection) and Click Properties.
9. In the Local Area Connection Properties page, click Internet Protocol Version 4 (TCP/IPv4), click Properties, and then click Advanced.
10. Click Add.
11. In the TCP/IP Address dialog box, type the secondary private IP address in the IP address box. In the Subnet mask box, type the same subnet mask that you entered for the primary private IP address in Step 1: Configure Static IP Addressing on Your Windows Instance , and then click Add.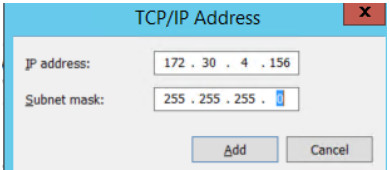
12. Verify the IP address settings, and then click OK.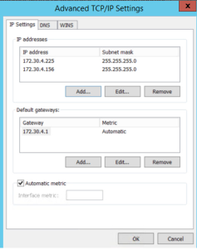
13. Click OK again, and then click Close.
14. To confirm that the secondary IP address has been added to the operating system, at a command prompt, run the command ipconfig /all.
*Open Appvanceand create a performance test with 'Dynamic IP Address' enabled under options panel. Give 5-10 per cent logs to see output on controller window.
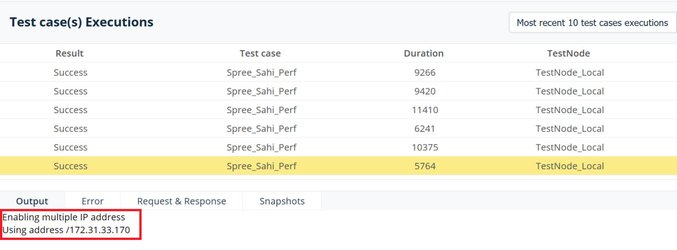
*Play a scenario and controller window is opened in new tab.
*Click Test case Executions tab in a controller window and click each execution status to see the output.
*Under output tab user can see a text "Enabling multiple IP address" and with a different IP being used for different user.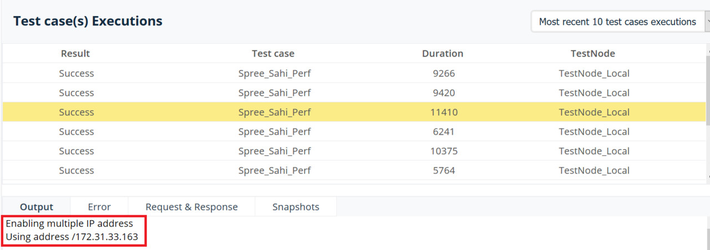
-