SmartTag Workbench
SmartTags are one of the unique features of Appvance IQ, SmartTags are collection of objects and their properties. This collection contains key-value pairs; the key being a logical name identifying the set of objects, and the value contains unique objects properties (ex: Valid HTML tags, SmartTag Type, Rules) that are used to identify the object on the web page.
One of the main burdens of an automated UI test script is the amount of maintenance needed when object properties change within the application under test. A very common way of minimizing the time it takes to update your automated test scripts is the use of a SmartTags Library. A basic SmartTag library can be implemented as a collection of key-value pairs, with the key being a logical name identifying the object and the value containing unique objects properties used to identify the object on a screen. This can be used in Test Designer scripting, JS scripting, and also during Appvance AI scans as Appvance AI supports creating application blueprints using the SmartTag Library created.
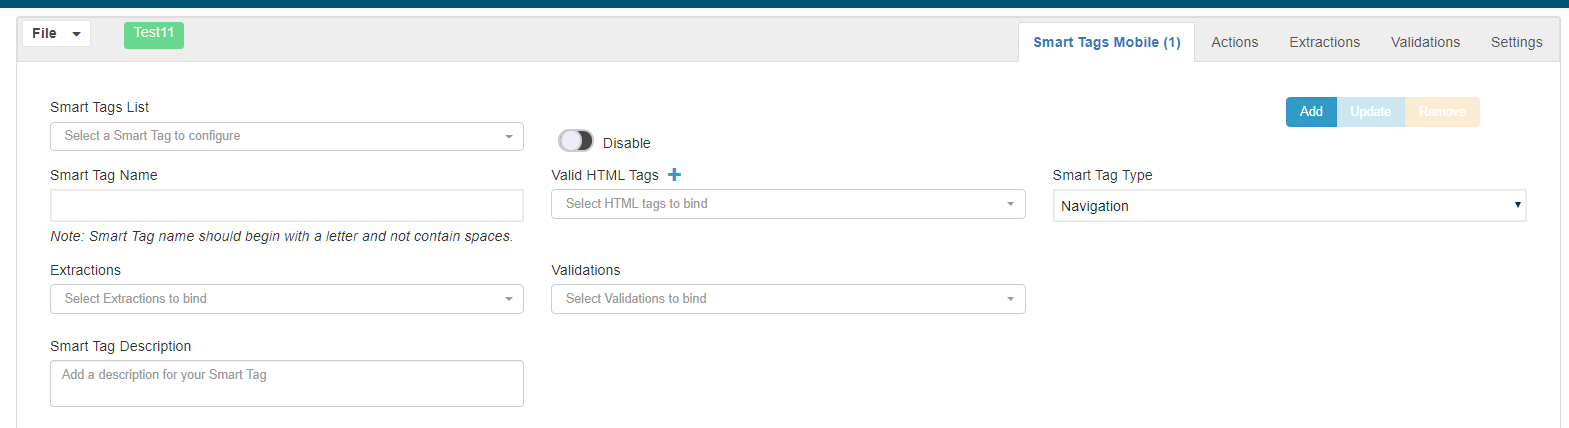
For information on SmartTags for testing mobile applications, see SmartTag Workbench for Mobile Testing.
Accessing the SmartTag Workbench
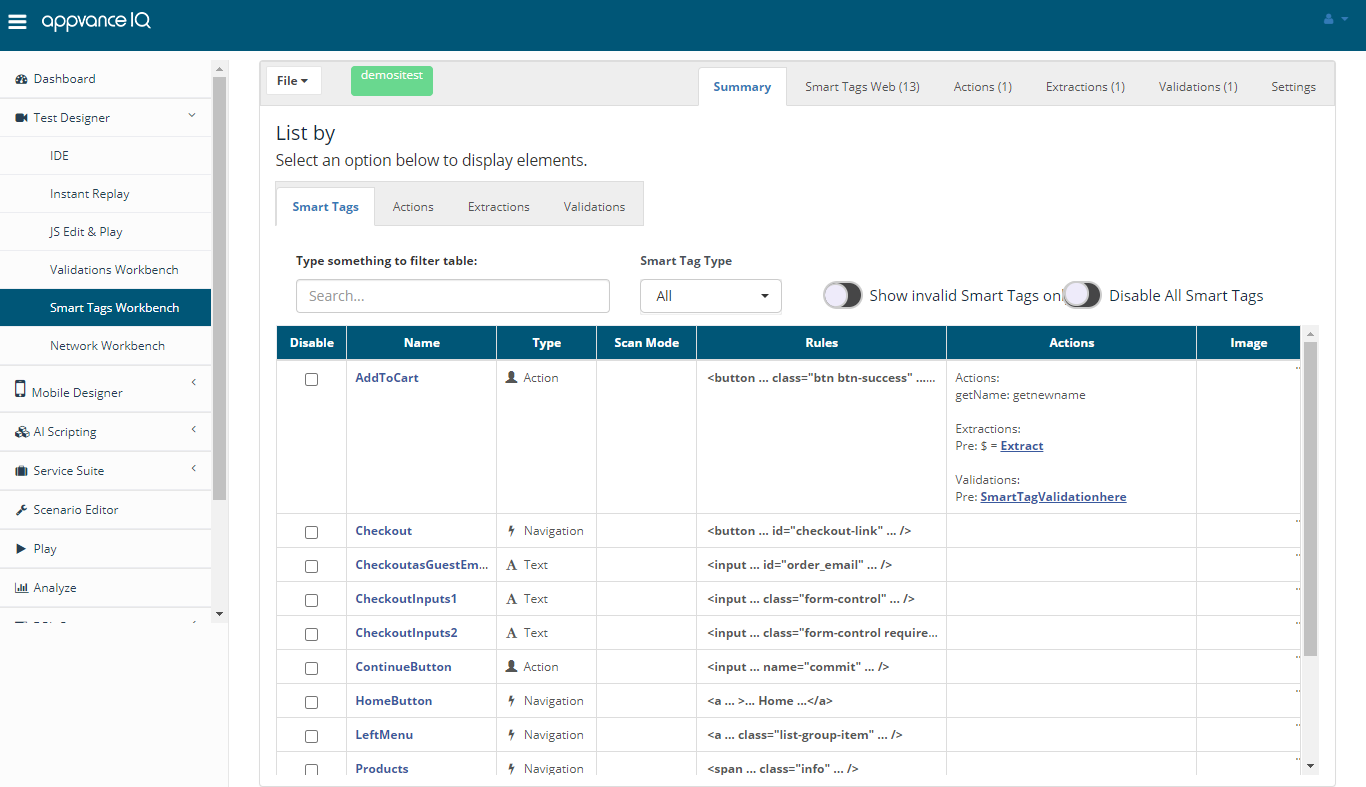
In AIQ navigate to Web Testing > SmartTag Workbench.
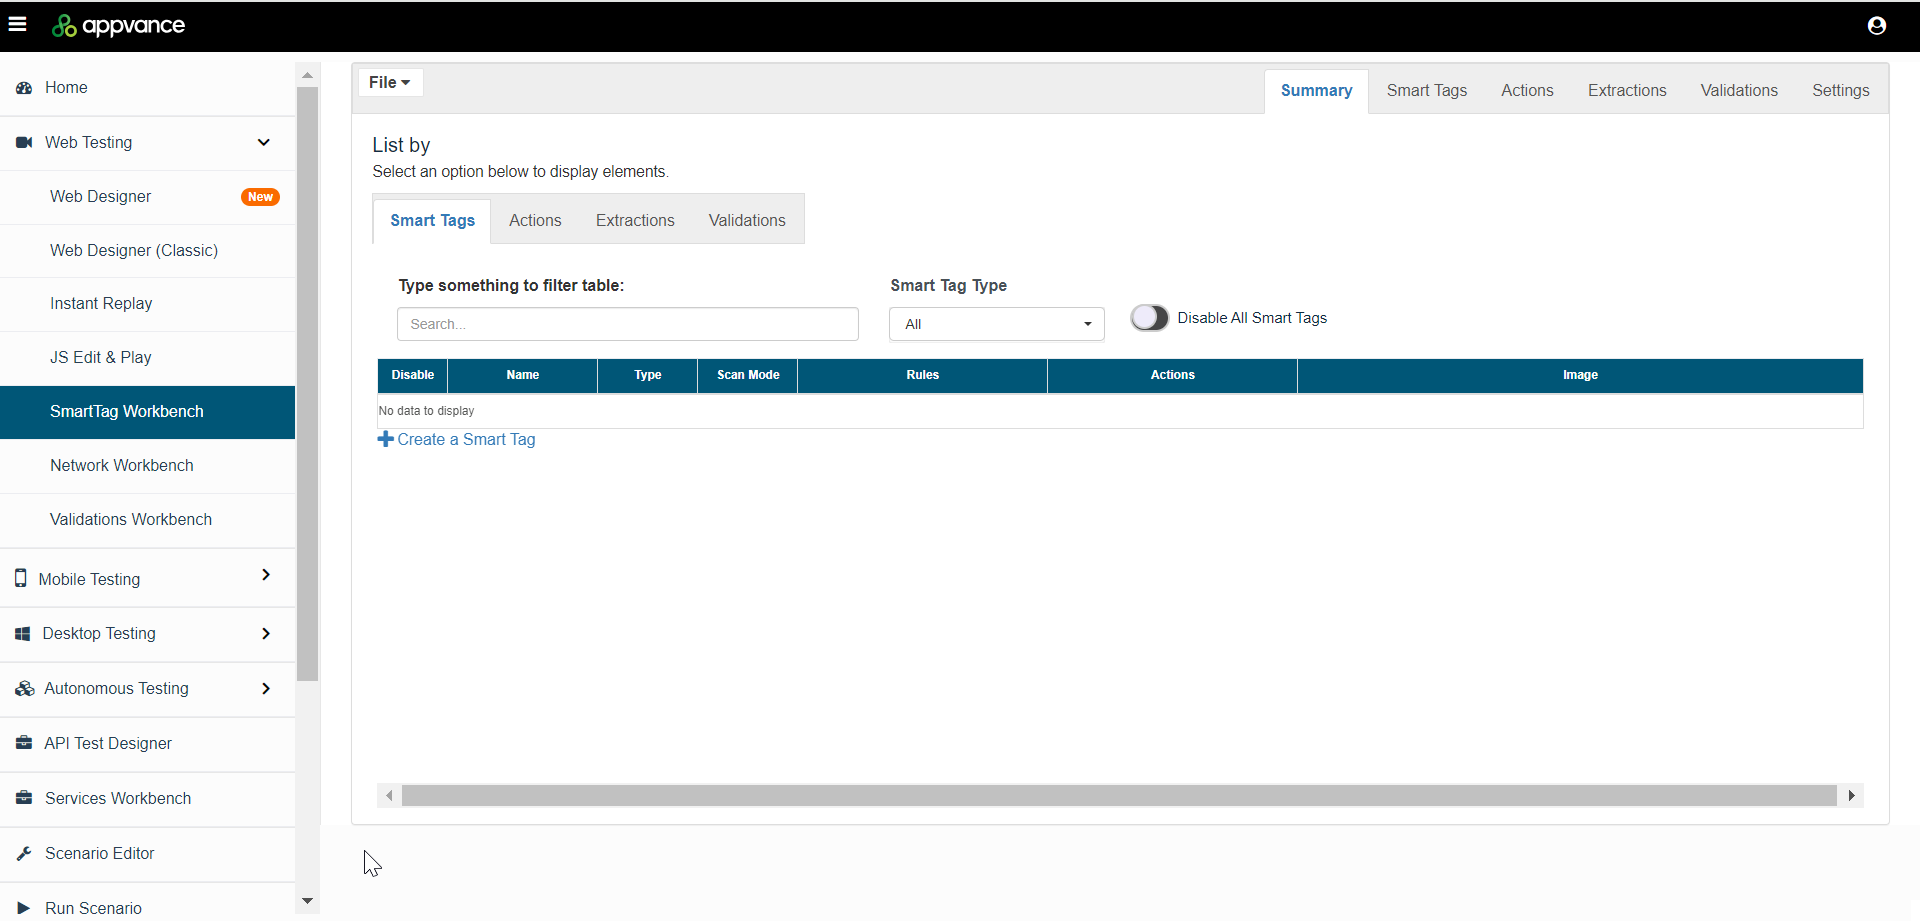
SmartTag Summary Tab
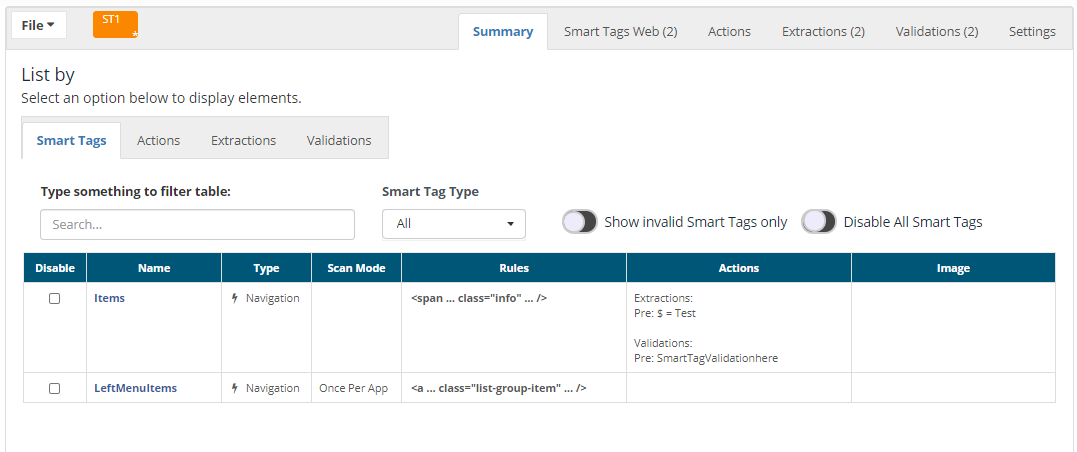
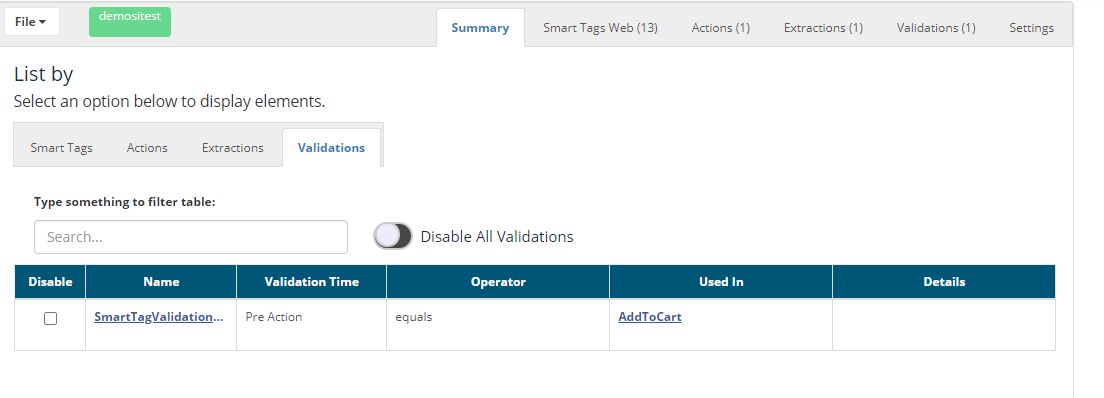
The summary tab gives the summary of all defined SmartTags, actions, extractors, and validations.
-
You can use the summary tab to Search the SmartTags using the search option, which applies for Actions, Extractions, and Validations
-
SmartTags can be selected using SmartTag type, by navigation, action, etc
-
Show Invalid SmartTags only can be used to get all the invalid SmartTags
-
Has option to disable or enable definitions, Disable all of them can be used to disable all the SmartTags or validations, etc
-
Columns can be sorted
-
The summary will provide details and links for the actions used, extractors used and validations used
-
Mouse hover on a SmartTag name will show the description of a SmartTag
SmartTag UI
The SmartTag Library tab allows you to create and configure SmartTags to be used for Test Designer or JS or Creating blueprints more quickly. This is the place to edit your .json configuration files for the SmartTag library. The SmartTag Library tab allows to create, edit and delete SmartTags. This is a .json file. Will have .stags as the extension.
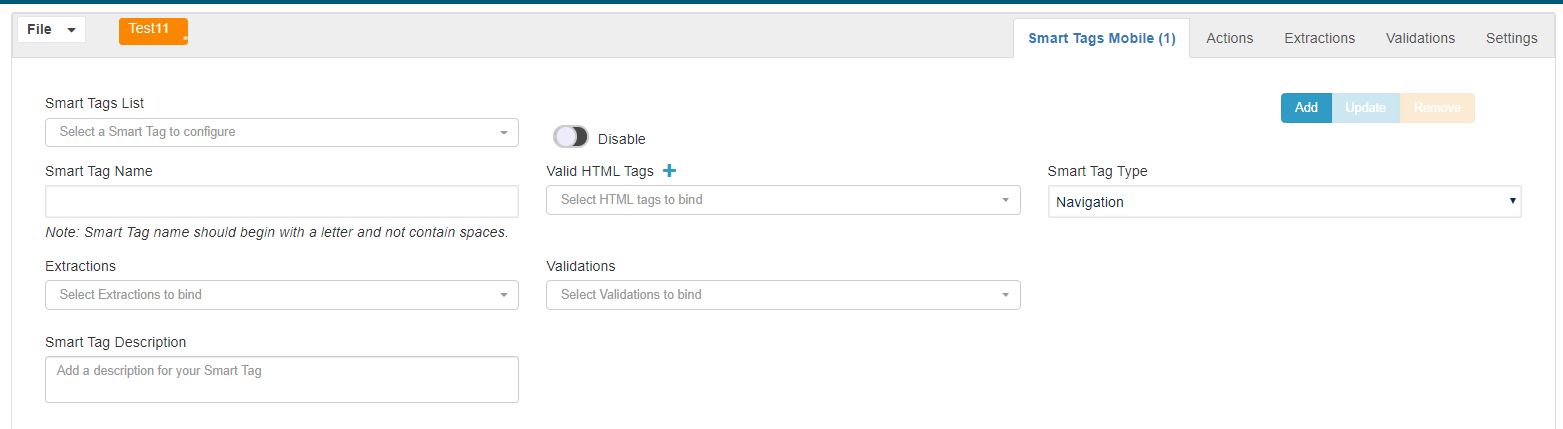
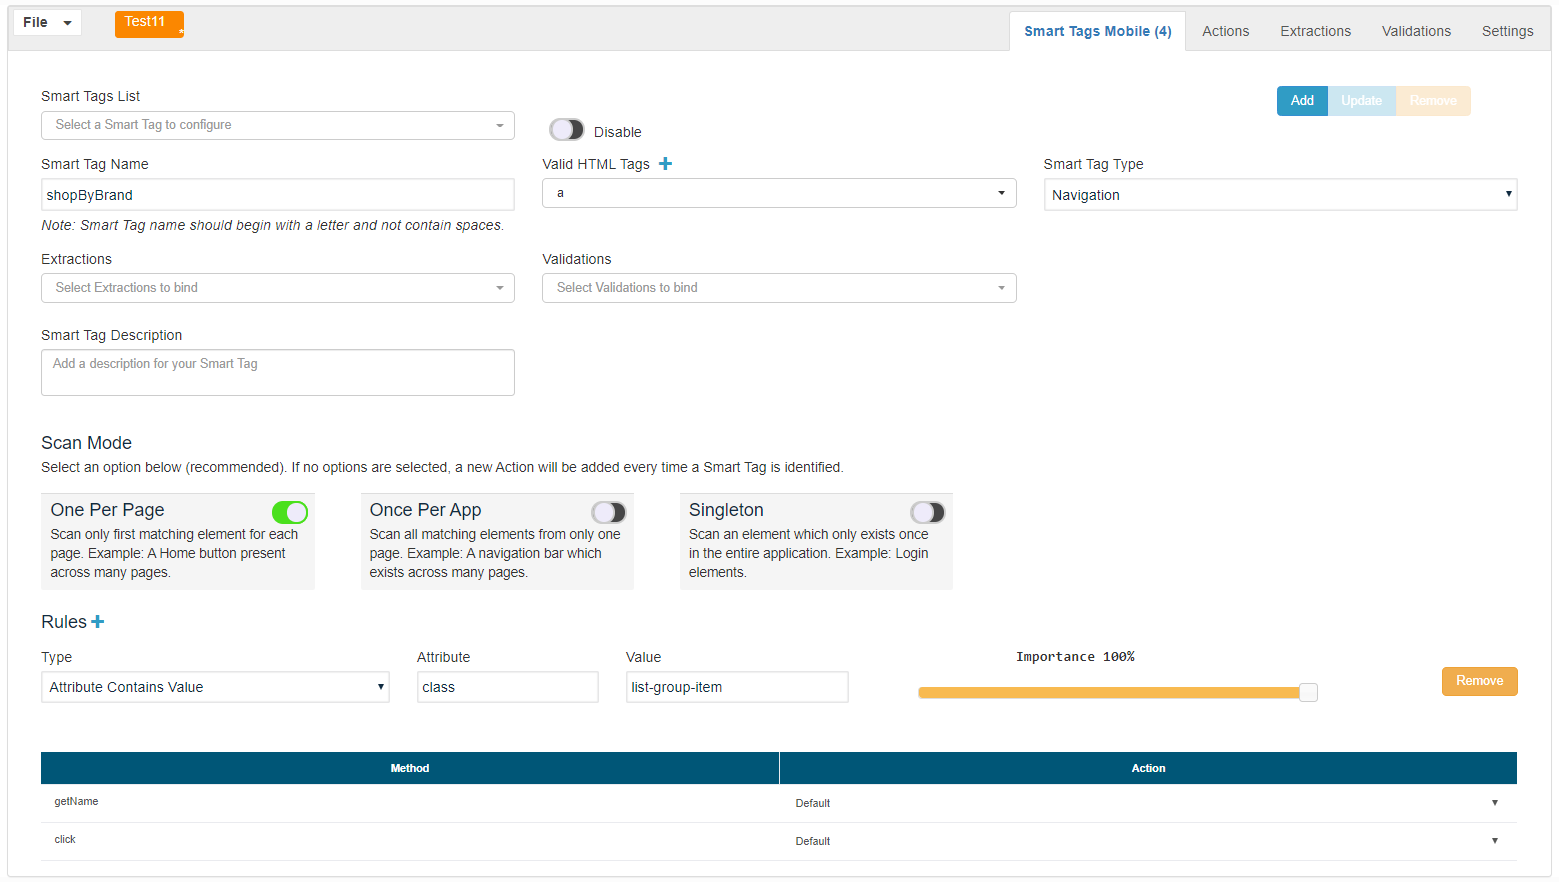
Creating a new SmartTag
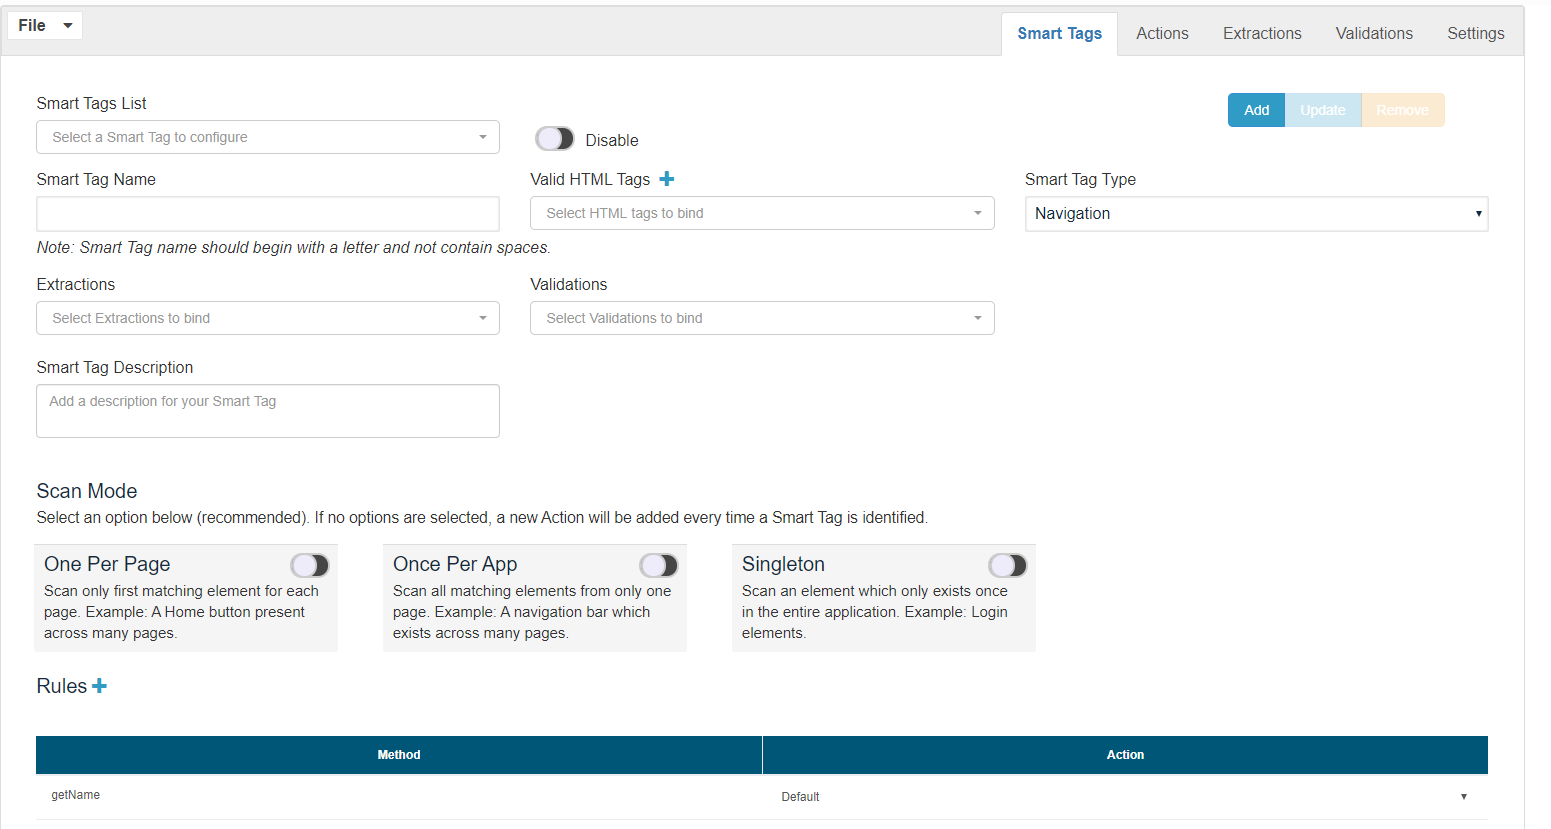
To create a new SmartTag, simply fill all of the required input fields of the form and then click the "Add" button located at the top right of the container window. Make sure to fill up the following required inputs to be able to add a new SmartTag:
-
SmartTag name
-
At least one valid HTML tag
-
SmartTag Type
All the other inputs and data of the form are optional based on your needs, such as the rules, however, to create a new SmartTag you will always be required to provide the above input data. If you have selected a SmartTag from the "SmartTags List" selector and you want to create a new SmartTag, click the "SmartTags List" selector and select the first option called "Create New SmartTag", this will reset the SmartTags form and allow you to create a new SmartTag from scratch.
Manage Valid HTML Tags
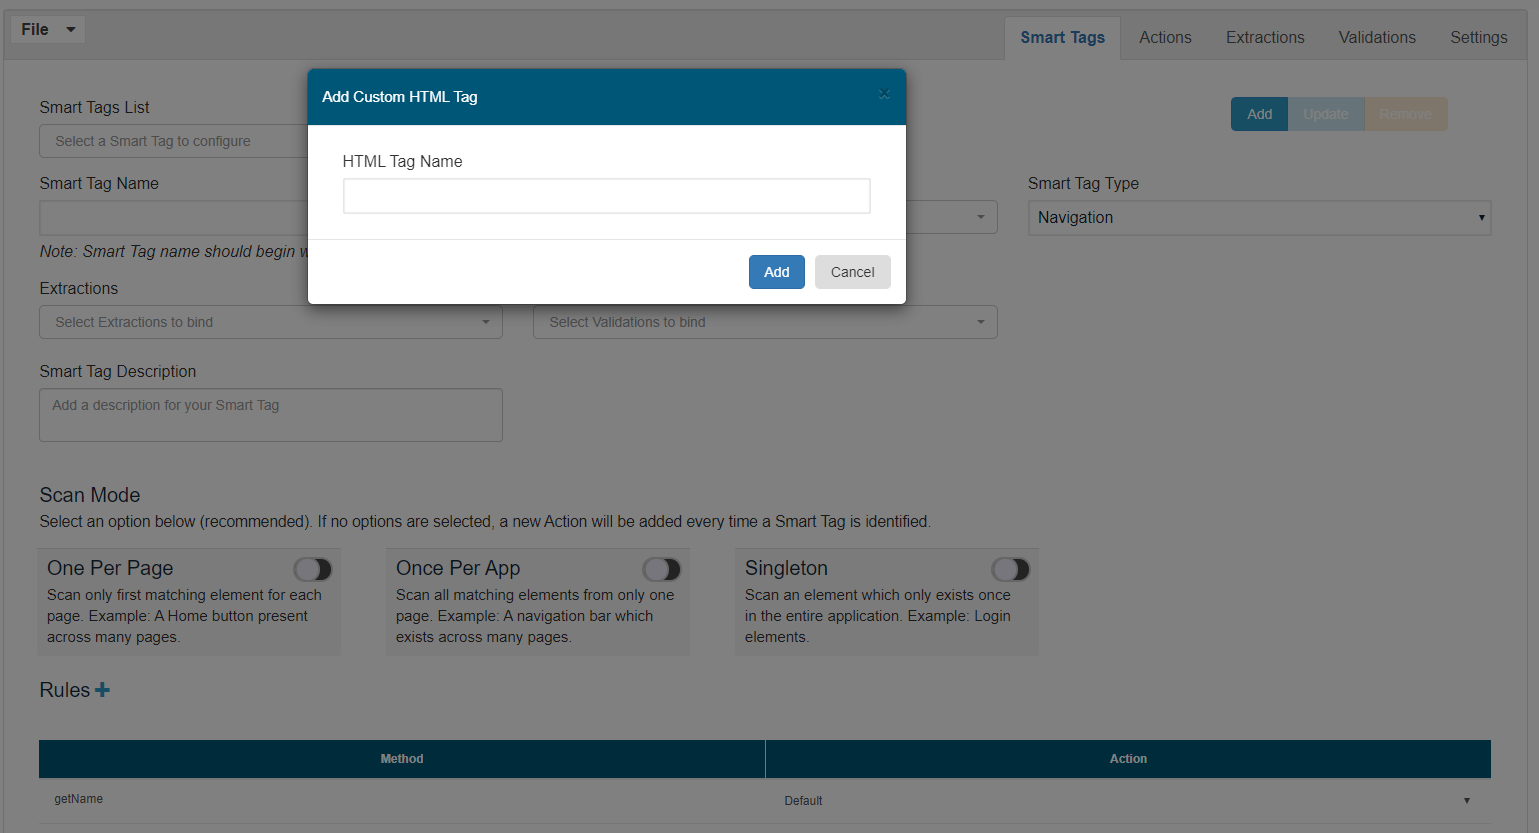
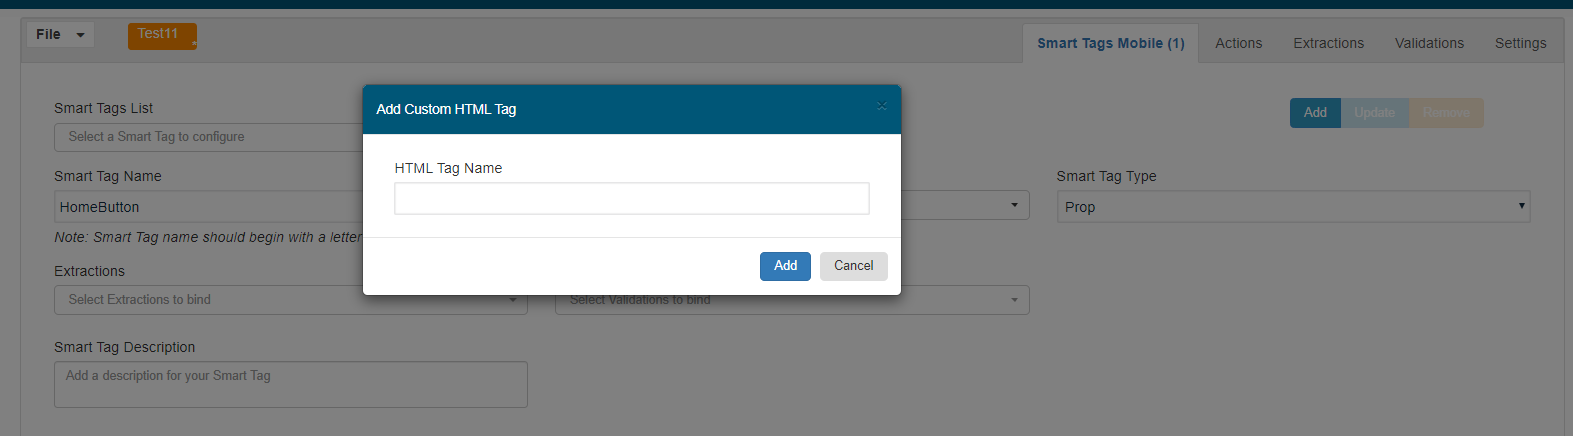
The list of valid HTML tags is a static list of elements referenced from W3School's valid HTML tags list. However, if you need to add a custom HTML tag, you can do so by clicking the plus sign ("+") located beside the valid HTML tags selector label. This will prompt a modal window where you can type in the custom HTML tag to be added to the list of valid HTML tags of the current context.
You must follow the W3C Custom Elements standard for custom HTML tags such as hyphenation to add a valid HTML tag.
SmartTag Description
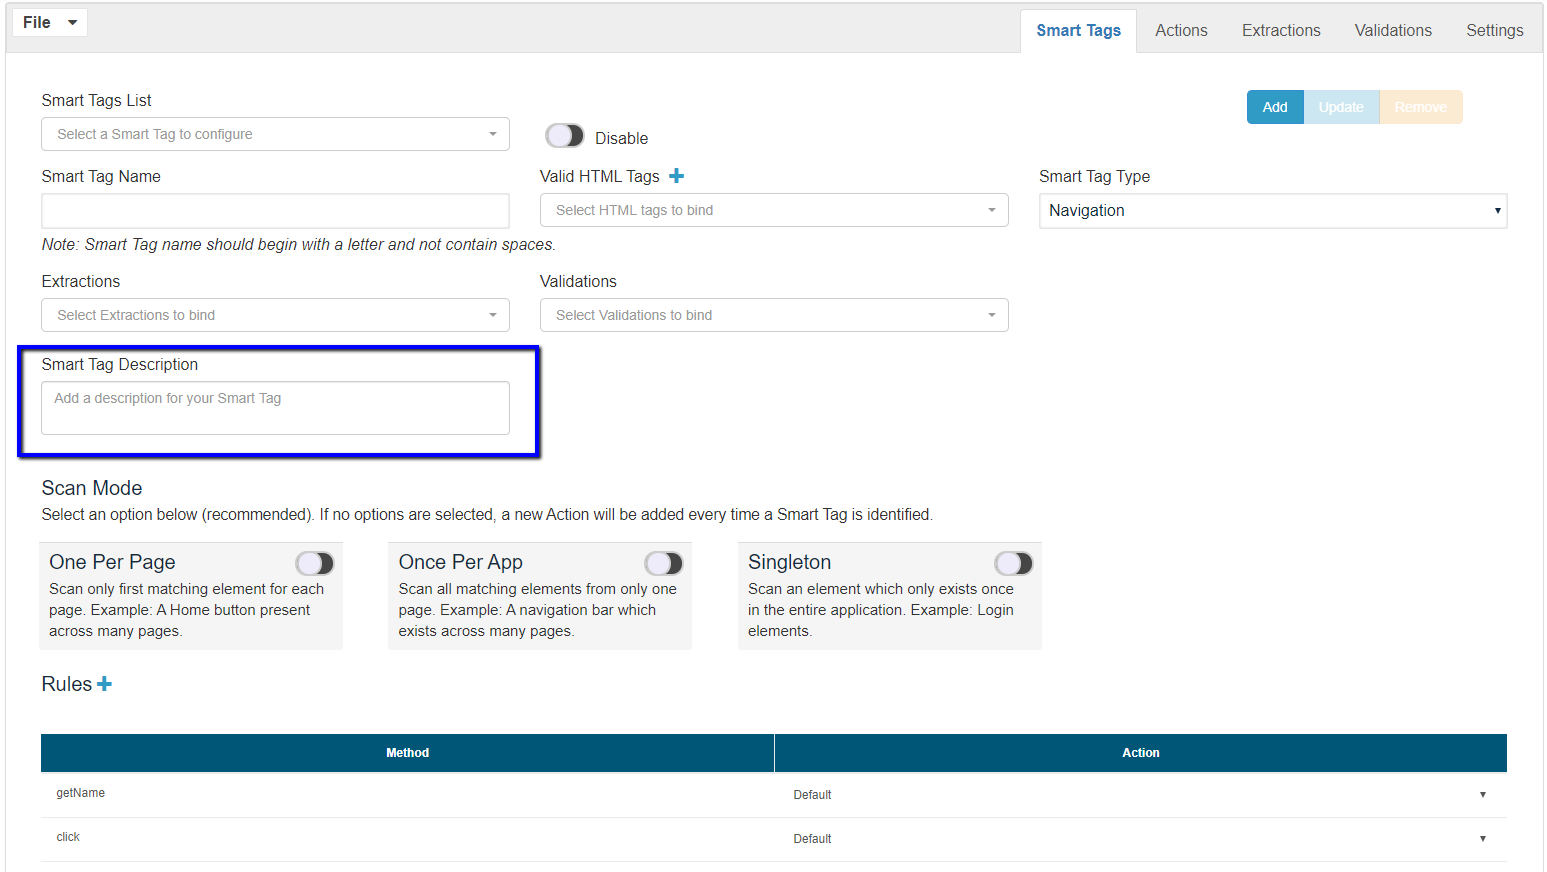
SmartTag descriptions can be used to provide meaningful descriptions for the SmartTags created that way it will help others in the team to check back on those descriptions to understand the SmartTags better.
Manage SmartTag Type
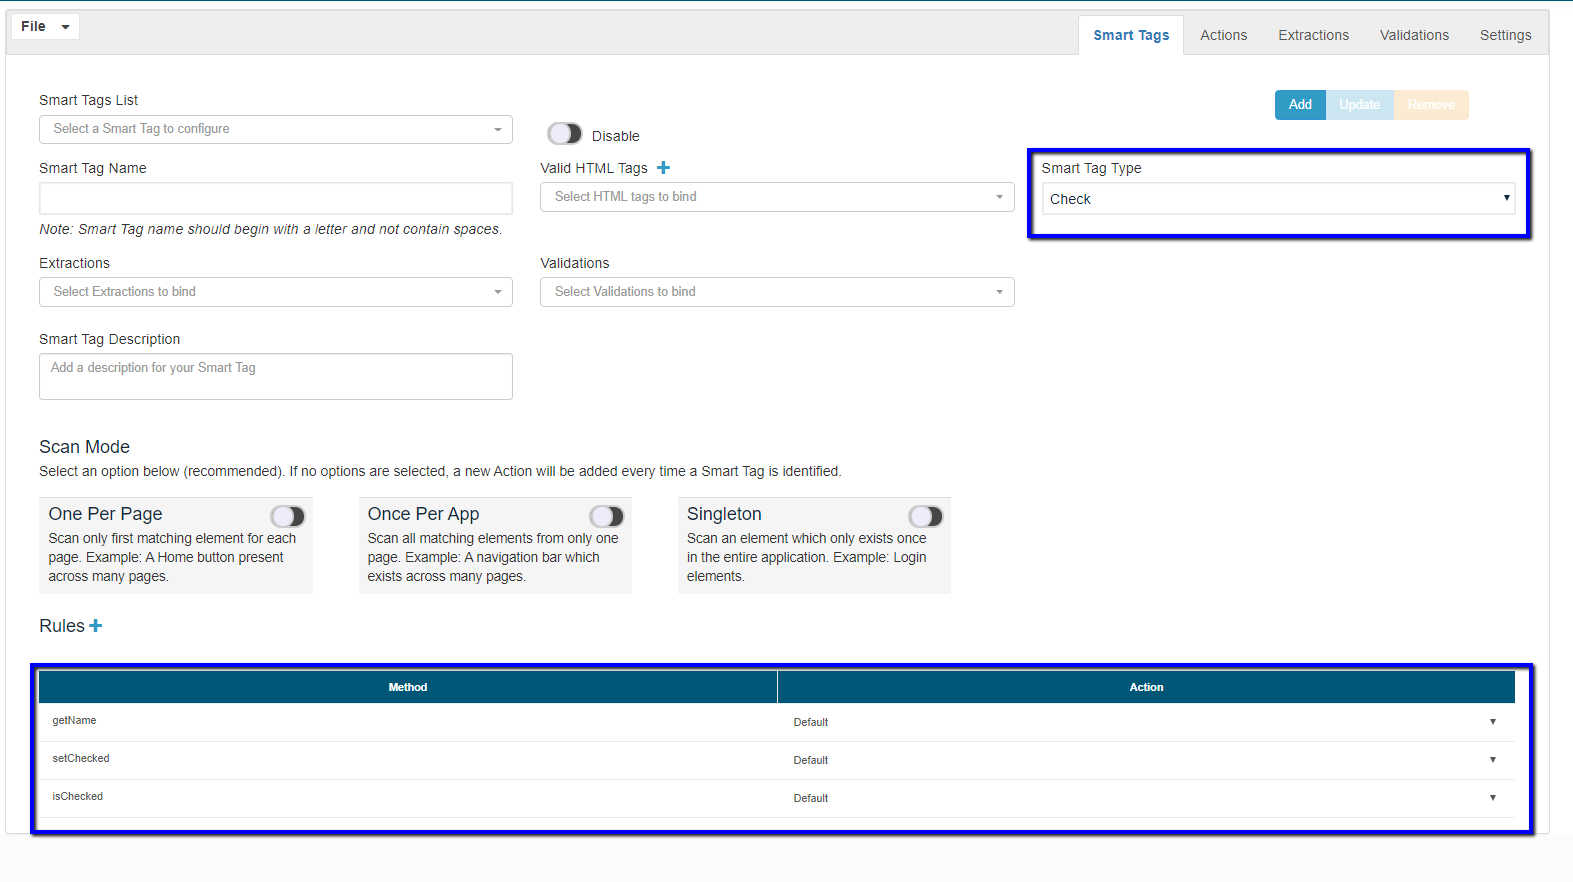
The SmartTag Type selector allows selecting the type of SmartTag you want to configure, based on the selected SmartTag Type, the available methods of the Methods and Actions table will toggle, each of the rule types have their own set of methods associated with. By default, when you are creating a new SmartTag or resetting the SmartTag form, the SmartTag type "Prop" will be selected. Once you have selected the desired SmartTag type, you can bind existing Actions to the available methods, all of the created actions so far in the current context will be available in the methods Action selectors at the Methods & Actions table at the bottom of the SmartTag container window.
Here's the list of methods linked to each of the available SmartTag types:
-
Prop: getName
-
Navigation/Action/RadioButton: getName, click
-
Check: getName, setChecked, isChecked
-
Select: getName, getValues, getSelectedValue, setSelected
-
Form: getName, submit
-
Text: getName, setText, getText
-
Menu: getName, expand, collapse
-
Search: getName, submit, setValue
-
Hover: getName, mouseHover
-
Noise: getName, click - The noise SmartTags were created for elements like pop-ups that can happen randomly on an application. A click to a noise SmartTag will create a clickIfFound() Test Designer command that will not fail if the element is not found.
-
AutoClosableElement - This is for pop-ups, it is just a SmartTag for the close icon of the pop-up
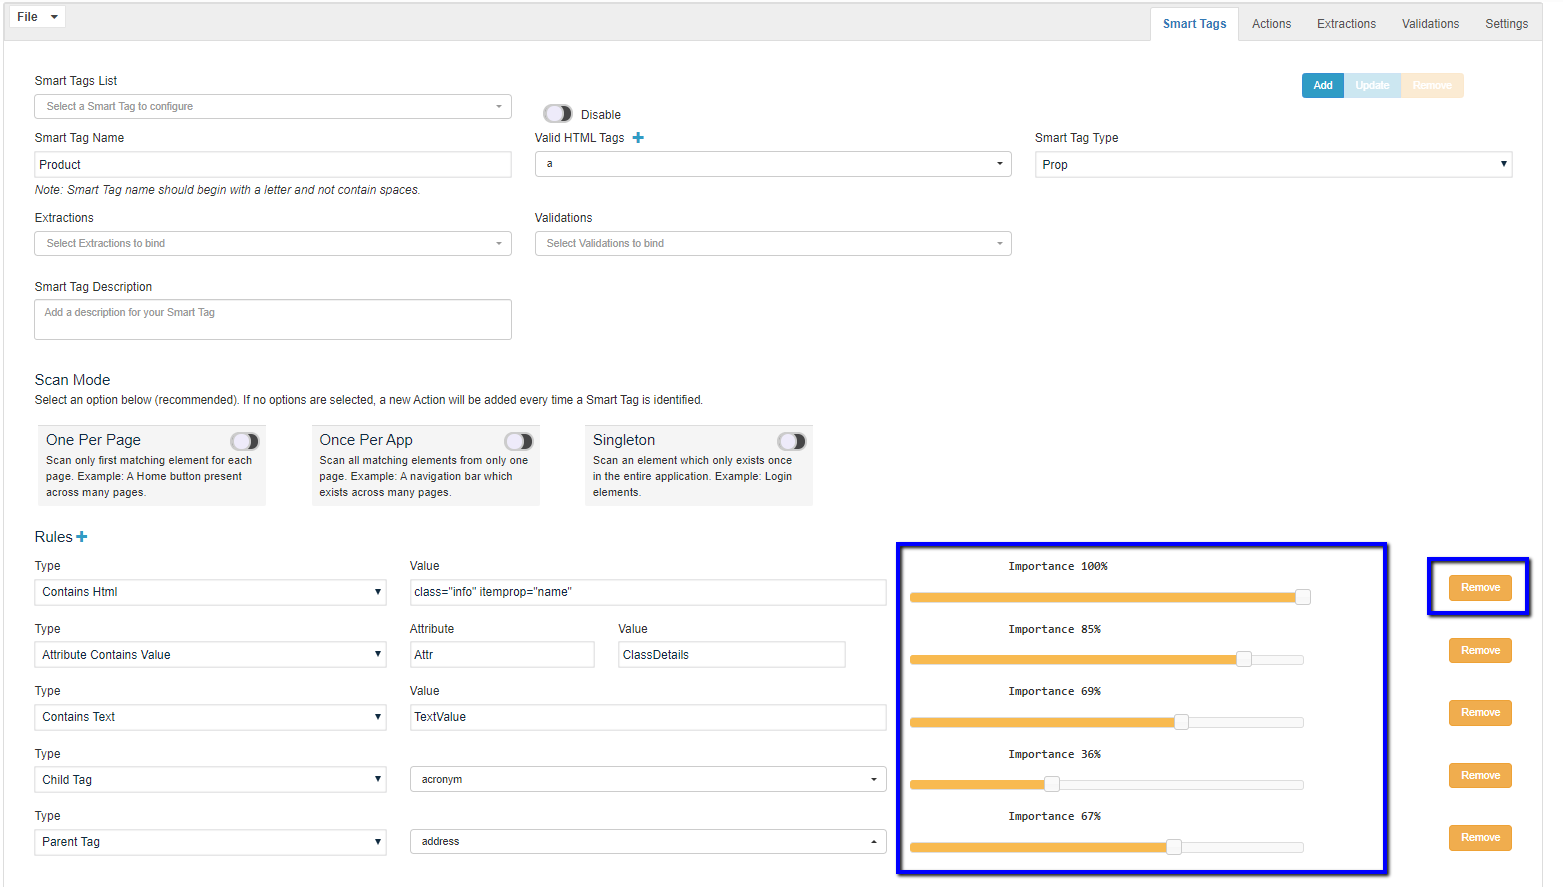
Manage SmartTag Rules
To add rules to your SmartTag, simply click the "Add Rule" button located under the "Rules" section, this will automatically add a new rule to the SmartTag, you will see the default rule type input fields displayed, these inputs will change depending on the rule type selected, meaning that based on the selected rule type you will be given a different kind of inputs and options to configure the SmartTag rule properly. Here's the list of available rule types and their corresponding input fields and restrictions:
-
attrContainsValue/attrDoesNotContainValue: This is a key-value rule type, meaning that whenever you select one of these rule types you will be given two input fields, the first one is for the attribute key and the second one is for the attribute value. Please notice that for this rule type it is only required to have a key, you can add this type of rule without an attribute value, but it always has to provide a key to be a valid rule (I.E. empty HTML attributes like 'disabled')
-
containsText: This is a text-based rule type, when you select this rule type you will be given a standard text input field, it is always required to have a value to be a valid rule.
-
childSmartTag/parentSmartTag/parentsSmartTag: This kind of rule type is bound to the available SmartTags list in the current context, you will be given a selector filled with the list of available SmartTags created so far. You must always select a single SmartTag to be a valid rule.
-
childTag/parentTag/parentsTag: These kinds of rule types are bound to the available valid HTML tags list in the current context, you will be given a selector filled with the list of available HTML tags, you must always select a single valid HTML tag to be a valid rule.
-
containsHtml: Evaluates and matches the given HTML data with that of the accessor.
For example: <li class="navear" item-name="prop" id ="id2">
If the above data is given in containsHTML rule in SmartTag json , while scanning the elements , it will try to match the given value with that of element's HTML data (outerHTML data of element) and returns the element.
To change a Rule Weight you can interact with the "Importance" slider of each rule container, the slider label will dynamically change based on the slider value so you can know exactly which is the rule weight.

To Remove a Rule simply click the "Remove" button located at the rightmost of the rule container.
Updating a SmartTag
File > Save and File > Save As can be used to save the modified changes.
To Remove a SmartTag, select a SmartTag from the "SmartTags List" selector and click the "Remove" button and click save.
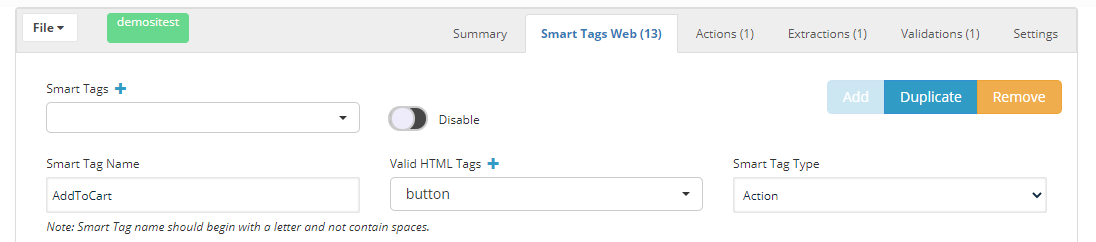
SmartTags can be duplicated using the Duplicate button copying all the same contents and it will add a "SmartTagName-copy" and you can use the SmartTags to change or modify the SmartTags.
Actions Tab UI
Actions are used when you want to override the default behavior of a SmartTag.
For example, navigation's default action would be CLICK
if you need to change the default action, so if you need to click a specific area instead of a full click, a custom action could be created to perform this, and always remember to assign the action that was created in the Actions tab.
Actions tab allows you to create and configure Actions to the current context that can be bound with the SmartTag methods at the Methods & Actions table of the SmartTags Library tab.
You must use JQuery or JavaScript methods on the Action tab. Commands documented in Test Designer JS Commands Reference are not valid in the Actions Tab. However, those commands can be used in the Validations tab.
To create a new Action, type in the action name and the corresponding JavaScript function string and click the "Add" button located at the top right corner of the Actions tab container window. Make sure to fill up the following required inputs to be able to add a new action:
-
Action Name
-
JavaScript Function String
Once you have added the Action, it will be available at the Actions selectors of the Methods & Actions table of the SmartTag tab. If you have selected an Action from the "Actions List" and you need to create a new SmartTag, click the "Actions List" selector and select the "Create New Action" option, this will reset the Actions form and allow you to create a new Action.
/** You can create custom actions for SmartTags here.
-
Your available variables are:
-
- element: The Element is the SmartTag name
-
- params: The input parameters of the function if any
-
- ds$: Equivalent of the jQuery accessor "$"
*
-
E.G.: To get the selected values of a select HTML tag type:
*
-
return ds$("option", element);
**/
The array hint field is optional.
To update an Action is the same as the SmartTags Library tab functionality, you first have to select an Action from the "Actions List", modify the configuration as required, and then click the "Update" button.
To Remove an Action, select the action from the "Actions List" and then click the "Remove" button.
Example:
React Selects
Suppose there is a control that behaves like a Select, Drop-Down list, or Combo box but its HTML structure does not follow the standard, select, and option tags, but instead uses nested div tags. A Select type SmartTag allows the following interactions or functions: show values, get all values, get the selected value, and set value. Since the control does not follow the standard, the default implementation for the functions of Select type SmartTags will not work. Therefore, a custom implementation for each function must be provided.
Notice the getValue, getSelectValues and setSelected functions are bound to custom functions
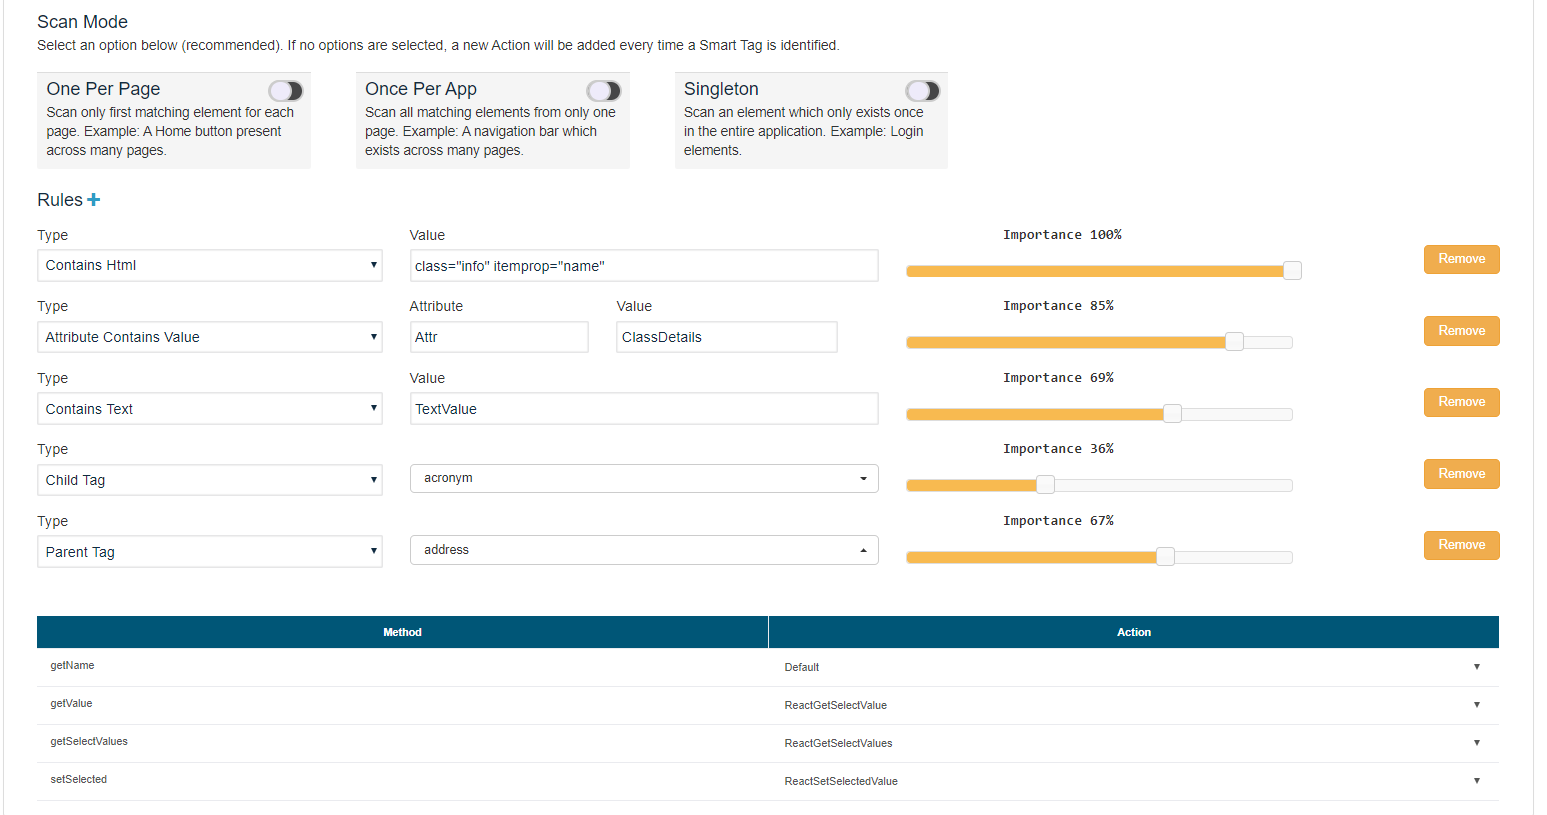
Custom implementation for getValue which is set to use reactGetSelectValue
Post Actions & Previous Actions
Post Actions & Previous Actions selectors have linked with the "Actions List" selector, meaning that whenever you create or delete an action, this change will take place at all of the form selectors. These selectors allow you to bind multiple posts and previous actions to the current action in scope previous actions will be executed before the current action, and post actions will be executed after the current action.
JavaScript Function String
As the name suggests, a string representing a JavaScript function, this field is a JavaScript editor embedded in the UI that allows you to edit the JavaScript code professionally, providing coding tools such as code highlight, auto-close brackets, line numbers, and so on. It's important to notice that you must not include the function declaration, only the function body, this is part of Create Blueprint implementation under the hood, you must only code the JavaScript function body.
Note: All the SmartTags have getName which gets the accessors, we could override the getname so that the string that we get is not ambiguous for the Test Designer.
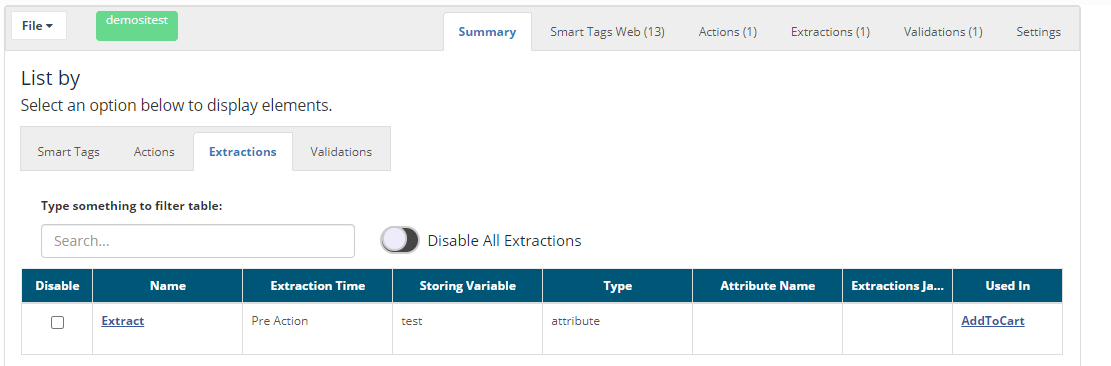
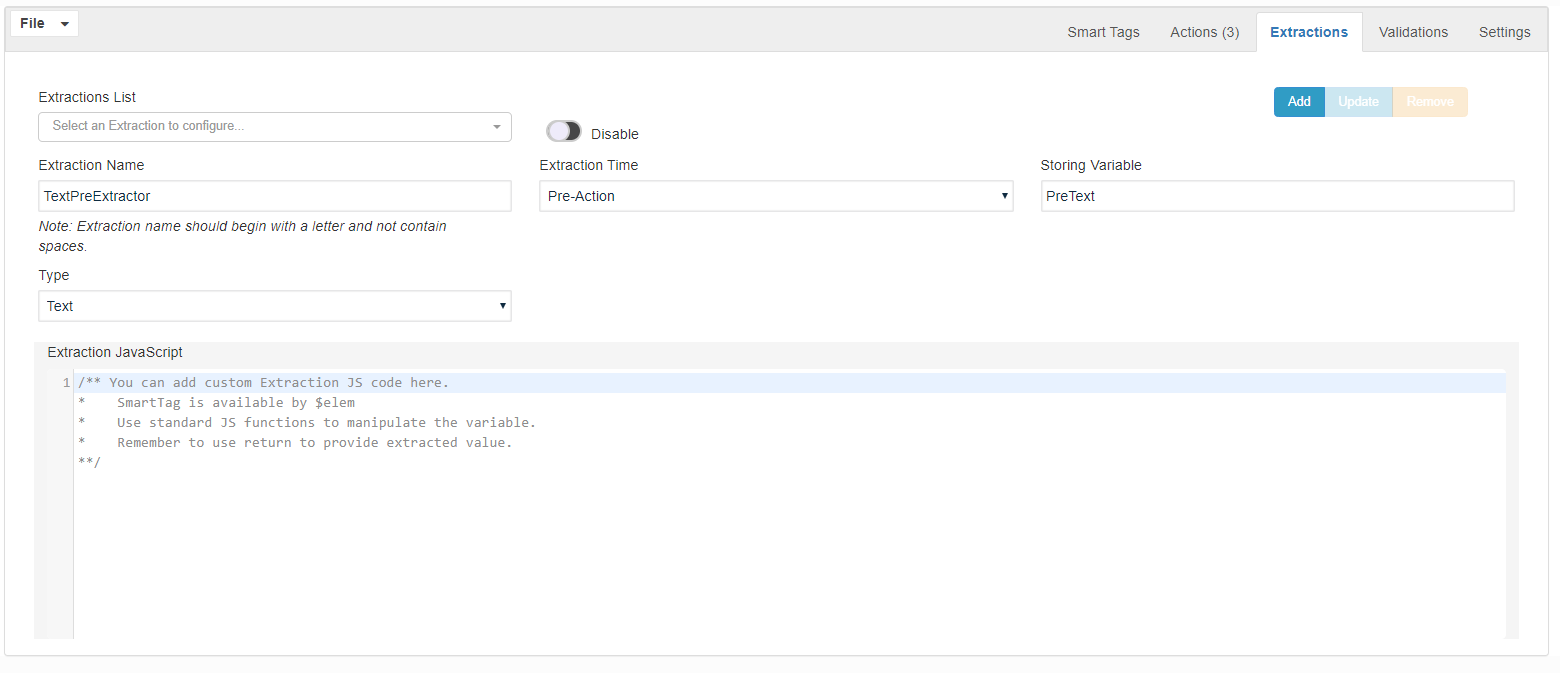
Extractors
Extractors are a type of validation that allows you to extract data from SmartTags.
The extraction process can occur before a SmartTag is processed or after a SmartTag is processed (Processing means the execution of the SmartTags)
You can extract many types of data, like the text of a SmartTag, the id of a SmartTag, various attributes of a SmartTag by providing the attribute name, you can also extract XPath's data by using xpath expressions.
Following are the ones that we could extract.
-
Text
-
Attribute
-
ID
-
Xpath
You can also provide customized JS code that allows you to extract many different elements from the whole page.
All the data that you extract are stored in a variable using the variable name.
As already mentioned there are pre and post actions:
An example of a pre-action could be a link where you need to get the text and store that value to be used for further processing or further validations.
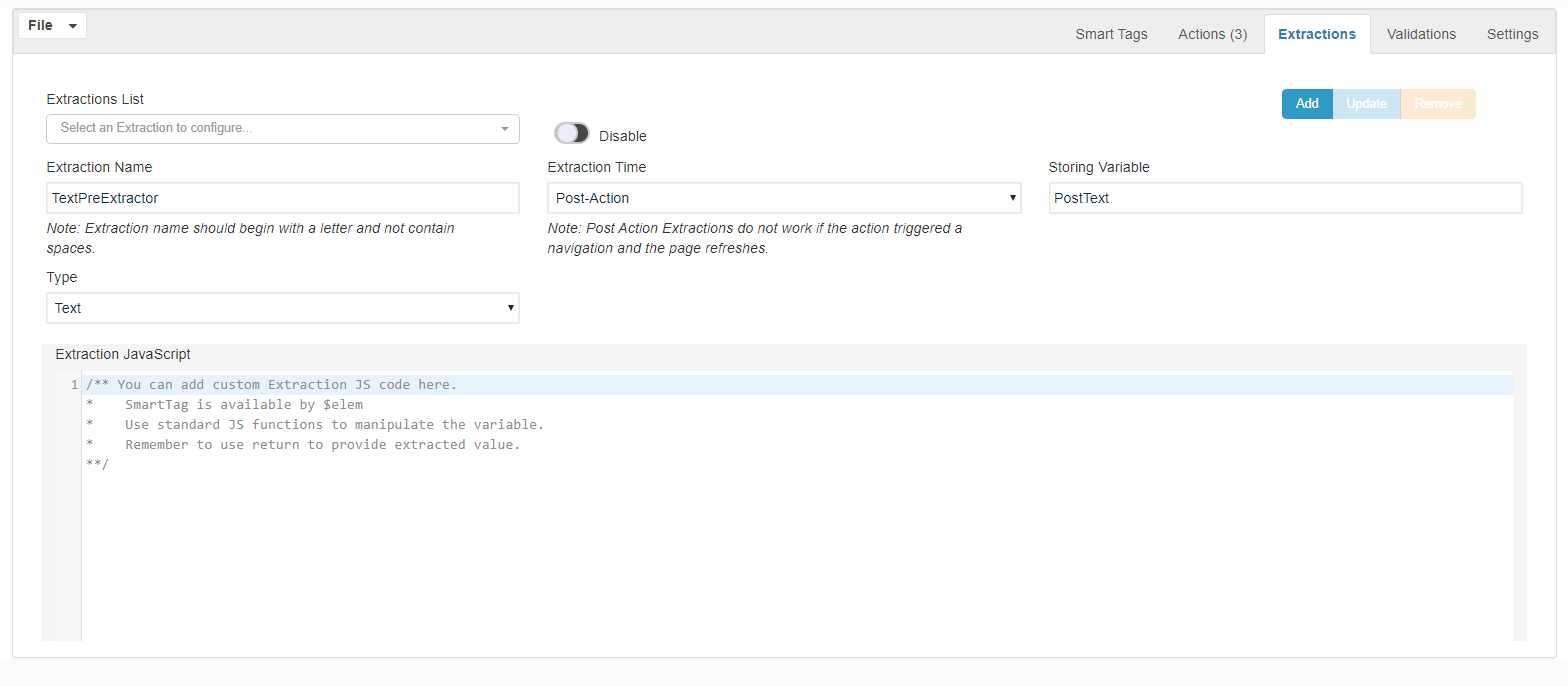
Post Action extractors are something that you could store in a setValue, and after setting the value you could validate what was set as the input for those accessors using Post extractions.
You could also use JS code like the one below:
/**You can add JS code here.
-
Use standard functions to manipulate the variable.
-
Variable must be referenced with $.
-
Use functions available in JS Edit & Play to extract data.
-
Reference of functions is in Test Designer JS Commands Reference
-
Note: The first line must return value.
**/
Examples of Pre-Action Extractor and a Post-Action Extractor below using Text:
Validations
Validations allow the extraction of data from a SmartTag and compare this data before or after a SmartTag is processed against a target that can be a variable from a previously executed Extractor or a valid JavaScript expression or a value.
Comparisons can be:
-
Equals - equals
-
Not Equals - notEquals
-
Contains - contains
-
DoesNotContain - doesNotContain
-
Less Than - lessThan
-
Greater Than - greaterThan
-
Less or Equal - lessOrEqual
-
Greater or Equal - greaterOrEqual
-
Starts With - startsWith
-
Ends With - endsWith
The importance of having a validator is that they have the flexibility of choosing different kinds of assertions compared to auto-validations before or after a SmartTag is executed.
As Extractors, you could choose the validators to be executed pre or post after a SmartTag is processed.
Different types of Validations are supported on:
-
Attribute
-
Text
-
Id
-
Xpath
Expected Value (JS Code): Expected string or the expected value to be entered.
Examples:
validating numbers - 257
validating text - "helloworld"
validating true/false - true or false values
We could also provide functions like - parseint(23)
parsestring("string").uppercase(); etc
Also, we could use the extractors to validate by invoking the defined extractors in the extractors tab just by using $ Symbol.
Hitting $ will invoke all the defined extractors from the extractors tab.
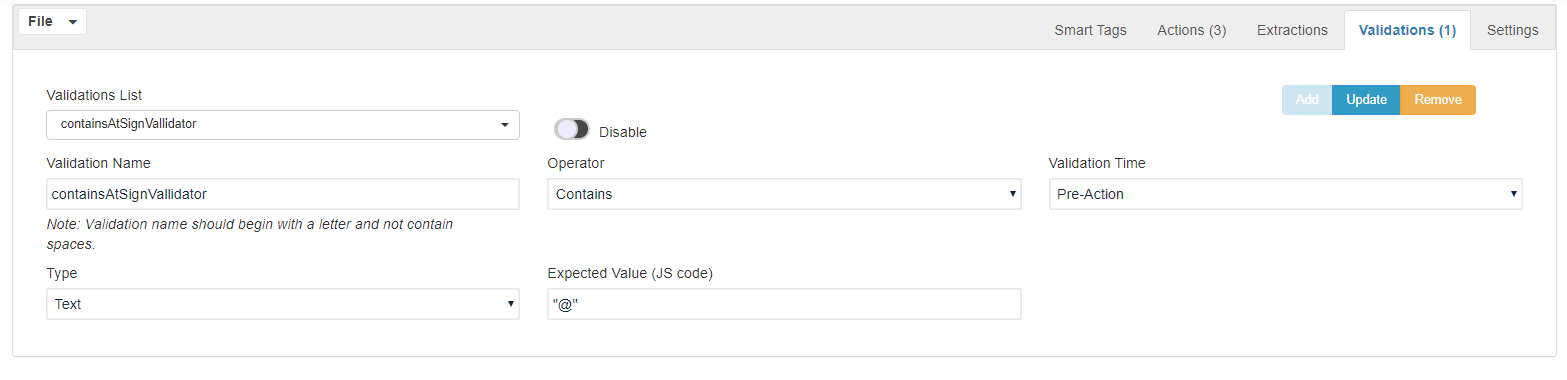
Some Examples Below:
Validation with Greater or Equal with Text Type and an Expected number value.

Validation with Contains Operator with Text Type and Expected string value.
This is an example showing invoking an Extractor using the $ symbol.

Other Validations
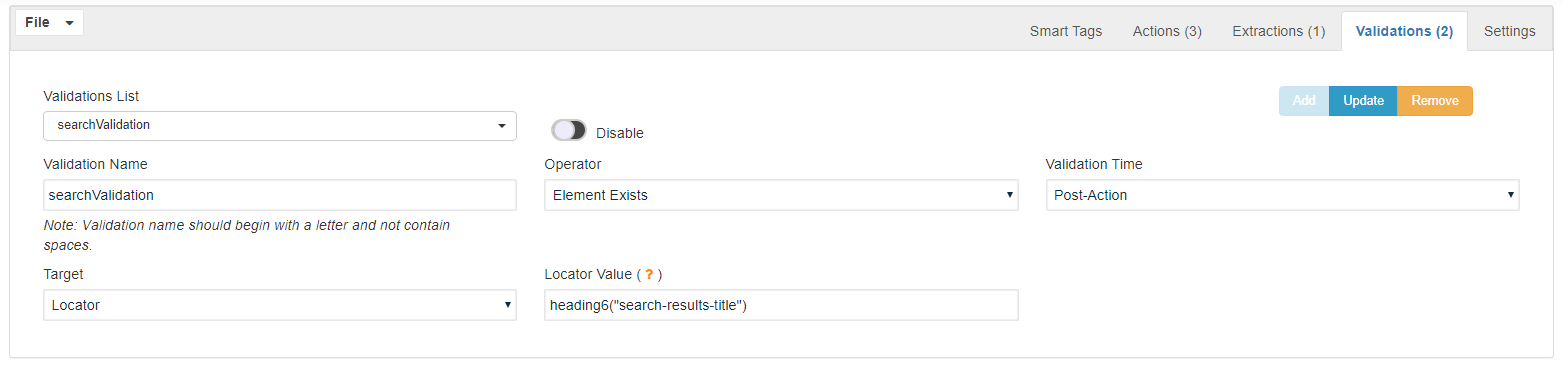
Other Validations allow determining the existence of a value or element after a SmartTag is processed. Before a SmartTag is processed, data is extracted from a SmartTag or the value of a previously executed Extractor or a specific JavaScript expression or value is loaded. After a SmartTag is processed, the value or the element is checked for its existence.
These validations always extract data from a SmartTag and after a SmartTag is processed, we validate the data against the resulting page or the specific element of the page.
The only assertion that we could do with other Validations is CONTAINS and DOES NOT CONTAIN.
This validation happens always after a SmartTag is processed.
Different Types supported:
-
Attribute
-
Text
-
ID
-
Static Text
-
Element Exists
-
Xpath
Targets:
-
Particular Locator
-
Present in Whole Page (Assert Contains)
-
Not Present in Whole Page (Assert Does not contains)
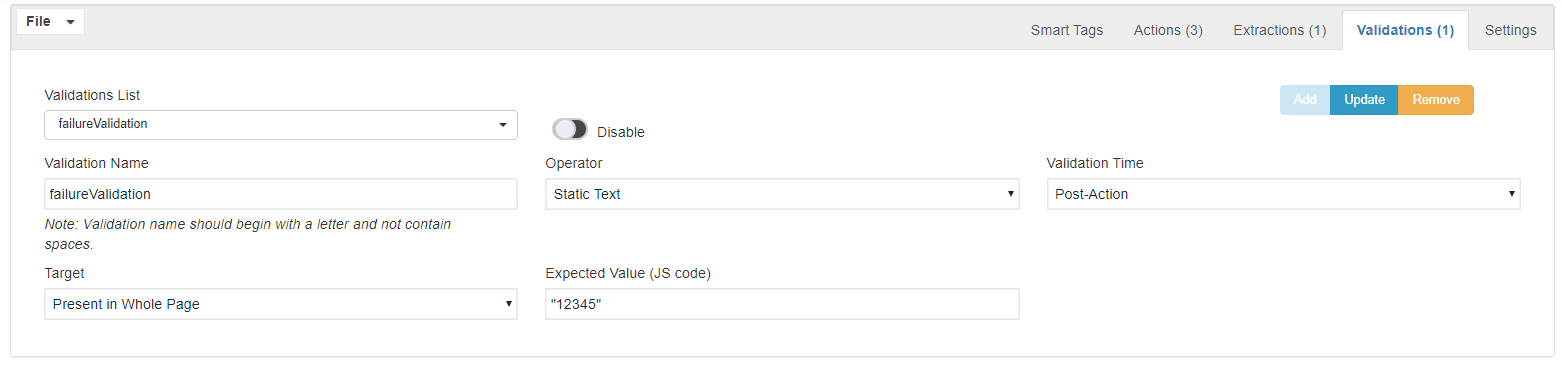
Some examples are below:
Type of Static Text and with expected text value targeting the whole page.
Type of Element Exist and provides the Locator value:
Note: The locator value is something that looks like the accessors from the Test Designer script.
Given this element: Login Button
<a href="/login" id="login_link_id" name="login_name">Login</a>
Valid Locators can be:
link("/login")
link("Login")
link("login_link_id")
link("login_name")
link(1)
Can also use CSS and XPath locators like:
byXPath('//*[text()="Login"]')
byCss("#taxonomies > div:nth-child(2) > a:nth-child(1)")
Native element types can be
link("")
textbox("")
emailbox("")
password("")
textarea("")
button("")
reset("")
span("")
submit("")
select("")
radio("")
checkbox("")
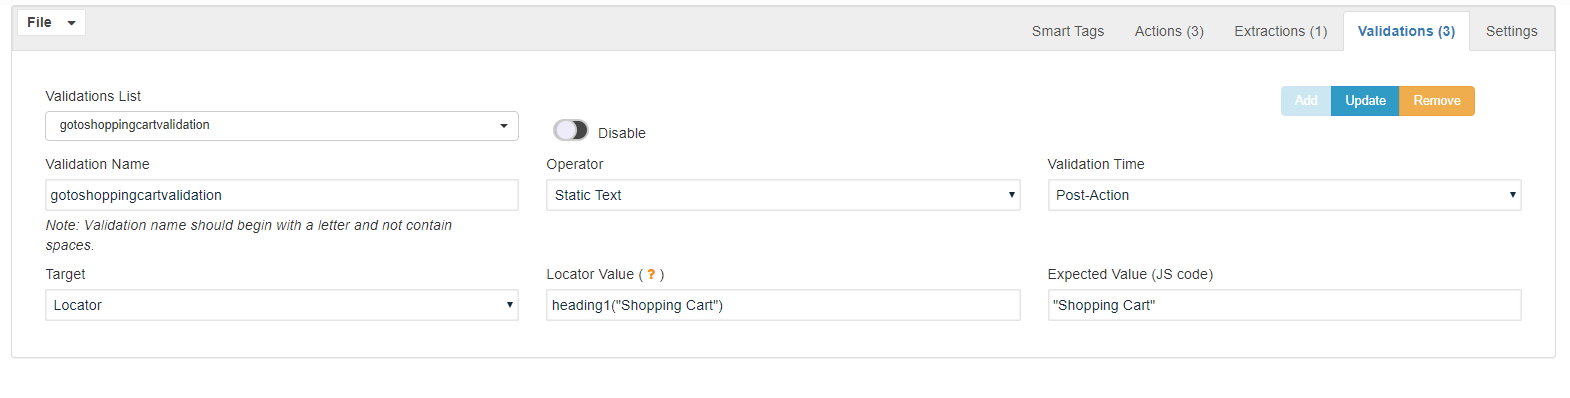
Type of Static Text expecting a string value from a Locator Target providing the Locator Value:
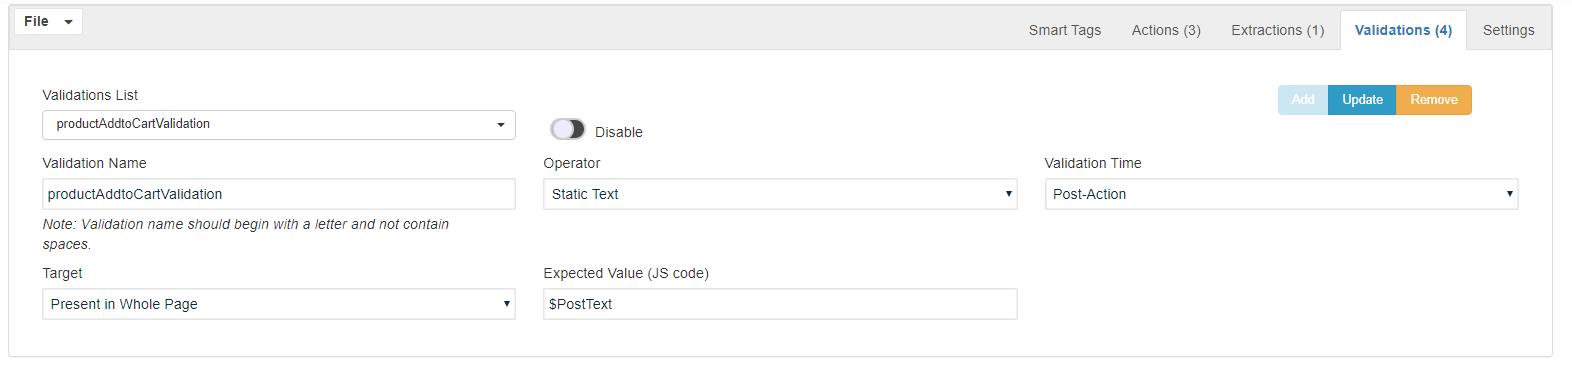
Type of Static Text expecting a string value (Extracted String value) from the whole page:
Note: When running designer scripts, you would notice that the validations would be performed both pre and post-validations.
Test Designer logs example:
Evaluating PreAction Validation: HasButtonNewLookUp for SmartTag: shopThisStore
Validation succeeds.
Validations have both pre and post-sections. Generally, pre section will always be successful and the post-section shall pass or fail depending on the assertion.
Pre section defines a variable with the value:
-
Id, Attribute, Text, and XPath will extract this data from the SmartTag
-
Static Text will define the variable with the value provided in this field
-
Element Exist will define the variable with the value provided in the Locator Value field
The post section performs the assertion based on the option selected in the Target field:
-
Id, Attribute, Text, XPath, and Static Text will perform assertContainsText (Locator), assertTextPresent (Present in Whole Page), and assertTextNotPresent (Not Present in Whole Page)
-
Element Exist will perform assertExists
Settings
Settings are the most simple screen of the SmartTag UI, its purpose so far it's only to configure the SmartTag Rules Threshold, there's only a Slider control that allows you to change this threshold, by default it's 0.75. The range of this slider is from 0.0 to 1.0.
Files Management
The SmartTags UI allows you to handle SmartTags configuration files, these are JSON files (.json extension) that contain a valid SmartTags configuration JSON. The file manager window is available through the "File" drop-down located at the leftmost top corner.
These are the available options:
-
New: Creates a new SmartTag context to be persisted into a file. If you have loaded a file before its contents will be removed from memory.
-
Open: Opens an existing valid SmartTag configuration JSON file.
-
Save: Saves the current SmartTag configuration to a file, if you have opened a file before, the content will be persisted to the same file opened, if no file has been opened you must provide the file path and name.
-
Save As: Save the current SmartTag configuration to a file, it always asks for the file name and path, it comes in handy when you open an existing file, modify its content, and then you need to save it with a different file name to keep the original untouched.
It is worth mentioning that the SmartTag UI will let you know when you have modified and opened the file and the changes have not been saved. When you open a file, the UI will display the file name right next to the "File" option of the file manager, if the file name label is in green color, it means that the file has not been modified since the last save (or not modified when opened), if the file name label is on orange color, it means that the file content has been modified but not yet persisted to disk, meaning that in-memory changes have not been saved to the file. To save the changes, use the "Save" option of the file manager.
SmartTag creation with an example application
In this section, we shall learn about the following:
Valid HTML Tags
SmartTag Types
Scan Types
SmartTag Rules
Navigate to SmartTag Workbench under Record and click File > New.
The first step is to fill up the SmartTag name, fill up the SmartTag name with meaningful names according to the usage, for example, Left_Menu_Items, Credentials, Top_Links are some valid names.
Valid HTML Tags
As we all know, everything you do on a web page is using tags. The basic format of a tag is this:
<TAG> (something) </TAG>
For example, say I want to get a header, like the one above. Well, the code for that header is:
<H1>Tags: What are they? How do they work?</H1>
Notice that the tag begins with: <H1> and ends with: </H1>. This is an important aspect of tags. Almost all begin AND end.
Some valid HTML tags are defined at: HTML Document Type
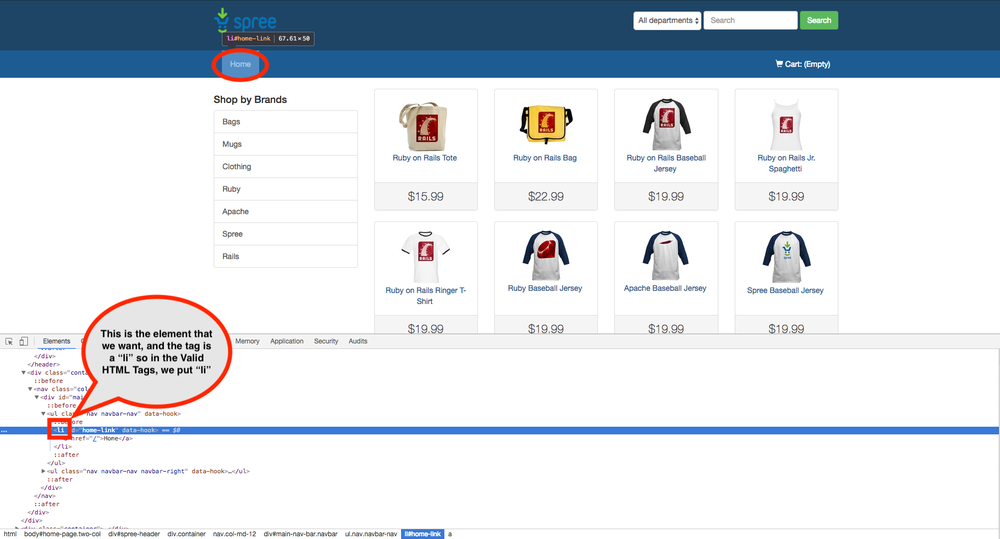
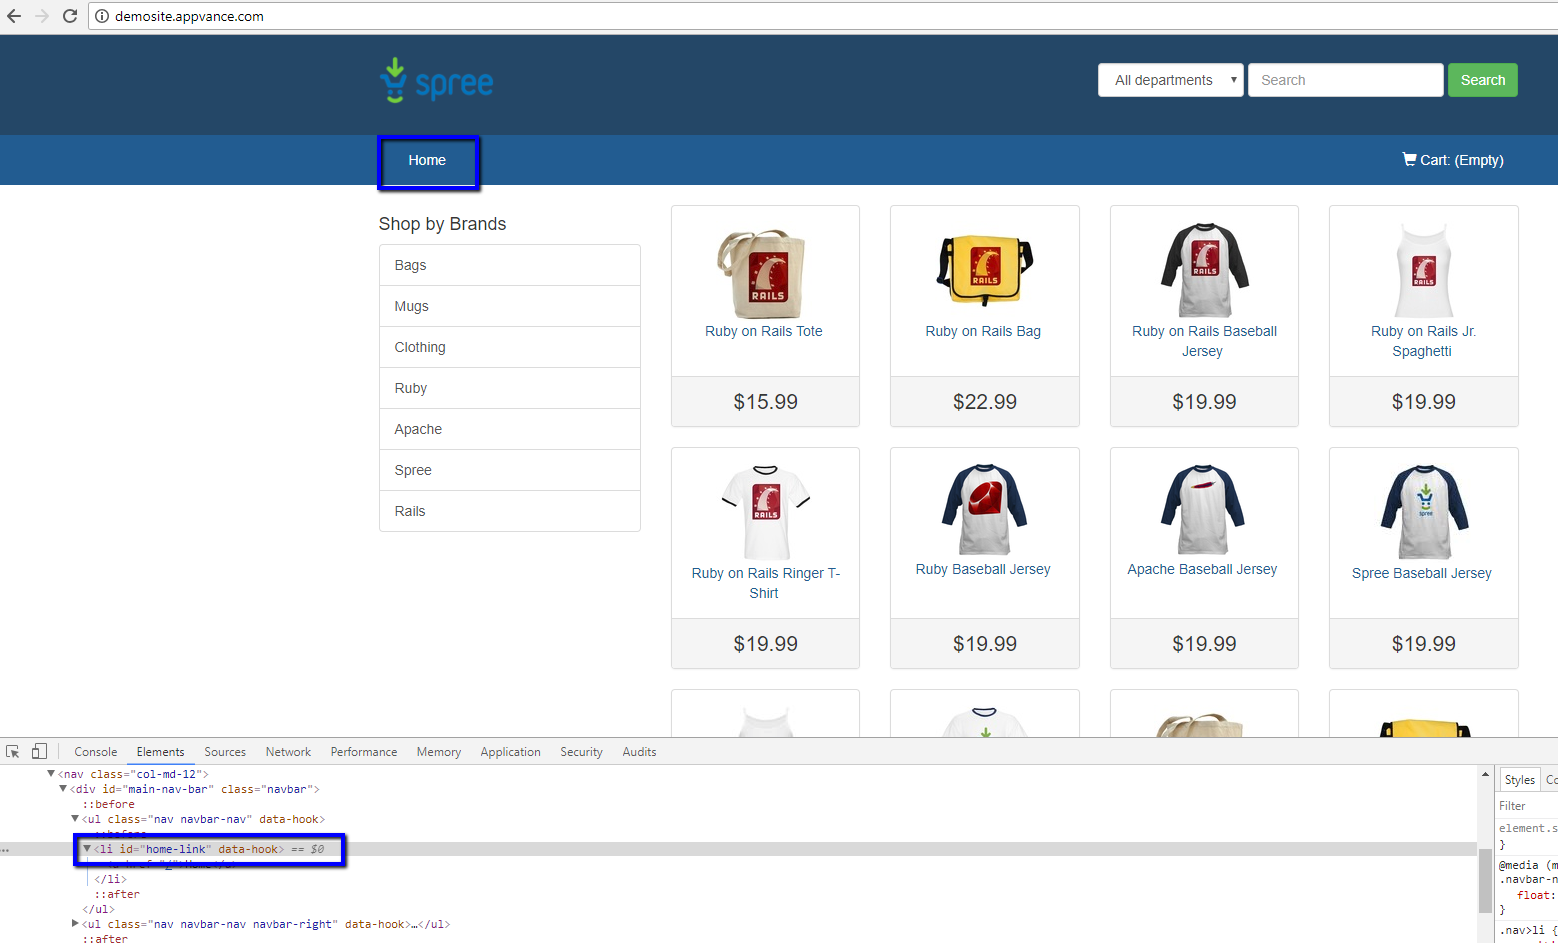
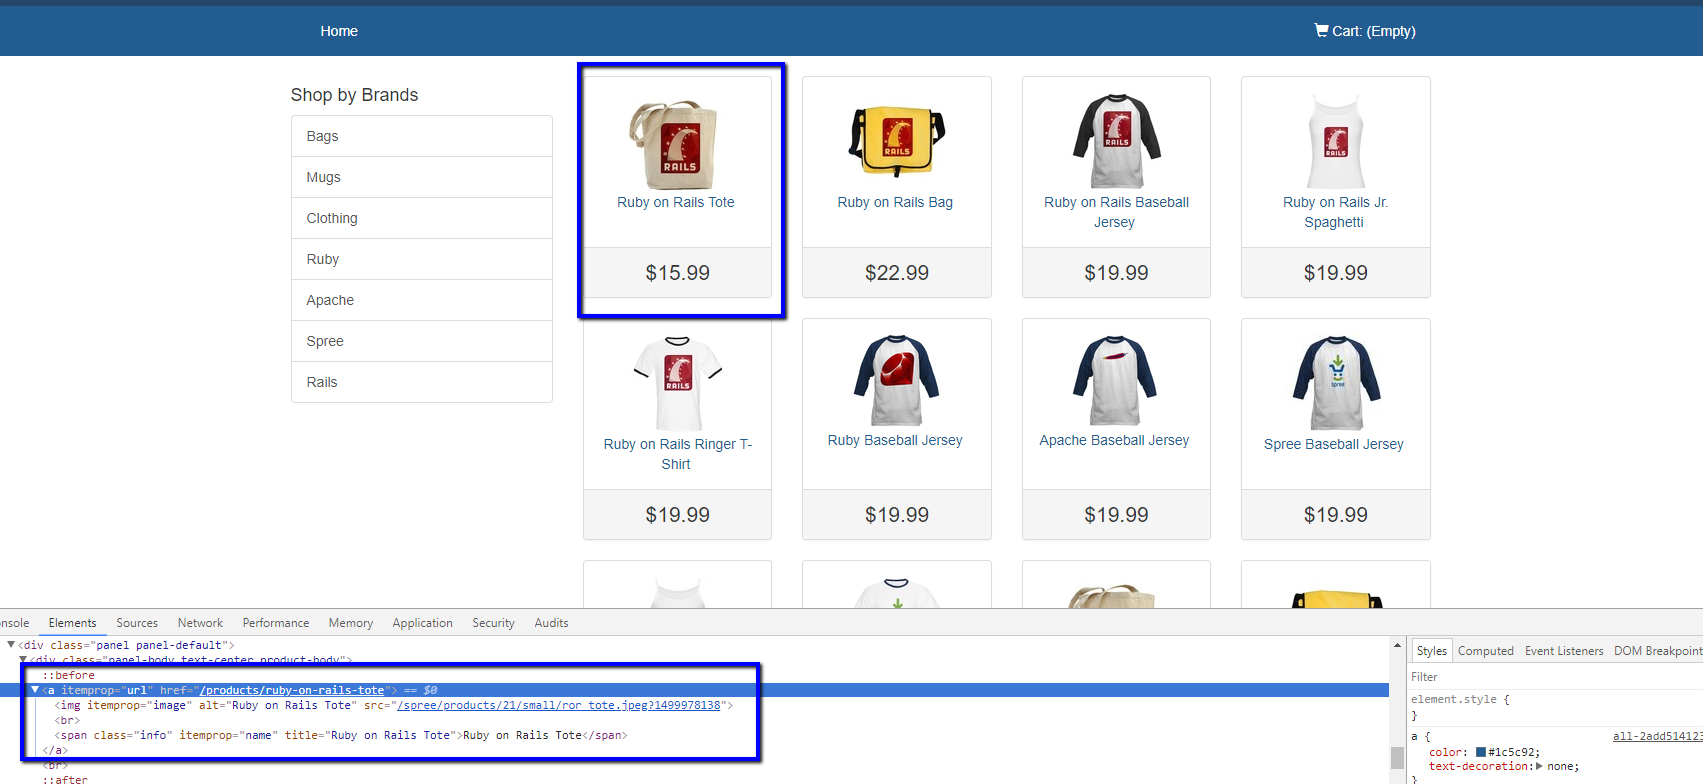
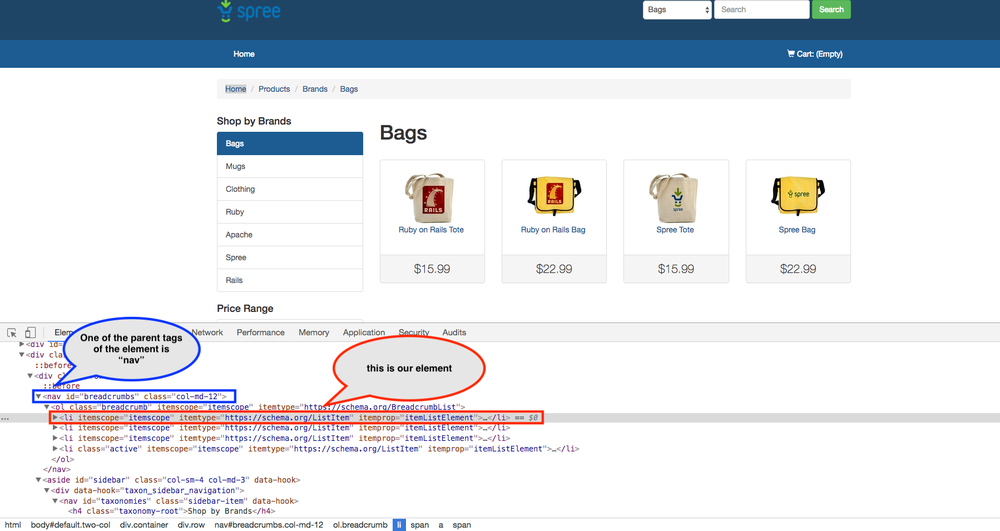
Valid HTML Tag selection depends on the element that we are looking at, To see tags on the web page, right-click the web page or the target element and select Inspect as shown below.
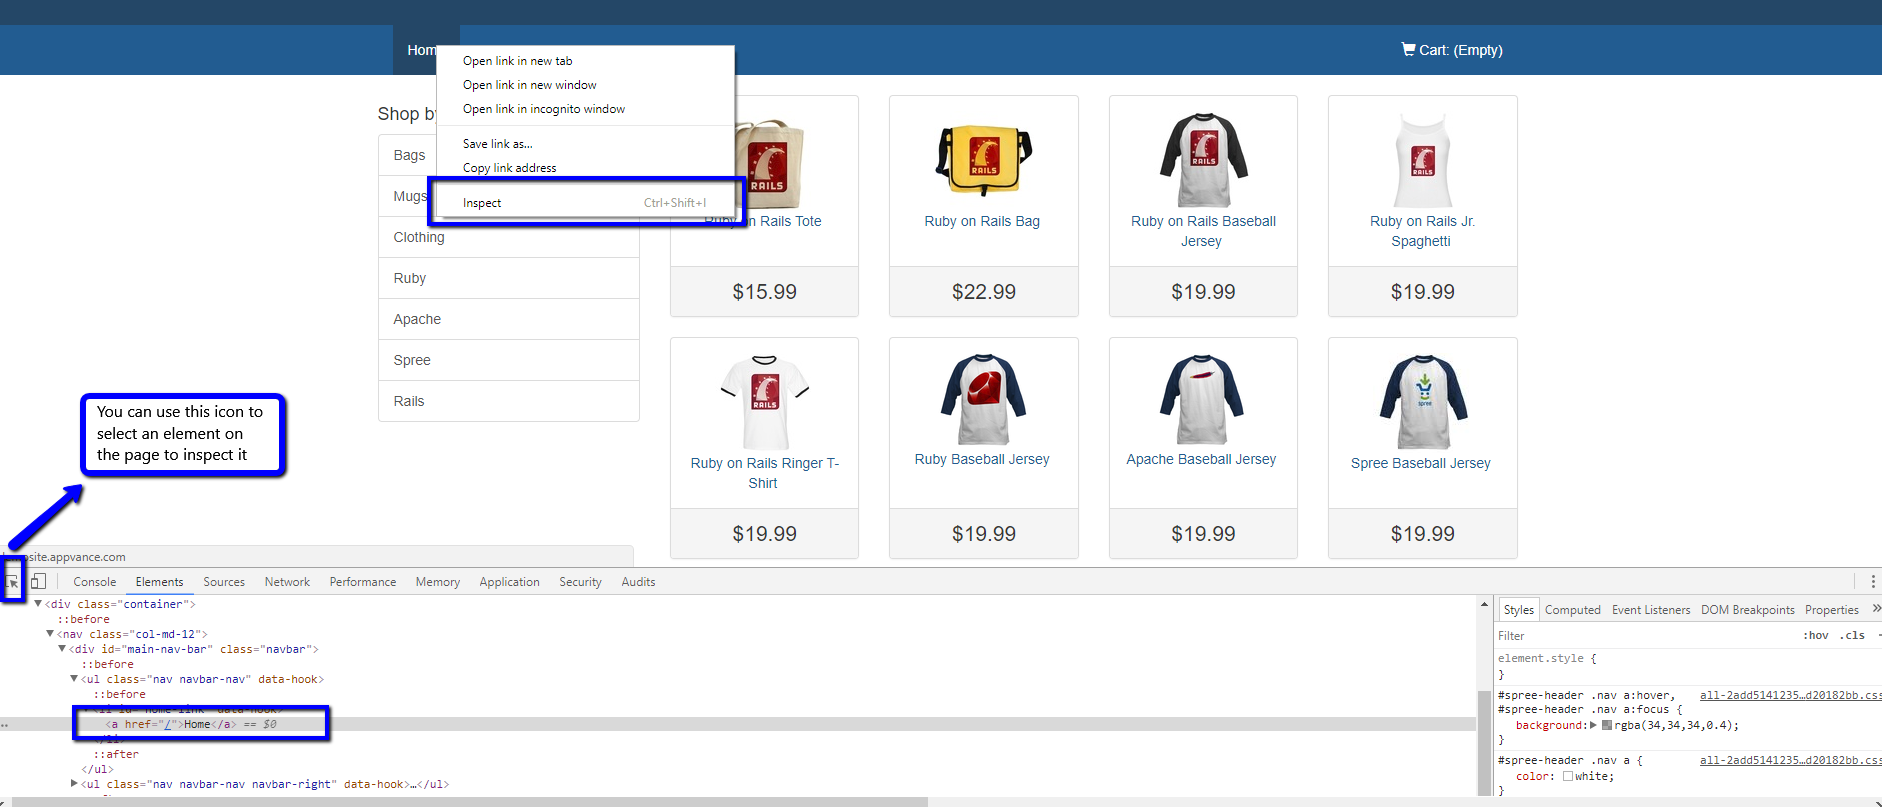
If the home link was our target element, you could check below that the valid tag for that is 'li', we could go ahead and select 'li' from the valid HTML tags. Also notice that it is a multi-select, you could choose more than one valid HTML tag.

You could also notice a + icon next to Valid HTML Tags (+), it can be used to add any new custom HTML Tag Name to the default list from your application
SmartTag Types
A SmartTag can be of different types:
-
Navigation: click the element and always navigates to the same site. For example, a home button that always redirects to the home page
-
Action: Ask the user if he wants to click it or not. For example, a button to log in
-
RadioButton: Select a radio button
-
Check: Click a check-box
-
Select: Get all the elements of a combo box
-
Form: Similar to the standard HTML form, previous inputs are expected to be filled before the form is submitted
-
Text: Detect a text field to input text
-
Menu: Display the options of a menu
-
Search: Specific type of form with only one input
-
Hover: Make a Mouse Hover above the target element(s)
-
Prop: This type of SmartTag is like "null", but it is used in parent SmartTags to create references
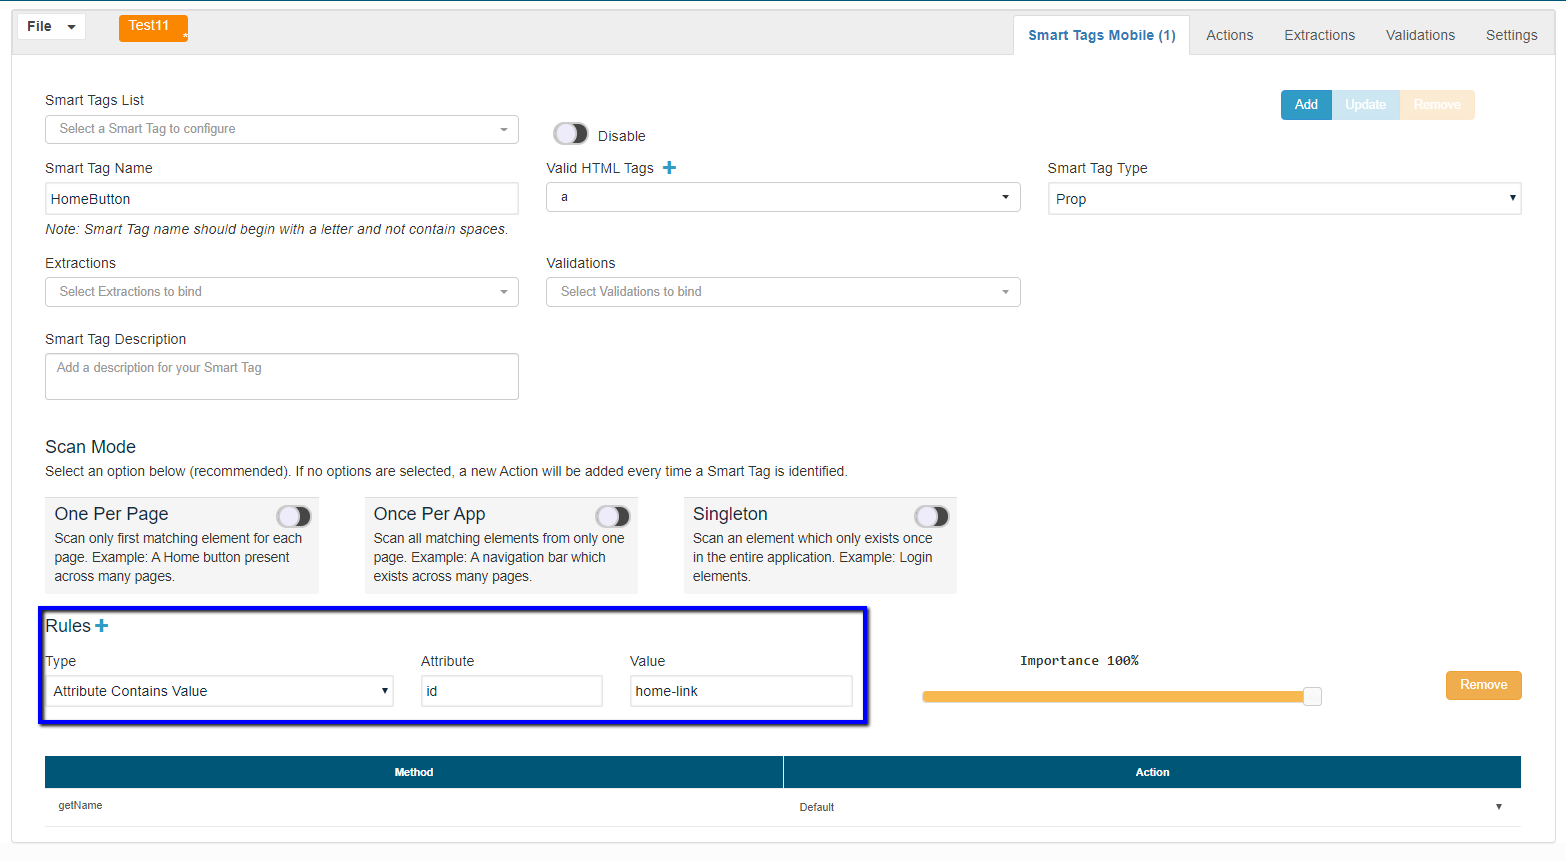
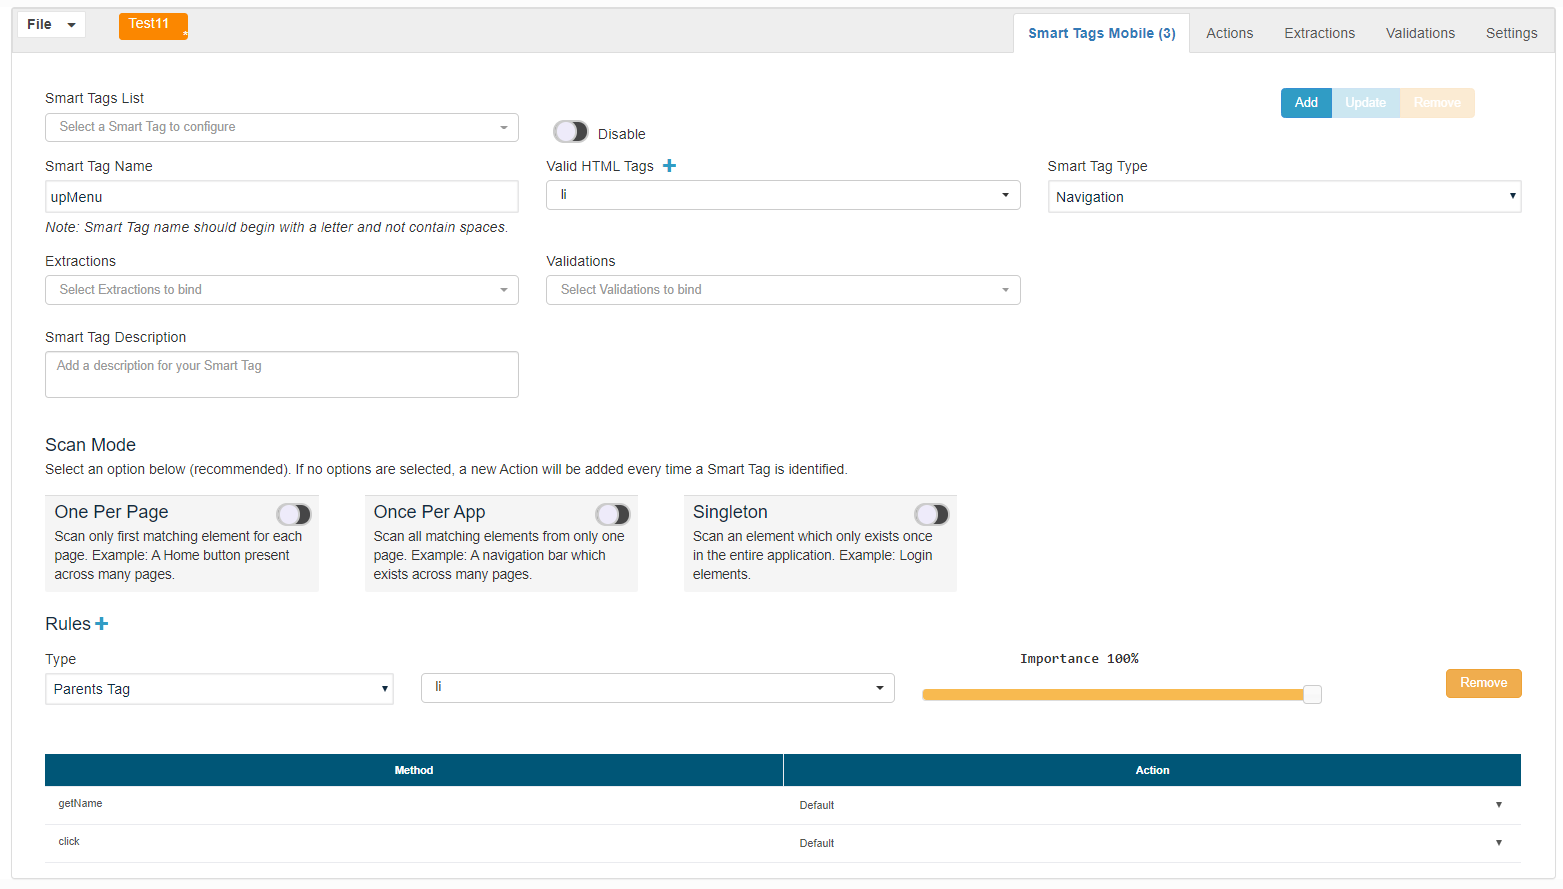
So depending on the element that you are looking for, a SmartTag Type should be chosen, for the example that we were working on, Navigation is the SmartTag Type that should be chosen (For the Home button) which navigates to a different page.
Scan Types
Scan Types are mostly used for scans that we perform in the blueprint of the application creation.
Below are the 3 options available.
Once per app:
Check this option, If many navigation actions are redirecting to the same state, this option will consolidate them into just one for the entire site this strategy will reduce the scanning time and final file size as well.
Once per page:
Checking this option would make sense in cases such as a table containing details where all the SmartTags are mostly similar, Blueprint scan will process just the first occurrence by adding the action with the $SmartTag Name, this new capability will improve the Blueprint scan process and not repeating the same actions on that page.
Singleton:
This option is used for elements that only appear one time on the page.
SmartTag Rules
The available SmartTag rule types and short descriptive take some examples for each of the SmartTag rule types that are available so it is easy to understand.
-
attrContainsValue/attrDoesNotContainValue: This is a key-value rule type, meaning that whenever you select one of these rule types you will be given two input fields, the first one is for the attribute key and the second one is for the attribute value. Please notice that for this rule type it is only required to have a key, you can add this type of rule without an attribute value, but it always has to provide a key to be a valid rule (I.E. empty HTML attributes like 'disabled').
For example, the button "Home" has the attribute "id = home-link".
-
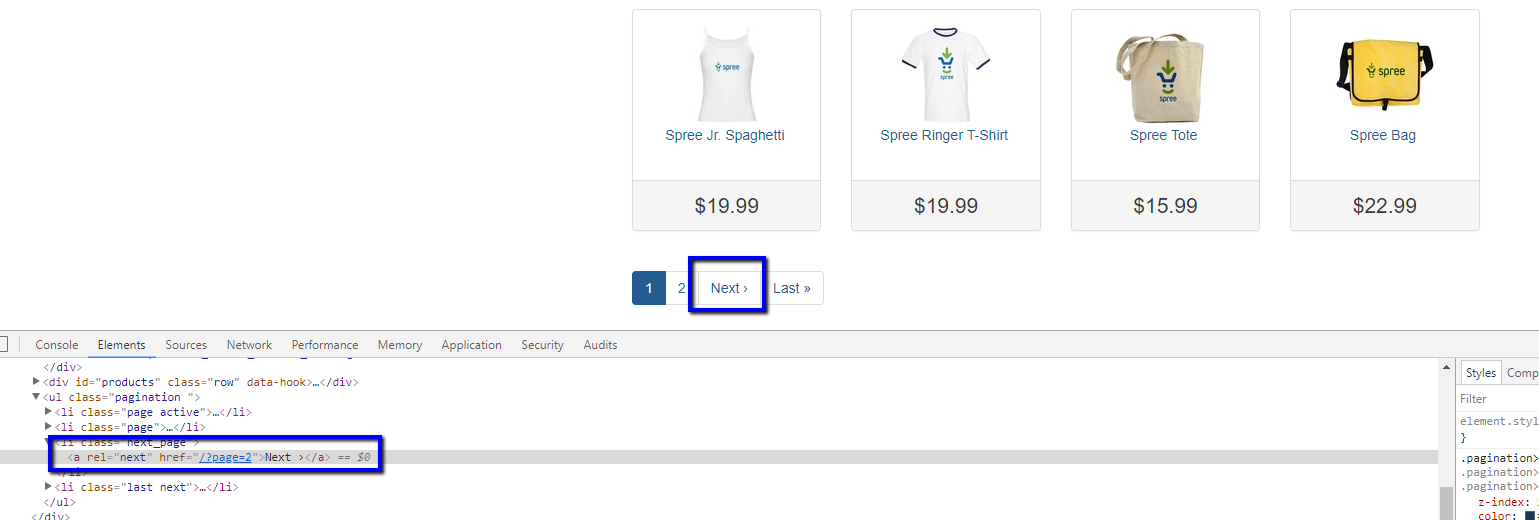
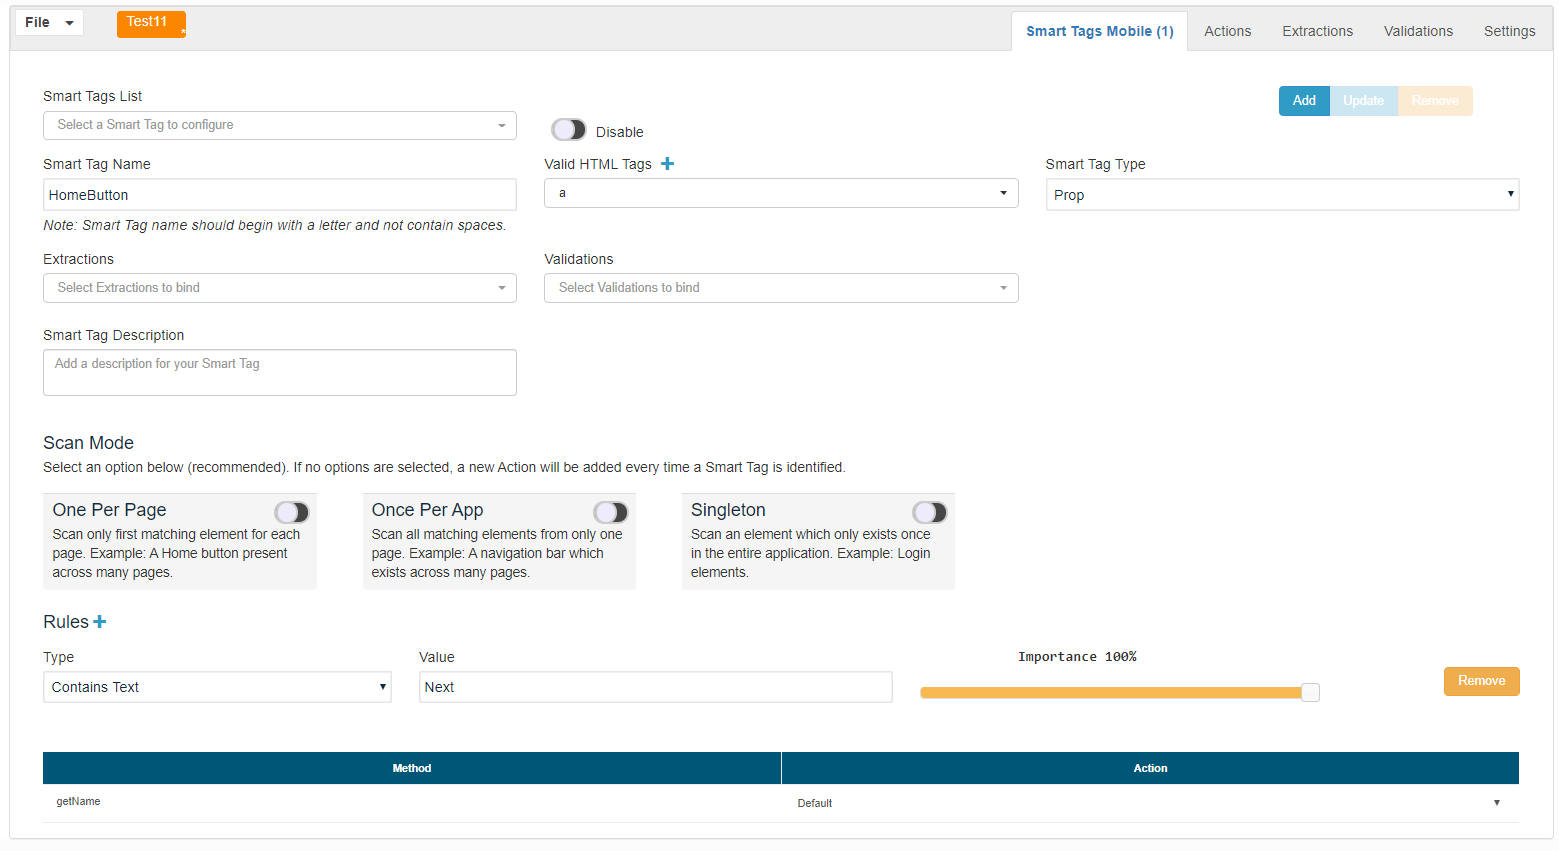
containsText: This is a text-based rule type, when you select this rule type you will be given a standard text input field, it is always required to have a value to be a valid rule.
For example, want to create a SmartTag for the "Next" button; select containsText and enter the text.
-
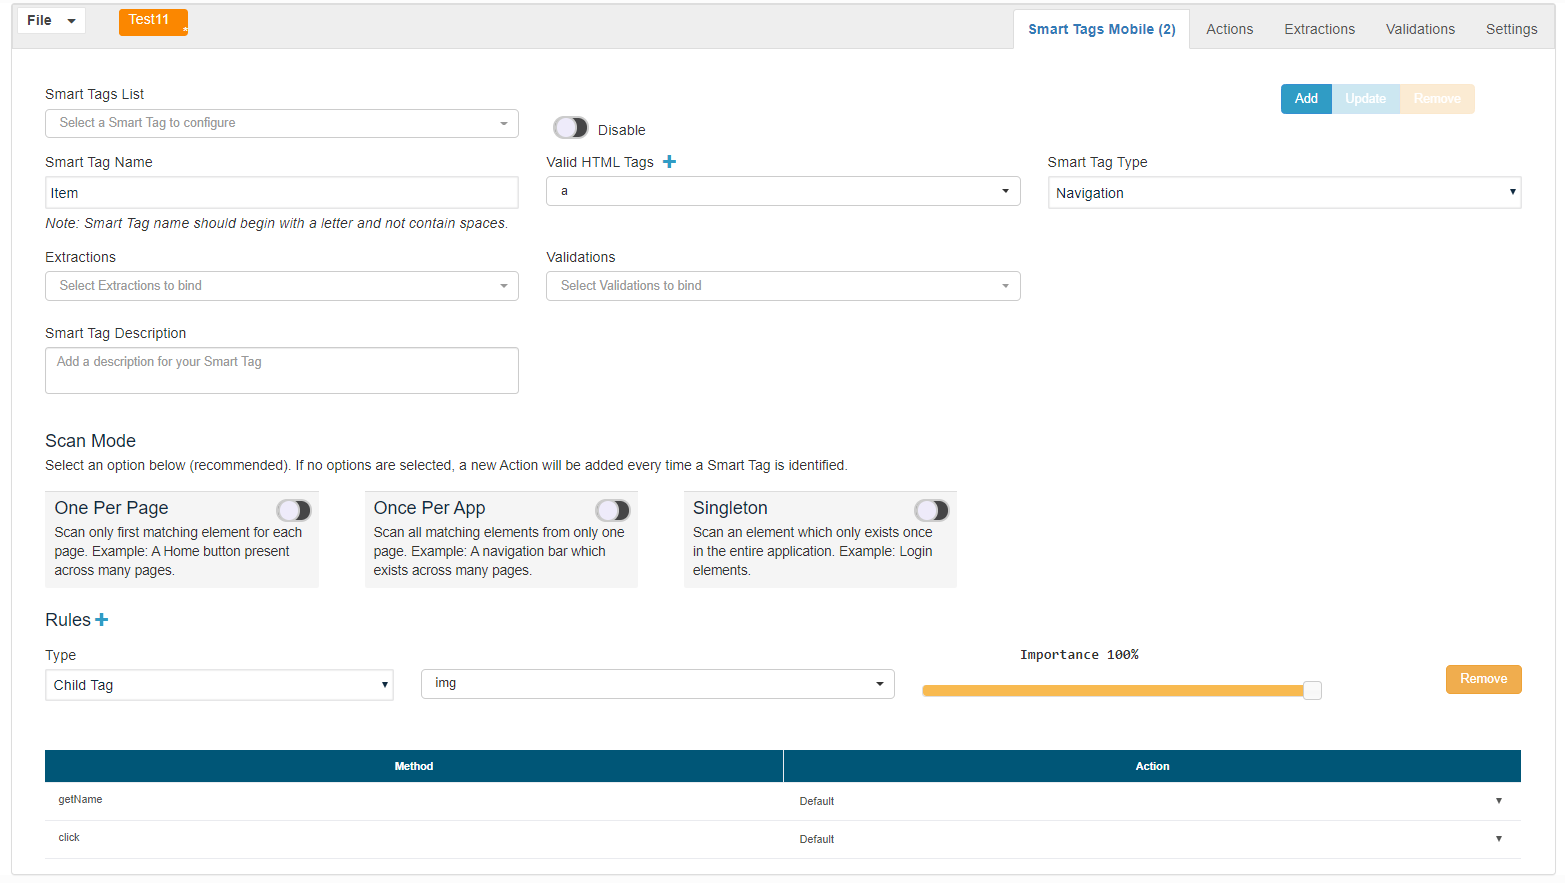
childTag/parentTag/parentsTag: This kind of rule type is bound to the available valid HTML tags list in the current context, you will be given a selector filled with the list of available HTML tags, you must always select a single valid HTML tag to be a valid rule.
For example, to create a childTag as a rule for the below-highlighted element, use the rule as mentioned:
-
parentTag: evaluate that the item has a parent with a specific tag. For example, to create a parentTag as a rule for the below element:
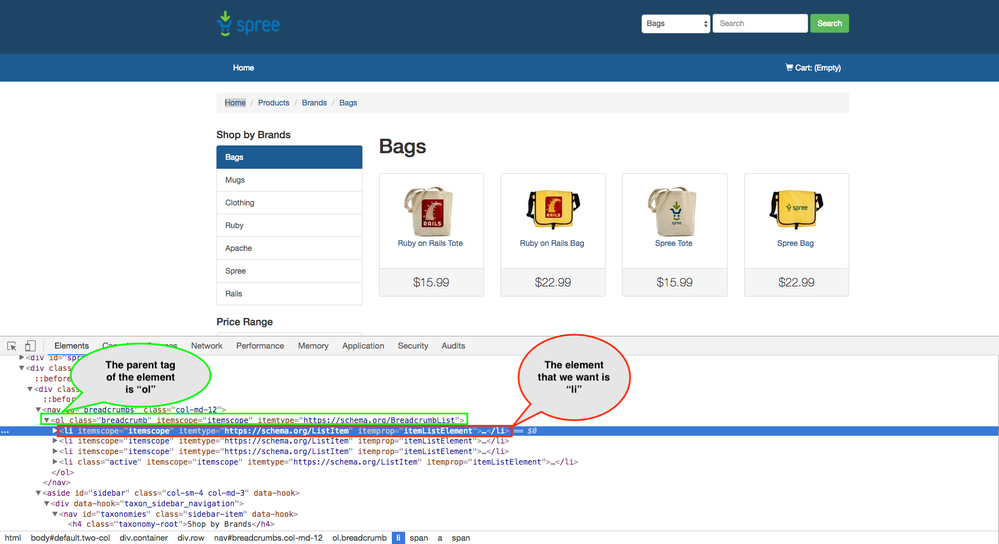
-
parentsTag: evaluate that the item has many parents tags. For example, to create a parentsTag as a rule for the below element

-
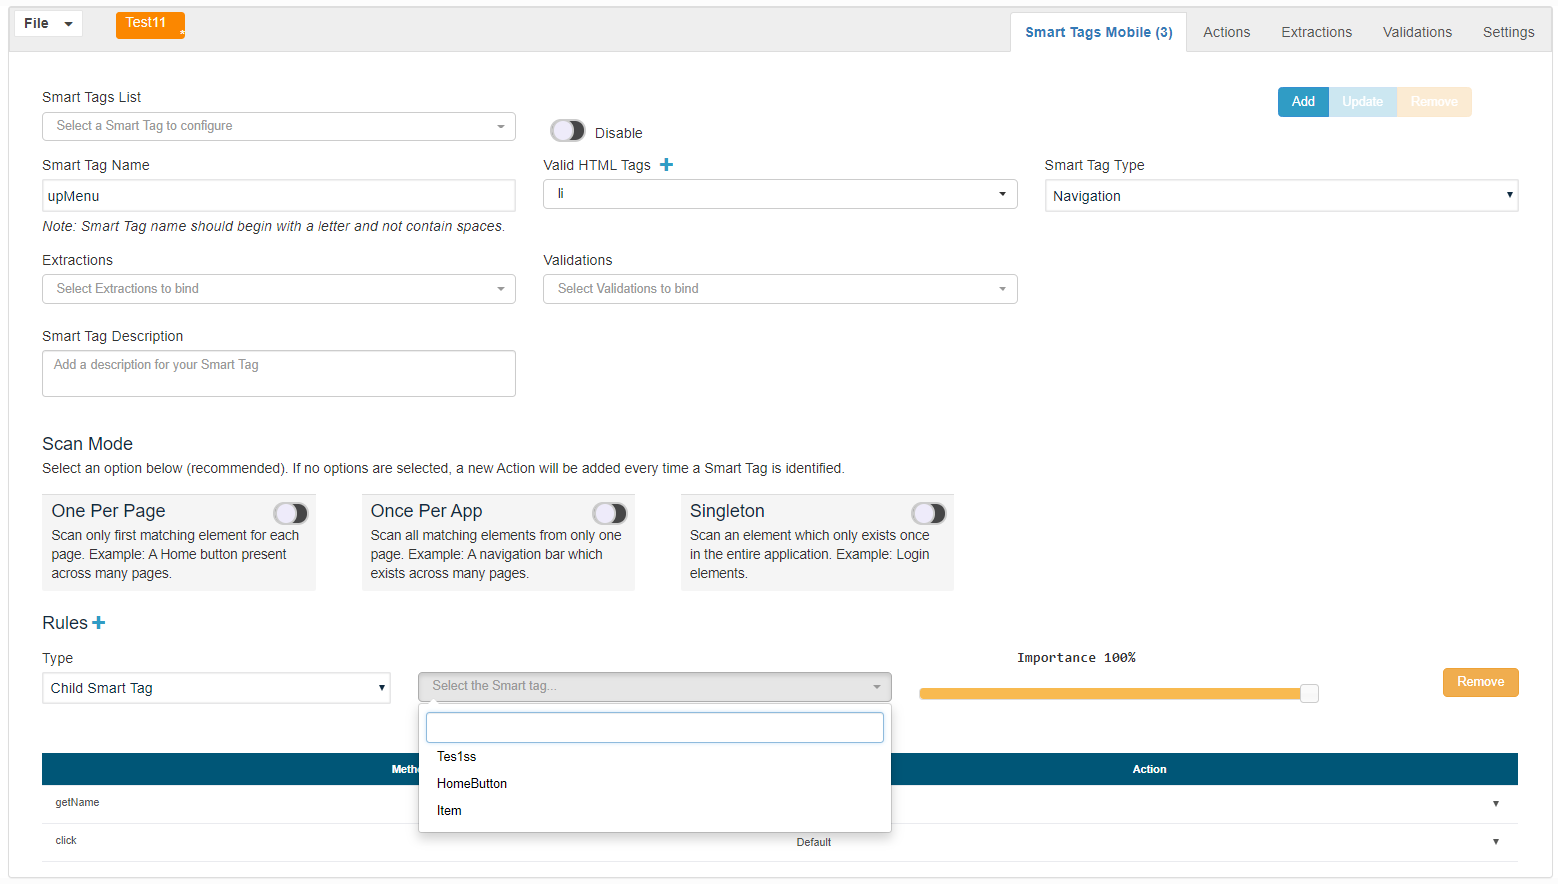
childSmartTag/parentSmartTag/parentsSmartTag: These kinds of rule types are bound to the available SmartTags list in the current context, you will be given a selector filled with the list of available SmartTag created so far. You must always select a single SmartTag to be a valid rule.
Try SmartTags in JavaScript/Test Designer
Now we know how to create SmartTag for different elements of the web page and other uses, now it is time to create some JS scripts using those SmartTags that we created.
For the application, http://demosite.appvance.com , we created 2 SmartTags for the products and the Shop by Brands left menu as highlighted below.
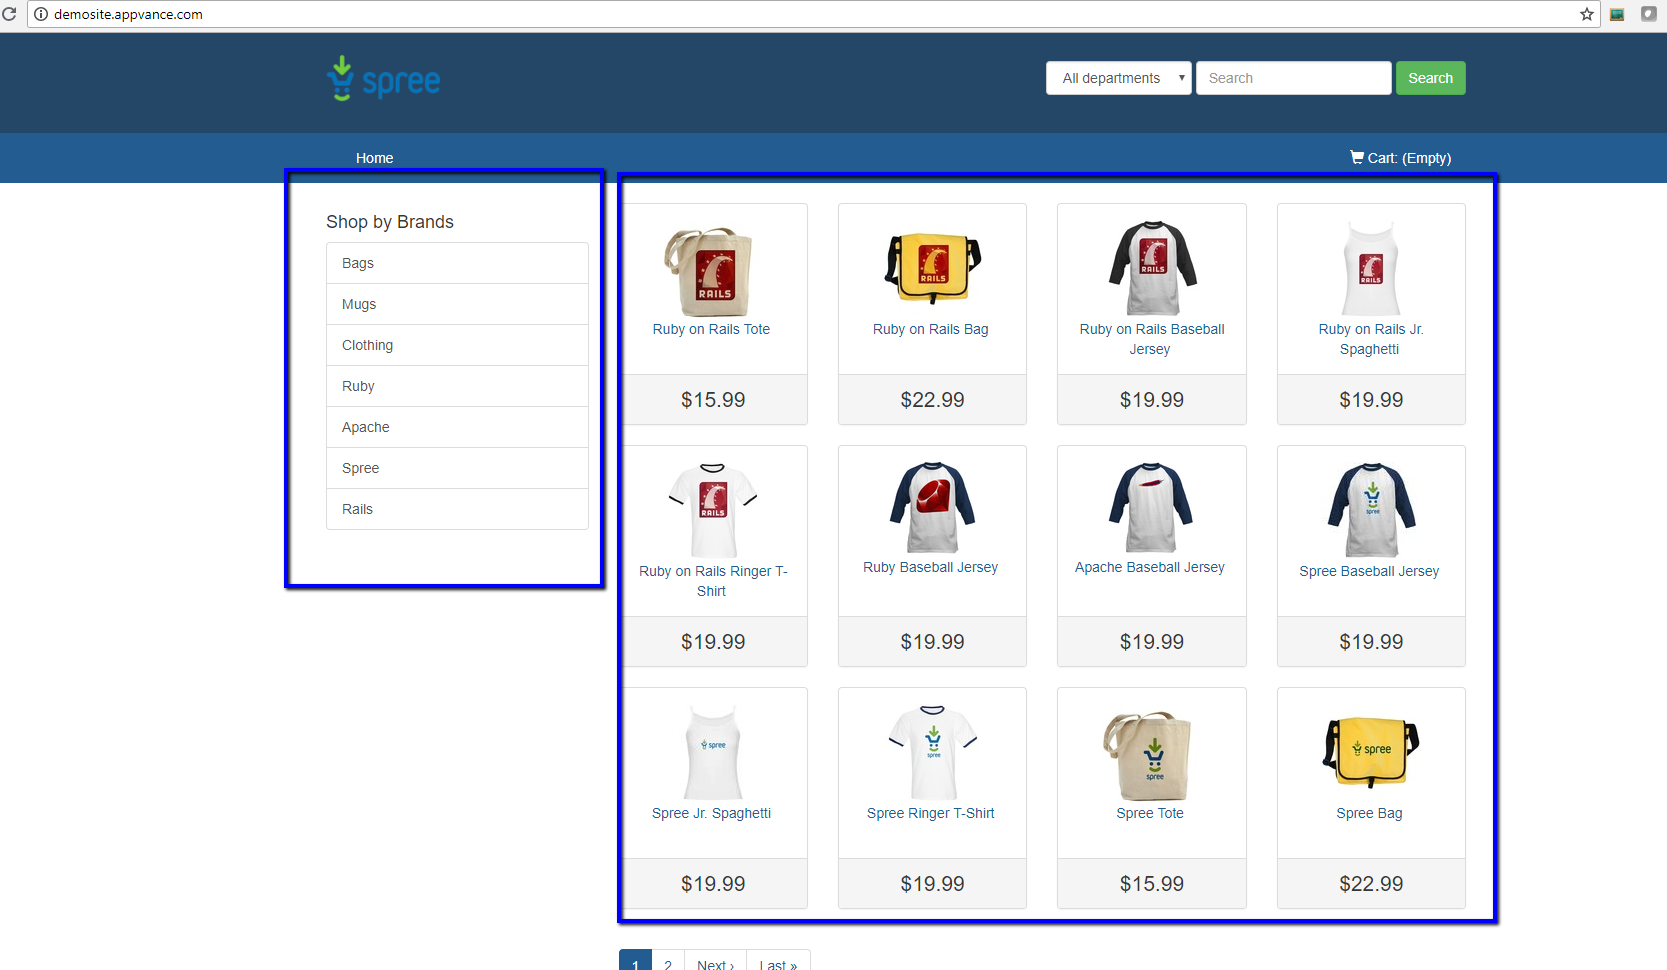
SmartTags created are shown below:

Useful blueprint custom action examples
-
GetName Custom Actions
Get element text including the text of its children nodes.
return ds$(element).text();
-
Get only the current node element text.
This action does return the current element node text without adding the text of its children nodes. If you apply this to a SmartTag that targets a span(“Yes“), this will make sure your SmartTag only focuses on the actual span that has the “Yes” text and not on its span’s parents.
Copyreturn ds$(element)
.clone() //clone the element
.children() //select all the children
.remove() //remove all the children
.end() //again go back to selected element
.text(); -
Get the element name from one of the element’s attributes
The following template can be used to set a general getName function that checks for an attribute to get its value, but if it does not have that attribute then it tries with another one. Modifying the code can change the order in which the attributes get fetched or add more attributes.
Copyvar htmlElement = ds$(element);
var name = htmlElement.attr('id');
if (typeof name === 'undefined') {
name = "";
}
if (name === "") {
name = htmlElement.attr("value");
}
if (typeof name === 'undefined') {
name = "";
}
if (name === "") {
name = htmlElement.attr("name");
}
if (typeof name === 'undefined') {
name = "";
}
if (name === "") {
name = htmlElement.attr("placeholder");
}
if (typeof name === 'undefined') {
name = "";
}
if (name === "") {
name = htmlElement.attr("data-ref");
}
if (typeof name === 'undefined') {
name = "";
}
if (name === "") {
name = htmlElement.text();
}
if (typeof name === 'undefined') {
name = "";
}
return name.trim();
-
Set Value
return ds$(element).val(params);
-
Set Value and Enter
return _ds.setValue(element, params + '{{ENTER}}');
-
Do a fake MouseOver ( used for some menus)
ds$(element).parent().find('div > ul').show();
// where there is a div, and it has hidden child ul
-
Get Element from a Custom Select ( For application based on complex frameworks)
// This is an example using bootStrap
// array hint should be defined as "array" (without quotation marks)
var selectValues = [];
ds$(element).find('a').each(function(idx, theElement){
selectValues.push($(theElement).text().replace(/\n|\r/g, "").trim());
});
return selectValues;
-
Set Select Element from a Custom Select ( For application based on complex frameworks)
Copy// This is an example using bootStrap
// array hint should be defined as "[]" (without quotation marks)
var found = false;
// params
ds$(element).find('a').each(function(idx, theElement){
var theElementText = ds$(theElement).text().replace(/\n|\r/g, "").trim();
if (params === theElementText && !found){
found = true;
//theElement.click(); // method 1
//ds$(theElement).click(); // method 2
// _ds.click(element); // method 3
}
});
return found;
-
Click to Show the list of elements inside a Custom Select (For applications based on complex frameworks)
return ds$(element).click();
-
Remove any new line character from the returned variable, in this case is "name"
When creating SmartTag libraries, for the case of returning a name for SmartTags, please include this in the return ( if needed, otherwise please skip it):
Copyreturn name.trim().replace(/(\\r\\n|\\n|\\r)/g,\"\");
var name = ds$(element).text();
if (name === ""){
if (ds$(element).hasAttr('data-component-id')){
name = ds$(element).attr('data-component-id');
}
if (ds$(element).hasAttr('id')){
name = ds$(element).attr('id');
}
}
if (typeof name !== 'string') {
name = "";
}
return name.trim().replace(/(\r\n|\n|\r)/g,"");