Introduction
Usually, validations in the realm of scripting are very limited. The process is normally several actions, then validations, then actions.
That is standard and also a good approach, but as applications grow bigger, these “dot” validations don’t suffice as there could be several other places that behave incorrectly during the script but it was not detected, or just detected by one test case and then overlooked.
These kinds of issues could be detected by a human easily but were hard to address by automated scripts.
To increase the power of issue detection during scripting, Appvance created Validation Workbench which does “extra” validations during Scripting/Blueprinting.
These extra validations consist mainly of 5 elements
-
A name of the validation (For reporting)
-
If the validation is enabled
-
When the validation should be triggered
-
The execution (body) of validation
-
Type of validation (PASS/FAIL) a PASS validation will succeed if the execution succeeds. A FAIL validation will fail if the execution succeeds
So a single script with only 10 lines of codes, and 1000 validations, after every action (click, setValue, type, setSelected, etc.), will check how many of the 1000 validations should be evaluated, and if they should, it will process it automatically.
This enhances the power of the script without affecting its readability/size.
Appvance provides 2 ways of creating validation, through the Validation Workbench & using a CSV file.
Validations Workbench is a Test Designer submodule in which you can create and modify more structured and personalized validations, verifying automatically if validations are successful, failed validation. Validations workbench uses a trigger as a condition to run the validation.
This validation workbench is not related to any SmartTags or it is not related to (independent of ) any Test Designer script, Test Designer step, Scenario Editor, Scenarios, checkpoint tab in Test Designer, etc.
Created validations can be used in Test Designer scripts which can be triggered automatically and also the validation workbench can also be used in AI Blueprinting.
In simple terms, it works this way:
-
Where to look
-
What to do there
-
What is the pass or fail criteria
The Validation Workbench has a .valid extension.
Navigation
-
Login to AIQ as Admin or a User
-
Expand the Test Designer Section
-
Click Validation Workbench
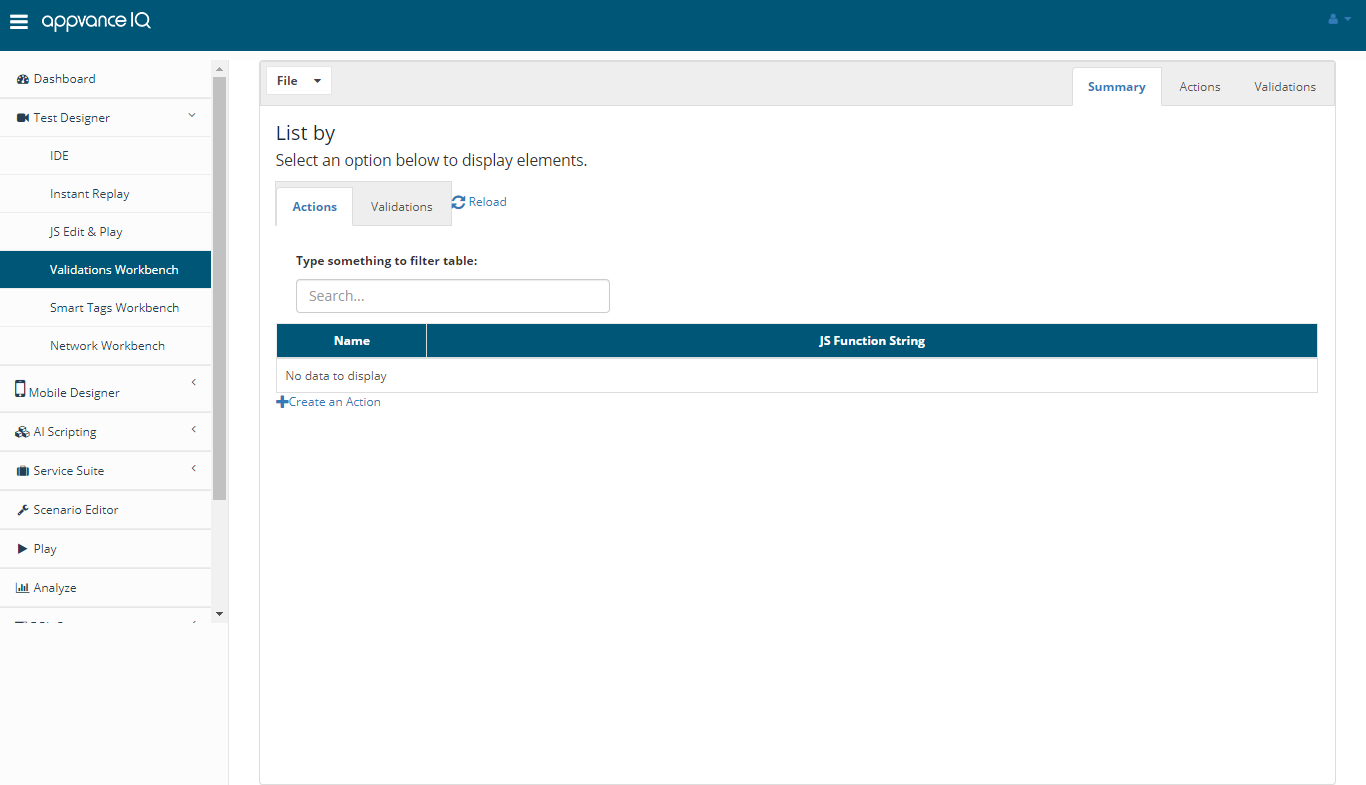
Validation Workbench and Options
Summary
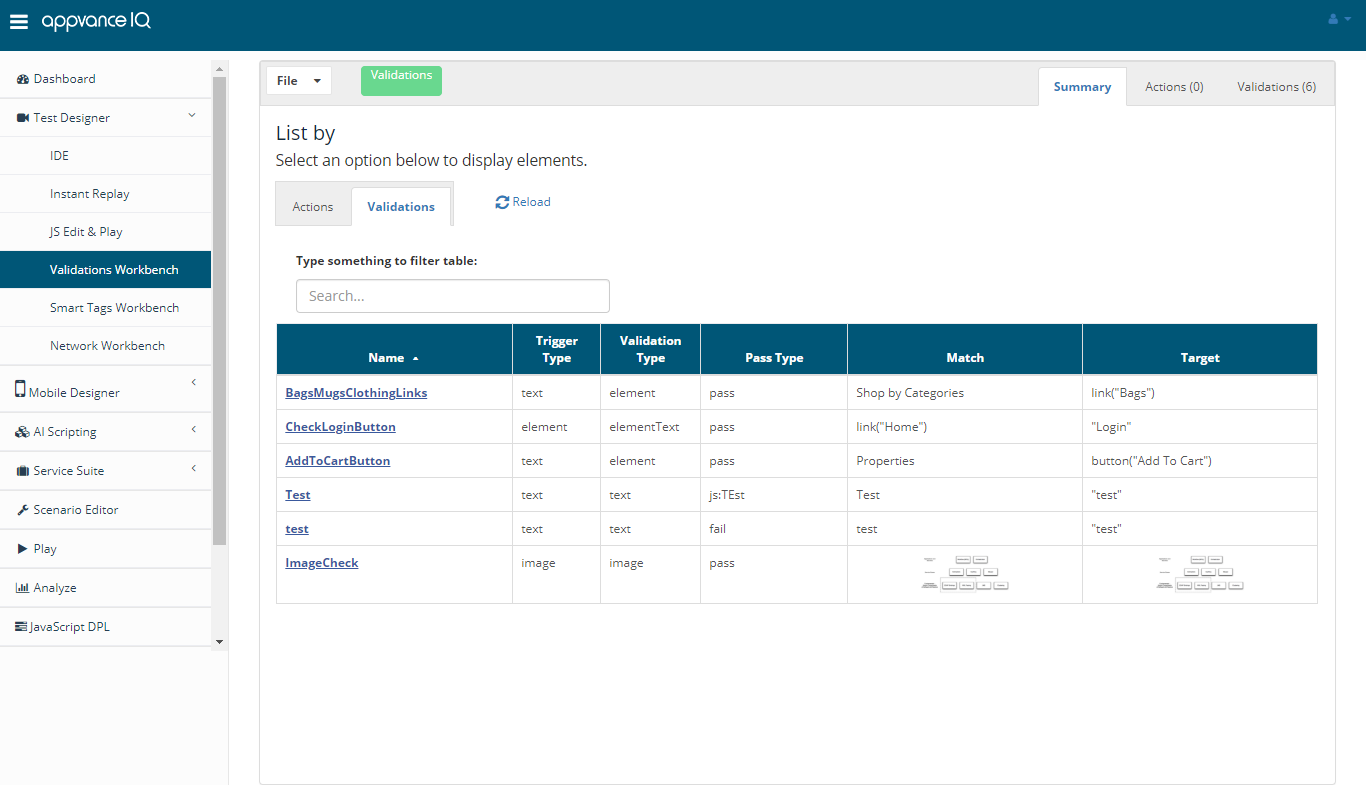
The summary tab will give the overall view of the defined validations and Actions in a tabular format with the Name, Trigger Type, Validation Type, Pass type, Match, and Target.
Clicking these names will directly take you to the defined Action or Validation.
You can also sort columns, Search and use reload to refresh the list.
Actions
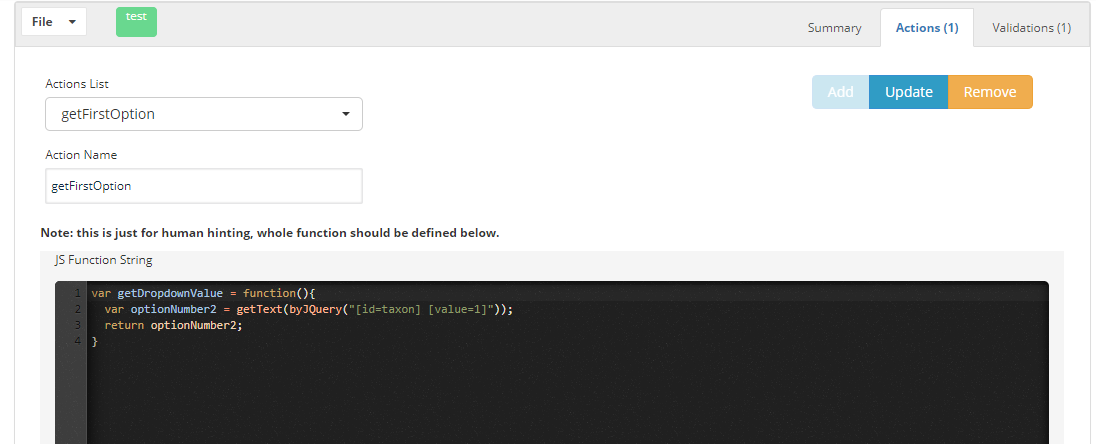
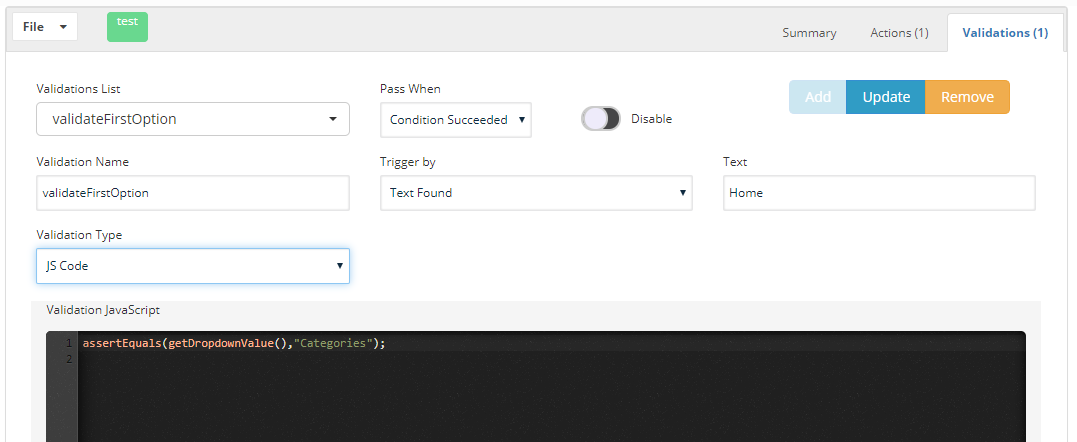
In the Actions Tab of the validations, you would be able to create javascript functions to get values. You would be able to get values from request, extract text, etc and store it in a variable. Then you can use that variable in the Validations tab.
Example below:
Validations
The validation tab is where the validations are defined and saved. Below you will see all the possible validations that can be defined and triggered.
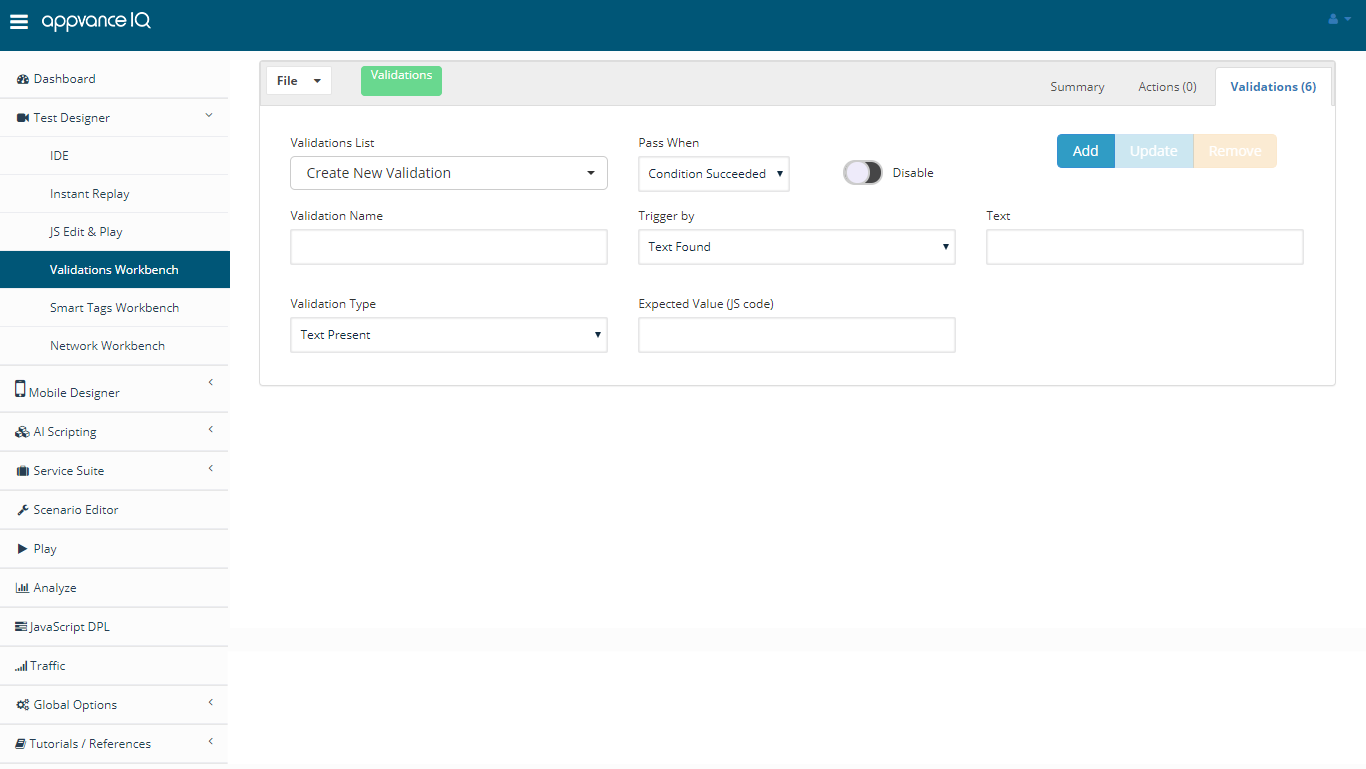
Validation Name: Provide any meaningful name to define the name of the validation, in Test Designer scripts or AI, the validation names are the reference that would be displayed, even in the logs of the Test Designer script, validation names would be displayed when they are triggered and evaluated.
Pass When:
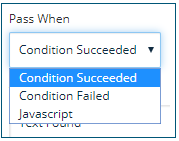
There are 3 options,
-
Condition Succeeded: When this is chosen, we are telling the validation should be succeeded when the condition defined is true
-
Condition Failed: When this is chosen, we are telling the validation should be succeeded when the condition defined is false
-
JavaScript: When this is selected, a text box will be displayed, this will receive a parameter that is defined from a CSV file (DPL). To use this, there should be a CSV file created with some data.
This option is a combination of both Condition Succeeded and Condition Failed. A variable is defined which gets the value from the CSV file from the Test Designer IDE and if it's passed, it will work as Condition Succeeded, else if the condition fails, it works as Condition Failed.
Below is one example of how this works:
Here is a Test Designer script that logs in to AIQ and based on whether the logged-in user is an admin or a user, a validation of license link is triggered.
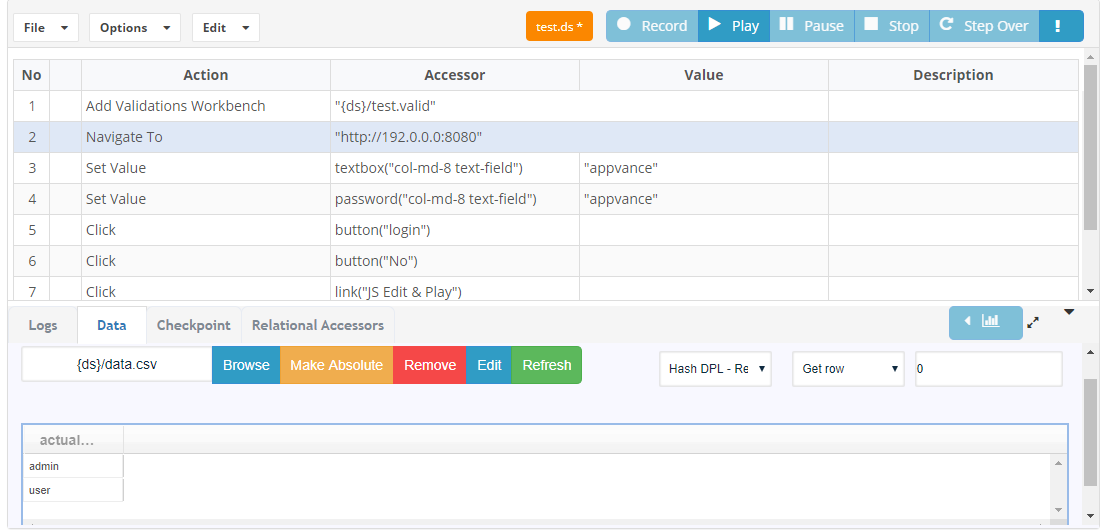
As you notice that the CSV file has entries admin and user, this data is passed to the validation workbench as shown below.

In the example, if you notice Pass when, the text box next to it is defined as - $actualUser==='admin'?'pass':'fail'
When the value passed is admin, the $actualUser will get the value as admin, which means the condition is true, and based on the validation defined if it finds the text 'Admin Options' it will check for the locator 'link("licenseLink")'
Similarly when the value passed is user, the $actualUser will get the value as 'user', which means that the condition is false, and based on the validation defined, it works as Condition failed, and the validation would be triggered when the Text 'Admin Options' is found and the validation triggered would be to check if 'link("licenseLink")' does not appear on the page.
Enable and Disable option:
You can enable or disable validations using this toggle, the disabled validations will not be used or triggered in Test Designer or AI Blueprinting.
Add and Delete:
Add button is used to add the validations after filling or choosing values from the drop-down.
The delete button is used to delete the validation chosen.
After making any changes, it is required to save the validation file to take the updates.
Trigger By
There are 9 possible ways of triggering the validations
-
Static Text Found: When trigger by is chosen to be Text Found, the trigger is activated as soon as it finds the provided Text in the Text Field next to the Trigger by option (As soon as the text is found in the application being tested);

-
Image Found: When this option is chosen, the user is presented with the browse option to browse the image file, the trigger is activated when the browsed image is found on the application under test

-
Element Found: With this option, the trigger would be activated based on the Locator chosen, the locator is something that can be copied from a Test Designer script, once the locator is found in the application under test, this trigger would be activated for the validation

-
JS returns true: Choosing this option, a JS call can be written in the console, the trigger will be activated when the JS code returns true

-
Manual Call: With the Manual Call trigger selected, you have to specify the validation manually in Test Designer scripts, Else this validation will not be triggered
-
Quick Example Below:
ManualTriggerCheck is the validation name that is used in the below Test Designer example

-
-
Always: This trigger would always be activated for all the steps and for all the paths that the AI blueprint takes, and there could be validation failures when the validation is not found and the trigger is always.

-
JS Text Found
Validation will get triggered if the result of a JS expression is found on the web page / mobile app
-
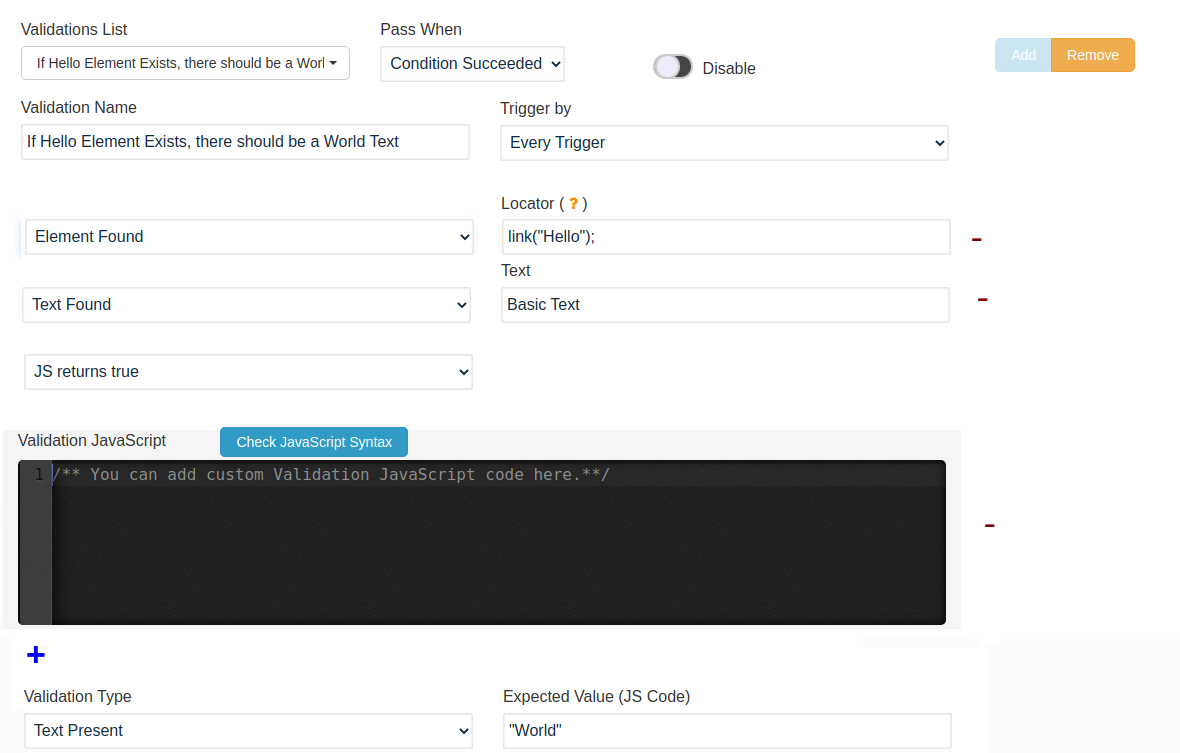
Every Trigger
This validation will only get triggered if every sub trigger succeeds.
Valid options for sub triggers are Element Found, Static Text Found, JS Text Found, and JS returns true.
You can add and remove sub triggers with the + and - signs respectively
-
Any Trigger
This validation will get triggered if at least one trigger succeeds.
Valid options triggers are Element Found, Text Found and JS returns true.
You can add and remove triggers with the + and - signs respectively.
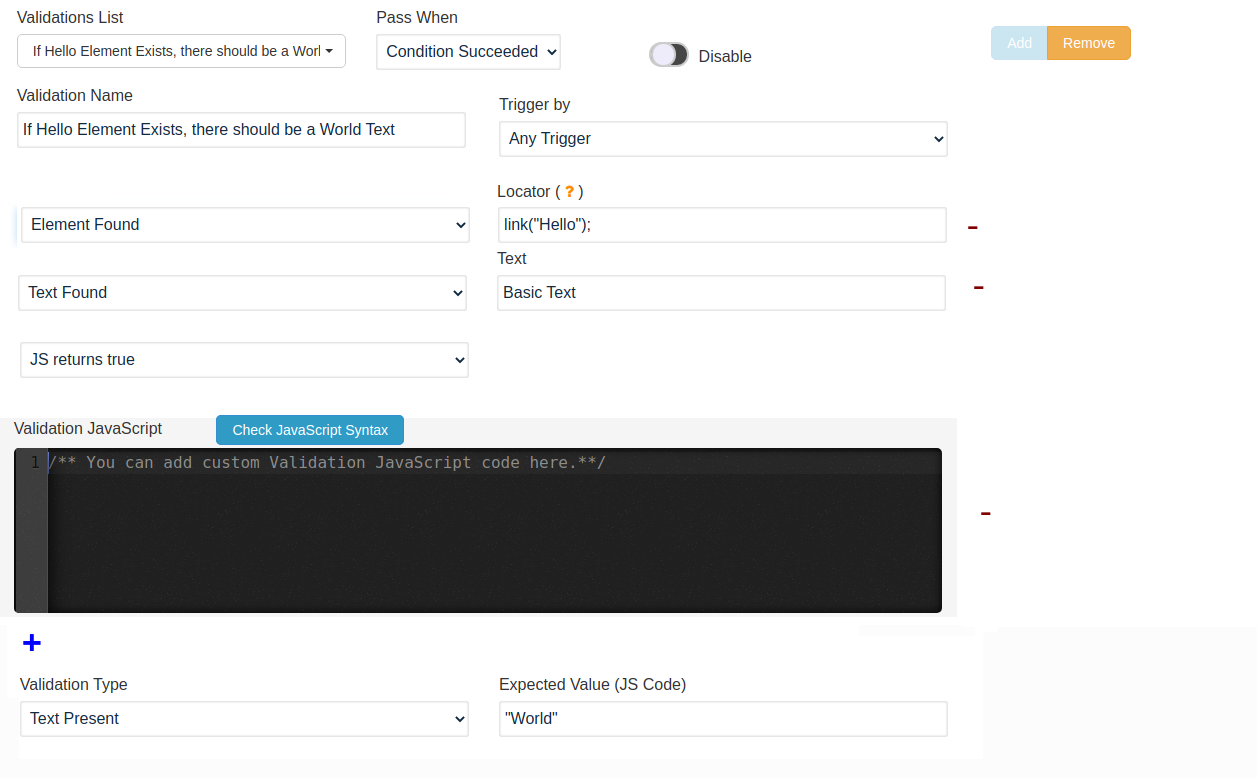
Some options should be chosen with care.
Validation Type:
There are 5 Validation types described below.
-
Text Present: Text Validation is done when this validation type is chosen, you will have to provide the Expected text value, as this is JS code, the expected value should be written in quotes.
The values can also be driven from the CSV sheet, an example in Driving Validation from CSV will show the usage and syntaxes.

-
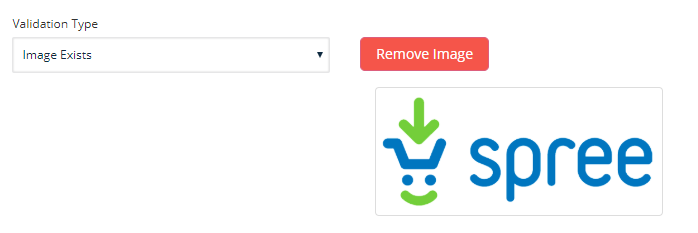
Image Exists: This will validate whether the browsed image is available on the application under test
-
Text Present in Element: Text Present in Element will look for the text in the locator, the locator follows the Test Designer syntax
The Expected value is a text that should be mentioned in double-quotes since the expected value is in JS Code, Expected value can also be driven from a CSV file

-
Element Exists: This is a simple Element that Exists on the page validation, much like an asset that exists in Test Designer, it follows the same syntax as in the Locator field

-
JS Code: This option allows you to write a JavaScript code to elaborate a more structured and personalized validation
Adding Validations with multiple locators of the same object
There could be instances where a single object on the page would want to be referenced by multiple accessors like an AND condition to meet the criteria, below are some examples to define multiple locators for the same object.
-
byJQuery("span[class=info][title='Ruby on Rails Bag']")
The above approach is by using JQuery, class, and title of the object are used to refer to the same object.

-
span({"className":"info","title":"Ruby on Rails Jr. Spaghetti"})
This method again uses className and title to refer to the same object.

File Management
-
File > New: This option is used to create a new validation file, if you already have a validation file open that is not saved, File > New will ask to save the file and then let the user create a new one.
-
File > Open: This option is used to open an already saved validation file that has at least one valid validation added. Validation file has .valid extension
-
File > Save: This option is used to save the validation file either locally or in the configured repository, if the file is being saved the first time, this behaves like the Save As option.
-
File > Save As: This option can be used to save the already saved file in a different location.
When the file is saved, the file name would be displayed in green, if there are changes in the file name would be shown in Orange, and after saving the file, it will change the color to green.
Validation Workbench in Test Designer
Let's start by creating some of the examples:
An application that is picked for example is our https://demosite.appvance.com
-
Example 1: Checking for the Login button based on the Home link available.

You will have to save the defined validation file.
Go to Test Designer
Right-click and add an empty step.
Choose the Action to be "Add Validation Workbench" - Browse the saved validation file.
From the 2nd step, right-click and do record from here to record your script.
Or if you already have a script, you can add the first line to browse the validation workbench and save the Test Designer script.

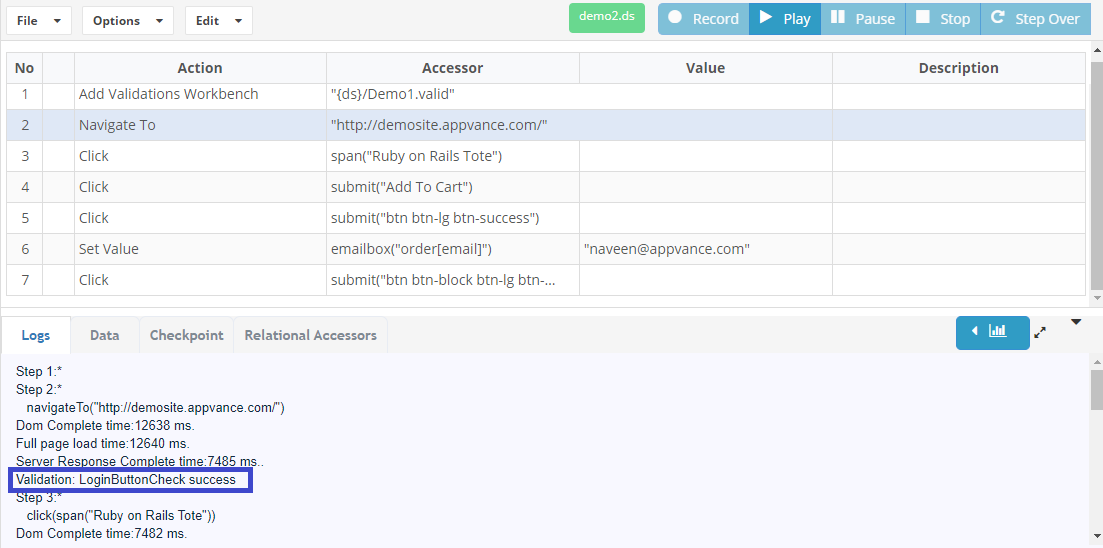
As you can notice in the below screen-shot, the validation would be automatically triggered as soon as the script finds the Locator "link("Home")" and it validates looking for "link("Login")"and the validation would be successful when the element is found else the script would be failed with the message saying the validation was unsuccessful.
-
Example 2: Trigger by Text and Validation Type Text

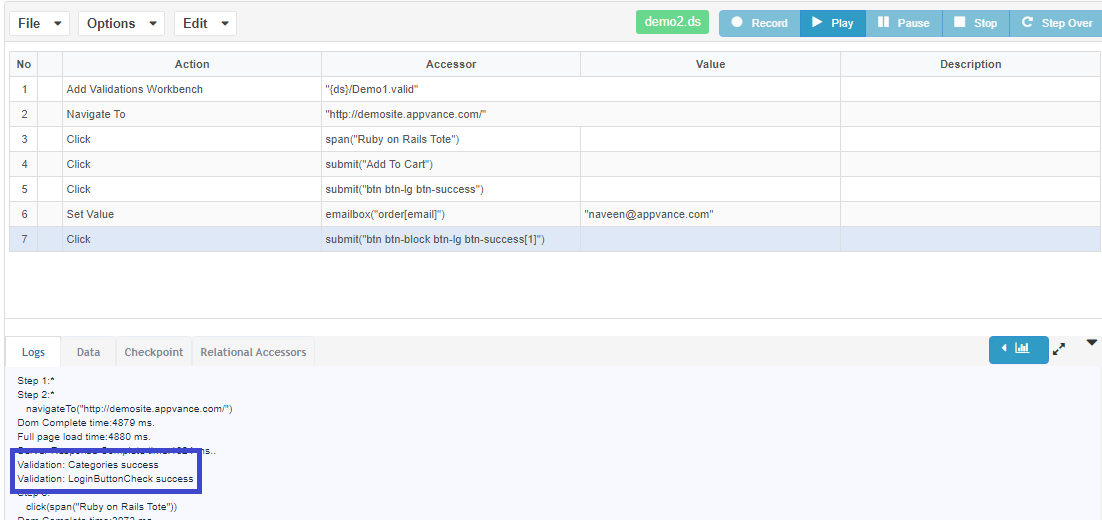
In this example, the validation would be triggered when the text "Shop by Categories" is found in the application and the validation would be to check if the text "Bags" is available".
Below the Test Designer script, you will also notice that all the applicable validations would be triggered and executed as well, in this case, both example 1 and example 2 validations were triggered in the same step and were executed.
-
Example 3: Triggering by image and validating the text
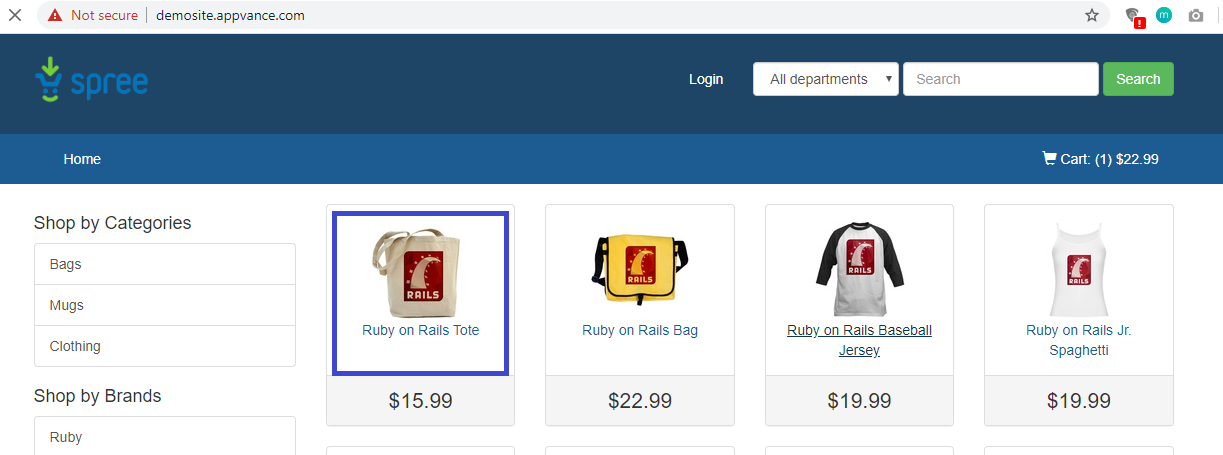
The below example shows how the image is being browsed and the validation is done.
In Test Designer, the full-screen screenshot is taken as well when the trigger is activated and the validation is done.
-
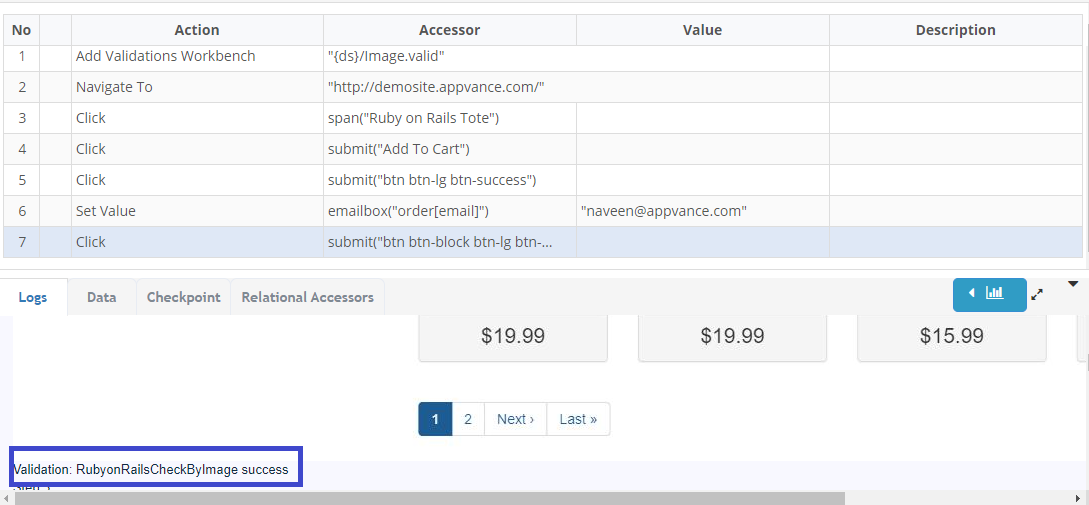
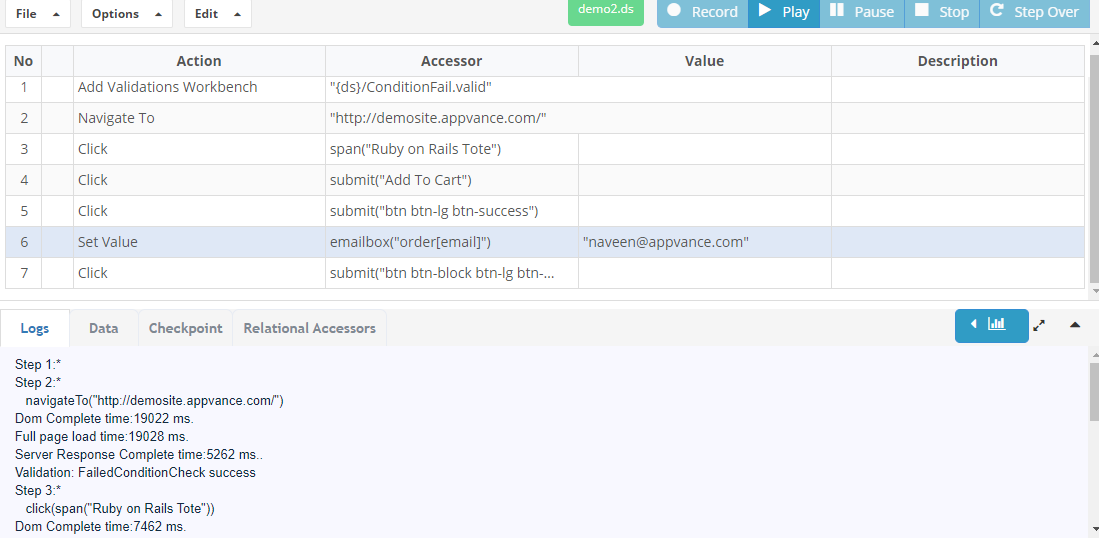
Example 4: Pass When Failed Condition
Below is another example where we could make sure a locator or image or text or a JS is not present in the application, for which this condition could be used to trigger and make sure the image or locator or text is not present in the application under test.

-
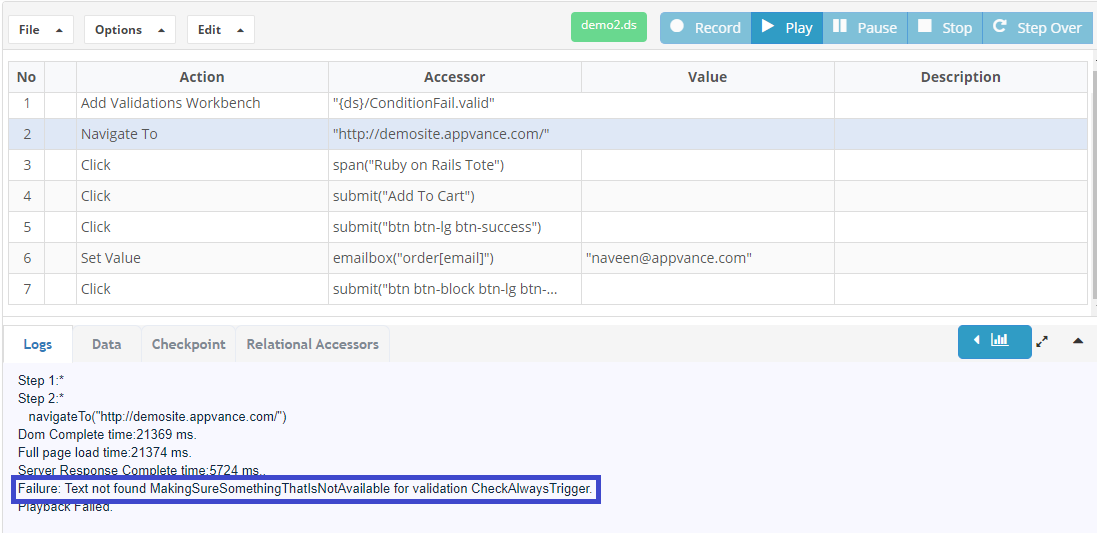
Example 5: Trigger Always

This example will show you the trigger by always, which will trigger the validation for all the steps.
Driving Validations from a CSV
The below example shows you how the validation data can be passed from a CSV file.
This example is using the JIRA system and triggers the validation of the priority passed based on the mentioned Text.

The $Priority that is defined in the validation workbench will use the value from the CSV sheet that is browsed by the Test Designer.
Validation Workbench in AI Blueprinting
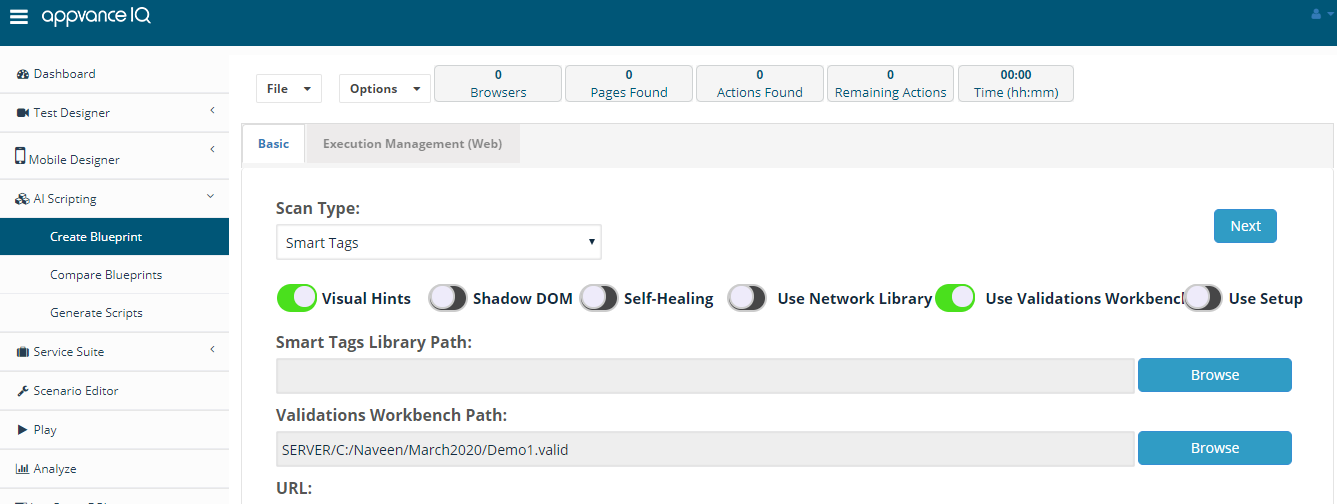
To use validation workbench in AI Blueprinting and perform automatic validations.
-
Go to Create Blueprint under AI Scripting
-
Choose Web
-
Choose the Scan Type and Enable Use Validation Workbench option
-
Browse the validation file (.valid file)
-
Rest would be similar steps as to how the blueprint is generated
-
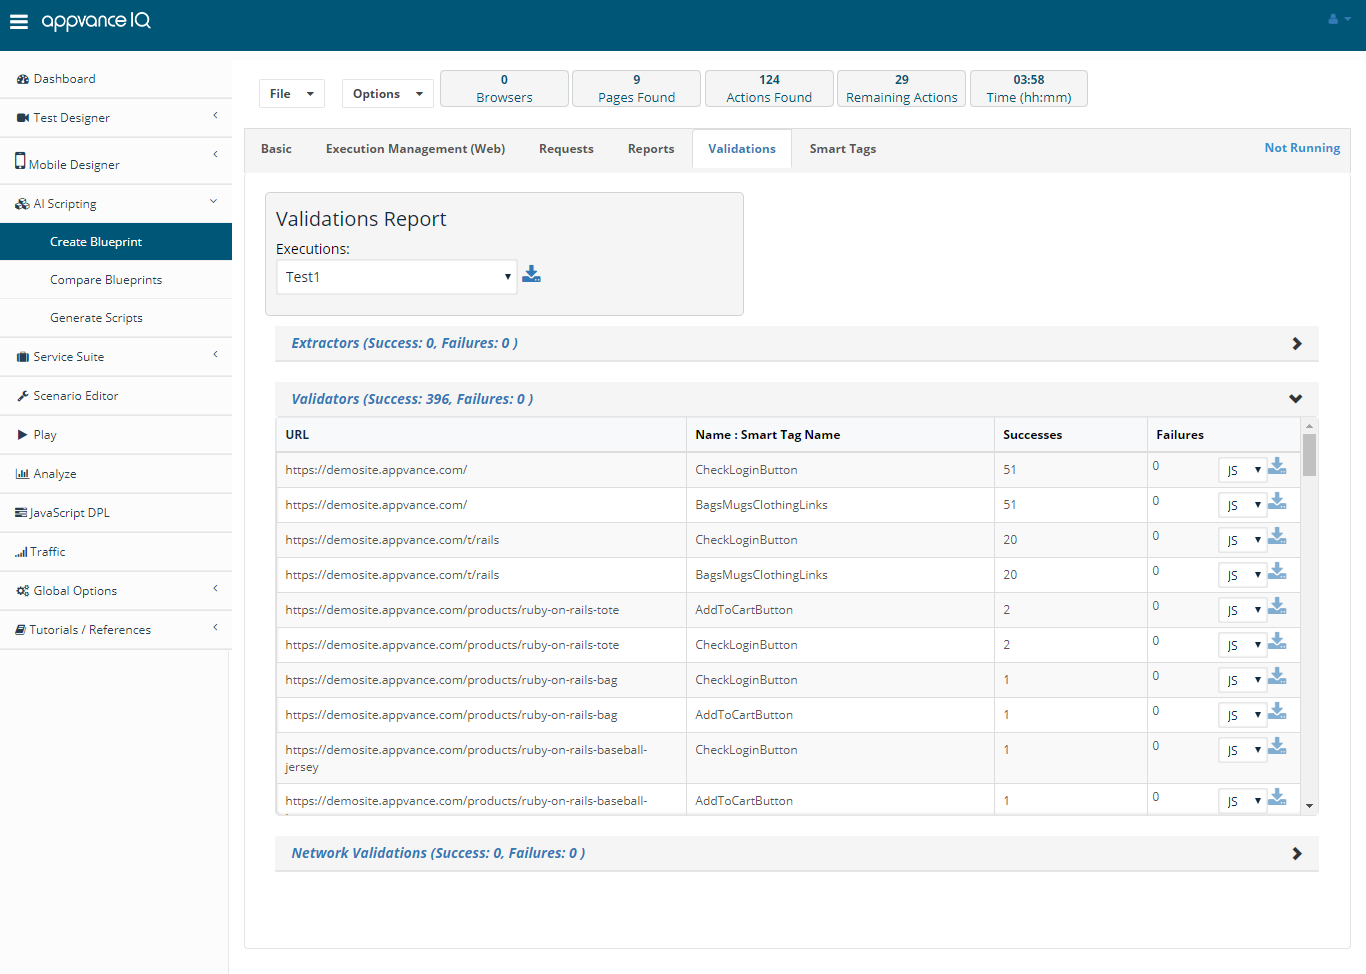
Once the blueprint is done, go to the Validations tab to check the passed and failed validations with the validation names.
The failed validations will have the option to download the .js and .ds files to check the failures
FAQ
-
How different is the Validation Workbench when compared to what we already have in the SmartTag workbench With Validation Workbench you can create more elaborated validations which automatically verify if the validation is successful or if it fails without assigning to a smartTag? Also, you can create validations with js code that will receive parameters and use them to decide if is needed to run the validation or not.
-
These validations are true validations of any sort NOT tied to a tag but anything…a state a page an API a UX item. And validate the throughput of the application.
-
-
When it comes to ds3 scripts, we can add a lot of validations using the Checkpoint tab itself, how is this new wb going to help? With Validations Workbench you can create more validations types, that are more personalized than using Checkpoint tab validations, for example, you can make your own JS validations, call them manually or automatically.
-
If you use the same validation workbench in several scripts then a single modification to the validation workbench will update all the related scripts, as opposed to in-script validations that will require modifying all related scripts.
-
-
I define say 10 validations and that is browsed in Test Designer, Now will that validation be done on every step in Test Designer? if so will it not impact the performance? For each step, it would be run all the validations, which means that whether we have for example five steps and ten validations, it will be run five times the 10 validations that it´s equal to 50 validations ran, and it will consume resources.
-
What is tested every time is not the full validation but the trigger condition, but yes that has a performance impact. If you set the trigger to manual for all validations then there is NO impact on performance and you still get the benefit of the centralized definition of commonly used validations.
-
-
The previous version of validation UI had Pre-Action/Post-Action and there was a note saying if the page refreshes, post-action validation won't work. So now the current case handles it? Whatever new validations are added now, whether it will be performed pre-action or post-action and which step does that corresponds to because we don have any link to the element of the DS script step in it. All validation workbench will work on the same page. SmartTag validations are independent of these workbench validations, so, pre/post actions remain in the product as before.
-
There were many Operations to add in validations such as - equal to/not equal to – quite a list from existing. Are we going to support all this here basically is this going to replace the existing one? How are we going to tag it to SmartTags? Validation Workbench has its operations, which are Boolean validations that are triggered when they find the condition, the other ones are not going to be replaced.
-
In the validation type drop-down when we select an image that exists then on what criteria it will match that image on the application web page? It will match the image on the application web page either by source code written in it or by the term called “footprint” .i.e it recognizes the particular image on the web page.
-
Blueprint - if we are calling validation in custom JS, it should always be added as the last line of the custom JS for it to work, if it is added in the middle of the steps, it does not trigger the validation. Is this statement correct?
-
No. Explicit validate(“name”) will cause that validation “name” To be validated in the place where that line is added. The same with forceValidations.
-
The automatically triggered validation are the ones that only get triggered in the last step of a custom action.
-
-
setRealtimeValidations(false) - Setting this upfront in the global setup js, it does not trigger any validations right?
-
If we do not want to trigger any validations, why would anyone want to browse the validation file and set this to false
-
If you do not want real-time validations then can change the validation trigger to manual. Guess usage in setup is only to avoid automatic validations in setup steps.
-
-
forceValidation() - Should this again be called as the last step of a page, and this will trigger all the validation that applies to that page/page state.
-
Is this correct?
-
Not required. That will be done automatically. The only usage of that is when want to add a check of validations in between the steps of a custom action
-
-
validate(ValidationName) - Calling this in BP as the last step (custom JS), will this trigger the validation irrespective of the trigger by set in the validation workbench?
-
Suppose, for example, the validation was set to trigger by Image, and we call validate(validationName) in the blueprint, will this trigger the validation even if it does not find the trigger by (image)?
-
Will check the trigger condition. If the trigger condition is not met then validation will not be checked
-