1.2 - Install Guides
Installation guides for Appvance IQ on Windows, Mac, Linux, and cloud platforms.
- Windows Installation Guide for AIQ (GraalVM 11 Based)
- Installation Prerequisites
- Anti-Virus Settings
- Install and Configure GraalVM 11
- Download Appvance AIQ
- Install and Configure MySQL 8 for AIQ on Windows
- Run AIQ on Windows as a Service
- Installing License and Certificate
- Useful Utilities for AIQ Administration
- Use getCssValue in Scenario Editor Scripts
- Mac OS X Installation Guide for AIQ (GraalVM 11 Based)
- Download AIQ for macOS
- Install Java GraalVM 11 for AIQ
- Configure Java for AIQ
- macOS Required Configurations for AIQ
- MySQL Install and Setup for AIQ
- Install the AIQ Database Schema
- Update MySQL Packet Size and Case Settings for AIQ
- Ubuntu Server Installation Guide for AIQ
- How to Install Appvance IQ results database in Amazon MySQL RDS
- How to upgrade Appvance IQ Controller & TestNodes
- Prepping your Machine for First Recording | Test Designer
- Install AIQ License and Certificate - Duplicate Review
Windows Installation Guide for AIQ (GraalVM 11 Based)
This is a step-by-step guide for installing and configuring Appvance IQ on Windows.
Installation Prerequisites
Install Preparation Checklist
Please ensure all preparation checklist items are completed and verified prior to install.
Your Appvance contact is always available and more than willing to help with any questions or issues. We recommend confirming the check list at least one business day prior to your scheduled install date, or more depending on your corporate timeframes for resolving permission issues.
Summary Install Preparation Checklist
After you have read the prerequisites, proceed to the next step: Anti-Virus Settings
Anti-Virus Settings
The Appvance IQ installation package is sizable and the vast majority of the contents will never change between installations or upgrades. Because of this, you can exclude the AIQinstallation folder the from the scheduled daily / weekly / monthly scans. Doing so will reduce the time and resources devoted to these scans. Also if these folders are not excluded, you may see some unexpected behavior in AIQ.
For example, this may impact scenario executions, specially on DS and DS3 engines that write many temporary files for requests and responses.
Following are some of the top Anti-virus programs from which the files and folders of Appvance IQ should be excluded:
- AVG Anti-virus
- Avast Anti-virus
- Kasperskey Anti-virus
- McAfee Virus Scan
- Norton Anti-virus
- Symantec Endpoint protection
- Windows Defender
See McAfee slows down Appvance IQ (Windows) for specific recommendations for McAfee.
After you have configured your anti-virus software, proceed to the next step: Install and Configure GraalVM 11
Install and Configure GraalVM 11
Appvance requires GraalVM 11 to be installed on the controller machine in order to run Appvance IQ. GraalVM is a JDK (Java Development Kit) that is designed to accelerate the execution of applications written in Java and other JVM languages.
For instructions on installing GraakVM on Appvance Test Nodes, see Appvance IQ Manual Test Designer Install (GraalVM 11 Based).
The release notes for GraalVM can be found on the GraalVM site.
Download and Install GraalVM Version 11
- GraalVM 11 can be downloaded from https://github.com/graalvm/graalvm-ce-builds/releases/tag/vm-21.3.0.
- Download the Java 11 based Windows installer.

- When the download is complete, extract the zip file to
C:\Program Files.
Configure Environment Variables
- Locate the folder where graalvm 11 is copied over (in the C:/Program Files from the step above)
- For example C:\Program Files\graalvm-ce-java11-windows-amd64-21.3.0\graalvm-ce-java11-21.3.0
- Open the System Properties dialog, select the Advanced tab and click Environment Variables.
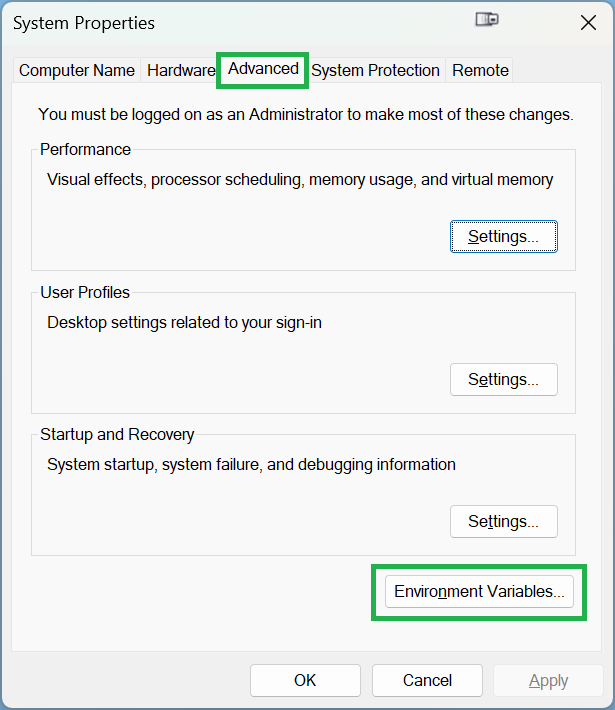
- In the System Variables section, click New.
- Enter JAVA_HOME as the variable name.
For the variable value enter the path to the GraalVM that you downloaded and extracted. For exampleC:\Program Files\graalvm-ce-java11-21.3.0.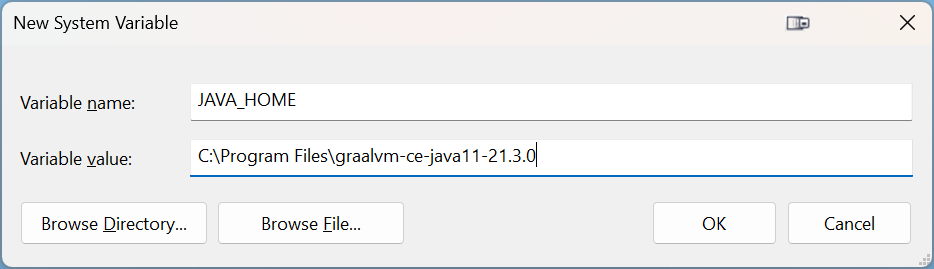
- Click Ok.
- In the System Variables list, select the Path variable and click Edit.
- Enter your Java path, appended by
\bin;at the beginning of the Variable value box. For example:C:\Program Files\graalvm-ce-java11-21.3.0\bin;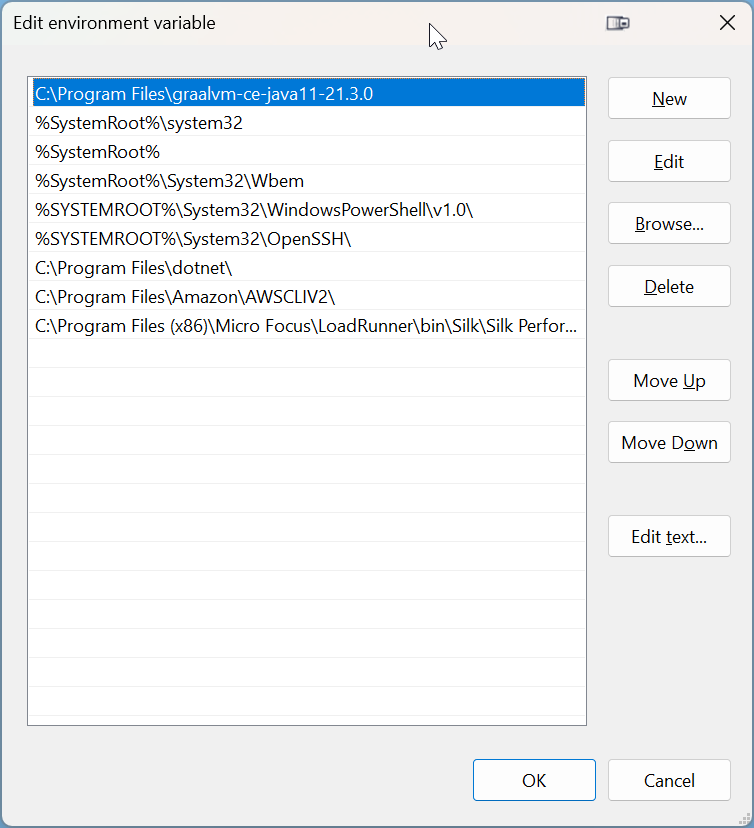
Confirm Java Installation
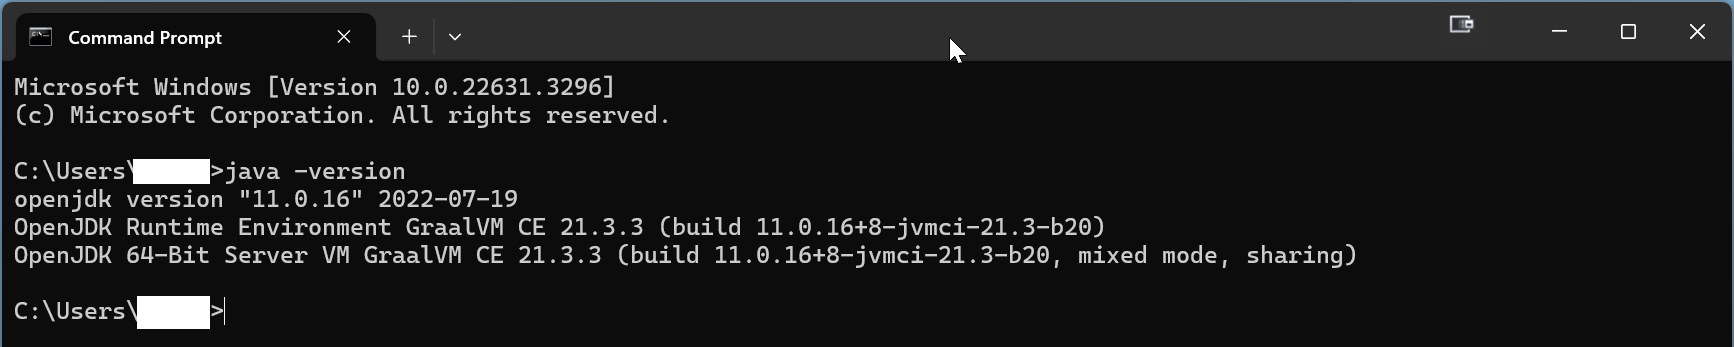
- Open a Command Prompt.
- Type
java -version - Confirm that the correct version of Java has been installed.
After the Java installation has been completed, proceed to the next step: Download Appvance AIQ
Last updated: July 31, 2024
If you have any feedback on this topic, please contact us at documentation@appvance.ai
Download Appvance AIQ
Contact the Appvance Customer Success Team for the location of the AIQ download that you should install.
- Download the AIQ .zip file. An example file name is something like: AIQ-5.x.x-345862.zip.
- Extract the zip file.
- The AIQ software is contained in the
aiq_distributionfolder.
Considerations
If you notice that extracting the Appvance IQ zip file is slow, the following may suggestions may improve the performance of that task:
- Anti-virus programs, such as Windows Defender, being active with real-time searching for malware. This can delay in file intensive operations such as unzipping an archive. This may also affect scenario executions, specially on DS and DS3 engines that writes many temporary files for requests and responses. See Anti-Virus Settings for more information.
- Too little space free on the hard disk. Remove unwanted files or software to free up space.
After you have downloaded the AIQ software distribution, proceed to the next step: Installing and Configuring MySQL 8 Database (Windows)
Install and Configure MySQL 8 for AIQ on Windows
Install and Configure MySQL 8 for AIQ on Windows
Use this guide when preparing a Windows-hosted MySQL 8 database for an AIQ environment. Confirm the supported database version, sizing, and security requirements before installing or changing an existing database.
Preparation
- Confirm the target AIQ version and supported MySQL 8 configuration.
- Use a dedicated database host or instance when possible.
- Plan storage, backup location, retention, and recovery requirements.
- Create service and database accounts with only the permissions required by AIQ.
- Document port, hostname, schema, account, and maintenance-window details.
Validation workflow
- Install MySQL 8 using the approved Windows installer and configuration profile.
- Apply the required character set, time zone, networking, and service settings.
- Create the AIQ database/schema and account according to the installation plan.
- Test connectivity from the AIQ host before starting AIQ services.
- Run a login and small execution smoke test after AIQ is connected.
Maintenance note: Back up the database before upgrades, configuration changes, or cleanup operations.
Last updated: October 8, 2026
Run AIQ on Windows as a Service
Run AIQ on Windows as a Service
Use this guide when AIQ must start automatically on a Windows host and run under a managed service account. Corrected the older title wording and replaced “Appvance IQ” phrasing with current AIQ terminology.
Preparation checklist
- Confirm the Windows version, AIQ version, Java/runtime dependencies, ports, and required file-system paths.
- Create or select a dedicated service account with the minimum permissions required to run AIQ.
- Verify database connectivity, browser/driver paths, and environment variables before installing the service.
- Document log locations, startup dependencies, and restart policy.
Validation workflow
- Start AIQ manually once and confirm login and a small smoke execution work.
- Install or configure the Windows service using the approved procedure.
- Start, stop, and restart the service from Windows Services or the service manager.
- Reboot the host if allowed and confirm AIQ starts automatically.
- Review logs for permission, path, port, or dependency errors.
Last updated: October 9, 2026
Installing License and Certificate
AIQ requires a valid license file and a valid certificate for the server that hosts the Controller.
Install License
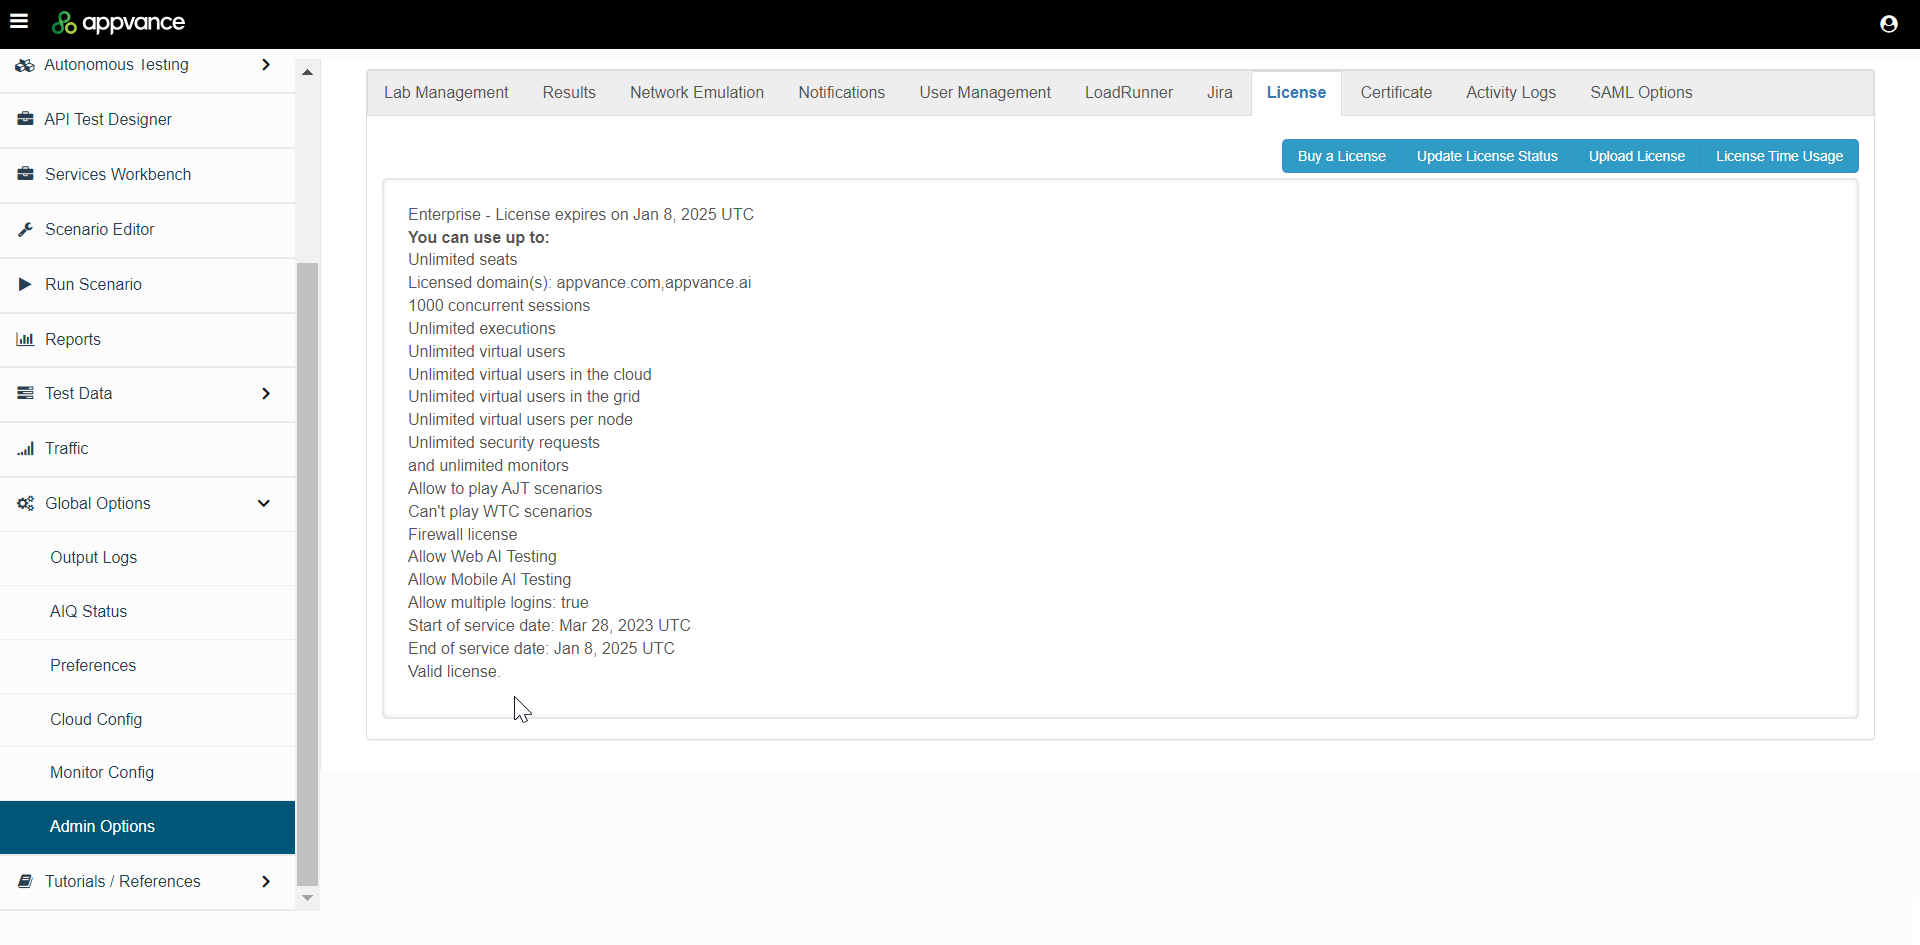
License files are distributed by the Appvance Customer Success Team or Appvance Support. Be sure that you have been provided a license file before you proceed.
- From your Appvance IQ URL, login and select Global Options > Admin Options > License (tab).
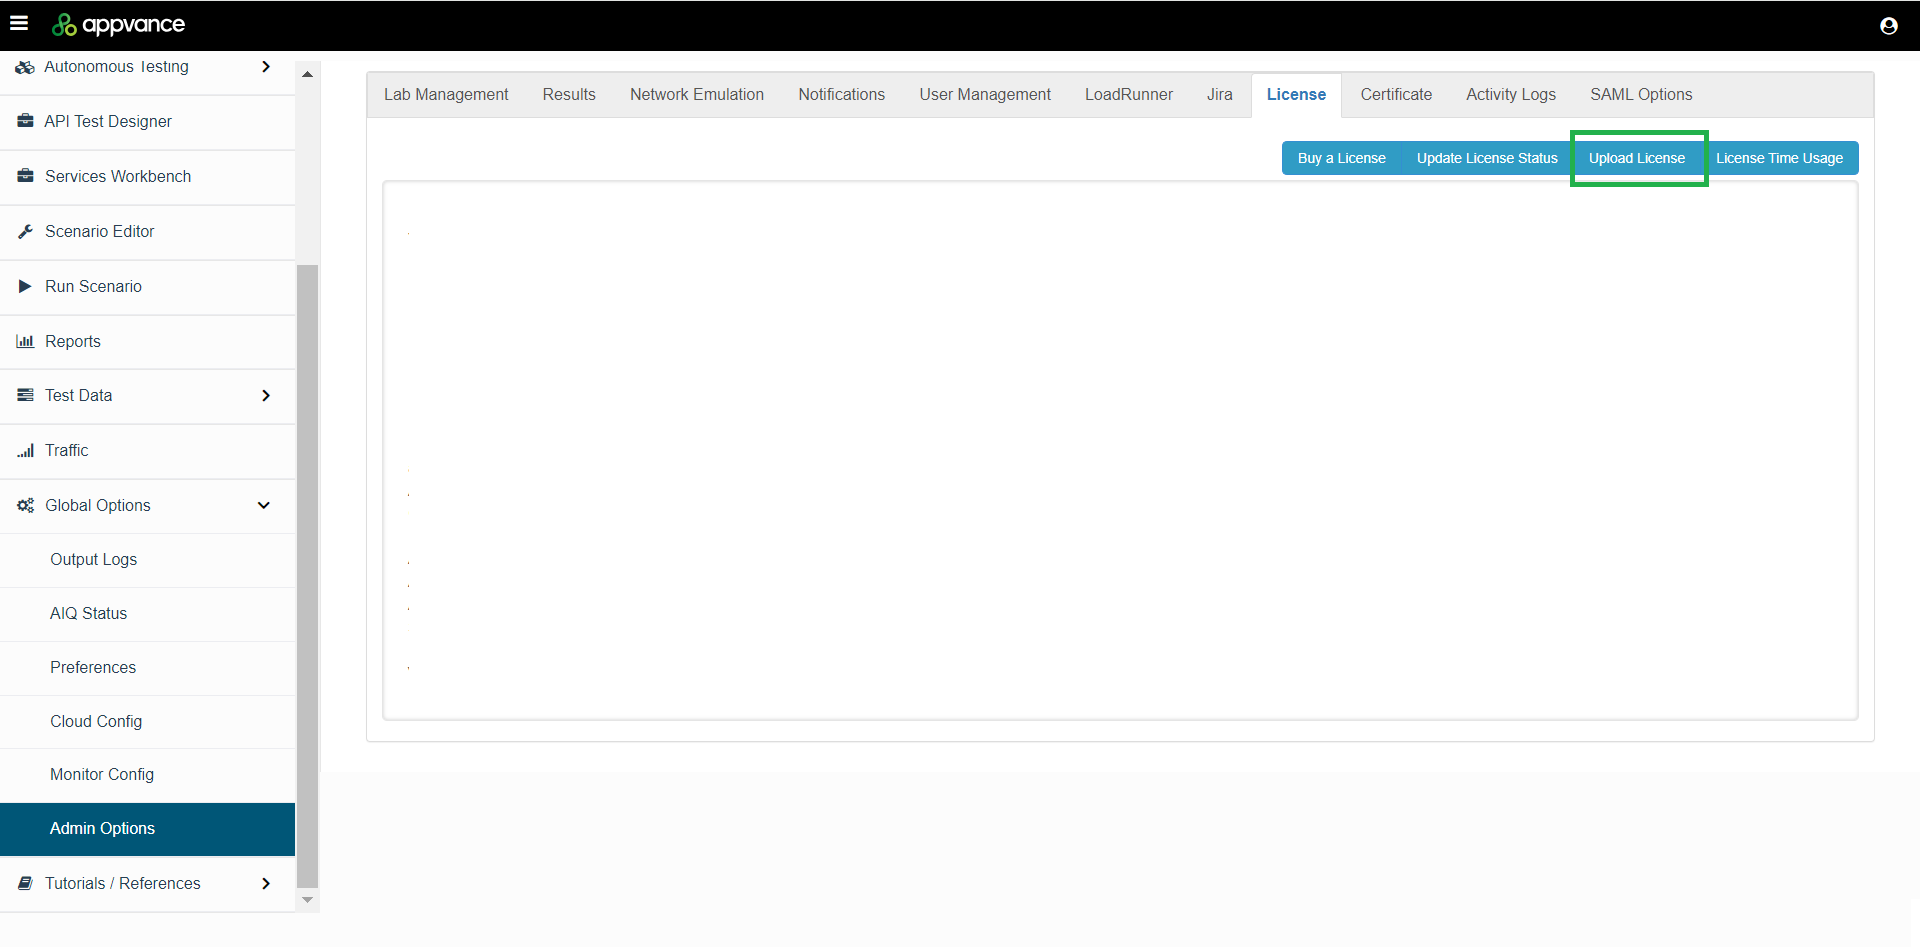
- Click Upload License.
- Browse to the license file provided by Appvance and click Open to load the license file.
Install Appvance Certificate
Every Appvance Controller requires a valid certificate. You may provide and install your own server certificate, or update and use the Appvance-provided certificate.
Provide your own certificate
- Copy your certificate to:
<AIQ install path>\sahi\ - Install your certificate in Trusted Root Certification Authorities.
See the Microsoft site for more information on Trusted Root Certification Authorities.
Update the Appvance-provided certificate
About the Appvance Certificate
The default Appvance certificate points to localhost and must be updated to point it to your specific IP or DNS. To do so, follow the steps in this topic.
Important
- These steps are only to be performed on the Appvance Controller machine
- The certificate creation steps currently ONLY work on Windows, however, the generated certificate is valid for Linux/Mac as well
- If using EC2 and you stop and restart the server, the DNS will be lost and you must repeat this process
- Once installed on the Appvance Controller, configure the certificate on client machines using How to Install Appvance IQ on Windows (GraalVM 11 Based) (related topics: Firefox configuration to work with https and Windows configuration to work with https)
Generate an Appvance Certificate
This procedure assumes that your Appvance Control machine is already set up and running.
- On the Appvance Controller machine, login to AIQ.
- Navigate to Global Options > Admin Options > Certificate (tab).
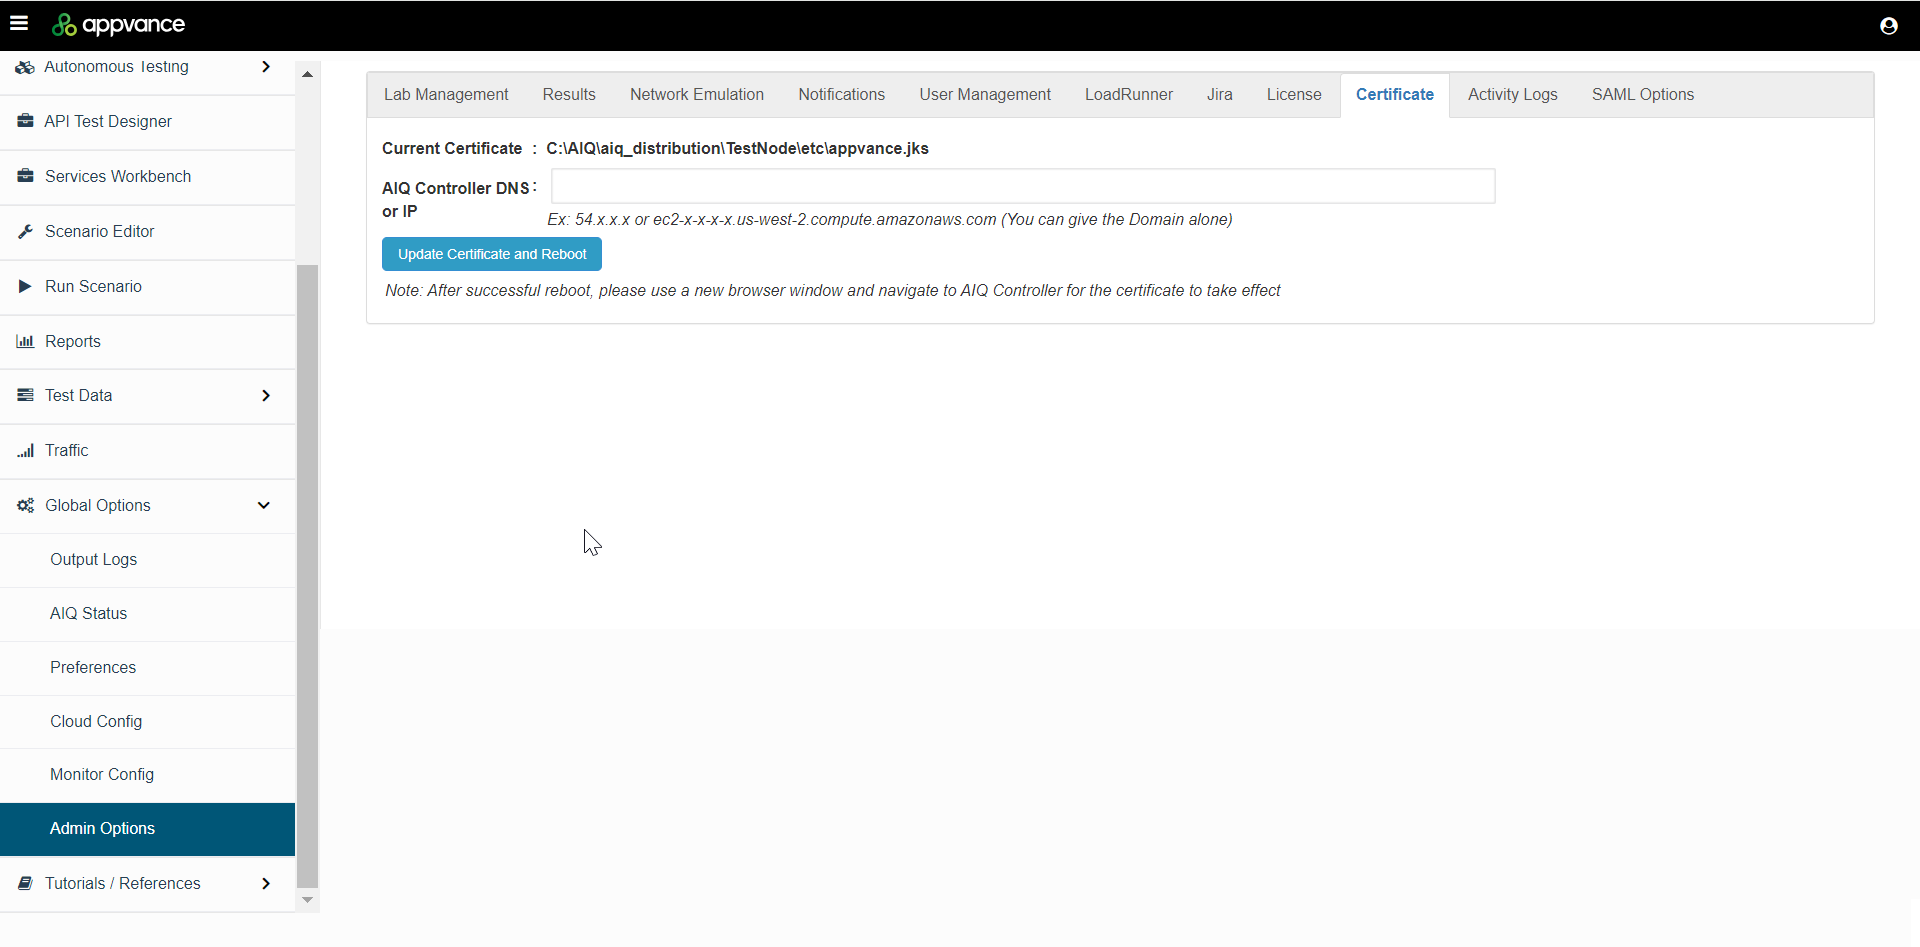
- Enter the DNS or IP of the AIQ controller. Do not enter a protocol or a port. For example:
ec2-12-21-23-23.us-west-2.compute.amazonaws.com - Click Update Certificate and Reboot.

- After a successful reboot, please use a new browser window and navigate to the AIQ Controller for the certificate to take effect. The browser may fail to load the IP address, the certificate still generate.
- Appvance generates the certificate, with a valid key store, inside the Appvance Controller machine's TestNode\certs directorySpaces and periods are replaced with '_' in the file name.
- Restart the Appvance services on Appvance Controller machine.
- Browse to <AIQ install directory>\sahi and double-click appvance.cer
- Click Install Certificate.
- Select Current User and click Next.
- Select Place all certificates in the following store and click Browse.
- Select Trusted Root Certification Authorities and click OK.
- Click Next.
- Click Finish.
- When the Certificate Import Wizard window appears, indicating the import was successful, click OK.
- Click OK.
Configuring Port 8443
Once installed, you need to configure Port 8443 for public access.
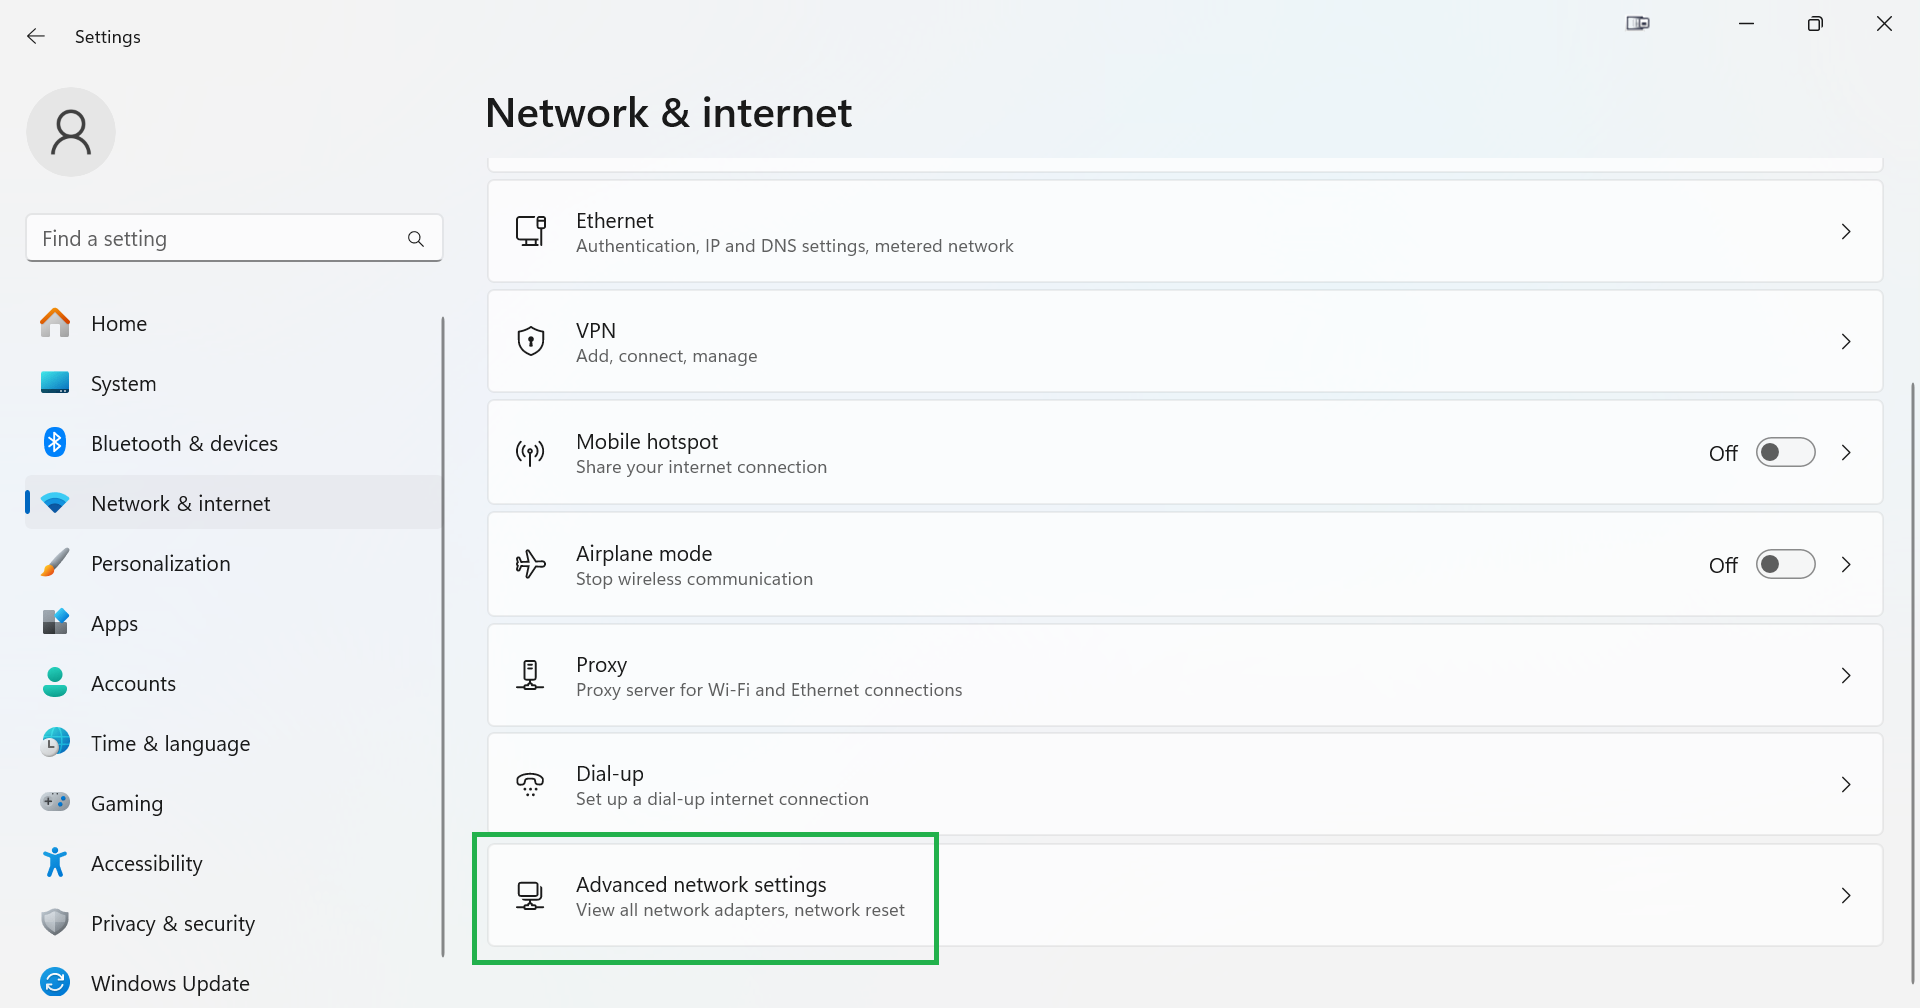
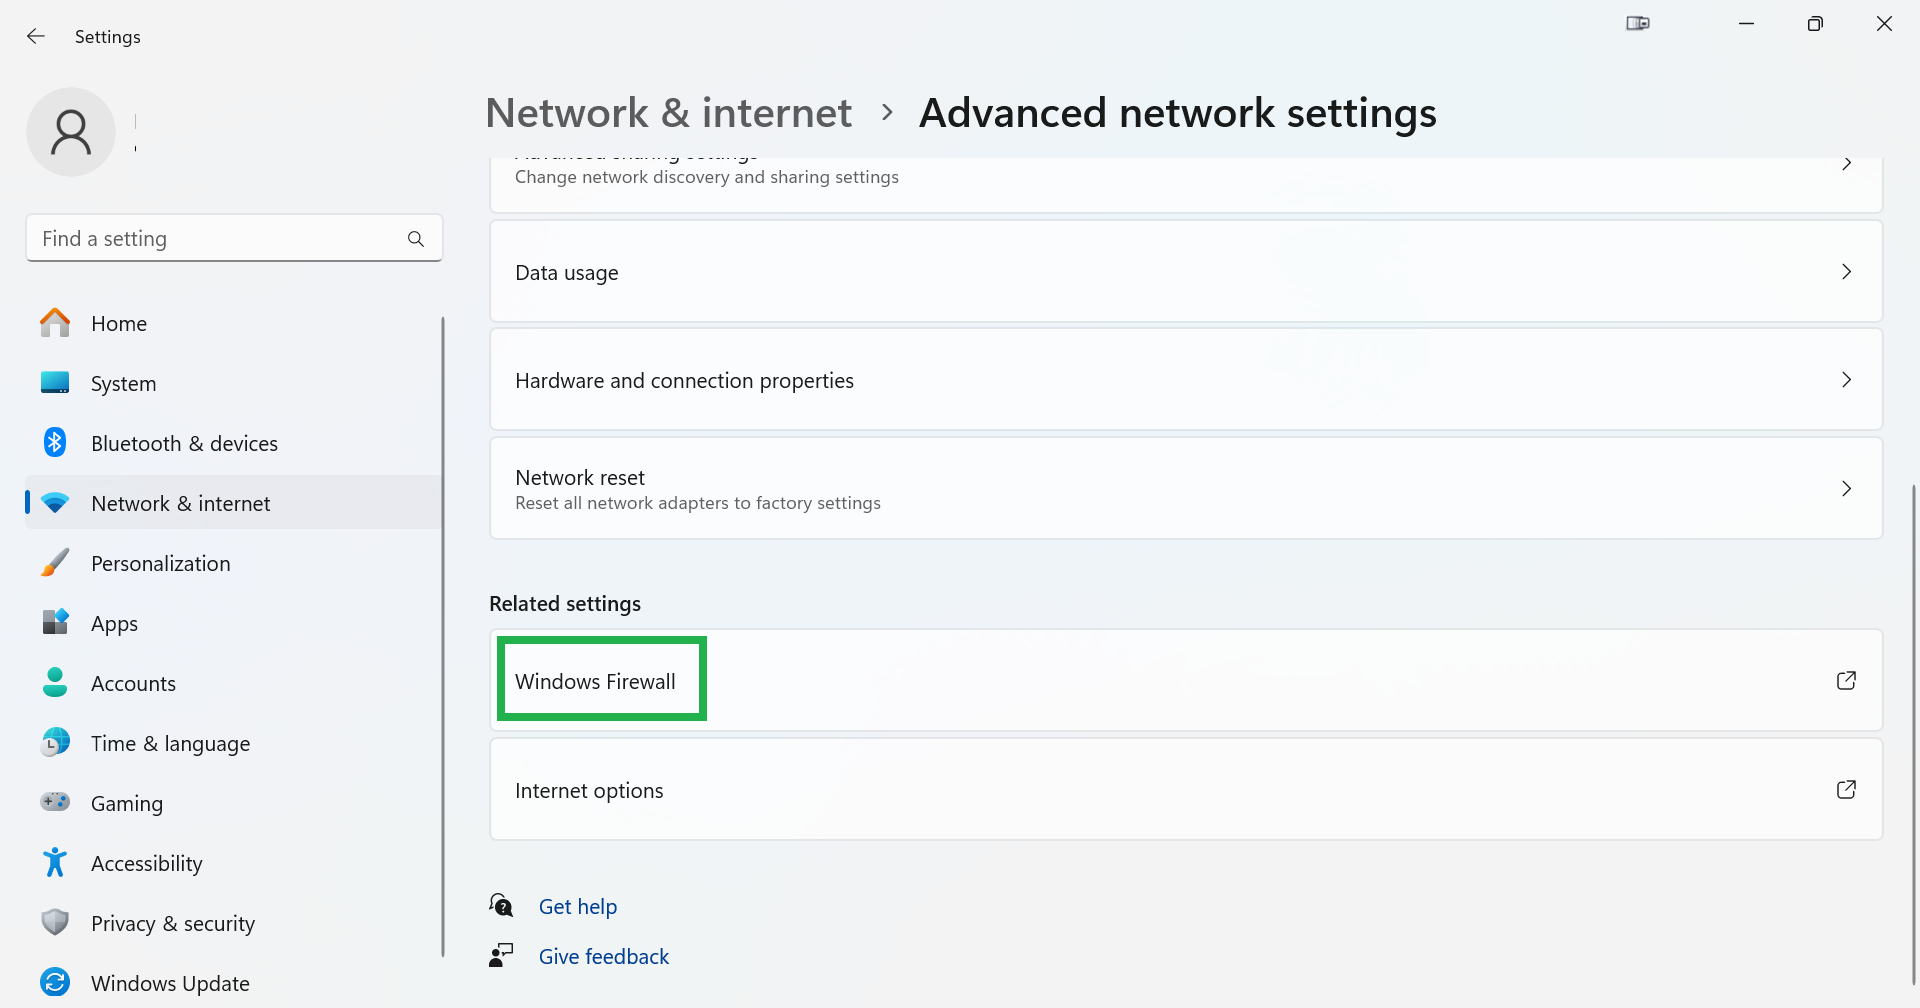
- In Windows Settings, open the Network and Internet. Select Advanced network settings.
- Select the Windows Firewall option.
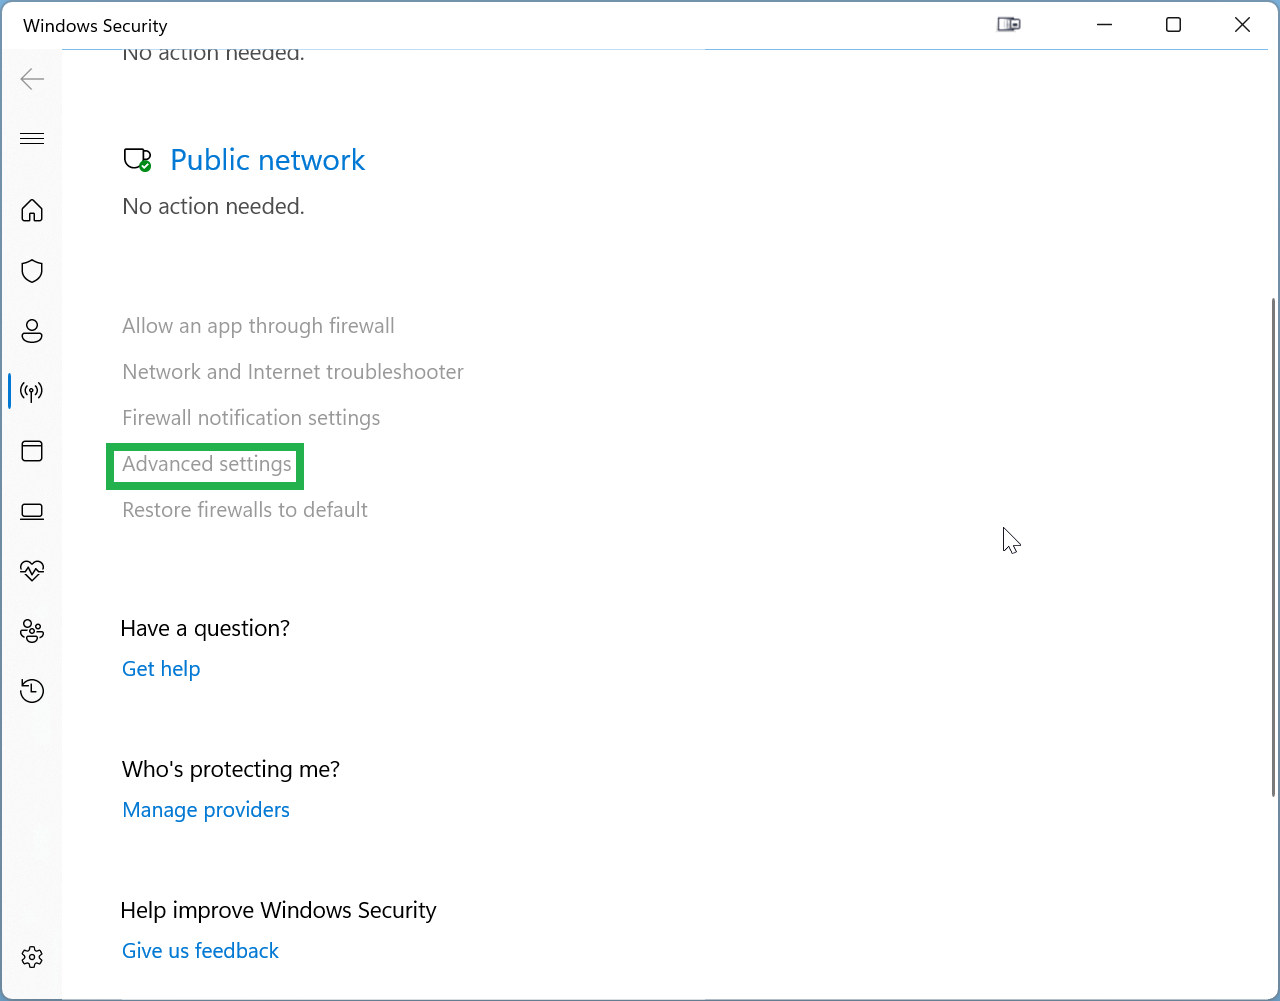
- Select Advanced settings.
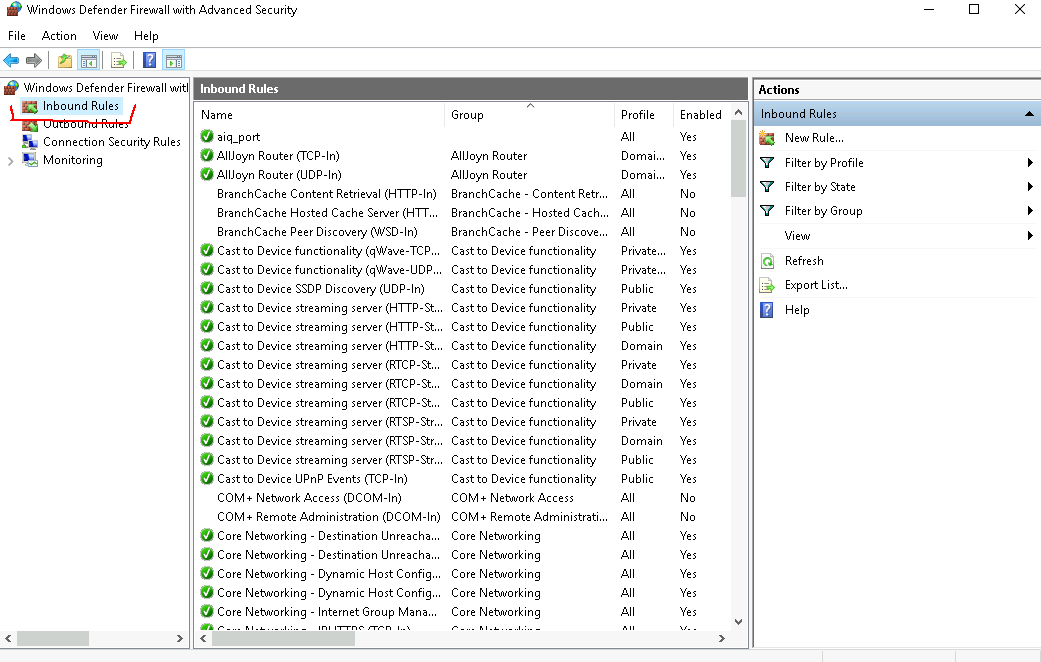
- Select Inbound Rules.
- In the Action tab, select New Rule.
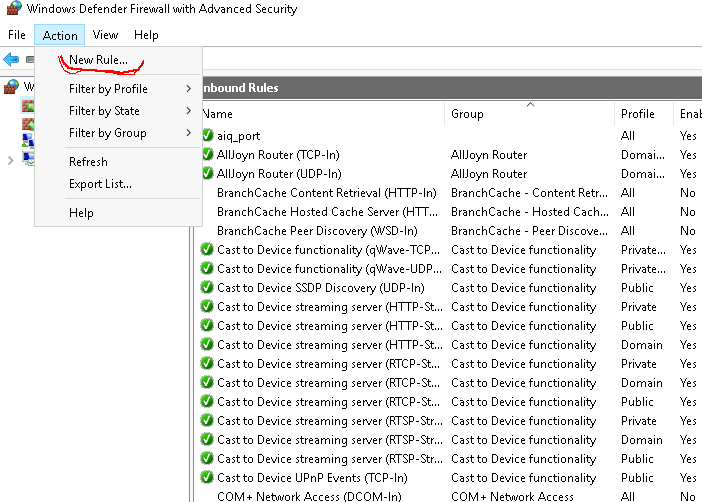
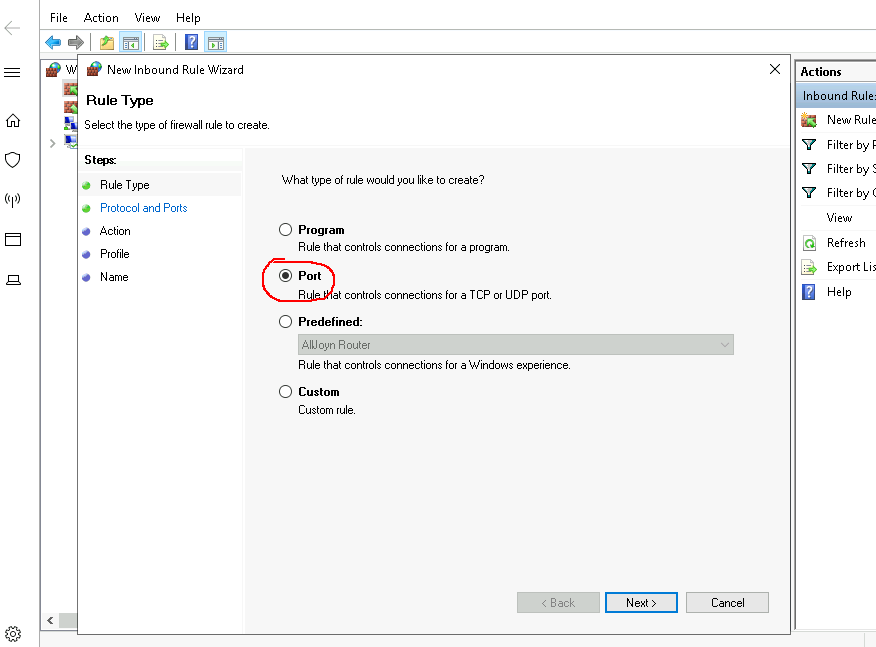
- In Rule Type, select Port.
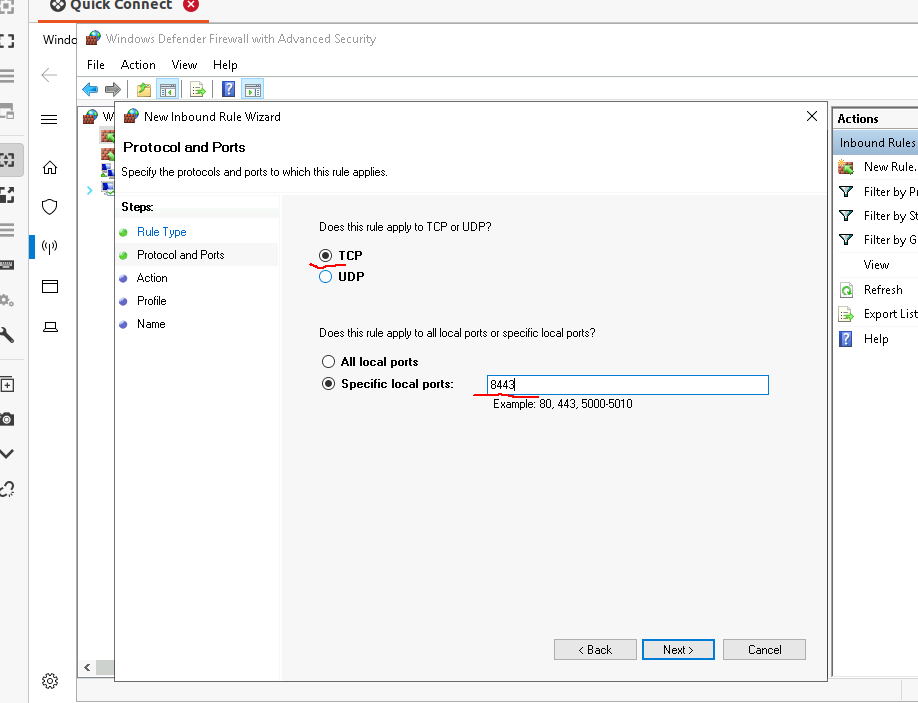
- In Protocol and Ports, select TCP and specify the local port as 8443.
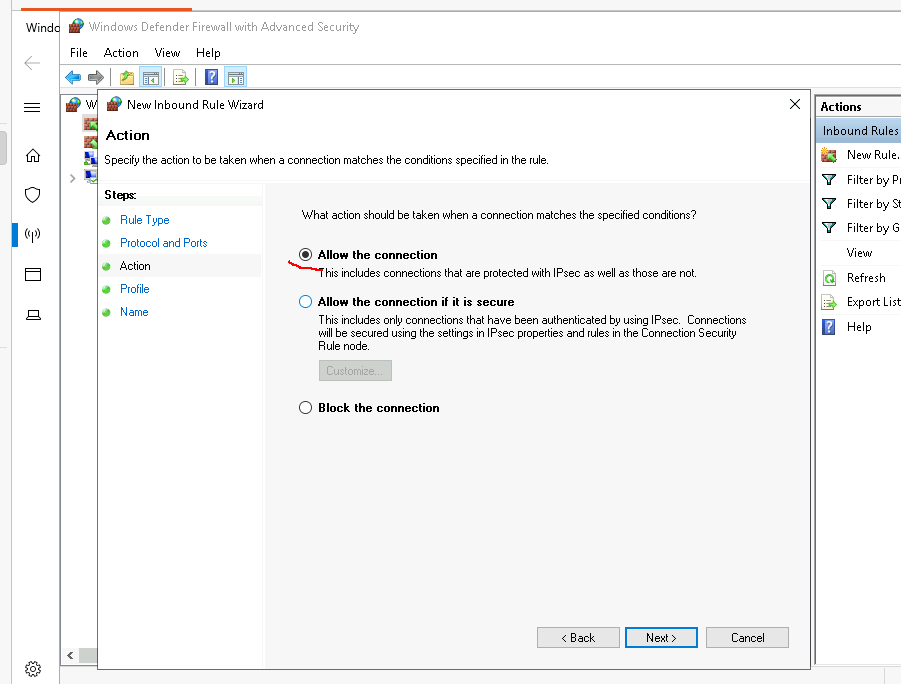
- In Action, select Allow the connection.
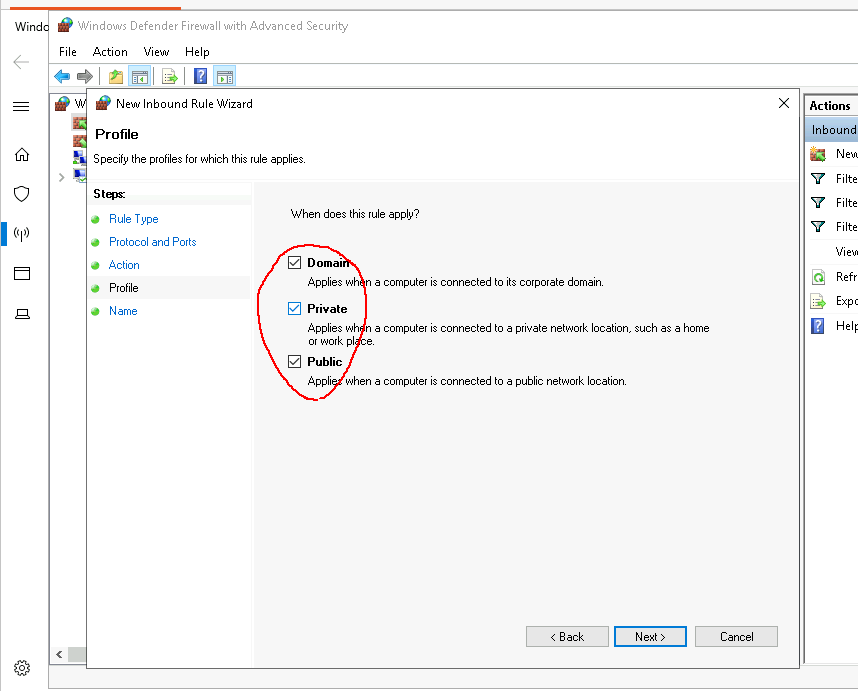
- In Profile, select all the options.
- Name the port.
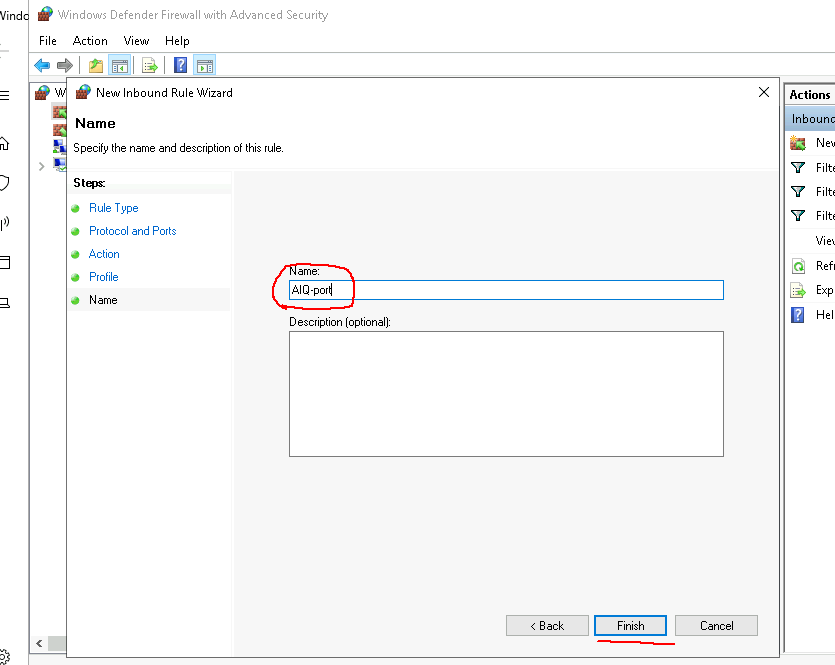
- Click Finish.
The AIQ controller firewall requires specific TCP ports open. Find the complete list in .Appvance IQ Production System Requirements.
Last updated: July 31, 2024
If you have any feedback on this topic, please contact us at documentation@appvance.ai
Useful Utilities for AIQ Administration
Recommended guidance
Use utilities to support AIQ installation, troubleshooting, and administration. Utilities should help validate ports, certificates, disk space, network access, logs, browser dependencies, and service health without becoming undocumented production changes.
Examples of useful utility checks
- Port listeners and conflicts for AIQ services, Test Nodes, databases, and proxies.
- Disk usage, memory, CPU, and process status on AIQ hosts.
- Certificate expiration, trust chains, and TLS connectivity.
- Browser installation and version checks on execution nodes.
- Network connectivity to repositories, applications under test, integrations, and package sources.
Operational rules
- Use read-only checks first when diagnosing a production environment.
- Document any utility that changes configuration or service state.
- Do not paste secrets into command lines, logs, screenshots, or documentation.
- Prefer approved OS/package-manager tools over random downloaded utilities.
- Keep customer-specific scripts in a controlled repository with owners and review history.
Last updated: October 5, 2026
Use getCssValue in Scenario Editor Scripts
Use getCssValue in Scenario Editor Scripts
Use getCssValue only when validating a CSS property is part of the test objective. For most functional tests, validate visible behavior or business output instead of implementation-level styles.
Recommended use
- Confirm a required state is represented by a CSS property, such as disabled, highlighted, hidden, or color-coded status.
- Validate style behavior only after the page has reached a stable state.
- Keep expected values maintainable and avoid checking browser-specific formatting unless necessary.
Maintenance notes
- Prefer stable locators for the element being inspected.
- Use conditional waits before reading style values.
- Document why the CSS property is business-relevant.
Last updated: September 18, 2026
Mac OS X Installation Guide for AIQ (GraalVM 11 Based)
A step-by-step guide for installing and configuring Appvance IQ on Mac OS X.
Download AIQ for macOS
- Download AIQ.
If you do not have an Appvance IQ download link, please reach out to your Appvance contact, or email support@appvance.ai.
- Extract Appvance IQ to the desired install location.
For example:/Users/<username>/AIQ
Next step: Install Java GraalVM11
Last updated: July 31, 2024
If you have any feedback on this topic, please contact us at documentation@appvance.ai
Install Java GraalVM 11 for AIQ
Recommended guidance
Install Java or GraalVM 11 only when the AIQ release being deployed explicitly requires it. Current environments should always be checked against the active AIQ system requirements before changing runtimes.
Before installation
- Confirm AIQ version, operating system, CPU architecture, and supported runtime build.
- Download from an approved source and verify the package when possible.
- Plan installation path, environment variables, service account access, and rollback.
- Back up existing runtime configuration before replacing it.
Validation workflow
- Confirm the runtime version from the account that starts AIQ.
- Restart AIQ services after approved configuration changes.
- Review startup logs for path, permission, or runtime errors.
- Run Scenario Editor and Service Suite smoke tests before returning the environment to users.
Last updated: October 7, 2026
Configure Java for AIQ
Recommended guidance
Configure Java only according to the AIQ version and deployment model in use. Java requirements can differ across AIQ releases, operating systems, installers, and legacy integrations.
Before configuration
- Confirm the AIQ version and the supported Java or GraalVM runtime.
- Check operating system, installation path, service account, and environment variables.
- Remove or isolate conflicting Java installations when they affect AIQ startup.
- Validate permissions for AIQ services, scripts, and Test Nodes.
Validation workflow
- Confirm the runtime version from the same account that starts AIQ.
- Restart AIQ services after approved configuration changes.
- Review startup logs for runtime, path, or permission errors.
- Run a Scenario Editor and Service Suite smoke test after Java changes.
Last updated: October 7, 2026
macOS Required Configurations for AIQ
Recommended guidance
Apply macOS configuration steps according to the AIQ version, macOS version, CPU architecture, browser requirements, and customer security policy. Do not bypass macOS security prompts through documentation; the user or administrator should approve required permissions.
Configuration areas
- Runtime dependencies, browser dependencies, certificates, and local permissions.
- Download quarantine, Gatekeeper, and application execution approvals handled by the user.
- Network, proxy, DNS, and firewall access to AIQ and applications under test.
- File permissions for installation, logs, repositories, and Test Node assets.
Validation workflow
- Confirm AIQ starts and users can log in.
- Run Scenario Editor and Service Suite smoke tests.
- Verify browser launch, downloads, certificates, and required permissions.
- Document macOS version and any administrator-approved policy changes.
Last updated: October 7, 2026
MySQL Install and Setup for AIQ
Recommended guidance
Install and configure MySQL for AIQ only according to the supported database version and deployment model. Database configuration affects login, execution history, reports, upgrades, and data integrity.
Before setup
- Confirm AIQ-supported MySQL version, host, port, storage, charset, and collation.
- Plan database user permissions, backup, restore, monitoring, and maintenance windows.
- Review firewall, network, DNS, certificate, and OS service settings.
- Document configuration values that AIQ requires during install or upgrade.
Validation workflow
- Confirm the database service starts after reboot.
- Validate AIQ can connect using the configured account.
- Run login, Scenario Editor, Service Suite, and reporting smoke tests.
- Review database and AIQ logs for permission, packet size, or case-sensitivity issues.
Last updated: October 7, 2026
Install the AIQ Database Schema
Recommended guidance
Install the AIQ database schema only with the installer or migration process supported by the target AIQ version. Schema changes affect platform stability, upgrades, reporting, and execution history.
Before installation
- Confirm AIQ version, database version, host, schema name, user permissions, and backup status.
- Verify charset, collation, packet size, case-sensitivity, and storage requirements.
- Coordinate downtime and rollback if the schema is being created or migrated in a shared environment.
- Use approved scripts only; do not manually edit schema objects without support guidance.
Validation workflow
- Run schema creation or migration from the approved installer or script.
- Confirm AIQ can connect with the configured database user.
- Run login, Scenario Editor, Service Suite, and reporting smoke tests.
- Review AIQ and database logs for permission, migration, or object errors.
Last updated: October 7, 2026
Update MySQL Packet Size and Case Settings for AIQ
Recommended guidance
Update MySQL packet size and case-sensitivity settings only when required by the AIQ version, database workload, or support guidance. These settings can affect imports, upgrades, reports, and cross-platform database behavior.
Before changing settings
- Back up the database and current MySQL configuration.
- Confirm the exact variable names, target values, and MySQL version.
- Coordinate downtime if a database restart is required.
- Document why the setting is being changed and who approved it.
Validation workflow
- Apply changes in the correct MySQL configuration file or managed service setting.
- Restart MySQL if required and confirm the active values.
- Run AIQ login, scenario, service, report, and upgrade-related smoke tests.
- Review logs for packet, table-name, permission, or migration errors.
Last updated: October 7, 2026
Ubuntu Server Installation Guide for AIQ
Recommended guidance
Use the Ubuntu Server installation guide only after confirming the target AIQ version, supported Ubuntu release, runtime requirement, database configuration, and deployment architecture. GraalVM 11 references should be treated as version-specific.
Pre-install checklist
- Confirm CPU, memory, disk, network, DNS, firewall, and certificate requirements.
- Verify package repositories, runtime dependencies, browser dependencies, and service accounts.
- Plan database, repository, Test Node, backup, monitoring, and log locations.
- Review security policies for antivirus, endpoint protection, SSH, and sudo access.
Post-install validation
- Confirm AIQ services start after reboot.
- Validate login, Scenario Editor, Service Suite, reports, repositories, and Test Node connectivity.
- Review logs for runtime, database, permission, or port errors.
- Document installed versions and customer-specific deviations.
Last updated: October 7, 2026
How to Install Appvance IQ results database in Amazon MySQL RDS
Setting parameter group
After creating a MySQL RDS database in Amazon AWS, you need to create a new parameter group by navigating to RDS > Parameter Groups > Create parameter group
After group is created, select Edit Parameters. The following values should be set:
| Parameter | Value |
|---|---|
| log_bin_trust_function_creators | 1 |
| bulk_insert_buffer_size | 536870912 |
| connect_timeout | 10 |
| max_allowed_packet | 104857600 |
| max_connections | 500 |
| max_user_connections | 200 |
| myisam_use_mmap | 1 |
| read_buffer_size | 524288 |
| validate_password | OFF |
| wait_timeout | 1080 (AIQ-6619) |
Assign the new parameter group to your database
After creating the new parameter group, assign it to the database and reboot it.
Then connect to the MySQL database using the admin credentials and execute MySQLInitial.sql and then MySQLAppvance.sql. No error should be visible in the execution. If an error happens, review the error message.
Error Code: 1419. You do not have the SUPER privilege and binary logging is enabled
If you get this error while running MySQLAppvance.sql on AWS RDS, make sure that the RDS parameter group has the value 1 (ON) for log_bin_trust_function_creators. The RDS database MUST be rebooted for parameter changes to take effect.
How to upgrade Appvance IQ Controller & TestNodes
Describes how to use Lab Management to upgrade an Appvance IQ Controller and its TestNodes.
If upgrading from 4.0.x to 4.1+, do not use Lab Management as described below. Instead please see Manual Upgrade Steps.
IMPORTANT: Mac OS X Servers / Linux Controllers
DO NOT use the Lab Management upgrade method to upgrade a Linux AIQ Controller which uses the /etc/systemd/system service. Lab Management only supports Linux upgrades where /etc/rc.local startup script is used. See Manual Upgrade Steps.
1. Create a Grid Configuration File
- Browse to Appvance IQ and login using an admin-level account
- Click Global Options and select Cloud Config
- Select the Grid Configuration tab
Controller
- Enter
http://localhost:8080/TMServer/ws/Testnodein the Grid Machines box and press Enter - Click Save, and save the Controller Grid Configuration file
TestNode
- Click Refresh to clear the form, select Grid Configuration again
- Enter
http://<test-node-dns>:8080/TMServer/ws/Testnodein Grid Machines - Press Enter. To add more machines, click Add Machine
- Click Save, and save the TestNode Grid Configuration file
2. Configure Lab Management
- Click Global Options, Admin Options (Lab Management tab)
- Click Add Cloud
- Enter a name in Cloud config name, select Grid in Type
- For each config file: click Browse, select the grid config file, click Save
- Select a Cloud to see all systems in the Machines list
3. Upgrade using Lab Management
- Click Global Options, Admin Options (Lab Management tab)
- Select a cloud location to upgrade in List of Clouds
- Tip: Upgrade Controller before TestNodes
- Confirm Machine Status displays Available
- If Machine Status displays Invalid Login, click the refresh icon
- Click Upgrade to begin
- Type UPGRADE (case-sensitive) in the confirmation box
- When complete, the version will reflect the new build
Prepping your Machine for First Recording | Test Designer
1. Install Pre-Requisites
Install Appvance IQ Certificate
IMPORTANT: Test Designer will not function without a valid certificate. If you installed an Appvance certificate prior to February 7th, 2022, you must still install the new Appvance certificate.
Download Certificate:
Windows Steps
- Double click the certificate file
- Select Local Machine
- Select Place all certificates in the following store
- Select Trusted Root Certification Authorities
- Click OK and Next
Mac OS Steps
- Double click the certificate file
- Right-click Appvance 2020 certificate, select Get Info
- Expand Trust, select Always Trust
- Close the Get Info window
Restart Browser
Quit and reopen your browser. This ensures the certificate is properly applied.
System Requirements
- Intel i5 or i7 processor or greater
- 5-10 GB free hard disk space
- 6 GB RAM minimum
- AIQ 4.1+
2. Install Test Designer
Mac
- Download TestDesigner-installer.dmg from
https://AIQ_SERVER:8443/UI/TestDesigner-installer.dmgor via AIQ Login - Log into AIQ, select Record a Designer Script
- When Designer Proxy Not Detected appears, click Download Designer Script Proxy
- Open TestDesigner-installer.dmg, double-click TestDesigner-installer
- If Cannot Open dialog appears, click Cancel, right-click and select Open
- If Cannot Verify dialog appears, click Open, enter password
- Click Next, accept agreement, click Next
- Accept install directory, click Next to begin installation
- Select Yes/No for user settings, perform system optimization if prompted
- Click Finish
Windows
- Download TestDesigner-installer.exe from
https://AIQ_SERVER:8443/UI/TestDesigner-installer.exeor via AIQ Login - Log into AIQ, select Record a Designer Script
- When Designer Proxy Not Detected appears, click Download Designer Script Proxy
- Run TestDesigner-installer.exe
- If Windows protected your PC, click More info then Run anyway
- Accept UAC prompt, select language, click OK
- Click Next, accept agreement, click Next
- Accept install directory, click Next to begin installation
- Select Yes/No for user settings, click Finish
3. Connect Repository
After installing Test Designer, connect to your AIQ repository by entering your AIQ server URL and credentials when prompted.
Troubleshooting
Install AIQ License and Certificate - Duplicate Review
Recommended guidance
This page appears to duplicate the AIQ license and certificate installation topic. Keep only one authoritative article when possible, and consolidate customer-neutral guidance into the primary license/certificate page.
Use this page only if
- It documents a version-specific or environment-specific variation.
- The steps differ from the primary license/certificate article.
- The page is needed temporarily during migration cleanup.
Consolidation checklist
- Compare this article with the primary license and certificate page.
- Move unique supported content into the authoritative page.
- Remove obsolete screenshots, duplicate steps, and old paths.
- Delete or redirect this page after content owners confirm it is redundant.
Last updated: October 7, 2026