# Linux | Ubuntu Server Installation Guide for AIQ (GraalVM 11 Based)
## Exclude files and folders from scheduled scans
The size of the Appvance IQ installation package is around 2 GB and is not expected to change until a new build is released. This folder should be excluded from the daily, weekly, or monthly scheduled scans as it will take up valuable scanning time. If the following folders are not excluded, you may see some unexpected behavior.
The list below are some of the top Anti-virus from which the files/folders of Appvance IQ should be excluded:
- AVG Anti-virus
- Avast Anti-virus
- Kaspersky Anti-virus
- McAfee Virus Scan
- Norton Anti-virus
- Symantec Endpoint protection
- Windows Defender
## Installation Process
The instructions below assume that the Linux server is running Ubuntu. Ubuntu's package manager is `apt-get.`
If your Linux server is running Redhat / Fedora, replace the lines with corresponding **yum** commands.
1. Initial steps.
```
sudo chmod go+w /etc/hosts
sudo echo "127.0.0.1 $HOSTNAME" >> /etc/hosts
sudo chmod go-w /etc/hosts
sudo apt-get update -y
sudo apt-get install wget -y
sudo apt-get install zip -y
```
2. Increase the open files linux limit in `/etc/security/limits.conf`.
In a text editor just add the following lines at the end of the `/etc/security/limits.conf` file. The leading star ( \* ) character is important.
\```
* soft nofile 500000
```
```
* hard nofile 500000
```
3. Getting GraalVM Community edition link.
Navigate to GraalVM site [https://www.graalvm.org/downloads/](https://www.graalvm.org/downloads/) and click the download button as below. On the release page you will be able to choose the correct platform for Java 11 depending on the technology supporting the server (AArch64 or x86-64). Copy the URL related to the download link.
4. Installing GraalVM Open JDK Community edition.
Using the download URL from the previous step, follow next steps to download, unpack and setup GraalVM Open JDK.
[Copy](javascript:void(0);)
```
cd /opt wget https://github.com/graalvm-ce-builds/releases/download/vm-22.1.0/graalvm-ce-java-linux-amd64-.tar.gz // REPLACE LINK WITH PATH OBTAINED FROM PREVIOUS STEPtar -xzf graalvm-ce-java-linux-amd64-.tar.gz. // REPLACE LINK WITH FILE NAME WITH THE ONE FROM PREVIOUS STEPexport PATH=////bin:$PATHexport JAVA_HOME=///cd ~java -version
```
5. When there are multiple versions of Java on the system.
In case where system need to have more than one java version, need to select the graalvm as defaullt to AIQ can work properly.
Adding a new alternative for "java" the third parameter assume that this is the only option for Java, in case there is another java version already installed, this third parameter would be 2, and so on.
```
$ sudo update-alternatives --install /usr/bin/java java /// 1
$ sudo update-alternatives --config java
```
6. Download and unzip AIQ
```
cd /opt
sudo mkdir aiq
cd aiq
wget "https://.zip". (get the zip file from the latest release notes)
unzip .zip
cd /opt
sudo chmod +x -R aiq
sudo chown -R ubuntu:ubuntu aiq
```
For Azure Deployments create aiq sudo user: `sudo chown -R aiq:aiq aiq`
AIQ will be installed after this setting. Just need to configure to point to the MySQL results database.
## Installing MySQL 8 Community Server
The following step is not required if you will be using a separate MySQL server. Installing a separate MySQL server is recommended.
1. Install local MySql 8 community server and run queries to set up the database
If you will be saving to another MySQL server like Amazon RDS or Oracle DB server, this step is not necessary.
2. Install MySQL 8 community server:
1. `sudo apt-get install mysql-server`
2. When prompted, enter (and note) password `mysql -u root -p < /opt/aiq/aiq_distribution/TestNode/webapps/AppvanceServer/WEB-INF/classes/database/MySQLInitial.sql`
3. Password will be asked after the above query, provide valid `passwordmysql -u root -p < /opt/aiq/aiq_distribution/TestNode/webapps/AppvanceServer/WEB-INF/classes/database/MySQLAppvance.sql`
3. Optional. Install Firefox and Xvfb (for web testing with Firefox browser only, so **this step is not required if controller will not be running Firefox test designer tests**.) `sudo apt-get install firefox -ysudo apt-get install xvfb -y`
## Starting AIQ with /etc/rc.local
The following steps are related to setting the start of AIQ services on boot-up of the system.
There are two options for this: via /etc/rc.local file or by setting up a systemd service. This last option is recommended for test nodes running API test nodes.
This method is preferred versus systemd as rc.local startup is compatible with one click upgrade using Lab Management.
1. Start aiq services as background process using `rc.local`, giving write permissions to `rc.local.sudo chmod -R +x /etc/rc.localsudo nano /etc/rc.local`
2. Paste the following lines into `/etc/rc.local`:
```
cd /opt/aiq/aiq_distribution/ && ./Appvance.sh
```
Only in the case you want to use your controller to run Firefox test designer test cases then have your `/etc/rc.local` like the following:
This requires you to install the xvfb X11 window server in ubuntu.
```
Xvfb :99 -ac -screen 0 1280x1024x24 &export DISPLAY=:99
cd /opt/aiq/aiq_distribution/ && ./Appvance.sh
```
For Azure Deployment on Ubuntu:
[Copy](javascript:void(0);)
```
#!/bin/sh -eexport JAVA_HOME=///export PATH=/path/to//bin:$PATHXvfb :99 -ac -screen 0 1280x1024x24 &export DISPLAY=:99cd /opt/aiq/aiq_distribution/ && ./Appvance.shexit 0
```
3. Save file changes:
- Press **Control + x**
- Press **y + Enter**
4. Reboot.
5. Navigate to `http://servername:8080` or `https://servername:8443`.
6. Login to AIQ using appvance/appvance.
## Troubleshooting
If AIQ does not start:
- `curl localhost:8080` to check for a response.
- As a root check `journalctl | grep rc.local` to see if AIQ started successfully.
- If you see a "`/etc/rc.local is not marked executable, skipping`" error, run the following command to make the `rc.local` file executable: `sudo chmod +x /etc/rc.local`
## Starting AIQ Using Systemd Service
Recommend this setting for test nodes that will be used for API load testing to make sure there are plenty of file handles available.
Current limitation for this method is that the one-click system upgrade using Lab Management does not support machines starting AIQ as a systemd service.
1. Navigate to the system directory: `cd /etc/systemd/system`
2. Create a text file in the `system` folder named `appvance.service` with following contents:
[Copy](javascript:void(0);)
```
[Unit]Description=Start Appvance IQ servicesAfter=syslog.target[Service]User=ubuntuType=simpleLimitNOFILE=1000000LimitNPROC=20000ExecStart=/bin/bash /opt/aiq_distribution/TestNode/startup.shWorkingDirectory=/opt/aiq_distribution/TestNodeTimeoutStartSec=0[Install]WantedBy=default.target
```
3. Execute this command: `systemctl daemon-reload`
4. Once installed, open port 8443 to public access.
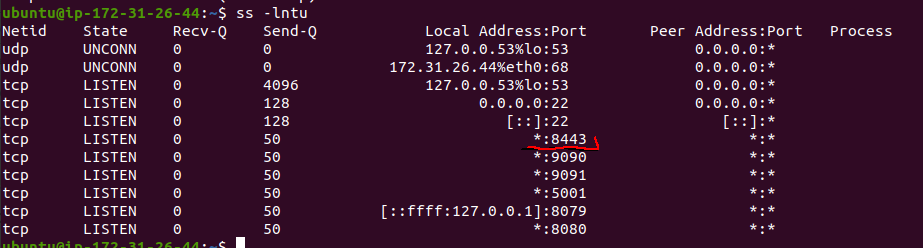
5. If the port is not open, type:
`sudo iptables -A INPUT -p tcp --dport 80 -j ACCEPT`
`sudo service iptables restart`
`sudo reboot`
6. After that enter the following browser URL : `https://:8443/UI/index.html`
---
Last updated: July 31, 2024
If you have any feedback on this topic, please contact us at