# 1.3 - Installation and Configuration
Installation and Configuration — 01 - Getting Started With AIQ. documentation.
# Installation and Configuration
This section describes installation procedures, configuration, deployment options, and options to integrate Appvance IQ (**AIQ** in short) into your software development life-cycle, production monitoring, and build environment.
For System Requirements, Install Guides, Evaluation Guides - Please refer to [Getting Started with Appvance IQ.](https://docs.appvance.net/Content/AIQ/Getting_Started/Getting_Started_with_Appvance_IQ.htm)
The following sections detail more information:
---
Last updated: June 02, 2023
If you have any feedback on this topic, please contact us at
# Setting up MYSQL RDS Instance from AWS
**This article has been consolidated.** The complete, current procedure is [MySQL 8.x Database on AWS RDS (8.0 and 8.4)](https://docs.appvance.net/books/12-install-guides/page/mysql-8x-database-on-aws-rds-80-and-84) in the *1.2 - Install Guides* book.
The step-by-step that used to live here walked through an AWS console that no longer exists — the *Launch a DB Instance* flow was retired years ago, and its screenshots would mislead anyone following them today. Everything it covered is now in the consolidated article:
- Supported versions — MySQL 8.4 LTS (recommended) and 8.0, and the Extended Support cost trap on 8.0
- Instance class and storage sizing
- Parameter group creation and the full AIQ parameter set
- Creating the instance on the current console, with screenshots
- Security group, schema installation, verification, monitoring and troubleshooting
If you arrived here from a bookmark, update it to the link above.
# TestNode Settings
## Change TestNode Port Number
Appvance IQ communicates with a TestNode over port 8080 for HTTP and 8443 for HTTPS by default.
1. Stop Appvance IQ.
2. Navigate to \\aiq\_distribution\\TestNode\\etc
3. Open jetty-http.xml in notepad editor or similar
4. Search for 8080 and replace the port number with any preferred value
5. Save the file
6. Restart Appvance IQ
Confirm the TestNode is on the new port number by browsing the new location. For example, after setting the TestNode to run on port 7070, browse
http://:7070/TMServer/ws/TestNodeand see the message: TestNode. Hi there, this is an AXIS service! Perhaps there will be a form for invoking the service here.
## Changing TestNode Memory Settings
To set the memory for an installed TestNode, change the contents of /AIQ/TestNode/startup.bat for Windows and /AIQ/TestNode/startup.sh for Unix and Mac OS X systems. These files contain the following command line:
@"%Java\_HOME%/bin/java" -Xmx128M -DSTOP.PORT=8079 -DSTOP.KEY=secret -jar start.jar @echo "TestNode? Started"
Adjust the memory settings using the -Xmx parameter.
## Enabling Java Server Mode for Faster TestNode Performance
The Java Virtual Machine (JVM) running the TestNode uses just-in-time compilation and other techniques to deliver the performance of your tests. You have two choices of JVM: Java Runtime Environment (JRE) and Java Development Kit (JDK.)
To see which JVM you are running, open a command shell and run: java -version.
The JDK offers a special -server switch. This tells the JVM to use pre-compilation and other techniques to improve your test performance. The tradeoff of -server is the test will take longer to start and use more memory.
## Proxy Server Configuration
If you normally need a proxy service to access Web sites, instruct Appvance IQ to use the proxy with the following instructions for Appvance Designer 2.0
For Appvance Designer 2.0, configure the external proxy by editing /Appvance IQ/sahi/userdata/config/userdata.properties and setting these properties:
- ext.http.proxy.enable=true
- ext.http.proxy.host=external\_proxy\_server\_hostname\_or\_ip
- ext.http.proxy.port=external\_proxy\_server\_port
If your proxy needs authorization, you should set these properties too:
- ext.http.proxy.auth.enable=true
- ext.http.proxy.auth.name=proxy\_authorization\_username ext.http.proxy.auth.password=proxy\_authorization\_password.
Make the same changes with ext. HTTPS settings for HTTPS sites.
- In addition, if you need to bypass the external proxy for some local sites you need to configure that too in sahi.properties like this:
ext.http.both.proxy.bypass\_hosts=localhost|127.0.0.1|\*.yourinternaldomain.com
Note that there is only one bypass setting for both HTTP and HTTPS.
For TestNode, configure the external proxy by changing the settings in the Options tab when using the Scenario Builder to configure the TestScenario.
Appvance IQ/TestNode/startup.sh (or .bat)Appvance IQ/Appvance Monitor/startMonitor.sh (or .bat)
---
Last updated: October 19, 2026
# Obsolete Flex Flash SWF Configuration Reference
This page is retained only to flag that Flex, Flash, and SWF configuration is obsolete for current AIQ testing.
## Validation workflow
1. Do not configure new AIQ environments for Flash or SWF execution.
2. Confirm whether any remaining customer workflow still depends on retired Flash technology.
3. Document the dependency as legacy risk and plan migration to supported application technology.
---
Last updated: October 2, 2026
# Installation and Configuration FAQ
Use this FAQ for current AIQ installation and configuration questions that do not require a dedicated procedure page.
## What changed in this article
- Renamed the generic FAQ title so it is clear which book/context it belongs to.
- Reframed the FAQ as a routing and troubleshooting aid for installation/configuration topics.
- Added checks to avoid duplicating content that belongs in dedicated upgrade, Test Node, certificate, browser, or performance pages.
## Validation workflow
1. Use this FAQ for short installation/configuration answers only when a dedicated article does not already cover the topic.
2. Link to the canonical procedure page when the answer requires multiple steps or risk controls.
3. Review FAQ entries periodically and promote repeated issues into standalone articles.
**Review note:** This page now has a clear scope and should not become a dumping ground for unrelated topics.
---
Last updated: October 2, 2026
If you have feedback on this topic, contact .
# Best Practices to Improve AIQ Performance
# Best Practices to Improve AIQ Performance
Use these practices to keep AIQ executions stable and results reliable. Performance tuning should consider the AIQ Controller, Test Nodes, database, browser capacity, network path, and the application under test.
## Execution practices
- Validate scenarios with a small run before scaling load.
- Use realistic ramp-up and ramp-down periods.
- Keep test data reusable, resettable, and separate from scenario logic.
- Avoid unnecessary fixed waits; use Scenario Editor conditional waits where possible.
## Environment practices
1. Size Test Nodes for the execution type and expected browser or user count.
2. Monitor CPU, memory, disk, network, and browser/driver health during large runs.
3. Keep AIQ, browser, driver, and operating-system versions aligned with release guidance.
4. Document environment changes before comparing performance results.
**Last updated:** September 18, 2026
# Installing and Configuring Desktop Designer
# Installing and Configuring Desktop Designer
This is the installation and configuration process to setup Desktop Designer in order to test Windows applications.
## System Requirements
### Hardware
- Intel iCore 5 or above
- Memory 16 GB
- 1 TB Hardrive (SSD prefered)
### Amazon EC2
- For Windows Server t3.xlarge
### OS and Software
- Windows 10 / Windows Server 2016
- Windows Professional only. Window Home not supported.
- Windows 11 PRO is not certified at this time.
- Windows Server 2022 Datacenter not certified at this time.
- Windows Application Driver (WinAppDriver) (Version 1.2.1 or greater)
[Download Link](https://github.com/Microsoft/WinAppDriver/releases)
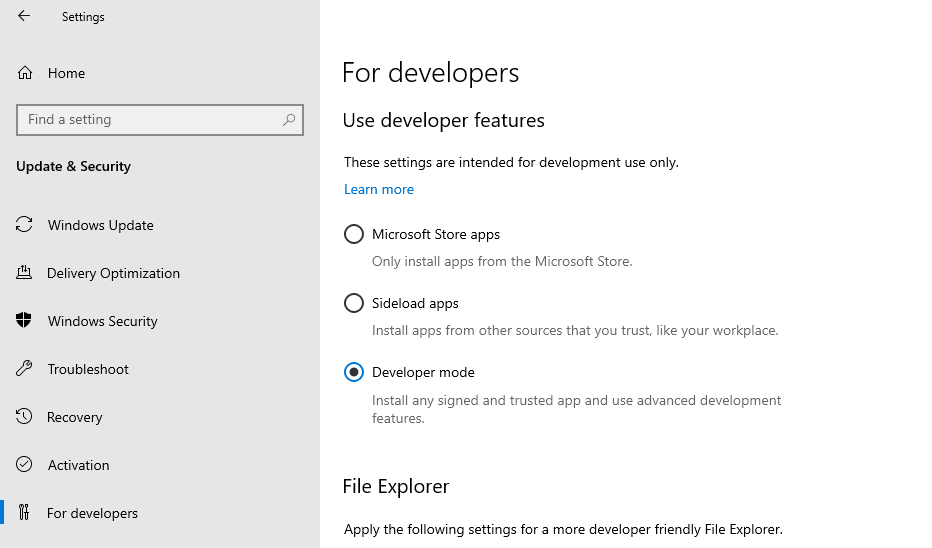
- Developer Mode must be set to On.
- Windows SDK (Optional)
[Download Link](https://developer.microsoft.com/en-us/windows/downloads/windows-sdk/)
- Install Chocolatey. Chocolatey is software management automation for Windows that wraps installers, executables, zips, and scripts into compiled packages.
## Installation Process
1. Enable Developer Mode.
1. Press WinKey+ I
2. In **Privacy and Security**, Select **For Developers**
3. Enable **Developer Mode**.
2. Download Windows Application Driver. Follow the installation process.
[Download Link](https://github.com/Microsoft/WinAppDriver/releases)
3. Open a Command Console in Administrator mode and navigate to the path where the Windows Application Driver was installed.
`cd C://Program Files/Windows Application Driver/`
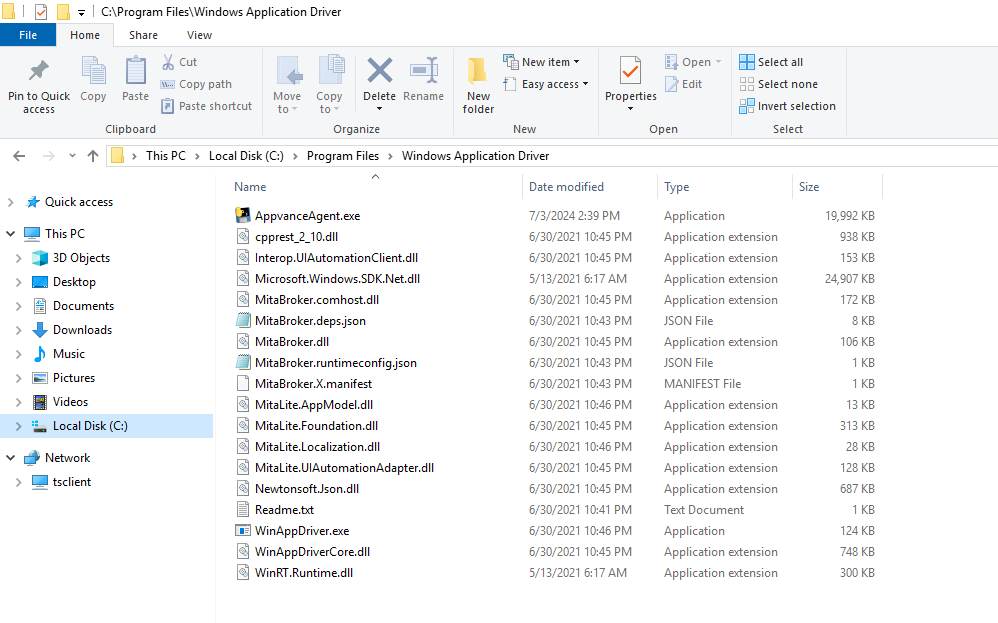
An Enviroment Variable can be set using the cmd prompt: `setx APPIUM_WAD_PATH "C:/Program Files x86/Windows Application Driver"`
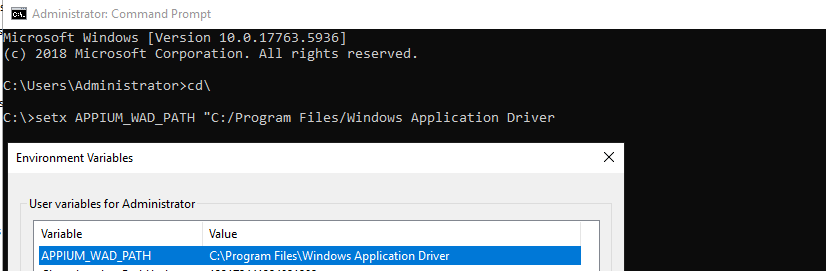
4. Download Video Recording Tool for Windows (`AppvanceAgent.exe`) and copy to the path "`C:/Program Files x86/Windows Application Driver Tool`:

The Windows Appvance Agent can be downloaded from the [Desktop Designer Installation Downloads](https://appvance.atlassian.net/wiki/x/A4De8Q) page. Access to this page is restricted and must be requested.
5. Install Chocolatey. This is needed to install the ffmpeg plugin.
[Download Link](https://chocolatey.org/install)
6. Install Chocolatey.
Full instructions can be found here: [Installing Chocolatey](https://chocolatey.org/install).
1. Run PowerShell as Administrator with the following command:
2. ```
Set-ExecutionPolicy Bypass -Scope Process -Force; [System.Net.ServicePointManager]::SecurityProtocol = [System.Net.ServicePointManager]::SecurityProtocol -bor 3072; iex ((New-Object System.Net.WebClient).DownloadString('https://community.chocolatey.org/install.ps1'))
```
7. Restart PowerShell and run it as Administrator again.
8. Run this command: `choco install ffmpeg`
9. Navigate to `C:/Program Files x86/Windows Application Driver` in PowerShell and run the following command:
`AppvanceAgent.exe --port 4726 --executable WinAppDriver.exe --base_path /wd/hub --win_app_driver_port 4725`
The first port is for video recording and the second is for WinAppDriver.
Port 4726 would be the value videoPort in the config file. Port 4725 would be the port you use in the serverURL. The videoPort field is mandatory.
See the [Configuration File Example](#Configur) below.
10. To access WinAppDriver Remotely there are two options:
Use a bridge like NGrok:
- Start ngrok with: ngrok http http://localhost:4725
- Copy the forwarding URL and use it in your script capabilities.
Open a port on the test machine.
Open up Windows Firewall with Advanced Security.
- Select **Inbound Rules** -> **New Rule..**.
- Rule Type -> Port.
- Select **TCP**.
- Choose a specific local port (472x)
- Action -> Allow the connection
- Profile -> Select all
- Name -> optional, choose a name for the rule.
You can also run the following command when run in an admin command prompt: `netsh advfirewall firewall add rule name="WinAppDriver remote" dir=in action=allow protocol=TCP localport=4723`
11. Run `ipconfig.exe` to determine your machine's local IP address.
Setting \* as the IP address command line option will cause it to bind to all bound IP addresses on the machine.
12. Run `AppvanceAgent.exe --port 4725 --executable WinAppDriver.exe --base_path /wd/hub --win_app_driver_port 4729` as an administrator with command line arguments as seen above specifying the local IP and port.
### Configuration File Example
[Copy](javascript:void(0);)
```
[ { "app": "", "appActivity": "TEST", "appPackage": "Root", "bundleId": "", "validDomains": "", "service": "On-Premises", "configName": "Root_DesktopApp", "deviceMode": "Desktop", "proxyURL": "", "videoPort": "4726", "serverURL": "http://192.168.3.14:4725/wd/hub", "source": "package", "platformName": "Windows", "capabilities": { "deviceName": "WindowsPC", "platformVersion": "", "automationName": "Windows", "app": "", "noReset": "true" } }]
```
## Appium Capabilities
Appium is an open source automation tool for running scripts and testing native applications, mobile-web applications and hybrid applications on Android or iOS using a webdriver.
Appium has the ability to automate Windows PC Desktop apps. This driver relies on a project from Microsoft called WinAppDriver, which is an Appium-compatible WebDriver server for Windows Desktop apps (and more in the future). WinAppDriver is often abbreviated "WAD". WAD is bundled with Appium and does not need to be installed separately.
[https://appium.readthedocs.io/en/latest/en/drivers/windows/](https://appium.readthedocs.io/en/latest/en/drivers/windows/)
### Define the Application Under Test
The application under test can be defined with the following:
`appCapabilities.SetCapability("app", "C:\Windows\System32\notepad.exe");`
or
`appCapabilities.SetCapability("app", "Microsoft.WindowsCalculator_8wekyb3d8bbwe!App");`
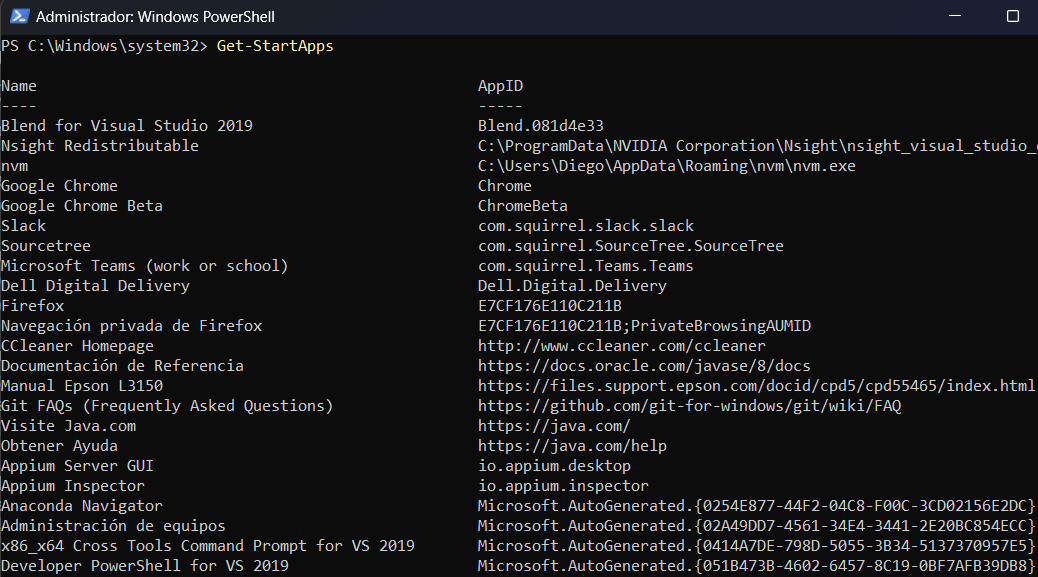
Both the path to the application and the application ID are valid. The application ID can be found running in PowerShell with admin permissions : `Get-StartApps`
### Platform and Device
The Platform and device are required:
> `appCapabilities.SetCapability("platformName", "platformName");`
>
> `appCapabilities.SetCapability("deviceName", "WindowsPC");`
Those capabilities are used to start the driver:
> `driver = new WindowsDriver(new URL("http://127.0.0.1:4723"), appCapabilities);`
## Enabling GUI even when RDP is Disconected
GUI can be still running if an automated RDP’s disconnection file is created using a batch file.
On the remote computer, do the following:
1. Create a batch file :
`for /f "skip=1 tokens=3" %%s in ('query user %USERNAME%') do (`
` %windir%\System32\tscon.exe %%s /dest:console`
`)`
2. In the **File** properties, click **Advanced** and select **Run as administrator**.
## Connectivity Details
If the Windows machine or Virtual Desktop Infrastructure (VDI) is in the same network than the machine running AIQ, then the local internal address can be use for connecting to the WinAppDriver.
Otherwise the machine hosting Windows must have assigned a Public IP and ports for RDP 3389 and 4725, 4726, 4727 forwarding the machine where the driver is running.
---
Last updated: October 12, 2026
If you have any feedback on this topic, please contact us at
# Roku Environment Setup
This section will detail the required setup to allow recording and running Desktop Designer scripts for a Roku device on a local environment.
This documentation does not include the steps related to the Roku device setup itself. It is assumed that the Roku device is already setup and working as expected.
See the Roku website for information on [Roku setup](https://support.roku.com/category/115001360548).
## System Requirements
### OS and Hardware
- Two machines running Windows 10 or newer. Windows 10 / Windows Server 2016 are supported.
- Windows Professional only. Window Home not supported.
- Windows 11 PRO is not certified at this time.
- Windows Server 2022 Datacenter not certified at this time.
- Intel iCore 5 or above
- Memory 16 GB
- 1 TB Hardrive (SSD prefered)
- One Roku device
- One HDMI Video Capture device
### Amazon EC2
- For Windows Server t3.xlarge
## Architecture
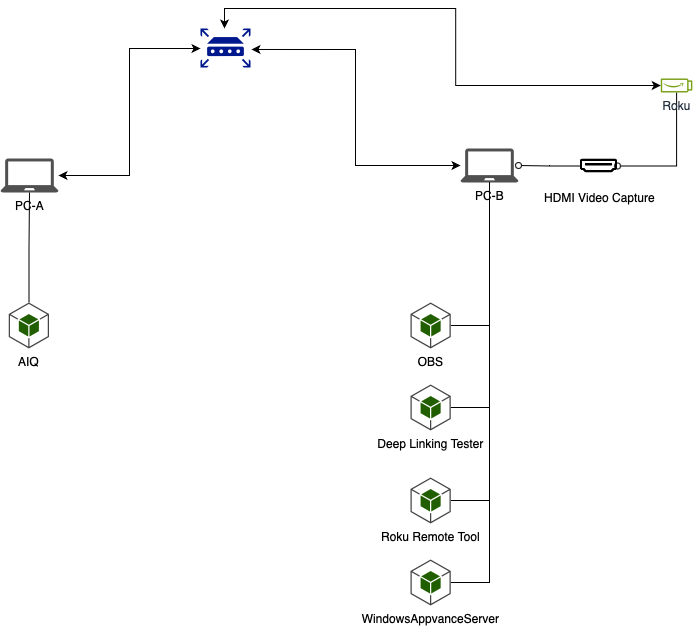
The way the Roku environment works is by using two different PCs / laptops connected to the same network.
- One of them (PC-A) is going to run AIQ and is going to be used for script recording/playback.
- The second one (PC-B) has a HDMI video capture device connected (with the Roku device connected to it). PC-B also runs the WindowsAppvanceServer along with the other required software applications used to display and control the Roku system.
## Prerequisite Setup
Make sure both computers are connected to the same network before completing the setup.
### PC-A (AIQ)
Properly setup AIQ on this machine. Refer to the [AIQ Documentation](https://docs.appvance.net/Content/Home.htm) for setup information for AIQ.
### PC-B (Roku Device)
Make sure the Roku device is plugged to the HDMI capture device, and is plugged to the computer.
## Required Software Installations
The following installations are required. Please see the individual websites for the installer downloads and installation instructions. AIQ specific configuration information for these components is provided later in this document.
#### Windows Appvance Driver
Windows Appvance Driver (WAD) works as a substitute for Windows App Driver in order to avoid well know issues reported in the WinAppDriver.
Installation Instructions and Download Link: [Windows Appvance Driver Setup](https://docs.appvance.net/Content/AIQ/DesktopTesting/Windows_Appvance_Driver_Setup.htm)
#### Open Broadcaster Software
OBS (Open Broadcaster Software) is free and open source software for video recording and live streaming.
Download Link: [https://obsproject.com/](https://obsproject.com/).
#### Roku Remote Tool
The Roku Remote Tool provides developers a quick and intuitive way to create reusable scripts for ad-hoc testing of their channel.
Download Link: [https://devtools.web.roku.com/RokuRemote/](https://devtools.web.roku.com/RokuRemote/).
#### Roku Deep Linking Tester
The Roku Deep Linking Tester provides a UI for configuring, saving, import/exporting, and executing deep linking test cases.
Download Link: [https://devtools.web.roku.com/DeepLinkingTester/](https://devtools.web.roku.com/DeepLinkingTester/).
---
Last updated: October 12, 2026
If you have any feedback on this topic, please contact us at
# Windows AIQ Driver Setup
# Windows AIQ Driver Setup
Use this page when preparing a Windows machine to run AIQ browser, desktop, or device-related automation that depends on local drivers. Match driver versions to the target browser, operating system, and AIQ environment.
## Preparation
- Install drivers with an account that has the required Windows permissions.
- Confirm the driver version matches the browser or application version used by the test.
- Store drivers in a controlled path and document that path in the environment configuration.
- Allow the driver through endpoint protection only when approved by IT or the customer security policy.
- Restart related services or the machine when the driver installation requires it.
## Validation workflow
1. Run a basic AIQ smoke test that starts the target browser or desktop application.
2. Confirm the driver process starts and stops cleanly.
3. Review output logs for path, permission, or version mismatch errors.
4. Record the driver version and installation path for future upgrades.
*Last updated: October 8, 2026*
# Configure Open Broadcaster Software for AIQ Test Evidence
# Configure Open Broadcaster Software for AIQ Test Evidence
Open Broadcaster Software (OBS) can be used to capture video evidence while AIQ tests run. Use it when a team needs visual proof of application behavior, playback issues, or environment-specific failures.
## Setup guidance
- Install a supported OBS version on the machine where the browser, desktop app, or device stream is visible.
- Create a dedicated scene for AIQ evidence capture and include only the required window, display, or device feed.
- Set the output path to a location with enough disk space for the planned run duration.
- Use a recording format that can be recovered if the session stops unexpectedly.
- Mask or avoid capturing credentials, customer data, and unrelated desktop content.
## Validation workflow
1. Start a short recording before the AIQ run.
2. Run a small scenario and confirm the video shows the relevant application state.
3. Check audio, resolution, timestamps, and file size.
4. Attach or reference the recording with the related execution evidence.
*Last updated: October 8, 2026*
# Setup Reku Remote Control
The following is the AIQ specific configuration in the Roku Remote Tool.
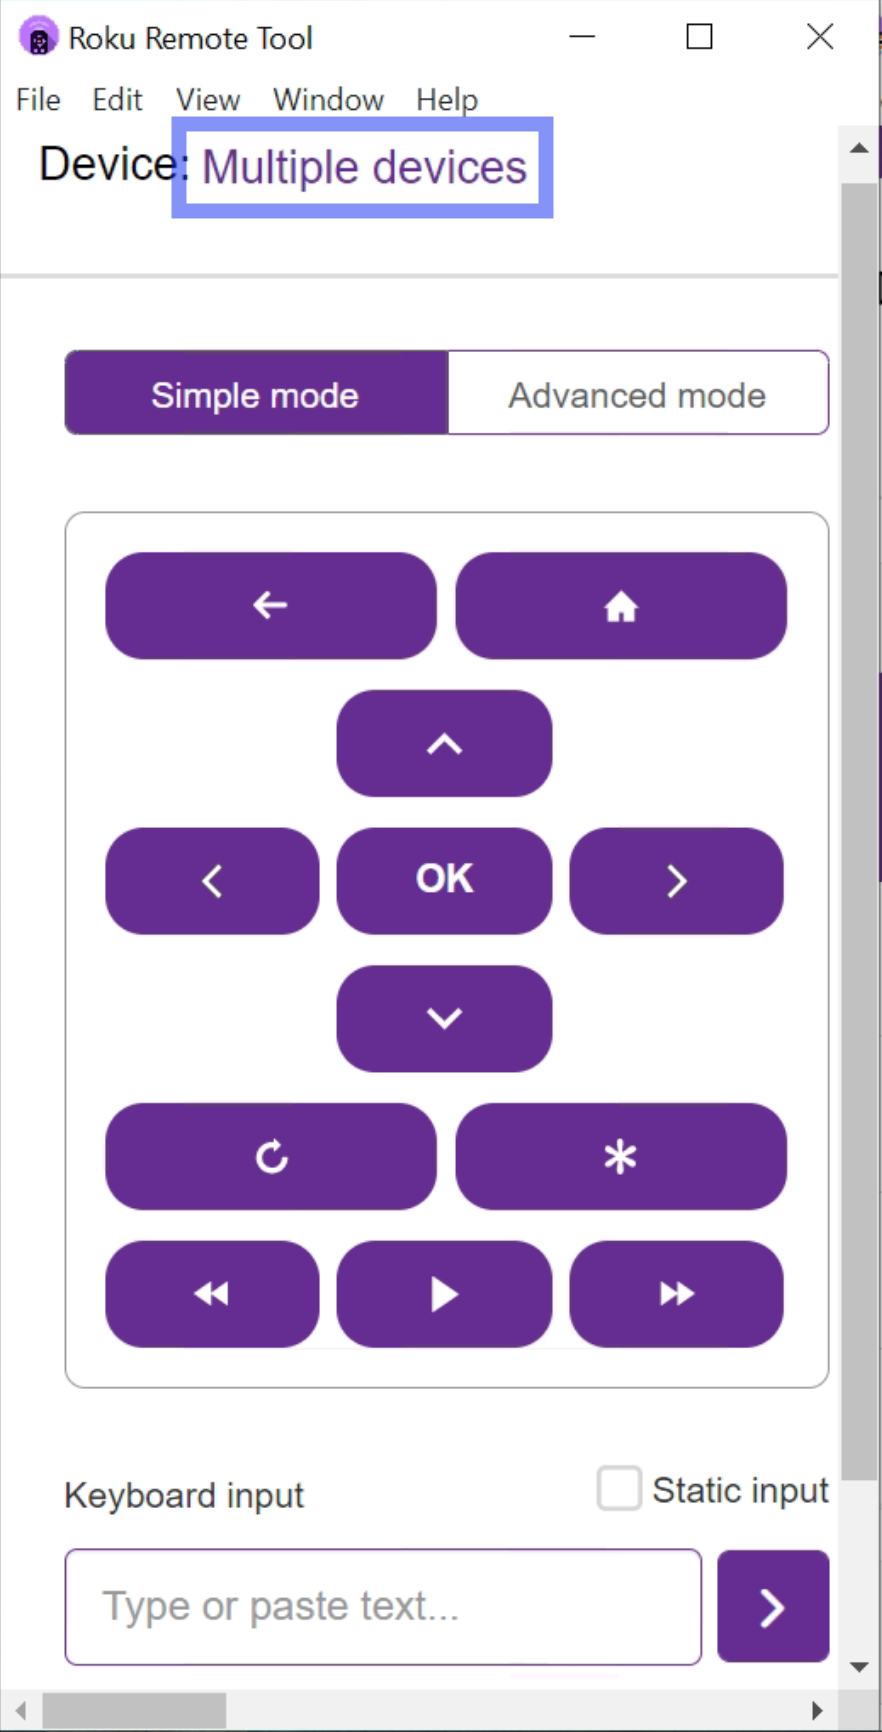
1. Open the Roku Remote Control application.
2. Click the button next to Device.
3. Select the Roku device where you are going to perform all testing.
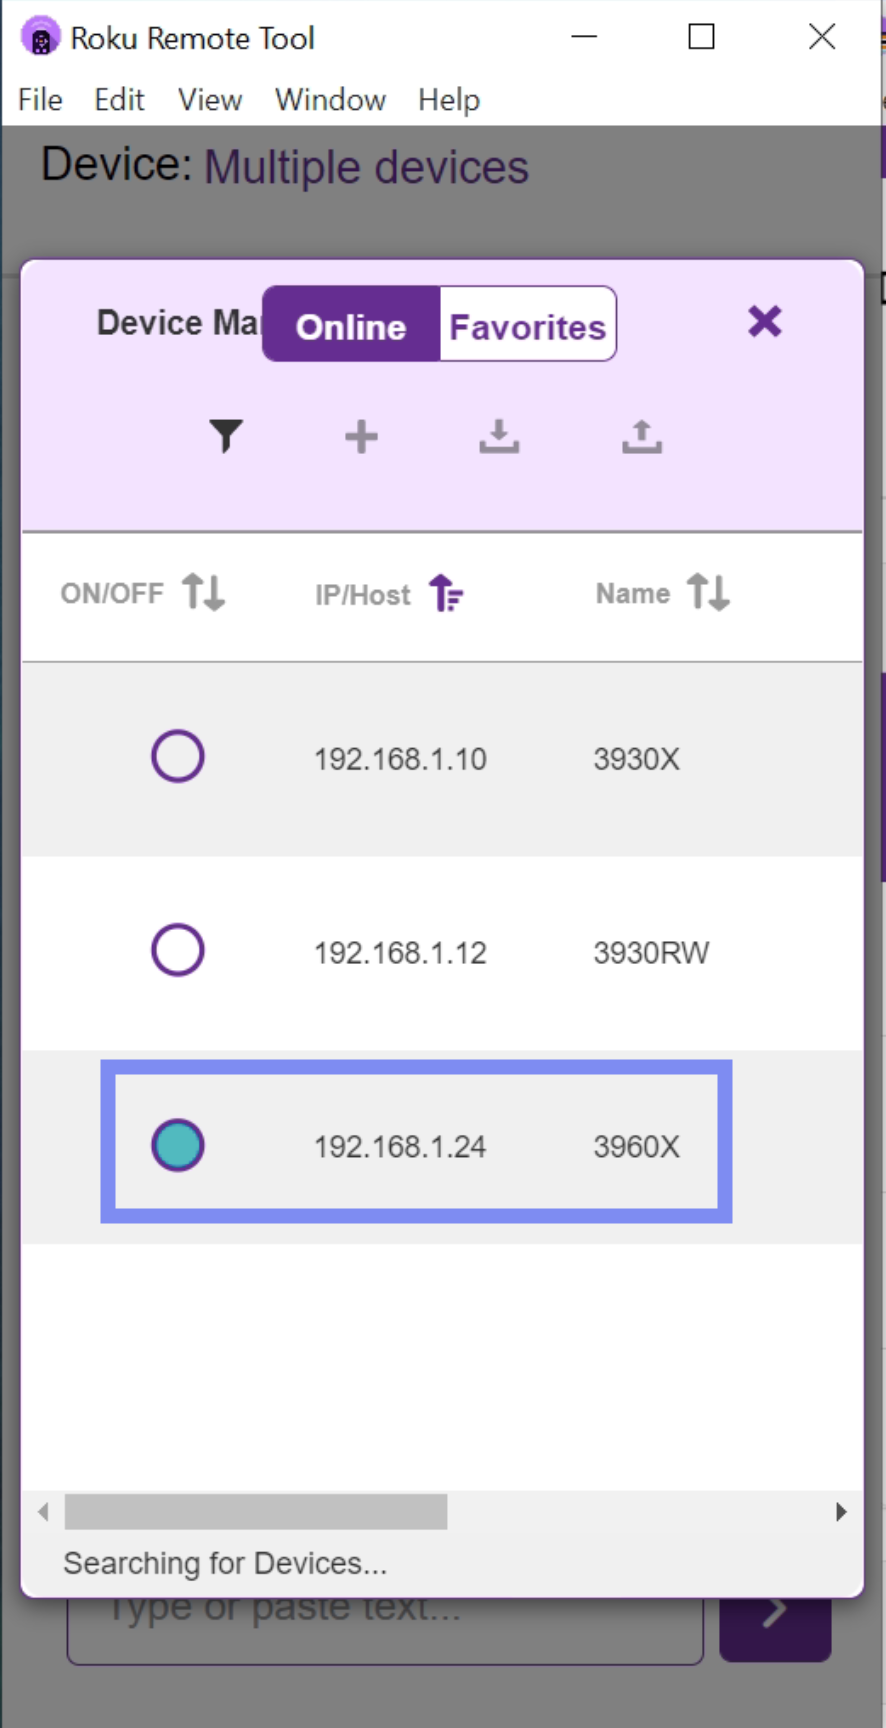
4. Close the device list window.
---
Last updated: September 24, 2024
If you have any feedback on this topic, please contact us at
# Set Up Deep Link Tester for AIQ Mobile Testing
# Set Up Deep Link Tester for AIQ Mobile Testing
Use a deep link tester when an AIQ mobile test needs to launch an app into a specific route, screen, or state. Deep links should be validated before they are added to repeatable mobile scenarios.
## Prerequisites
- Confirm the app build installed on the device or emulator supports the target scheme, universal link, or app link.
- Document the exact deep link format, required parameters, and expected landing screen.
- Use test accounts and non-production data when validating app navigation.
- Reset the application state between runs when the deep link depends on login, cache, or stored preferences.
## Validation workflow
1. Open the deep link manually on the target device and confirm the expected screen appears.
2. Add the deep link launch step to the AIQ mobile flow.
3. Run the test once with logging enabled and capture evidence.
4. Add assertions for the landing screen so failures are detected immediately.
*Last updated: October 8, 2026*
# Arrange Applications for Reliable AIQ Desktop Testing
# Arrange Applications for Reliable AIQ Desktop Testing
Arrange desktop applications consistently before an AIQ desktop test runs. Predictable window placement helps reduce failures caused by hidden controls, overlapping windows, or unexpected screen resolution changes.
## Recommended setup
- Use a dedicated test machine or session for desktop automation.
- Set the display resolution and scaling before recording or running tests.
- Open only the applications required by the scenario.
- Place the application under test in a known position and avoid overlapping windows.
- Disable pop-ups, notifications, and screen savers that can cover the application.
## Validation workflow
1. Start from a clean desktop session.
2. Open the required application and arrange it as expected.
3. Run a short smoke test that validates the first interaction and a key screen state.
4. Capture a screenshot if the arrangement is part of the support procedure.
*Last updated: October 8, 2026*
# Troubleshoot Possible AIQ Performance Issues
# Troubleshoot Possible AIQ Performance Issues
Use this article when AIQ feels slow, executions queue unexpectedly, reports load slowly, or test nodes are not keeping up with scheduled demand. Start with environment evidence before changing configuration.
## Common areas to review
- **Host resources:** CPU, memory, disk I/O, and available storage on controller, database, and test-node hosts.
- **Database health:** Result-table growth, slow queries, retention settings, and backup activity.
- **Test-node capacity:** Number of concurrent executions, browser/device availability, and node connectivity.
- **Scenario design:** Excessive waits, unnecessary screenshots, large payloads, and missing cleanup steps.
- **Network path:** Latency or firewall issues between AIQ services, test nodes, databases, and target applications.
## Recommended workflow
1. Capture the exact symptom, affected time range, and AIQ components involved.
2. Review logs and resource metrics before restarting services.
3. Run a small known-good scenario to separate platform issues from scenario-specific issues.
4. Apply one change at a time and record the result.
*Last updated: October 8, 2026*
# Cloud Configuration
# Cloud Configuration
- [Test Deployment in a Cloud](https://docs.appvance.net/Content/AIQ/Cloud_Config/Test_Deployment_in_a_Cloud.htm)
- [onnEC2 Configuration](https://docs.appvance.net/Content/AIQ/Global_Options/CloudConfig/Amazon_EC2_Configurator.htm)
- [Cloud Architecture](https://docs.appvance.net/Content/AIQ/Cloud_Config/Cloud_Architecture.htm)
- [Features and Benefits](https://docs.appvance.net/Content/AIQ/Cloud_Config/Features_and_Benefits.htm)
- [Grid Configuration](https://docs.appvance.net/Content/AIQ/Global_Options/CloudConfig/Grid_Testing.htm)
- [Softlayer Configuration](https://docs.appvance.net/Content/AIQ/Global_Options/CloudConfig/SoftLaye_Config.htm)
- [Cloud Testing Options](https://docs.appvance.net/Content/AIQ/Cloud_Config/Cloud_Testing_Options.htm)
- [Scriptless Test Deployment Configuration](https://docs.appvance.net/Content/AIQ/Cloud_Config/Scriptless_Test_Deployment_Configuration.htm)
- [Cloud Config - FAQ](https://docs.appvance.net/Content/AIQ/Cloud_Config/Cloud_Config___FAQ.htm)
---
Last updated: October 16, 2026
# Test Deployment in a Cloud
If you have any feedback on this topic, please contact us at
**Last updated: June 02, 2023**
# AIQ Cloud Architecture Overview
# AIQ Cloud Architecture Overview
AIQ cloud deployments use controller, execution, storage, and integration components sized for the target workload. Exact architecture depends on the customer environment, deployment model, and AIQ release.
## Core areas
- Controller services coordinate users, projects, executions, and reporting.
- Execution capacity is provided by Test Nodes or equivalent worker resources.
- Storage and data services retain configuration, execution results, and operational test data.
- Networking, certificates, proxy rules, and integrations connect AIQ to the systems under test.
## Operational checklist
1. Document ports, domains, certificates, and proxy requirements.
2. Size execution capacity for the expected browser, service, mobile, or performance workload.
3. Monitor controller, database, and Test Node health during high-volume runs.
4. Review security, access, backup, and retention requirements with the environment owner.
**Last updated:** September 18, 2026
# Features and Benefits
If you have any feedback on this topic, please contact us at
**Last updated: June 02, 2023**
# Cloud Testing Options
**Last updated: October 15, 2026**
# Configure Scriptless Test Deployment
Use scriptless test deployment configuration to prepare Scenario Editor tests for execution in the intended AIQ environment. Keep deployment settings aligned with the target environment, Test Node capacity, browser support, and test data strategy.
## Before deployment
- Confirm the target environment, browser or device requirements, and Test Node availability.
- Validate test data and credentials using approved secure configuration methods.
- Review scenario waits, locators, and validations for maintainability.
- Run a focused validation execution before adding the test to a larger suite.
## Deployment notes
1. Document environment-specific settings and avoid hard-coding them into steps.
2. Keep reusable data in DPLs or approved data sources.
3. Review output after the first scheduled or suite execution.
**Last updated:** September 18, 2026
# Cloud Configuration FAQ for AIQ
Use this FAQ to answer common AIQ cloud configuration questions without duplicating provider-specific setup steps.
## Validation workflow
1. Identify whether the question is about cloud provider setup, grid capacity, or node connectivity.
2. Verify credentials, routing, firewall rules, and browser versions before changing AIQ settings.
3. Use a small validation run before scaling to a full cloud execution.
---
Last updated: September 25, 2026
# Load Runner
# Legacy LoadRunner Integration Overview
Use this overview only when an AIQ environment still needs to reference LoadRunner integration concepts or migration details.
## Validation workflow
1. Confirm why LoadRunner is still required for the environment.
2. Identify whether the work involves script creation, software download, admin configuration, or execution.
3. Route the user to the specific LoadRunner page and document any migration plan.
---
Last updated: September 29, 2026
# Legacy LoadRunner Download Reference
This page is retained as a legacy reference for locating and preparing LoadRunner software in environments that still depend on it.
## Validation workflow
1. Confirm the approved LoadRunner version and license with the customer or tool owner.
2. Use the vendor-approved download path and validate the installer before use.
3. Record version and install location before configuring AIQ integration.
---
Last updated: September 29, 2026
# LoadRunner Installation
This installation has to be done on all Test nodes (Load Generators) which will be used to run scenarios from Appvance IQ.
See [LoadRunner for information on downloading LoadRunner.](https://docs.appvance.net/Content/AIQ/Load_Runner/Load_Runner.htm)
Here is an example installation of LoadRunner. This is not meant to replace the instructions in the appropriate *LoadRunner Installation Guide*. See the [LoadRunner Professional Help Center](https://admhelp.microfocus.com/lr/) for more the appropriate installation guide.
1. Launch the installer file that you downloaded. For example, Micro\_Focus\_LoadRunner\_2023\_Community\_Edition.exe.
2. Select the temp folder for the installer. **Click Next**.
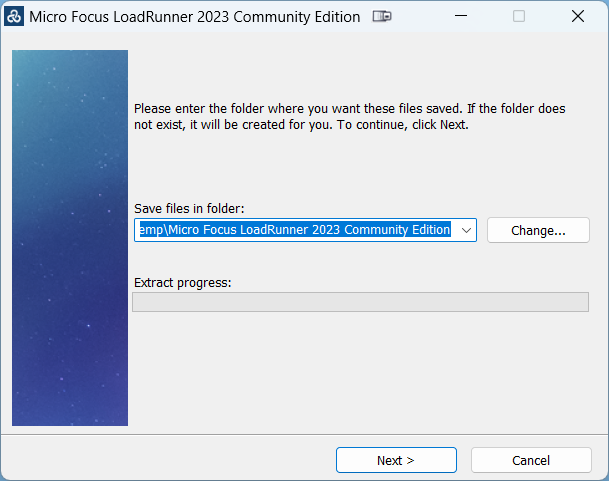
3. The installation files are extracted to the temp folder.
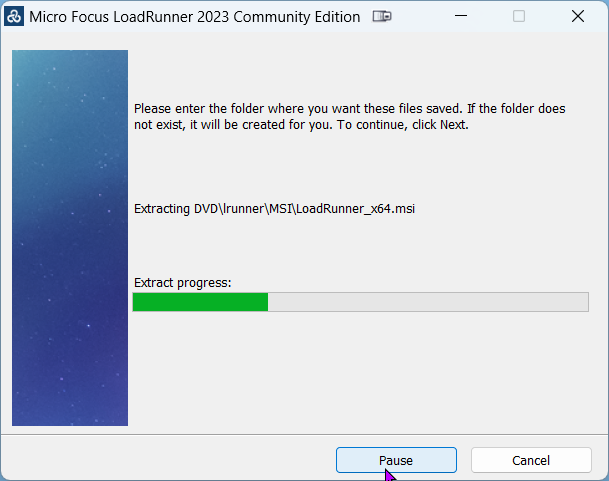
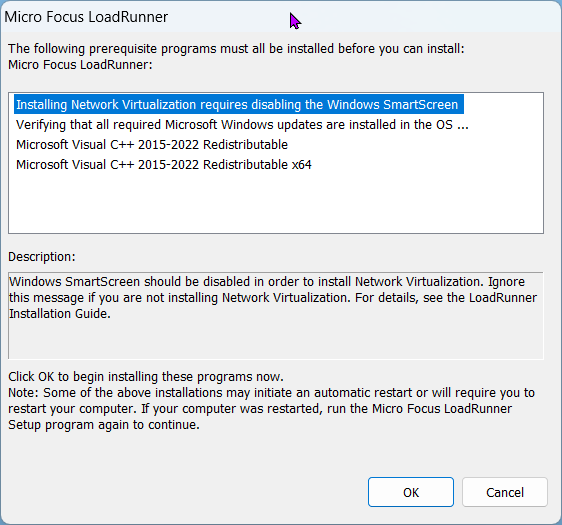
4. The required prerequisite installations are identified. Click **Ok** to begin these installations.
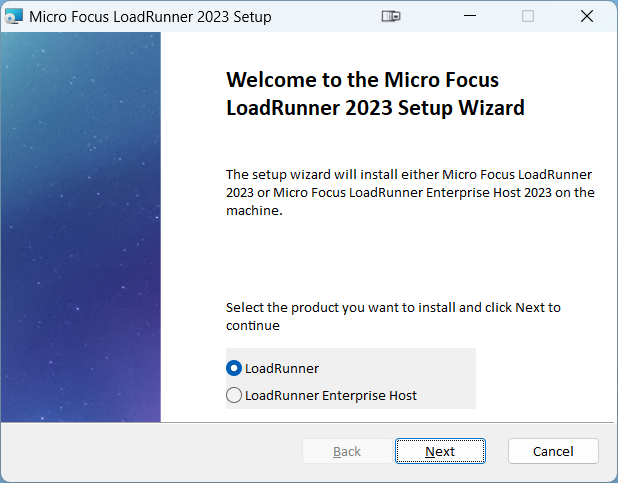
5. Once the prerequisite installations complete, the LoadRunner Setup Wizard displays.
6. Select **LoadRunner**. Click **Next**.
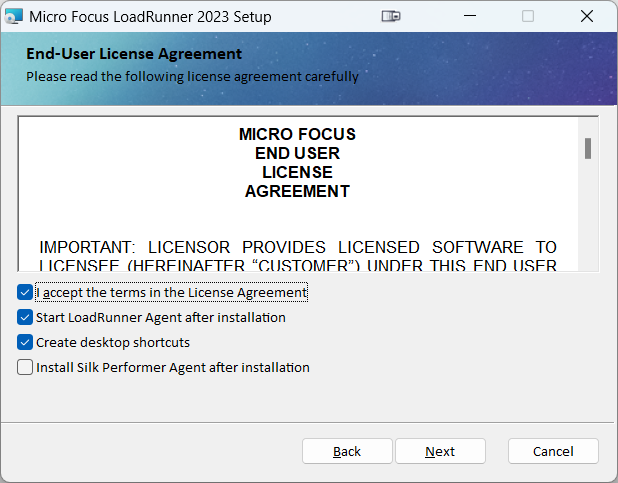
7. Accept the license agreement.
8. Confirm or change the installation location.
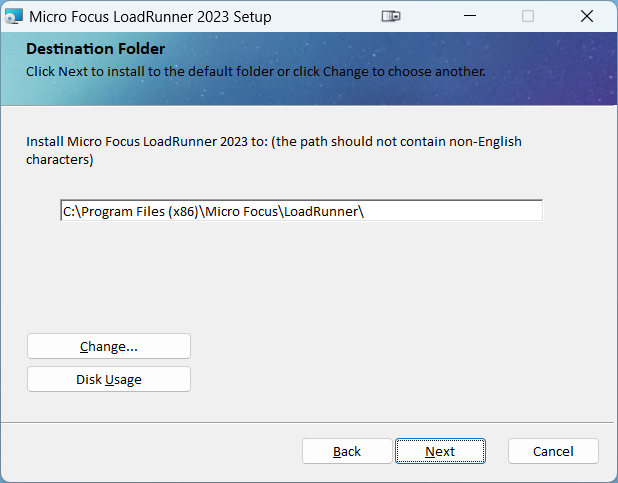
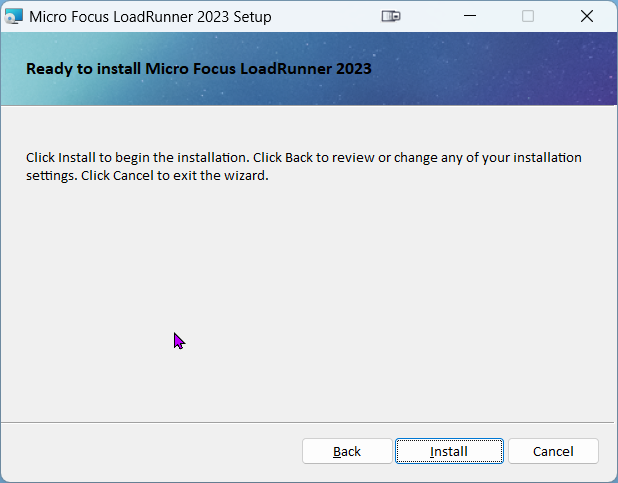
9. Click **Install**.
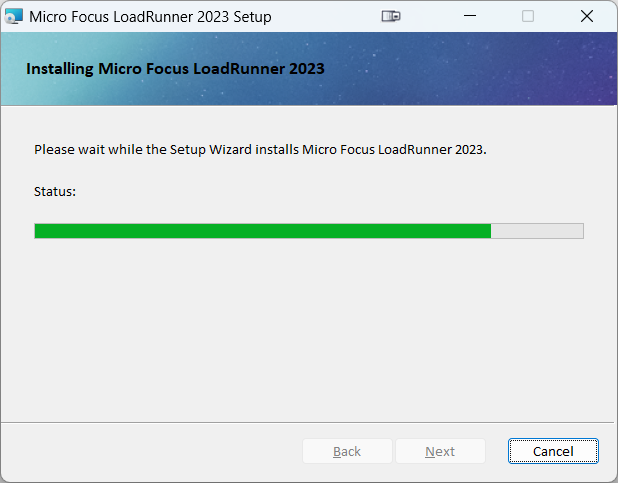
10. Installation progress is displayed.
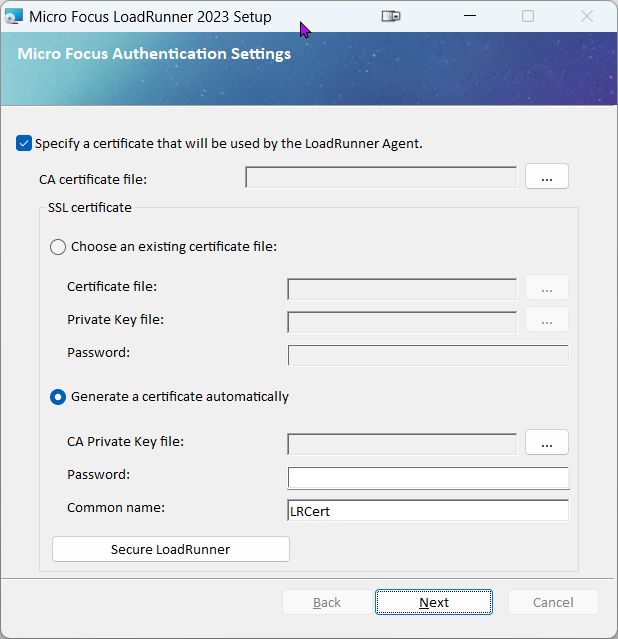
11. If you have a certificate, browse to it. Otherwise, deselect the "Specify a certificate" option. Click **Next**.
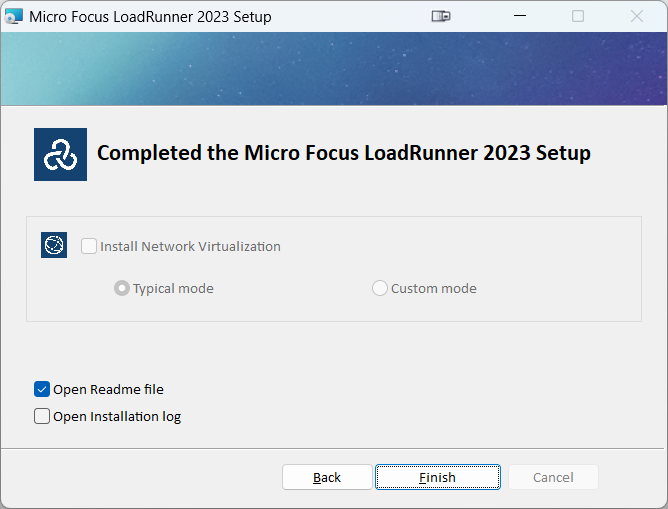
12. The installation completes. **Click Finish**.
## Post Installation Verifications
Here are the ways you can confirm the location and status of LoadRunner. These checks should be the first step of any LoadRunner troubleshooting.
### LoadRunner Install Location
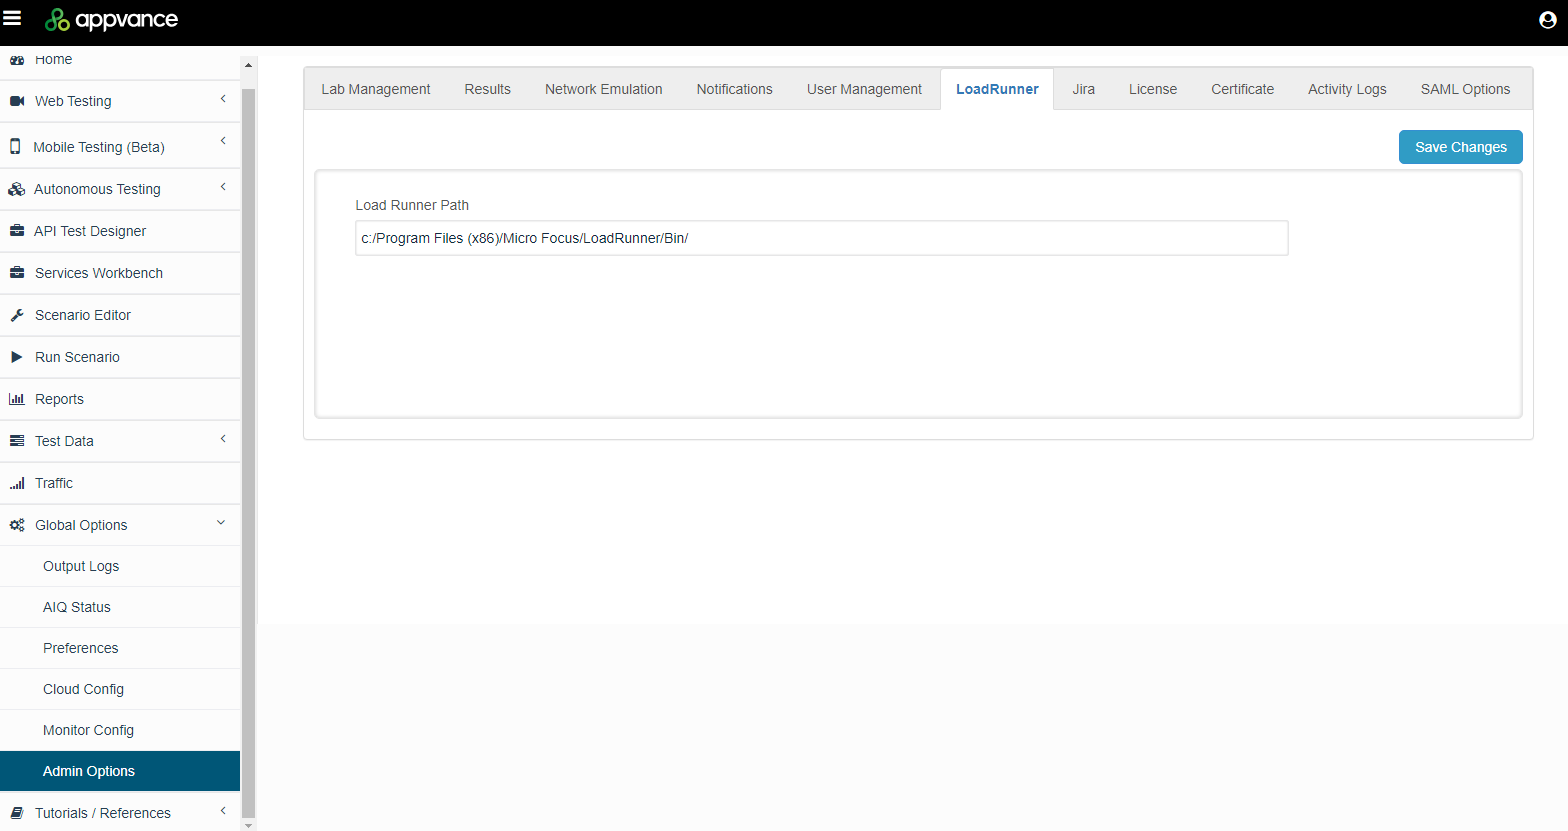
The **LoadRunner** admin page displays the installation location of LoadRunner. LoadRunner is a testing tool used to test applications, measuring system behavior and performance under load.
From AIQ navigate to **Global Options** > **Admin Options** > **Load Runner**.
### LoadRunner Status
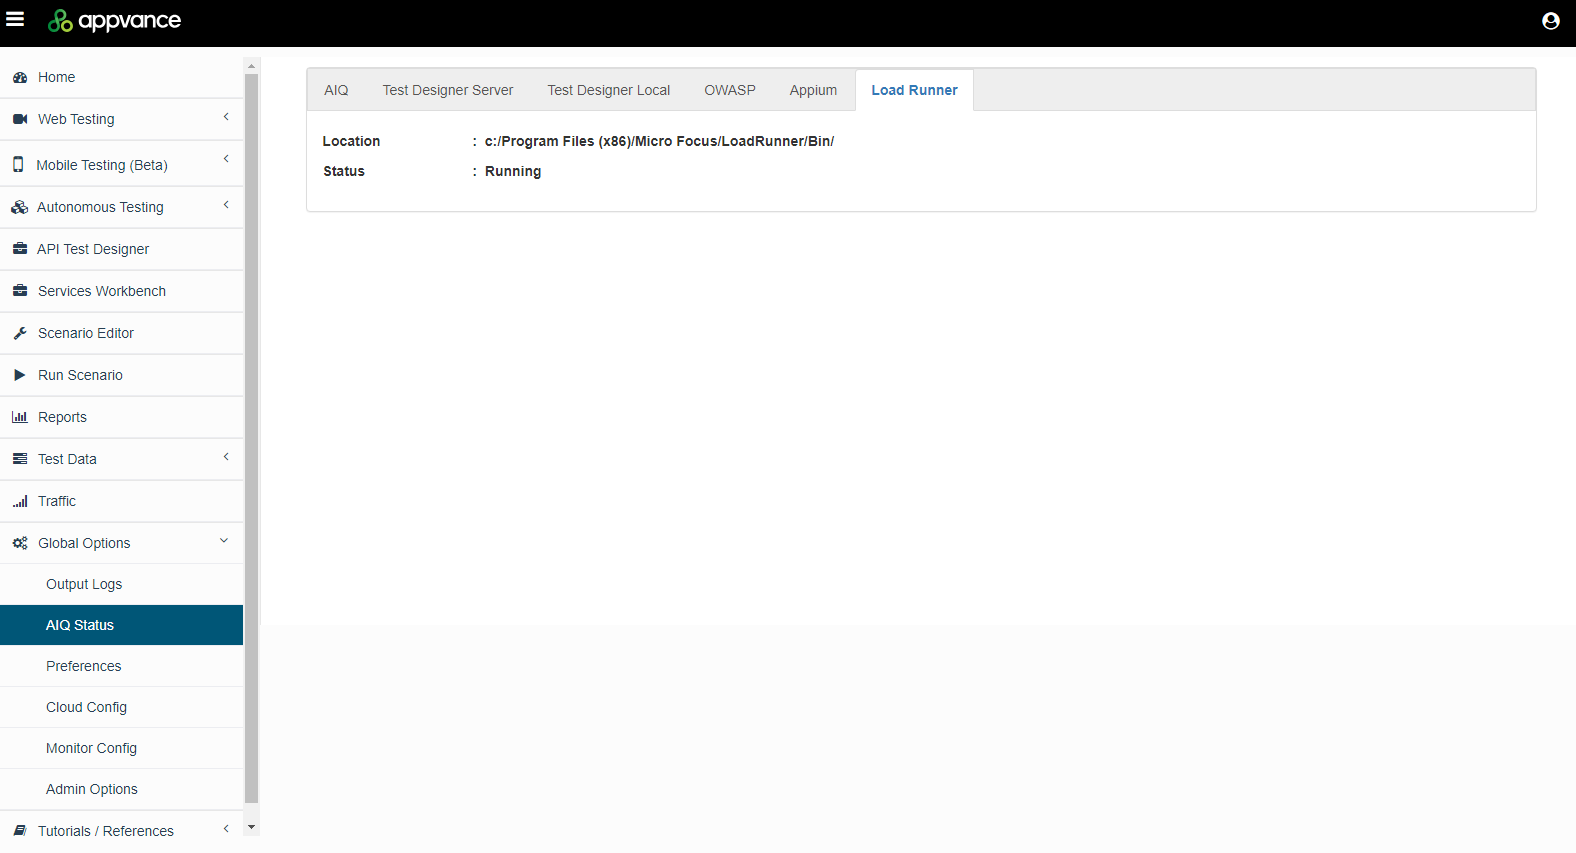
If needed, you can verify the status of LoadRunner.
From AIQ navigate to **Global Options** > **AIQ Status** > **Load Runner**.
Next Steps:
- [Creating a LoadRunner Script ](https://docs.appvance.net/Content/AIQ/Load_Runner/LoadRunner_CreateScript.htm)
- [Running LoadRunner Scripts ](https://docs.appvance.net/Content/AIQ/Load_Runner/LoadRunner_Script.htm)
---
Last updated: June 17, 2024
If you have any feedback on this topic, please contact us at
# Legacy LoadRunner Script Creation Reference
This page is retained as a legacy reference for teams that still need to create LoadRunner scripts for AIQ-related workflows.
## Validation workflow
1. Confirm the customer still requires LoadRunner scripts before creating new assets.
2. Create or update the script with required protocol, parameters, correlations, and test data.
3. Run a small validation before connecting the script to AIQ execution.
---
Last updated: September 29, 2026
# Run Legacy LoadRunner Scripts in AIQ
Use this article when an existing LoadRunner script must be executed through AIQ for a supported legacy workflow.
## Validation workflow
1. Confirm the LoadRunner script and dependencies are available to the AIQ execution environment.
2. Validate runtime settings, data files, and any required licenses before execution.
3. Run a small execution and verify output/results before scaling or reporting.
---
Last updated: September 29, 2026
# Evaluation Guides
# AIQ Evaluation Guides
## Recommended guidance
Evaluation guides should help users prove AIQ value through a focused, realistic, and repeatable workflow. Keep evaluation content current, scoped, and aligned with modern AIQ terminology such as Scenario Editor, Service Suite, AISG, and Test Nodes.
## Evaluation planning
- Define business goals, success criteria, timeline, and stakeholders.
- Select representative web, mobile, API, performance, or data-driven scenarios.
- Prepare test data, accounts, applications, environments, and access ahead of time.
- Capture evidence through reports, logs, screenshots, and repeatable results.
## Quality checks
1. Avoid broad demos that do not map to customer outcomes.
2. Use current product names and remove obsolete Designer or Blueprint wording when not historical.
3. Document assumptions, limitations, and follow-up actions.
4. Keep customer-specific evaluation notes out of public documentation.
*Last updated: October 6, 2026*
# Working with Test Designer
If you have any feedback on this topic, please contact us at
## Recommended learning path
Start with a recorded DS3 script, inspect its accessors and waits, then parameterize data before adding it to a Scenario. Run a small validation execution first; only after the script is stable should you configure distributed users, reports, or performance workloads.
**Last updated: October 15, 2026**
# Work with TestNG Scripts in AIQ
Use this article when a TestNG script needs to be prepared, packaged, and executed from AIQ.
## Validation workflow
1. Build the TestNG project and confirm testng.xml points to the intended classes and parameters.
2. Package dependencies so the AIQ execution node can resolve them.
3. Run a small AIQ execution and compare failures with the local TestNG output.
---
Last updated: September 29, 2026
# Running SoapUI Scripts as a Functional Test
SoapUI support was removed in release 5.2.0 of AIQ.
Appvance IQ is a platform that supports to run SoapUI scripts. Here are the steps that we need to follow to run the SoapUI scripts from Appvance IQ.
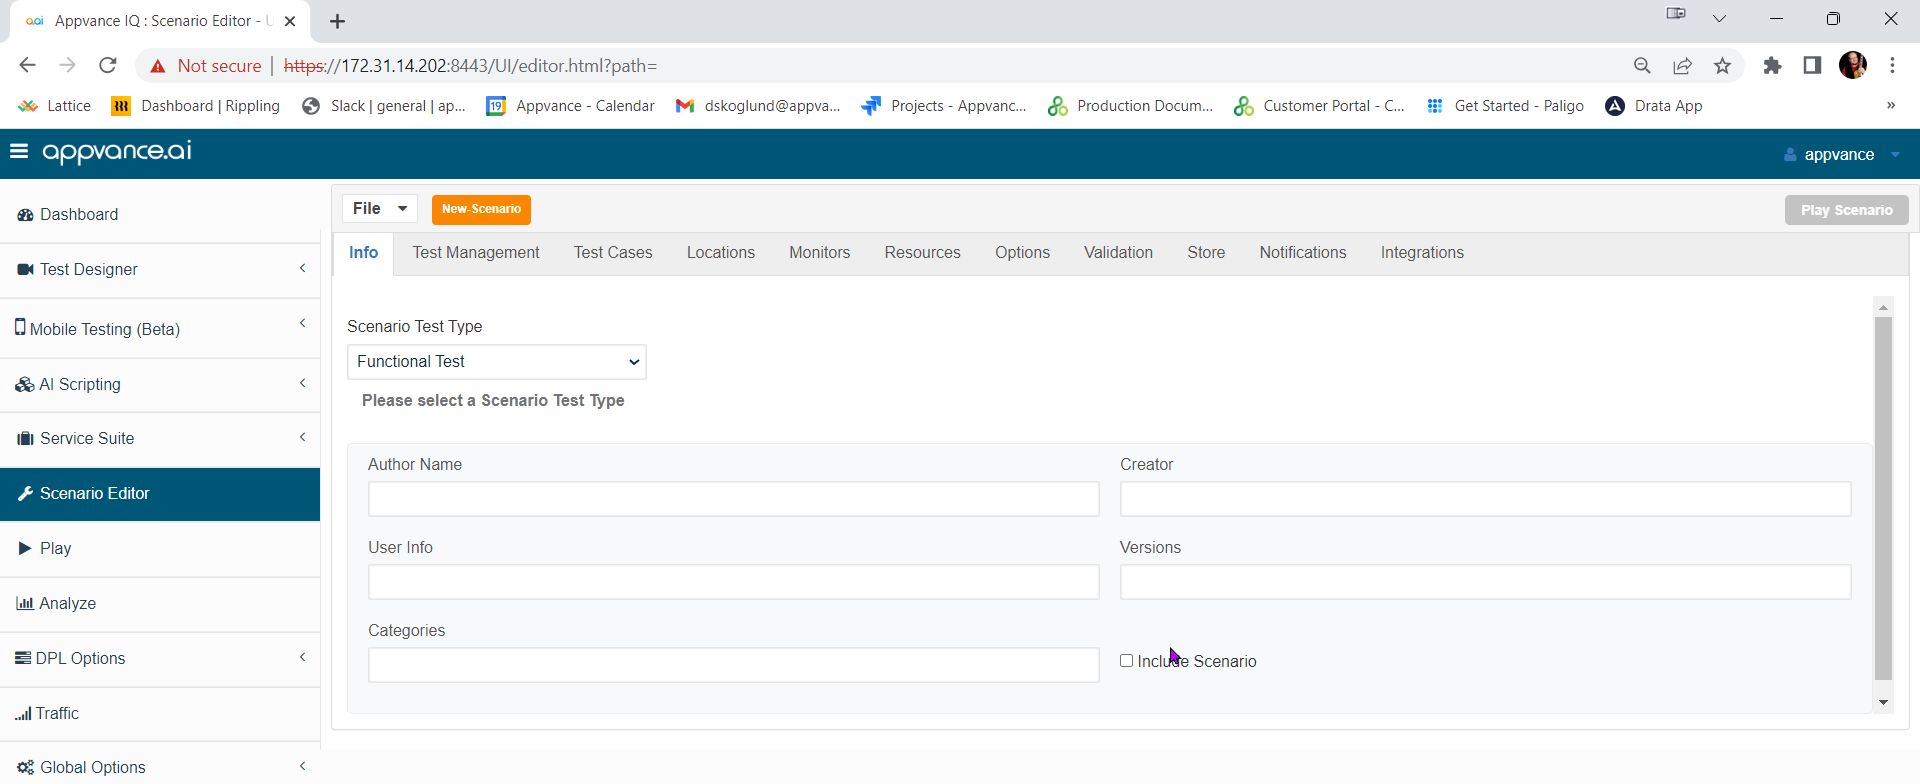
1. From the Appvance IQ Home screen and click **Build a Scenario** or open the Scenario Editor from the navigation tree.
2. Click **File** > **New** to create a new scenario.
3. Select **Functional Test** from the **Scenario Test Type** dropdown.
4. Click the **Test Management** tab and check: "Repeat scenario's test cases 1 time".
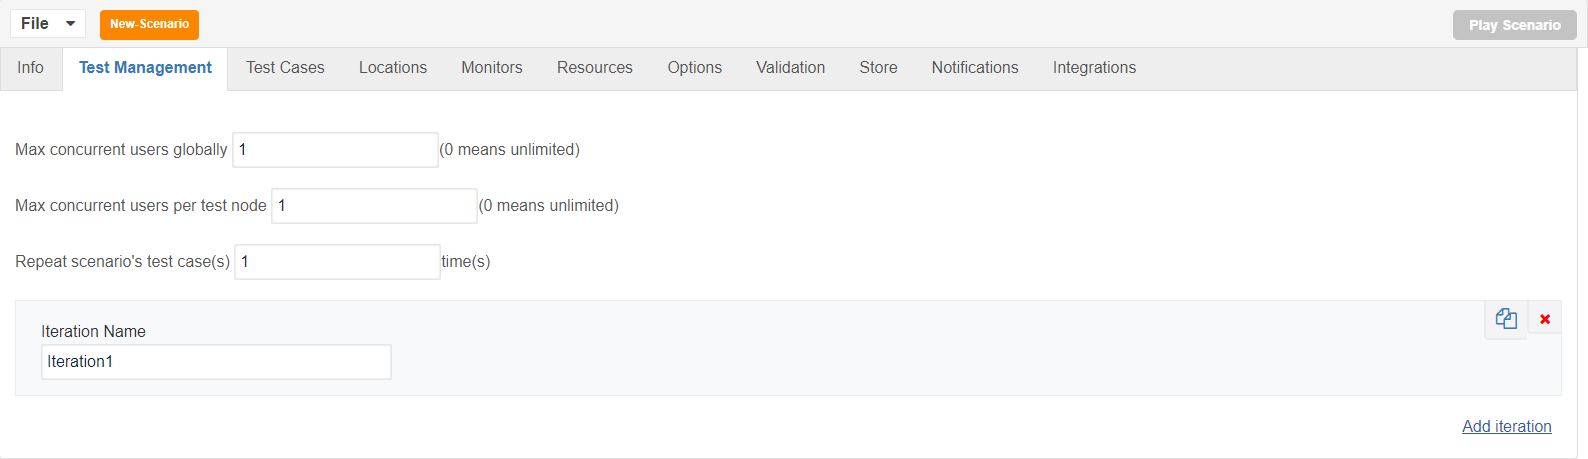
5. Click Test Cases tab and click the link for Add test case execution.
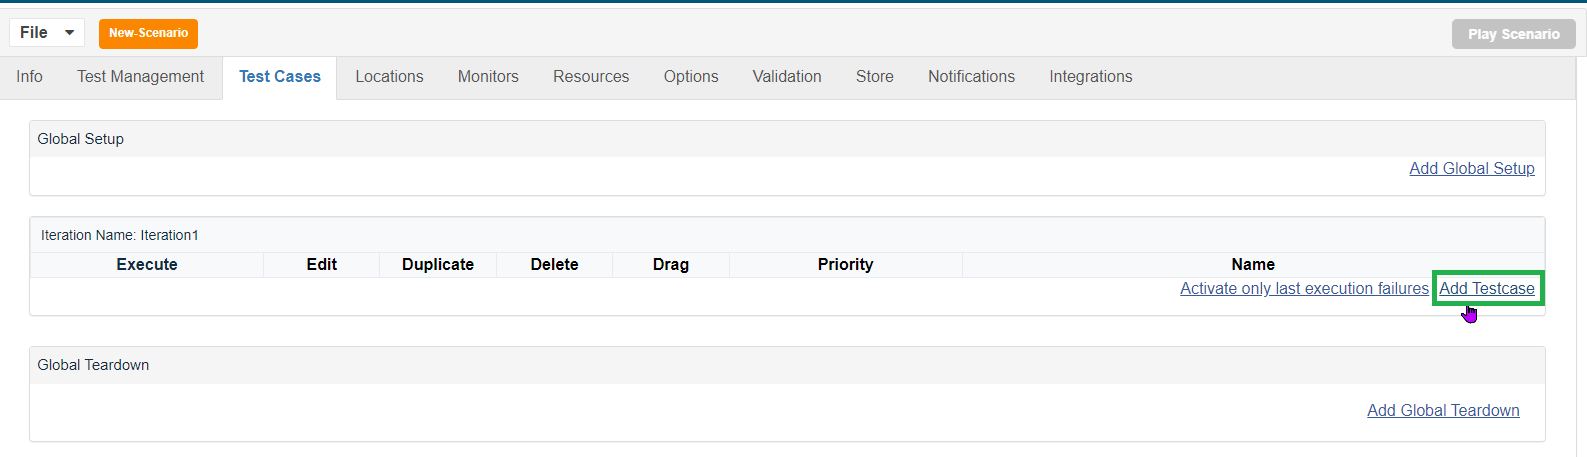
6. Enter Test case name and Script name.
7. Select SoapUI from Script Type dropdown.
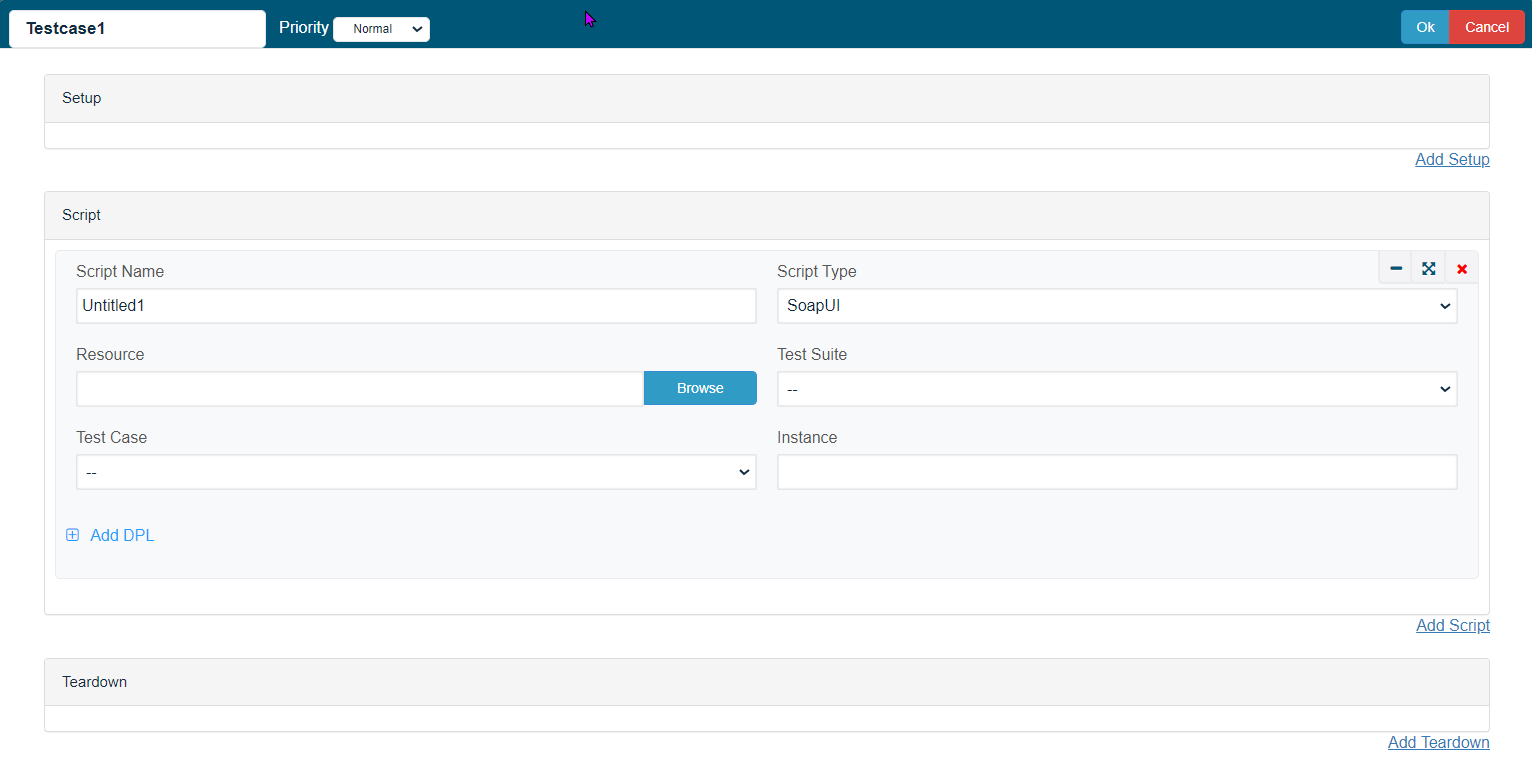
8. Click Browse and browse the Soap UI file and then the Test Suite and then the Test Case.
9. Save the test case.
10. Click Locations tab.
11. Enter Name: localhost and URL: http://localhost:8080/TMServer/ws/TestNode
12. Navigate to Resources and make sure SoapUI bundle with version 5.2.1 added by default.
13. Also make sure the resources are added with Name, Type and the correct path of the xml file.
14. Navigate to Options and make sure that Enable logging, Safe logs on Failure are selected.
15. Click check box Custom Database Credentials (Database Logging) and make the following settings:
- Database Type: MySQL
- Driver: com.mysql.jdbc.Driver
- URL: jdbc:mysql://localhost:3306/utp?useSSL=false
- Default Schema: utp
- Username: utp
- Password: utp
16. Click File->Save to save new scenario.
17. Click Play Scenario from the top navigation bar.
18. Controller window will open in a new tab which displays the tests running and will display the pass/fail status of the tests upon the test completion.
19. Left part shows the steps and the duration in milliseconds and right side shows the test run status under Output tab.
20. On the **Transactions** tab we can find the request/response and an error tab to drill down further.
21. Click **Click here** link to get to the list of Reports that Appvance IQ supports.
---
Last updated: July 25, 2024
If you have any feedback on this topic, please contact us at
# Running SoapUI scripts as a Performance test
Appvance IQ is a platform that supports to run SoapUI scripts. Here are the steps that we need to follow to run the SoapUI scripts from Appvance IQ.
SoapUI support was removed in release 5.2.0 of AIQ.
## SoapUI Performance test
1. Navigate to Appvance IQ Home screen and click Build.
2. Click File >New to create a new scenario.
3. Select Performance Test from the Scenario Test Type dropdown.
4. Click Test Management tab.
5. Enter Iteration name, select Total Execution from Completion Type dropdown and enter Total Execution : 100.
6. Click Test Cases tab and click the link for Add test case execution.
7. Enter Test case name and Script name.
8. Select "Service Suite-SoapUI" from Script Type dropdown.
9. Click Browse and browse the Soap UI file and then the Test Suite and then the Test Case. Save the test case.
10. Browse the SoapUI script the xml file and save the test case.
11. Enter 100 in User box. Click Set (Run Time):
12\. Ramp up 10 users every 10 second Maximum ramp up time 100 second and save Run Time option.
13\. Click Locations tab.
14\. Enter Name: localhost and URL:http://localhost:8080/TMServer/ws/TestNode (Should be added by default).
15\. Navigate to Resources and make sure SoapUI bundle with version 5.12 added by default.
16\. Also make sure the resources are added with Name, Type and the correct path of the jmx file.
17\. Navigate to Options and make sure that Enable logging, Save logs on Failure are selected.
18\. Click check box Custom Database Credentials (Database Logging) and make the following settings:
Database Type: MySQL
Driver: com.mysql.jdbc.Driver
URL: jdbc:mysql://localhost:3306/utp?useSSL=false
Default Schema: utp
Username: utp
Password: utp
19\. Click File >Save to save new scenario.
20\. Click Play Scenario from the top navigation bar.
21\. Controller window will open in a new tab which displays the tests running and will display the pass / fail status of the tests upon the test completion.
22\. Left part shows the steps and the duration in milliseconds and right side shows the test run status under Output tab.
23\. On The transactions tab we can find the request / response and an error tab to drill down further.
24\. Click Click here link to get to the list of reports that Appvance IQ supports.
---
Last updated: July 25, 2024
If you have any feedback on this topic, please contact us at
# Run JMeter Scripts as Functional Tests in AIQ
Use this article when a JMeter script is being executed in AIQ for functional validation rather than load generation.
## Validation workflow
1. Import or select the JMeter script and confirm assertions are present.
2. Run with a controlled user count and data set appropriate for functional validation.
3. Review output, assertions, and results before promoting the script to performance testing.
---
Last updated: September 25, 2026
# Run JMeter Scripts as Performance Tests in AIQ
Use this article when a JMeter script is executed in AIQ to generate load and measure performance behavior.
## Validation workflow
1. Confirm the workload model, virtual-user target, ramp-up, duration, and data requirements.
2. Run a small shakeout before the full performance test.
3. Review throughput, response times, errors, and infrastructure monitoring after execution.
---
Last updated: September 25, 2026
# Work with HAR Scripts in AIQ
Use this article when HAR network captures are converted, replayed, or validated as part of AIQ testing.
## Validation workflow
1. Review the HAR for sensitive headers, cookies, tokens, and customer data before reuse.
2. Validate that dynamic values are parameterized or regenerated during playback.
3. Run the HAR-based flow and compare network responses with the expected application behavior.
---
Last updated: September 29, 2026
# Record a Scenario Editor Test
# Record a Scenario Editor Test
This article replaces legacy Designer 3.0 wording with current Scenario Editor terminology. Use recording as a starting point, then review and maintain the scenario before adding it to a suite.
## Recommended workflow
1. Prepare approved test data and a clean application state.
2. Record the shortest flow that proves the target behavior.
3. Review generated steps and replace fragile locators or fixed waits.
4. Add validations and stored values where they prove business behavior.
5. Run a small validation execution and review output before scaling.
## Maintenance notes
- Do not keep obsolete Designer-only instructions in current AIQ documentation.
- Prefer clear scenario names and reusable data mappings.
- Use conditional waits instead of arbitrary pauses where possible.
**Last updated:** September 18, 2026
# Legacy Functional Scenario Creation Reference
**Last reviewed:** October 2, 2026
This page is retained as a legacy reference for older Appvance Designer Script 3.0 functional scenario workflows.
## What changed in this article
- Marked Designer Script 3.0 functional-scenario creation as legacy content.
- Added migration framing toward Scenario Editor for current functional scenario creation.
- Added checks for locators, waits, test data, browser support, and validation evidence before reusing legacy assets.
## Validation workflow
1. Confirm whether the functional test can be rebuilt or maintained in Scenario Editor.
2. If the legacy workflow is still required, document the exact AIQ version and browser/runtime assumptions.
3. Replay the scenario and update locators, waits, and validations before considering it maintained.
**Review note:** This page should not be treated as the current functional-scenario creation path.
---
Last updated: October 2, 2026
If you have feedback on this topic, contact .
# Legacy Performance Scenario Creation Reference
This page is retained as a legacy reference for older Appvance Designer Script 3.0 performance scenario workflows.
## Validation workflow
1. Confirm the performance scenario still represents the current business workflow and load model.
2. Validate data, pacing, correlations, and execution-node capacity before running at scale.
3. Prefer current AIQ scenario creation paths for new performance work.
---
Last updated: October 2, 2026
# Legacy App Pen Scenario Creation Reference
This page is retained as a legacy reference for older Appvance Designer Script 3.0 App Pen scenario workflows.
## Validation workflow
1. Confirm the workflow still depends on Appvance Designer Script 3.0 before following this page.
2. Prefer Scenario Editor for new scenario creation and document any blocker that requires legacy App Pen steps.
3. Validate the resulting scenario in the current AIQ environment before reusing it.
---
Last updated: October 2, 2026