# 2.3- Mobile Testing
Mobile Testing — Appvance IQ documentation.
# Mobile Testing
## Contents
- [Mobile Designer - New User Interface Overview](https://docs.appvance.net/Content/AIQ/52MobileDesigner/MobilDesigner_NewUI_Main.htm)
- [Mobile Designer (Classic)](/books/mobile-testing/page/mobile-designer-classic)
- [Mobile Testing Configurations](https://docs.appvance.net/Content/AIQ/MobileTesting/Mobile%20Testing%20Configurations.htm)
- [Getting Started with Android and AIQ](/books/mobile-testing/page/getting-started-with-android-and-aiq)
- [Getting Started with iOS and AIQ](/books/mobile-testing/page/getting-started-with-ios-and-aiq)
- [AWS Device Farm Mobile Testing](/books/mobile-testing/page/aws-device-farm-mobile-testing)
- [Fallback Accessors for Mobile Testing](/books/mobile-testing/page/fallback-accessors-for-mobile-testing)
- [Mobile Record From Here](/books/mobile-testing/page/mobile-record-from-here)
- [Image Injection](/books/mobile-testing/page/image-injection)
- [Visual Accessors for Mobile Testing](/books/mobile-testing/page/visual-accessors-for-mobile-testing)
- [Self-Healing for Mobile Testing](/books/mobile-testing/page/self-healing-for-mobile-testing)
- [Sample Mobile Scripts](/books/mobile-testing/page/sample-mobile-scripts)
- [Generating Traffic from Mobile and Running a Performance Test](/books/mobile-testing/page/generating-traffic-from-mobile-and-running-a-performance-test)
- [Mobile Responsiveness Browser](/books/mobile-testing/page/mobile-responsiveness-browser)
- [Mobile Apps - Processing Requests](/books/mobile-testing/page/mobile-apps-processing-requests)
- [Drag](/books/mobile-testing/page/drag)
- [Zoom In and Zoom Out](/books/mobile-testing/page/zoom-in-and-zoom-out)
- [Geo Location](/books/mobile-testing/page/geo-location)
Mobile Designer, AIQ’s test design technology for native mobile apps, allows dev teams to take a mobile-first approach with their testing to meet their customers’ mobile-first mindset. Its innovative visual accessor approach overcomes the limitations of other locators used by Appium, giving AIQ a more robust technical approach.
AISG + Automatic Regression Testing for mobile means teams can also leverage AIQ’s cutting-edge autonomous testing approach.
AIQ provides testing for native mobile, mobile web, and hybrid apps in iOS and Android. It covers all your test needs, including functional, API, performance, and load tests to ensure your users have an optimal experience.
Mobile Designer enables script recording and playback, a simpler approach to mobile test design than traditional mobile scripting. Click By Image allows Mobile Designer to incorporate screenshots into scripts.
AISG for mobile automatically identifies locators which can then be used in Mobile Designer scripts, making test creation even easier.
- Mobile scripts can be used in combination with other Test Designer scripts
- Fully data-driven test approach
- DevOps ready for CI/CD integration and results reporting
- Integrated with multiple cloud services: BrowserStack, SauceLabs, ExperiTest, and AWS Device Farm
- Screen timing accurate to +/- 15 ms
---
Last updated: April 13, 2023
If you have any feedback on this topic, please contact us at
# Mobile Designer New Interface - Legacy Overview
## Legacy reference
This page describes a Mobile Designer interface that should be considered legacy unless a customer is still maintaining older assets. Current guidance should use AIQ mobile testing and Scenario Editor terminology.
## Use this page for
- Migration context from older Mobile Designer assets.
- Understanding historical UI labels or screenshots.
- Temporary support while consolidating mobile documentation.
## Current recommendation
1. Use active Mobile Testing and Scenario Editor articles for new work.
2. Move still-useful migration notes into current pages.
3. Remove outdated screenshots, old navigation labels, and unsupported instructions.
4. Archive this page when legacy support is no longer required.
*Last updated: October 7, 2026*
# Mobile Designer Classic - Legacy Reference
## Legacy reference
Mobile Designer Classic should be treated as legacy documentation. Keep this page only for teams maintaining older mobile testing assets. Current mobile testing guidance should use Scenario Editor and current AIQ mobile terminology.
## When this page is useful
- Understanding or migrating old Mobile Designer assets.
- Comparing legacy mobile locators, gestures, or recordings with current Scenario Editor tests.
- Temporarily supporting customers on older AIQ workflows.
## Current recommendation
1. Create new mobile tests using current AIQ mobile testing workflows.
2. Move useful migration guidance into active Mobile Testing or Scenario Editor pages.
3. Remove obsolete screenshots, product names, and unsupported feature references.
4. Archive or delete this page when no supported legacy use remains.
*Last updated: October 7, 2026*
# Mobile Testing Configurations in AIQ
## Recommended guidance
Mobile testing configuration should define the device, platform, application build, automation framework, network access, permissions, and evidence requirements before execution. Keep configurations explicit so failures can be reproduced.
## Configuration areas
- Device type, OS version, orientation, screen size, and locale.
- Application package, build version, installation method, and reset behavior.
- Network, proxy, certificates, VPN, and back-end environment.
- Permissions such as camera, location, notifications, files, or microphone.
- Test data, DPLs, accounts, screenshots, logs, and video evidence.
## Maintenance workflow
1. Start with a smoke test on one known-good device.
2. Expand to device pools only after configuration is stable.
3. Review configuration after app, OS, browser, driver, or AIQ upgrades.
4. Document deviations from the standard mobile environment.
*Last updated: October 6, 2026*
# Get Started with Android Testing in AIQ
# Get Started with Android Testing in AIQ
Use this checklist to prepare Android testing with AIQ. Exact device, emulator, and driver requirements can vary by AIQ release, so confirm the release-specific prerequisites before execution.
## Setup checklist
- Use a supported Android device or emulator for the AIQ release.
- Install the application build intended for testing.
- Confirm network access to the application and any required test services.
- Use approved test accounts and resettable test data.
## Validation steps
1. Confirm the device is visible to the execution host.
2. Run a small smoke test before building longer scenarios.
3. Review output, screenshots, and logs for device or environment failures.
4. Document device model, OS version, application build, and AIQ version when reporting issues.
**Last updated:** September 18, 2026
# Getting Started with iOS and AIQ
# Requirements
1. Mac OS X
At this time Catalina 10.15.3 required. This is to evolve as Mac OS X evolves.
2. iOS Simulator compatible App file
3. AIQ Controller locally installed on Mac
```
/bin/bash -c "$(curl -fsSL https://raw.githubusercontent.com/Homebrew/install/master/install.sh)"
```
```
brew update
brew install libimobiledevice
brew install ios-deploy
brew install carthage
brew install appium
```
```
{
“serverURL”: “http:/example.com:4723/wd/hub, URL in which Appium runs”,
“proxyURL”: “http://example.com:9090, optional, URL in which Test Designer runs”,
“capabilities”: {
“platformVersion”: “13.1, must correspond to one of installed Simulators”,
“udid”: “some identifier, must correspond to one of installed Simulators”,
“wdaLocalPort”: “8100 - 8199, to automate multiple Simulators or physical iPhones”,
“deviceName”: “iPhone 8, must correspond to one of installed Simulators”
},
“app”: “Absolute path to where .app file is in local file system or URL of .app file, needed if value for bundleId is empty”,
“bundleId”: “Bundle ID of AUT, needed if value for app is empty, otherwise is optional if value for app is not empty”
}
```
```
{
“serverURL”: “http:/example.com:4723/wd/hub, URL in which Appium runs”,
“proxyURL”: “http://example.com:9090, optional, URL in which Test Designer runs”,
“capabilities”: {
“platformVersion”: “13.1, must correspond to one of connected physical iPhones”,
“udid”: “some identifier, must correspond to one of connected physical iPhones”
“wdaLocalPort”: “8100 - 8199, to automate multiple Simulators or physical iPhones”,
“deviceName”: “iPhone 8, can be whatever name”,
“xcodeOrgId”: “Team ID”,
“xcodeSigningId”: “iPhone Developer”,
“updatedWDABundleId”: “com.facebook.WebDriverAgentRunner”
},
“app”: “Absolute path to where .ipa file is in local file system or URL of .ipa file, needed if value for bundleId is empty”,
“bundleId”: “Bundle ID of AUT, needed if value for app is empty, otherwise is optional if value for app is not empty”
}
```
---
Last updated: July 05, 2023
If you have any feedback on this topic, please contact us at
# AWS Device Farm Mobile Testing
**What Is AWS Device Farm?**
Device Farm is an app testing service that enables you to test and interact with your Android, iOS, and Web apps on real, physical phones and tablets that are hosted by Amazon Web Services (AWS). There are two main ways to use Device Farm:
- Automated testing of apps using a variety of available testing frameworks
- Remote access to devices onto which you can load, run and interact with apps in real-time
**Automated App Testing**
Device Farm allows you to upload your tests or use built-in, script-free compatibility tests. Because testing is automatically performed in parallel, tests on multiple devices begin in minutes.
A test report containing high-level results, low-level logs, pixel-to-pixel screenshots, and performance data is updated as tests are completed.
Device Farm supports testing of native and hybrid Android, iOS, and Fire OS apps, including those created with PhoneGap, Titanium, Xamarin, Unity, and other frameworks. It supports remote access to Android apps for interactive testing.
**Supported Test Types and Built-in Tests**
Device Farm currently provides support for the following test types:
For Android:
- Appium Java JUnit
- Appium Java TestNG
- Appium Python
- Calabash
- Instrumentation (JUnit, Espresso, Robotium, or any instrumentation-based tests)
- UI Automator
- Explorer
For iOS:
- Appium Java JUnit
- Appium Java TestNG
- Appium Python
- Calabash
- UI Automation
- XCTest (including KIF)
- XCTest UI
For Web Apps:
- Appium Java JUnit
- Appium Java TestNG
- Appium Python
If you do not have your tests, you can use a built-in fuzz test. For more information, see Built-in: Fuzz (Android and iOS).
**Remote Access Interaction**
Remote access allows you to swipe, gesture, and interact with a device through your web browser in real-time. There are several situations where real-time interaction with a device is useful. For example, customer service representatives can guide customers through how to use or set up their devices. They can also walk customers through how to use apps running on a specific device. You can install apps on a device running in a remote-access session and then reproduce customer problems or reported bugs.
During a remote access session, Device Farm collects details about actions that take place as you interact with the device. Logs with these details and video capture of the session are produced at the end of the session for your review.
Initially, a limited number of Android and Fire OS devices are supported for remote access. However, the list of devices will grow during the beta period and as new devices enter the market.
**Test Types in AWS Device Farm**
AWS Device Farm provides many different built-in and custom test types for Android, iOS, and Web applications. Built-in tests enable you to test your apps without writing scripts. Custom tests allow you to test specific flows and business logic within your app. For more information, see Working with Test Types in AWS Device Farm.
Android Test Types
Device Farm provides the following built-in and custom test types for Android devices.
- Built-in: Explorer (Android)
- Built-in: Fuzz (Android and iOS)
- Appium Java JUnit
- Appium Java TestNG
- Appium Python
- Calabash
- Instrumentation
- UI Automator
**iOS Test Types**
Device Farm provides the following built-in and custom test types for iOS devices.
- Built-in: Fuzz (Android and iOS)
- Appium Java JUnit
- Appium Java TestNG
- Appium Python
- Calabash
- UI Automation
- XCTest
- XCTest UI
**Web Application Test Types**
Device Farm provides the following custom test types for Web applications.
- Appium Java JUnit
- Appium Java TestNG
- Appium Python
**Working with AWS Device Farm**
1. Log in to the AWS console using valid credentials and the user should be able to see the Home page of AWS as shown below
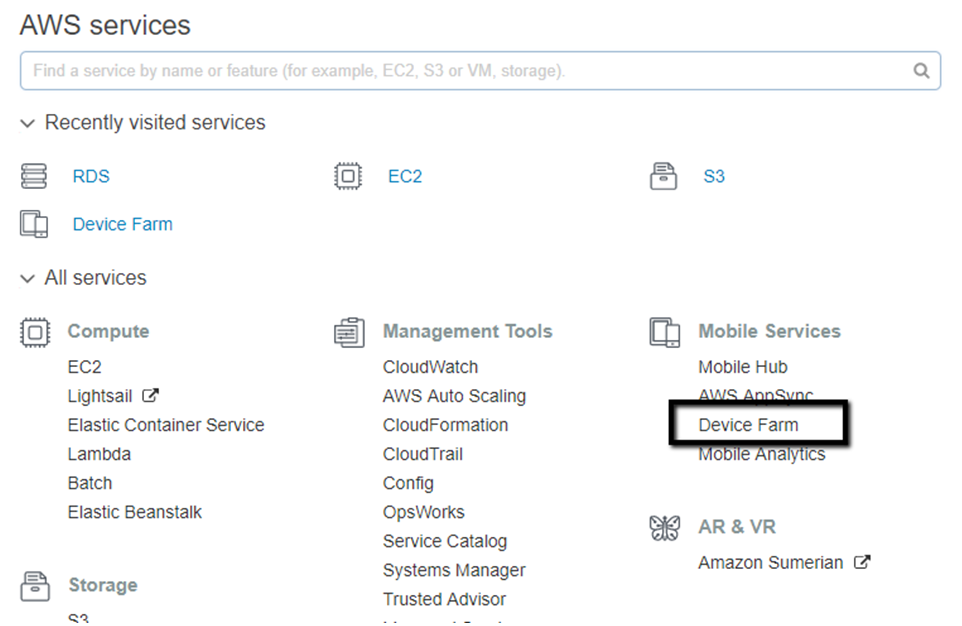
2. Click Device Farm
3. The user would be navigated to the Projects page as shown below
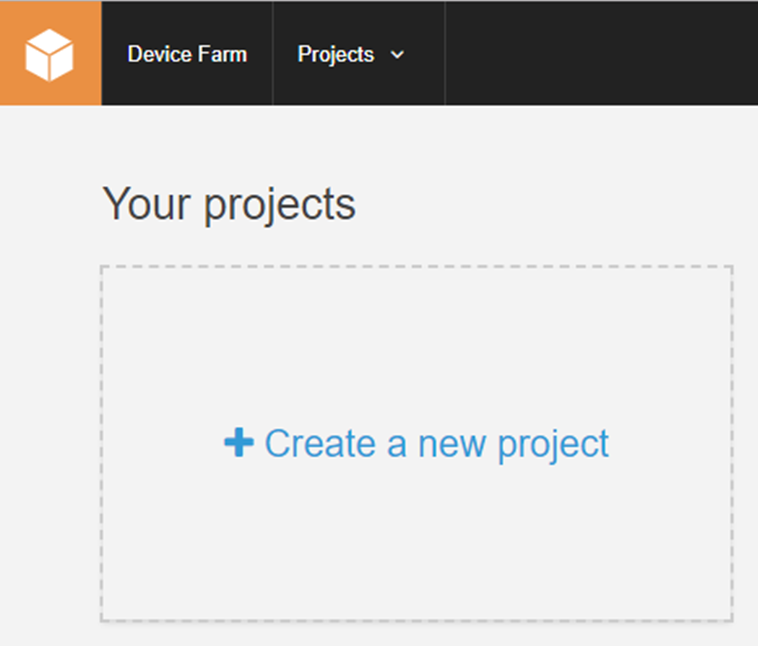
4. Click New Project
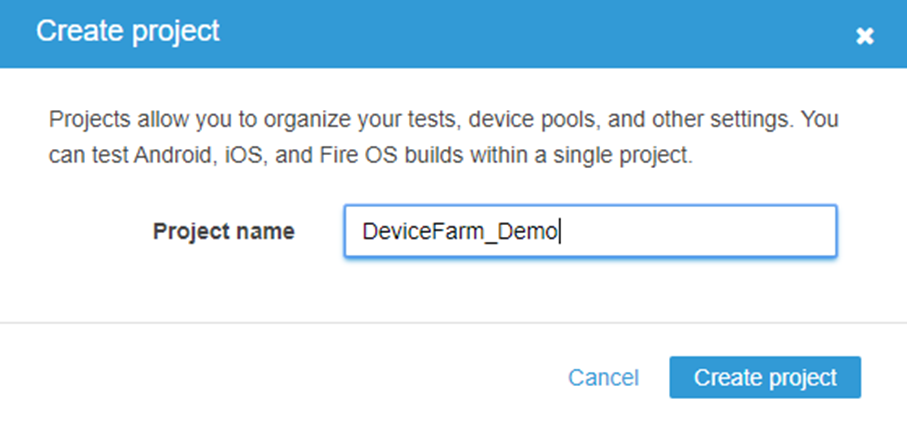
5. Enter the Project Name and click Create Project and the user will be navigated to the Run page
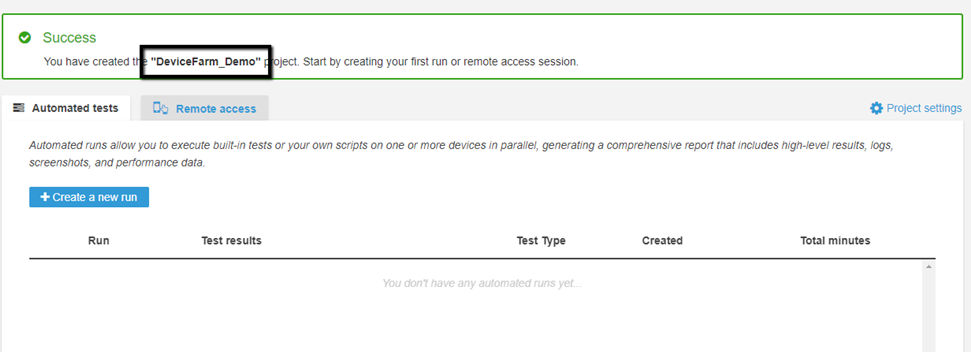
6. Now User has 2 options to choose from
- Automated Tests
- Remote access
**Automated Tests**
Step by step instructions on how to run automated tests in Device Farm
1. Click create a new run
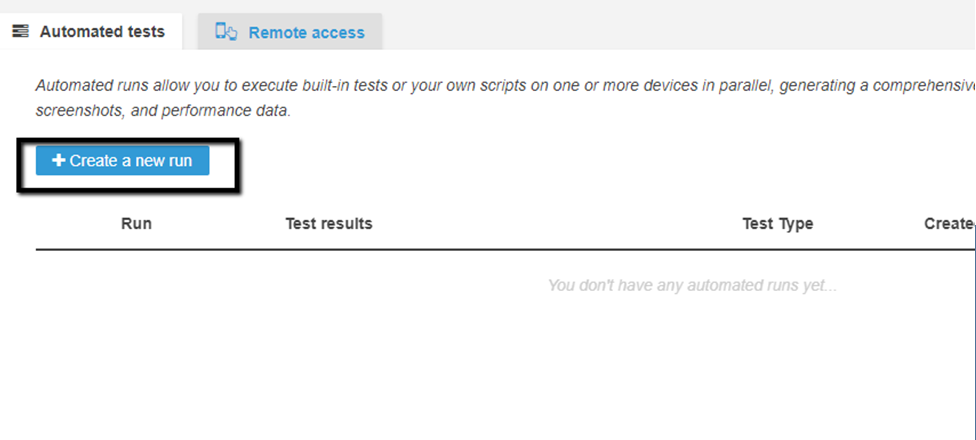
2. User will be directed to a page to select either Native application or Web Application
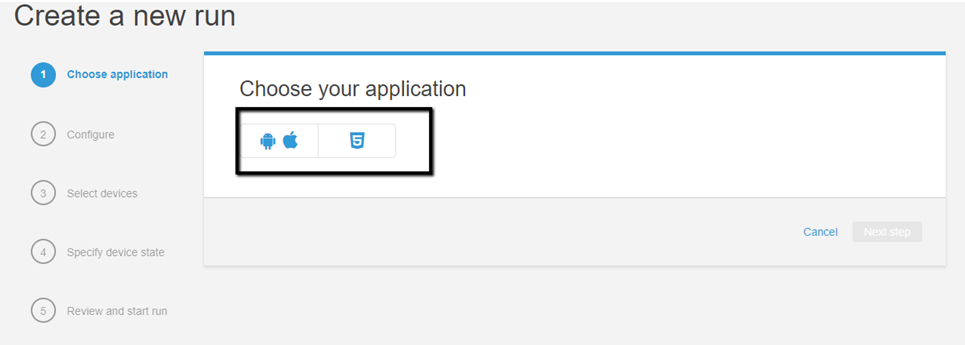
3. Select Native application and upload the APK or IPA file depending on the OS
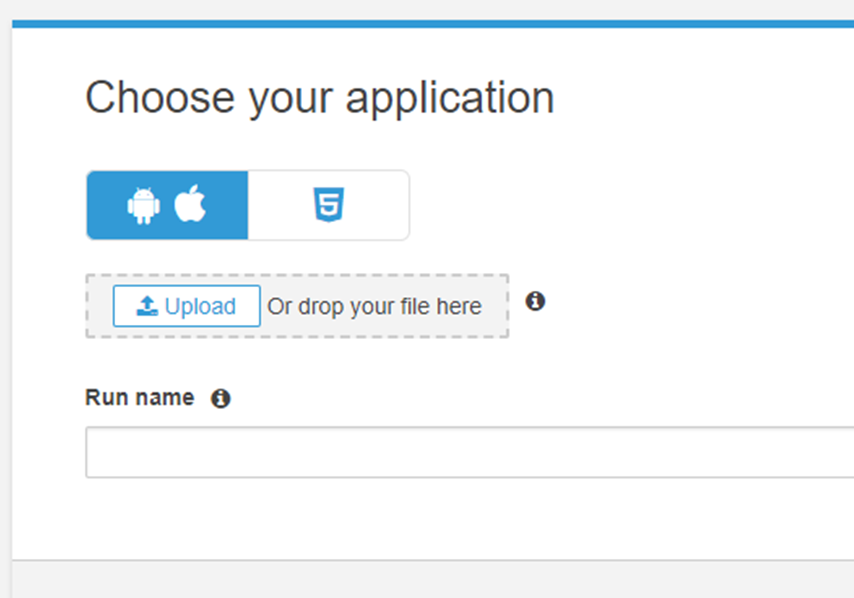
4. The user will upload the file
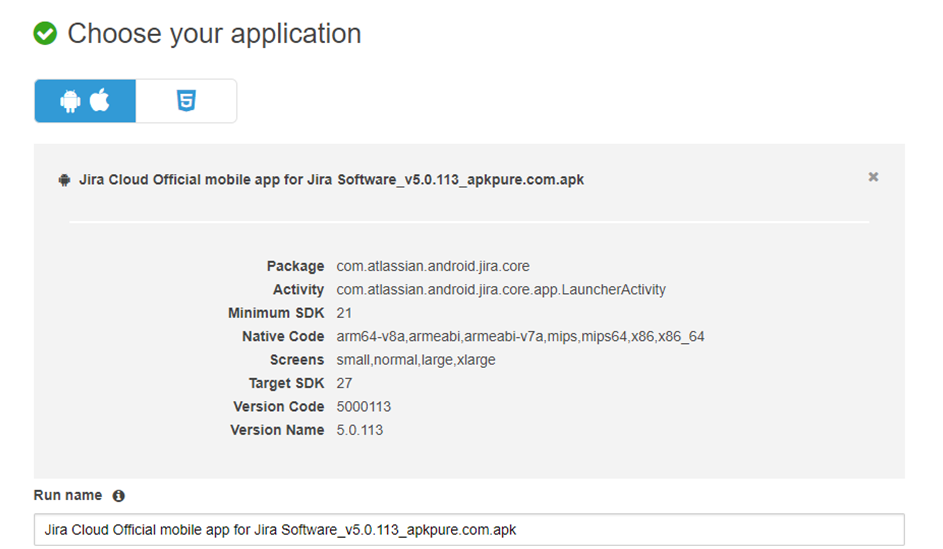Device farm will give us details about the package and the activity name. It also gives information on the Target SDK, Version code, and Version name.
The user clicks on Next Step
5. The user will be presented with Configure page where the user has to select the test type
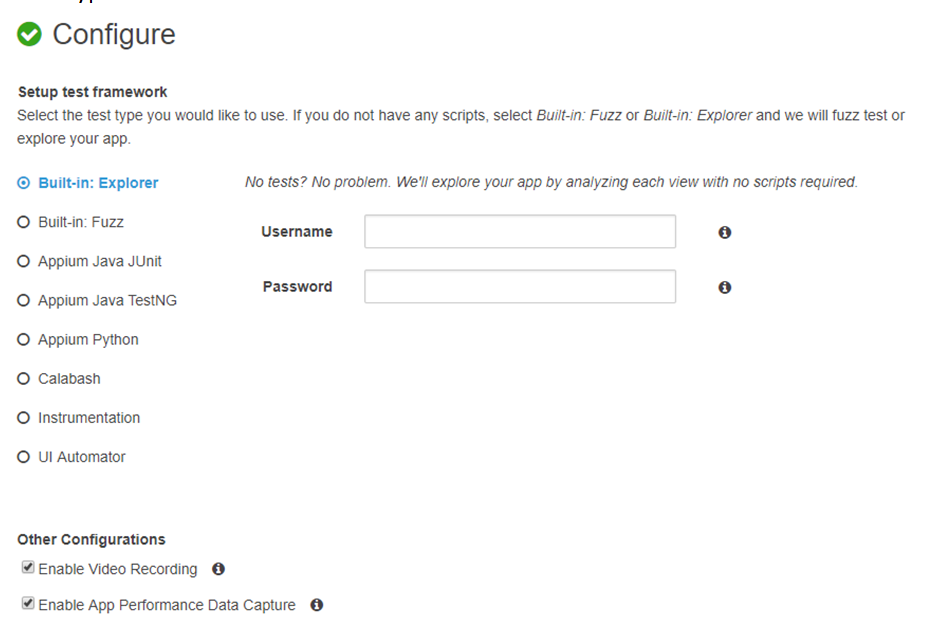AWS provides 2 built-in options for testing i.e Explorer and Fuzz. Rest needs to be developed by the User.
I will be selecting the Explorer option to test the application. Once that is selected click the Next step
6. The user will be navigated to the Select Devices page
This page will inform the user of the device which is compatible with the apk file or ipa file. Users can also create their device pool using the “Create a new device Pool” option
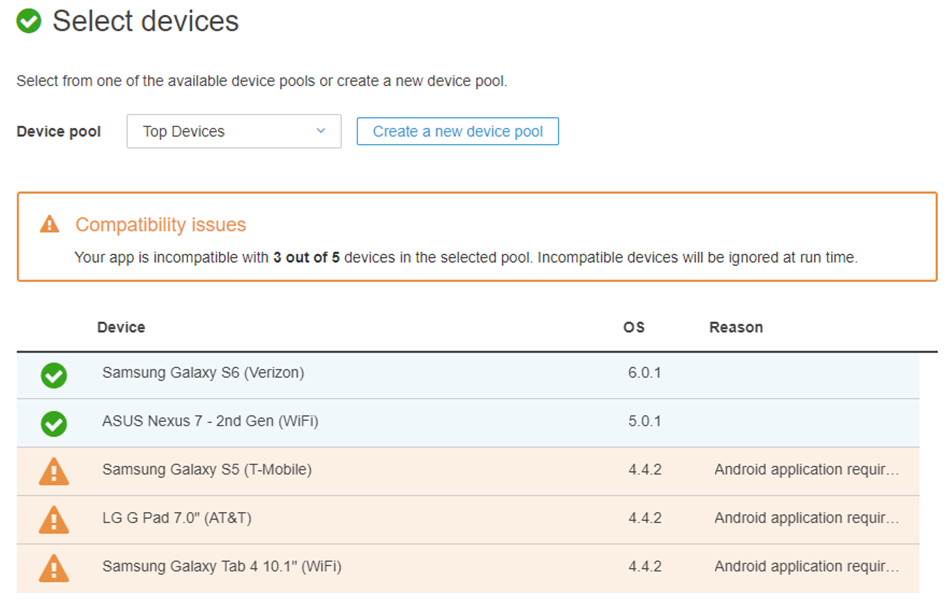Click Next
7. The user now will be presented to the Device state page
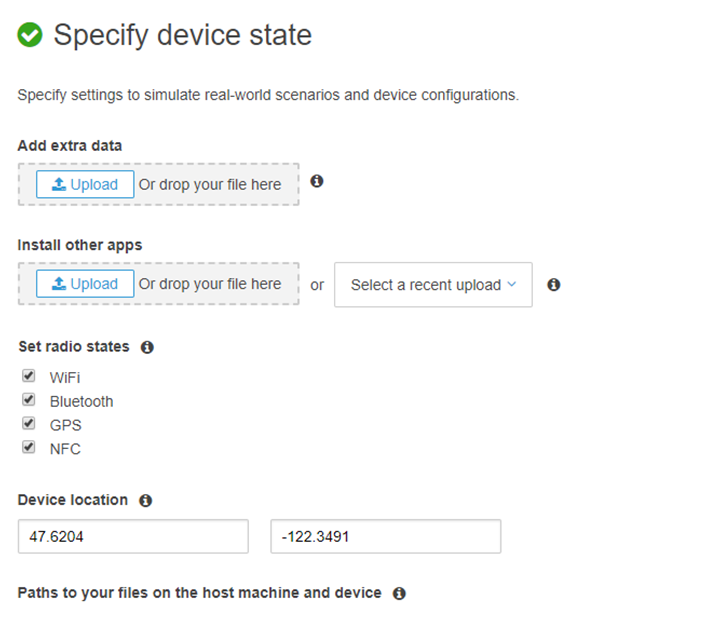User can change settings like wifi, Blue-tooth, etc.
Click Next
8. Review and start the Run page
The user has to select the minutes carefully since if the time given by the user is less than the actual run then only partial results will be available to the user
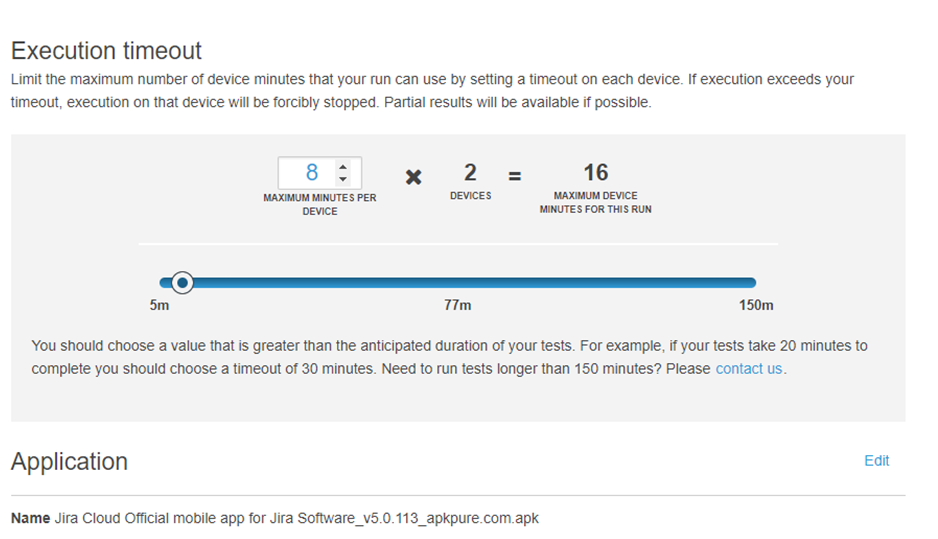Once the above setting is done user clicks on confirm and runs the button
9. The user will be presented to the Run page with a scheduled test in Progress
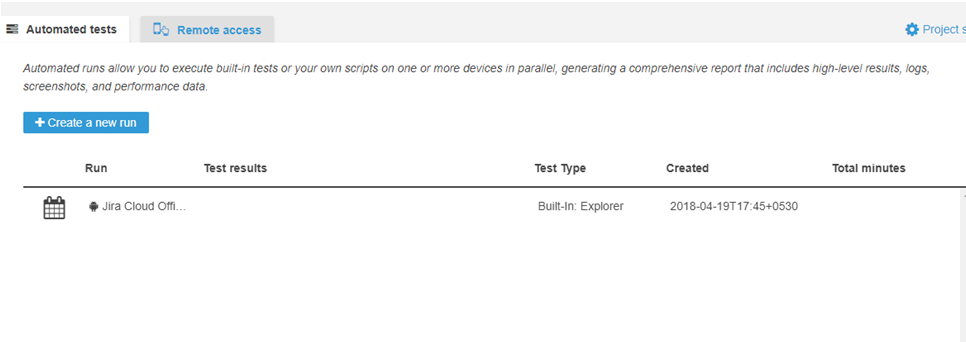 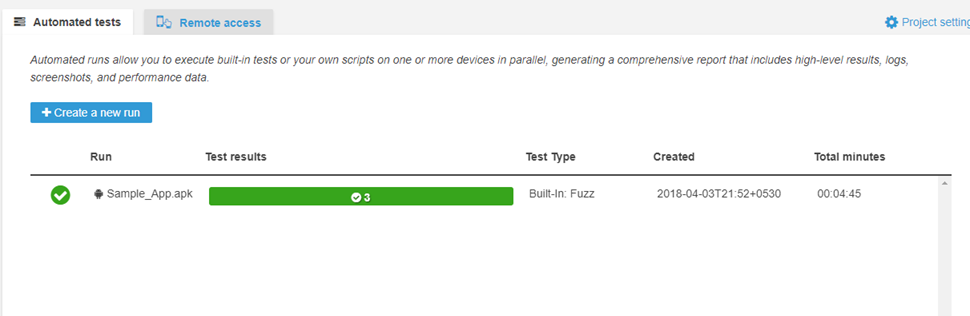Once the user clicks on the completed test, it will be navigated to the results page
Where the user can check the video recording, Suites that were run, screenshots, and also the logs needed for debugging.
**Remote Access**
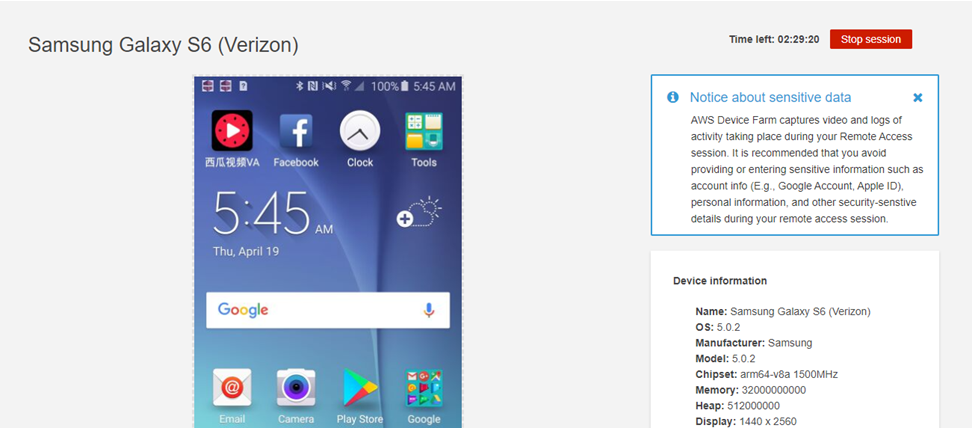
This feature allows the user to interact with the actual device which is launched in AWS
Steps to Start a new session are given below
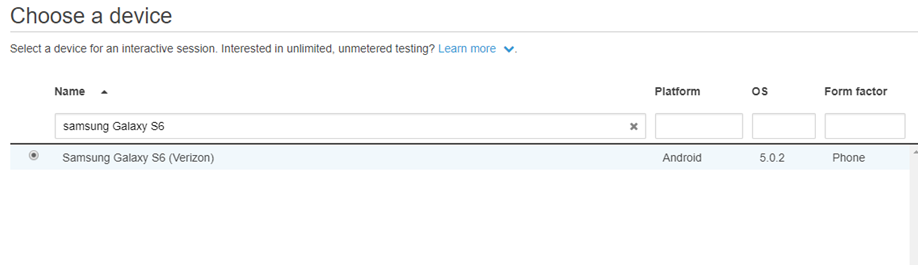
1. Click Start new session button on the Remote access page. Users will be presented with a page to select the device name, Platform, and OS
2. Select the device and click the “Confirm and Start Run” button
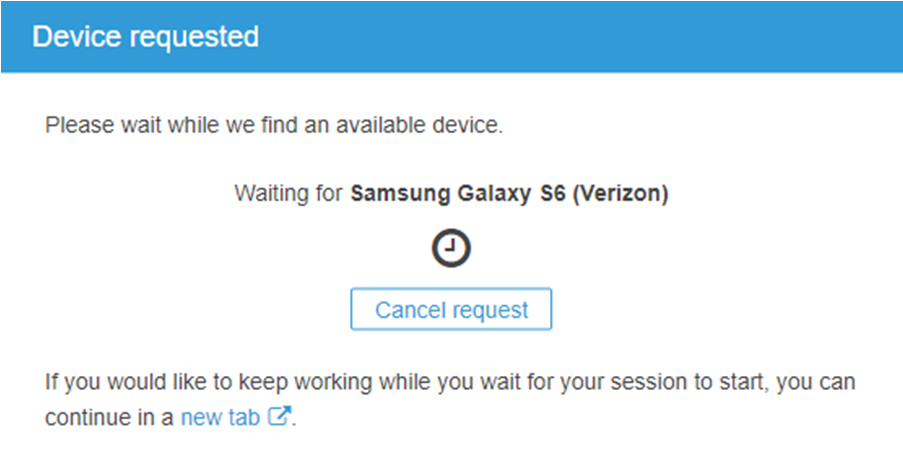
3. User will be presented with a page to indicate to the user that the device is being initialized in the back-end
4. Device will be launched and users can perform actions as they would on a physical device
---
Last updated: February 16, 2024
If you have any feedback on this topic, please contact us at
# Fallback Accessors for Mobile Testing
## Recommended guidance
Fallback accessors help mobile tests continue to identify controls when the primary locator is unstable. Use them carefully: a fallback should target the same intended element, not merely a similar visible control.
## When to use fallbacks
- Mobile frameworks generate dynamic IDs or slightly different element trees.
- Android and iOS expose different locator attributes for the same user action.
- Responsive layouts or device sizes affect element position.
- Self-healing requires a controlled alternative locator.
## Validation checklist
1. Confirm the primary and fallback accessors identify the same business control.
2. Test on the target device types, orientations, and OS versions.
3. Prefer accessibility labels, stable resource IDs, and meaningful text over coordinates.
4. Document why the fallback exists and when it should be reviewed.
*Last updated: October 6, 2026*
# Mobile Record From Here
The Record from Here option is available in the Mobile Designer. Record From Here is a debugging option that you can use to add more steps to existing test scripts.
This option was added in the AIQ 4.9.3 release. Previously, this option was only available in the Web Designer IDE.
To use the Record from Here option:
1. Open a test script.
2. Select a step within the script.
3. Right-click and select **Record From Here.**
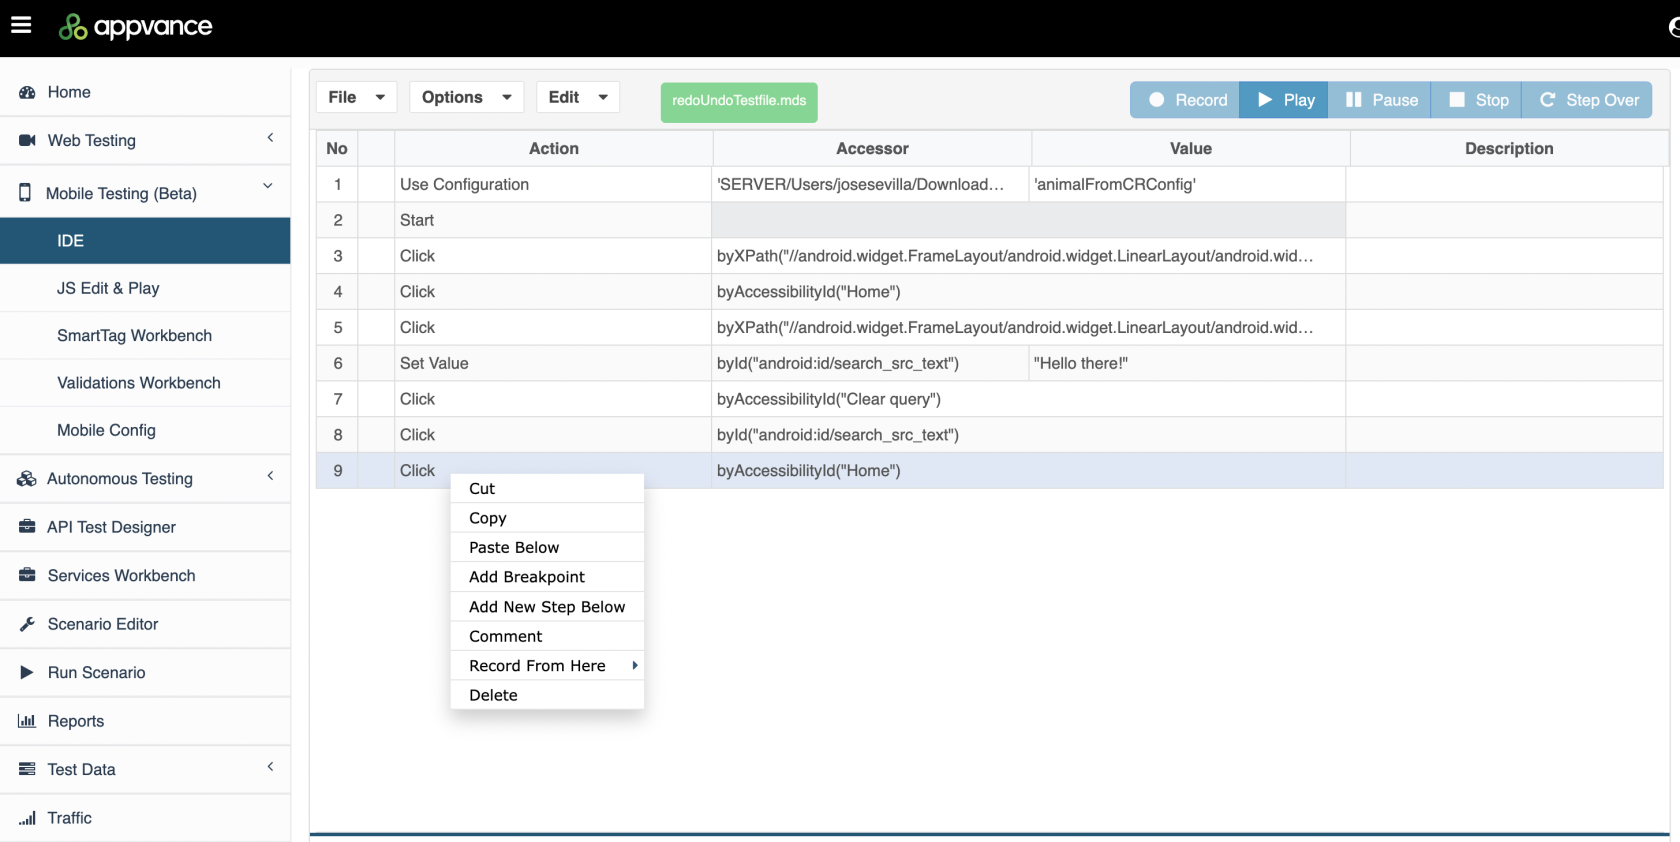
4. Select the browser.
5. The script will playback up to this point, and you will be able to continue to record adding additional steps into your scripts.
---
Last updated: July 17, 2023
If you have any feedback on this topic, please contact us at
# Use Image Injection in AIQ Mobile Testing
# Use Image Injection in AIQ Mobile Testing
Image injection lets a mobile test provide a controlled image to the application under test when the scenario needs repeatable camera, upload, or visual-input behavior. Use controlled test images and avoid customer-sensitive content.
## When to use image injection
- Testing flows that ask the user to upload or capture an image.
- Validating OCR, barcode, QR code, document, or visual-recognition behavior.
- Replacing manual camera interaction with a repeatable test input.
- Confirming how the application handles valid, invalid, or edge-case image files.
## Validation workflow
1. Select a small set of approved test images with known expected results.
2. Configure the mobile environment so the application receives the injected image.
3. Add assertions for the screen, uploaded file, extracted text, or downstream record.
4. Run the test on the required device profile and review evidence.
**Data-safety note:** Do not inject real customer documents, IDs, or private images unless the customer has explicitly approved that test data.
*Last updated: October 8, 2026*
# Use Visual Accessors for Mobile Testing
**Last reviewed:** September 30, 2026
Use this article when mobile tests need visual matching because a stable DOM, accessibility ID, or native locator is not available.
## What changed in this article
- Clarified that visual accessors are a fallback or targeted strategy, not the first locator choice for every mobile step.
- Added reliability checks for device resolution, orientation, theme, image crop, wait timing, and tolerance thresholds.
- Added guidance to prefer stable IDs/accessibility locators when available and to review visual matches after app UI changes.
## Validation workflow
1. Try a stable native, accessibility, or DOM locator first when the app exposes one.
2. Use a tightly cropped visual accessor only for the element region that must be matched.
3. Replay on the target device profile and confirm the match survives expected resolution, orientation, and theme variations.
**Review note:** This page now explains when visual accessors help mobile testing and how to reduce false positives.
---
Last updated: September 30, 2026
If you have feedback on this topic, contact .
# Mobile Self-Healing Support in AIQ
**Last reviewed:** September 24, 2026
Use mobile self-healing to improve locator resilience when supported mobile elements change in predictable ways.
## What changed in this article
- Apply self-healing to stable mobile workflows first; it is not a replacement for good locator strategy.
- Review healed steps after execution so accidental matches do not hide product changes or test defects.
- Document device, OS, app version, and locator type when reporting mobile self-healing behavior.
## Validation workflow
1. Run the mobile scenario and identify locator failures that are candidates for healing.
2. Enable or review self-healing behavior for the affected steps.
3. Replay on the target device matrix and confirm the healed step still validates the intended UI element.
**Review note:** Aligned the article with current AIQ self-healing language and added mobile-specific validation details.
---
Last updated: September 24, 2026
If you have feedback on this topic, contact .
# Sample Mobile Testing Scenarios
# Sample Mobile Testing Scenarios
Use sample mobile scenarios as starting points for learning AIQ mobile testing patterns. Review and adapt each sample before using it in a maintained test suite.
## How to use samples
1. Confirm the sample applies to the AIQ release, device type, and application under test.
2. Replace demo data, accounts, and environment-specific values with approved test data.
3. Update locators and waits so they match the current application behavior.
4. Run a short validation execution and review output before adding the scenario to a suite.
## Maintenance notes
- Prefer stable locators over coordinates or fragile visual assumptions.
- Document device, OS, app build, and AIQ version when keeping a sample as a reference.
- Remove samples that depend on retired applications, obsolete drivers, or unavailable test data.
**Last updated:** September 18, 2026
# Generate Mobile Traffic for Performance Testing
# Generate Mobile Traffic for Performance Testing
Use mobile traffic generation when performance testing must include requests produced from a mobile application or mobile browser flow. Keep the setup controlled so the captured traffic represents the target use case and can be repeated.
## Before you start
- Confirm the mobile device or emulator can reach the application under test.
- Document the network path, proxy requirements, and test environment.
- Use a non-production account and test data approved for performance execution.
## Recommended workflow
1. Capture the mobile traffic required for the scenario.
2. Review and clean the captured requests before scaling the run.
3. Parameterize dynamic values and test data.
4. Run a small validation execution, then increase load in controlled stages.
**Last updated:** September 18, 2026
# Test Mobile Responsiveness in a Browser
# Test Mobile Responsiveness in a Browser
Use browser-based mobile responsiveness testing to validate layout behavior at common mobile viewport sizes. This is useful for responsive web applications, but it does not replace testing on real mobile devices when device-specific behavior matters.
## What to validate
- Navigation, forms, and primary actions fit the mobile viewport.
- Text, buttons, and input fields remain readable and usable.
- Important content is not hidden behind fixed headers, footers, or overlays.
- Scenario Editor steps use stable locators that are not tied to desktop-only layout assumptions.
## Good practices
1. Test the smallest supported viewport first.
2. Validate at least one common phone and one tablet breakpoint when applicable.
3. Confirm critical flows on a real device or emulator before release decisions.
**Last updated:** September 18, 2026
# Mobile Apps - Processing Requests
**Android Emulator and Physical Device:**
This is regarding capturing all the HTTPS requests of the application and finding issues (slow requests and failing requests) from our AI technology, we need help from the dev team in compiling the application with the appvance certificate and Network security configuration XML file to be added to App's manifest XML File.
Reason for this: (We are bound to follow Android's security policies)
Since the introduction of Nougat (API 24) to Android, a number of changes were introduced to how Android handles trusted certificate authorities (CAs). Before, one only needs to install the self-signed SSL .cer file in the emulator/device Security Settings. Then the app will just simply be able to access your secure endpoints (HTTPS) using the global device settings.
The complete blog is [here](https://medium.com/@johnmarktagle/using-self-signed-ssl-in-android-nougat-6d59593a3b6f)
There are only 3 steps to follow - For the first one, click [here](https://appvance-qa.s3-us-west-2.amazonaws.com/naveen/userguides/certificate/appvance.pem) to download the pem file, the dev team should do the next 2 steps and send us the apk file.
**IOS Simulator and Real Devices:**
For Simulator, .app is required.
For Real Device testing, .ipa is required.
We will need access to TestFlight or other invitations in order to test the builds if the dev team compiles the app and uploads them on TestFlight to get the different app build versions to download and install/test the versions.
For Real Devices testing, the app should comply with the UDID of the device that will be used for testing to listen to all the requests and responses.
For instance, if we need to test on iPhones 8, 10, and 11, the UDIDs of those devices should be registered and complied with for us to download and install on those physical devices.
The reason for that is due to Apple’s policies on app distribution for testing, according to the below
[Apple Help Xcode](https://help.apple.com/xcode/mac/current/#/dev7ccaf4d3c)
[Developer Apple Xcode](https://developer.apple.com/documentation/xcode/distributing_your_app_for_beta_testing_and_releases)
Is it compulsory to have UDIDs registered?
if we want to provide our device UDIDs and trust the client (even though we can’t think of any possible harm)
but we believe that the simplest and easiest way to deal with this (in order to avoid having the client register our iPhone’s UDID) is to use [TestFlight](https://developer.apple.com/testflight/)
The customer simply provides us the link (hopefully it does not expire) and we can test their app without them having to register our UDIDs.
---
Last updated: June 02, 2023
If you have any feedback on this topic, please contact us at
# Use Drag Gestures in Mobile Tests
Use this article when a mobile test needs to perform a drag gesture on a device or mobile browser viewport.
## What changed in this article
- Expanded the one-word title into a mobile testing gesture article.
- Added checks for start/end coordinates, element state, viewport size, device orientation, timing, scroll interference, and replay stability.
- Clarified when to prefer a native locator or action before relying on coordinate-style drag behavior.
## Validation workflow
1. Confirm the target element, device profile, orientation, and expected start/end position.
2. Run the drag with conservative timing and verify the application state after the gesture.
3. Replay on the same target profile and adjust only after reviewing screenshots or video evidence.
**Review note:** This page now documents drag as a mobile gesture with reproducibility checks.
---
Last updated: October 5, 2026
If you have feedback on this topic, contact .
# Use Pinch Zoom Gestures in Mobile Tests
Use this article when a mobile test needs to zoom in or zoom out using a pinch gesture in a supported mobile workflow.
## What changed in this article
- Renamed the page to describe pinch zoom gestures instead of a vague “Zoom In and Zoom Out” title.
- Added checks for gesture center point, scale amount, device orientation, app zoom support, browser viewport, and visual verification.
- Added guidance to avoid relying on zoom gestures when a direct locator or application control is more stable.
## Validation workflow
1. Confirm the application supports pinch zoom and define the expected zoom result.
2. Run the gesture on the target device profile and capture evidence before and after zooming.
3. Validate that the next step uses stable locators or visual evidence that still works at the new zoom level.
**Review note:** This page now focuses on repeatable mobile zoom behavior.
---
Last updated: October 5, 2026
If you have feedback on this topic, contact .
# Geo Location
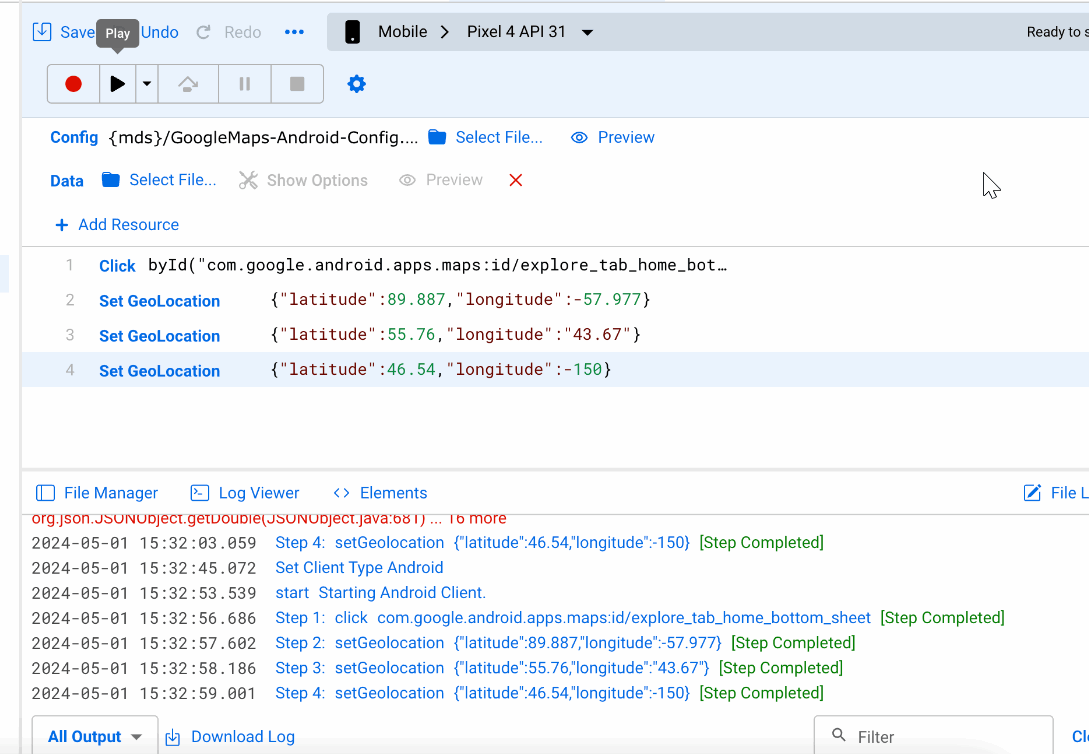
You can use Geo Location for iOS and Android phones with Browser Stack, SauceLabs, and On Premise testing. The Geo Location format is latitude and longitude in decimal format.
---
Last updated: September 17, 2024
If you have any feedback on this topic, please contact us at