# 6.1 - Global Options

Global Options — 06 - Global Options documentation.

# Global Options

The following sections contain information about global configuration options and administration functions in AIQ.

Some of these options are restricted to users with Administrator access.

Navigate to AIQ &gt; **Global Options**.

 ![](https://docs.appvance.net/uploads/images/gallery/2026-07/scaled-1680-/DKCB03OjYAQRnw1a-7ee9e54c5ab2.png)

The following sections detail more information:

<div class="MCMiniTocBox_0 miniToc nocontent" id="bkmrk--1"> </div><div id="bkmrk-last-updated%3A-july-1">---

Last updated: <span class="mc-variable General.NewDateTimeVariable variable">July 10, 2023</span>

If you have any feedback on this topic, please contact us at <documentation@appvance.ai>

</div>

# Review Output Logs in AIQ

## Recommended guidance

Use Output Logs as the first evidence source when an AIQ execution fails, behaves differently than expected, or stops before completion. Logs should be reviewed together with the scenario, data source, browser or device, Test Node, and time window.

## What to look for

- Execution start and stop timestamps.
- Scenario Editor step failures, assertion failures, and wait timeouts.
- Service Suite request, response, authentication, and parsing errors.
- Browser, driver, mobile, or Test Node errors.
- Repository, file, certificate, proxy, or environment access failures.

## Useful troubleshooting pattern

1. Filter the log to the failing execution or the narrowest time window available.
2. Identify the first meaningful error, not only the final error shown at the end.
3. Match the failing step to the scenario, data row, service call, or browser action.
4. Check whether the failure is reproducible with the same data and environment.
5. Attach relevant log excerpts when escalating; avoid sharing secrets, tokens, or full credentials.

## Common mistakes

- Assuming a UI failure is an AIQ platform issue before checking data and waits.
- Copying entire logs without removing sensitive information.
- Ignoring earlier warnings that explain a later failure.

*Last updated: October 5, 2026*

# AIQ Status Overview

## Recommended guidance

Use AIQ Status to confirm whether the platform is healthy before troubleshooting individual scenarios, services, or integrations. Status checks should separate platform availability from test design issues, data problems, browser/device problems, and external system outages.

## What to review

- Application services and background workers that support test execution.
- Test Node availability, capacity, and connectivity.
- Database, file storage, and repository access.
- Browser, mobile, API, and Service Suite execution dependencies.
- Recent errors in Output Logs, server logs, or integration logs.

## How to use the status information

1. Confirm the affected area: login, Scenario Editor execution, Service Suite, Test Controller, reports, or integrations.
2. Check whether the issue impacts all users or only one workspace, project, scenario, node, or browser.
3. Compare the status page with recent changes such as upgrades, repository updates, certificate changes, or new browser versions.
4. Collect timestamps, affected users, scenario names, node names, and error messages before escalating.

## Escalation notes

If the status page shows a service problem, avoid making unrelated scenario changes. Capture evidence and escalate with the exact time window, affected component, and any matching Output Logs entries.

*Last updated: October 5, 2026*

# Preferences

# Preferences

Contents:

- [Repositories](/books/global-options/page/repositories)
- [Report Templates](/books/global-options/page/report-templates)
- [Application Performance Monitoring Integration](/books/global-options/page/application-performance-monitoring-integration)
- [GIT Credentials](/books/global-options/page/git-credentials)
- [EC2 Credentials](/books/global-options/page/ec2-credentials)

# Report Templates

The Reports preferences page is used to create report templates.

1. Navigate to AIQ &gt; **Global Options** &gt; **Preferences** &gt; **Reports** tab.
    
     ![](https://docs.appvance.net/uploads/images/gallery/2026-07/scaled-1680-/pYW1UcId74pAOFbI-09ca48ae0d1f.png)
2. Enter a valid name for the new **Report Template**.
3. Select the required report options.
4. Click **Save**.
5. The newly created Report Template can be seen in the All Reports drop down on the Report Analysis page. Navigate to AIQ &gt; Reports.
6. To view the report, select the newly created report template from the drop-down.
    
     ![](https://docs.appvance.net/uploads/images/gallery/2026-07/scaled-1680-/kieBY1K2w6WLfGV1-ebf003ff2621.png)
 
See the [About Reports section for more detailed information on reporting in AIQ.](https://docs.appvance.net/Content/AIQ/Reporting/ResultsAnalysis/About_Reports.htm)

<div id="bkmrk-last-updated%3A-july-1">---

Last updated: <span class="mc-variable General.NewDateTimeVariable variable">July 17, 2023</span>

If you have any feedback on this topic, please contact us at <documentation@appvance.ai>

</div>

# Git Credentials in AIQ

## Recommended guidance

Use Git credentials in AIQ only for approved repository access. Credentials should be scoped, rotated, and stored through approved mechanisms instead of being copied into scenario steps, documentation, logs, or shared screenshots.

## Credential options

- Personal access tokens or service-account tokens approved for automation.
- SSH keys managed by the repository owner or platform team.
- Read-only access when AIQ only needs to pull repository content.
- Write access only when the workflow explicitly requires AIQ to push changes.

## Security checklist

1. Confirm the repository, branch, project, and required access level.
2. Use least privilege and avoid broad organization-level access.
3. Document owner, expiration, rotation, and revocation process.
4. Test repository connectivity without exposing the credential value.
5. Remove old credentials when users leave or repository ownership changes.

*Last updated: October 6, 2026*

# EC2 Credentials for AIQ Integrations

# EC2 Credentials for AIQ Integrations

Use this article when AIQ needs to access AWS EC2 resources. Prefer IAM roles or instance profiles whenever possible, and use static credentials only when the customer security model explicitly requires them.

## Security guidance

- Prefer EC2 instance profiles, IAM roles, or temporary credentials over long-lived access keys.
- Use a dedicated integration identity with least-privilege permissions.
- Store secrets in an approved secret store or secured AIQ configuration.
- Do not print access keys, secret keys, or session tokens in output logs.
- Rotate credentials and remove unused access promptly.

## Validation workflow

1. Confirm the AWS account, region, and resources AIQ must access.
2. Run a small read-only validation first.
3. Review AWS logs such as CloudTrail to verify the expected actions only.
4. Document owner, purpose, permissions, rotation date, and support contact.

*Last updated: October 9, 2026*

# Repositories

# Repositories Overview in AIQ

Use this overview to understand how repositories support AIQ scenario, resource, and test asset management.

## What changed in this article

- Converted the short “Repositories” page into an overview that points to configuration and operational usage.
- Clarified that repositories should have clear ownership, access control, branch/path strategy, and review practices.
- Added checks for pull behavior, asset visibility, dependency paths, and avoiding sensitive files in repositories.

## Validation workflow

1. Identify what assets belong in the repository and who owns them.
2. Confirm repository access, branch/path strategy, and permissions before connecting it to AIQ.
3. Validate that scenarios can read required assets after a pull and that no secrets are exposed.

**Review note:** This page now acts as an overview while the repository configuration page covers setup details.

---

Last updated: October 5, 2026

If you have feedback on this topic, contact <documentation@appvance.ai>.

# How to Setup a Repository Connection in AIQ

Did you know AIQ seamlessly works with change management repositories?

If you see the message "No Repositories" (highlighted below) in the File Manager pane it means that you do not have a valid repository configured. You must have a repository configured to store your files. Storing files locally is not supported.

Assets created by you and your team are automatically shared, versioned and available directly from AIQ when you setup a connection to the git or svn repository of your choice.

<div id="bkmrk-prerequisites%3A-what-" style="background-color: #EAE6FF;border-color: #998DD9;border-width: 1px;"><div style="background-color: #EAE6FF;">Prerequisites: What you’ll need before you begin

1. Your AIQ URL and credentials
2. The URL and credentials for your preferred git or svn repository
 
 </div> </div># Create a Repository Connection

1. Expand **Global Options** (bottom of the left Navigation bar) and click **Preferences**
2. Using either a provided GIT repository URL and your gitlab credentials, or a URL to your own repository, follow the steps in the image below to setup the repository connection
 
# What's Next?

When you use the AIQ File Browser, you'll now see your HOME directory as well as the connected repository, it's directories, and any files therein.

 ![](https://docs.appvance.net/uploads/images/gallery/2026-07/scaled-1680-/xXwQucPv98KJHvQk-662d00f2a000.png)<div id="bkmrk-last-updated%3A-march-">---

Last updated: <span class="mc-variable General.NewDateTimeVariable variable">March 21, 2024</span>

If you have any feedback on this topic, please contact us at <documentation@appvance.ai>

</div>

# Configure Repositories in AIQ

Use this article when connecting AIQ to Git, SVN, or other approved repositories for scenario, resource, and test asset storage.

## What changed in this article

- Renamed the page to current AIQ terminology and shortened the title.
- Updated repository guidance around Git/SVN configuration, credentials, tokens, SSH keys, pull behavior, and File Explorer usage.
- Added security checks for credential handling, repository ownership, branch strategy, permissions, and avoiding secrets in committed files.

## Validation workflow

1. Confirm the repository type, URL, branch/path strategy, owner, and authentication method before adding it to AIQ.
2. Add or update the repository from the approved AIQ repository workflow and validate connectivity with a pull.
3. Review permissions and test that scenario/resource files are visible without exposing credentials or unrelated repository content.

**Review note:** This page now focuses on secure repository setup and operational validation.

---

Last updated: October 5, 2026

If you have feedback on this topic, contact <documentation@appvance.ai>.

# Managing Repositories in AIQ

# Managing Repositories in AIQ

Repositories store or exchange assets used by AIQ workflows, such as scripts, test data, evidence, and integration files. Keep repository definitions consistent across environments so tests remain portable and supportable.

## Recommended guidance

- Use clear repository names that identify the environment, purpose, and owner.
- Document repository type, endpoint, path, credentials, retention expectations, and cleanup process.
- Use secured credentials or roles and avoid shared personal accounts.
- Separate development, staging, and production-like repositories when possible.
- Validate read/write access with small non-sensitive files before using the repository in a test.

## Maintenance workflow

1. Review repository usage before changing or removing an entry.
2. Update dependent tests, Service Suite flows, or CI/CD jobs when endpoint details change.
3. Monitor storage growth and remove obsolete artifacts according to retention policy.
4. Record ownership and renewal dates for credentials or certificates.

*Last updated: October 9, 2026*

# Configuring a GIT Repository

If you are going to use Visual Accessors, you must use a SFTP, FTP, or S3 repository. This is because Images are resource-consuming elements, at the disk, memory, and CPU level, so using an S3 repository will yield the best performance. The images will be saved with the script in your S3 repository which simplifies image management.  
Appvance does not recommend using Git to store your images if your are using the Visual Accessor functionality. This is due to Git not being designed to handle large amounts of binary files efficiently.

## Creating a new GIT Repository 

1. Enter a name for the repository in the Name box. This is a locally referenced name, and must not match the actual repository name.
    
     ![](https://docs.appvance.net/uploads/images/gallery/2026-07/scaled-1680-/VP9rcDBOFeXybW8h-4d793771566d.png)
2. Click the Type box and select Git or SVN.
3. Enter the URL to your repository, for example, [https://gitlab.com/CompanyABC/myRepository.git](https://gitlab.com/CompanyABC/myRepository.git)
4. Enter your credentials in the Username and Password boxes
    
    
    1. For Git SSH keys see [https://gitlab.com/help/ssh/README](https://gitlab.com/help/ssh/README)
    2. Click Clone Repository
5. The Status indicator displays a Cloning status until all assets are retrieved.
6. Optionally click Checkout Branch to select an alternate branch.
    
    
    - Note: As many users do not have write permissions to Master branches, selecting an alternate branch is recommended. Switching branches can take time to retrieve all files. The Status indicator displays a Cloning status until all assets are retrieved.
7. Any number of repository connections can be created, and appear in the Select box on the Repositories tab.
 
### Repository Updates 

Repositories are updated in real-time and are available throughout the entire Appvance IQ system, including, but not limited to, Scenario Builder and Test Designer and other script and test assets.

Files generated or updated using Appvance IQ are automatically added, committed, and (in the case of Git, pushed) to their respective repository servers.

Repositories are pulled at a 5-minute interval. To force a pull sooner (retrieving any changes to the repository not already present within AIQ), select a repository configuration and click Pull selected repository. For example, if another user updates or adds files, or you add or update files from another location, you may wish to retrieve the latest changes before the auto-update interval.

Click Clear to remove the currently selected repository configuration, providing an empty form to add additional repository connections.

Click Delete to remove the repository connection. Note: This will not delete a repository or any of its contents from the repository database. Deleting a repository will only remove its availability from AIQ.

## Accessing Repositories in AIQ

Connected repositories appear in the QuickStart list within the REPOSITORIES folder. Expand the Quick Start list to view any connected repositories.

 ![](https://docs.appvance.net/uploads/images/gallery/2026-07/scaled-1680-/WjpZyEMUROGsB6L6-f7cad6aac518.png)

Should a repository not contain the expected files, return to **Global Options** &gt; **Preferences** and select the **Repositories** tab to confirm the connection status.

When a user provides invalid credentials, the user shall be notified before adding the repository to the list like below.

 ![](https://docs.appvance.net/uploads/images/gallery/2026-07/scaled-1680-/6m2WHin78xM2XNWe-7a40c383c75b.png)

### Saving to Repositories: When the same file is used by multiple users 

The implementation of the GIT repository tries to avoid the possibility of a merge conflict. To achieve that, every time you SAVE a file, Appvance will FIRST PULL any changes from the remote branch, then save, then commit and finally push. This is every time someone saves a file.

This implies that, as a best practice, no one should be working on the same file at the same time (Just like how a windows file should not be shared among users for editing). If this happens, and both persons save their changes one after the other, the changes that will prevail are the changes of the person who saved last.

Implementing a merge conflict resolution method might bring more problems than fixes to this matter, as opens the possibility of, for example, breaking scripts or making a scenario XML file corrupt or at least invalid as the merge can produce not system congruent files. This kind of error caused by merged scenario files, for example, would be quite difficult to detect and fix, causing more problems.

###  How to add Git repository using SSH key 

1. Generate SSH key:
    
    Git Bash on Windows / GNU/Linux / macOS:
    
    ssh-keygen -t RSA -C "your.email@example.com" -b 4096
    
    For more details refer: [Gitlab ReadMe](https://gitlab.com/help/ssh/README)
2. The next step is to add your public SSH key to GitLab. Navigate to the 'SSH Keys' tab in your 'Profile Settings'. Paste your key in the 'Key' section and give it a relevant 'Title'. If you manually copied your public SSH key make sure you copied the entire key starting with 'ssh-rsa' and ending with your email
    
     ![](https://docs.appvance.net/uploads/images/gallery/2026-07/scaled-1680-/WwdDI8jet3cbQuGp-f665021fd5a3.png)
3. Navigate to Global Options &gt; preferences &gt; Repository page and select GIT from the Type drop-down
4. Enter a name in the Name field. Fill the URL and user name with your account information on git
5. Select SSH key
6. Open the file 'id\_rsa' (public key) on any of your favorite editors like notepad++. Copy and paste the entire content
7. Click Accept button
8. Select the above-created repository name from the select drop-down
9. The status will be shown as "WORKING", after fetching data from the repository
 
 ![](https://docs.appvance.net/uploads/images/gallery/2026-07/scaled-1680-/NdLf4rDiCUk8j7WY-7538e66e58ee.png)

## How to specify a branch with the git repository 

1. Provide all the required details as mentioned in earlier sections with the GIT Repo URL and click Clone Repository
    
     ![](https://docs.appvance.net/uploads/images/gallery/2026-07/scaled-1680-/xhAjVXmFk76tKcPD-03613d8fa07c.png)
2. You will notice the current branch: MASTER below the status, now you can click Checkout Branch on top
    
     ![](https://docs.appvance.net/uploads/images/gallery/2026-07/scaled-1680-/FaW6HKfY3hRw0FSo-d741d0ae930d.png)
3. You can select the branch from this list and click Checkout Branch.
    
    It will take a while to download and sync the files based on the new branch selected and you can notice that the branch would be changed
    
     ![](https://docs.appvance.net/uploads/images/gallery/2026-07/scaled-1680-/RKDGG9LLfmDhFKxn-5c6988c40881.png)
4. Now you can save all your files to the selected branch if you do not have enough permissions to save changes to the master branch (which usually is restricted to many users
 
### Repository with multiple Authentication (Proxy Server) 

When the repository needs to be configured as a multilayer authentication that needs the proxy server details to be added, this option can be chosen.

 ![](https://docs.appvance.net/uploads/images/gallery/2026-07/scaled-1680-/5ly5prVSXDpIyoUc-c298cba12395.png)

Just like adding the Repository details above, with the URL and credentials, Choose Proxy Options from the drop-down, fill in the web-proxy Server, Port, and the credentials of the Proxy Server.

Click Clone Repository after providing all the valid details and credentials.

Note: Do not provide HTTP:// or HTTPS:// for the Web Proxy Server.

 ![](https://docs.appvance.net/uploads/images/gallery/2026-07/scaled-1680-/BjSwxramYivrDCAe-c5ec05626de0.png)

## Committing with a GIT message 

You can now commit files from AIQ with a commit message while saving files, Renaming, and/or deleting files.

When you configure a GIT Repo, You will have an option to provide the default Commit Message which defaults to "Appvance Commit" which can be changed and saved while cloning.

Once the repository is configured, In all the file explorers from IDE or from anywhere in AIQ when saving a file, you should be seeing a text field with the default message which can be changed as well.

This will be seen only for Repository configurations and not for local file saves.

 ![](https://docs.appvance.net/uploads/images/gallery/2026-07/scaled-1680-/BBWcznQS4ojP5oZH-759fd3ca3fd5.png)

A commit message can also be provided when you rename or delete a file.

 ![](https://docs.appvance.net/uploads/images/gallery/2026-07/scaled-1680-/zDcCQWEApF5LKnkG-2a3a39bab458.png)

 ![](https://docs.appvance.net/uploads/images/gallery/2026-07/scaled-1680-/rE77epnvQg8wC1ue-f17acfb583d8.png)

 ![](https://docs.appvance.net/uploads/images/gallery/2026-07/scaled-1680-/LZUp4rQYUGndgpRL-5bb258c4dddf.png)

All the messages will be reflected in your GitLab for the configured repository.

<div id="bkmrk-last-updated%3A-march-">---

Last updated: <span class="mc-variable General.NewDateTimeVariable variable">March 21, 2024</span>

If you have any feedback on this topic, please contact us at <documentation@appvance.ai>

</div>

# Creating a SVN Repository

1. Fill in All the fields, Name of the Repository, can be any name that should be unique, a new configuration with the same name will override any previous configuration
2. Select Type to be SVN. Provide a valid User-name and Password. Provide the entry point URL and click Accept button for the repository to be configured successfully
    
     ![](https://docs.appvance.net/uploads/images/gallery/2026-07/scaled-1680-/E75OiAQWCAw3iCRg-bae4dce9000a.png)
3. Similarly, any number of Repositories can be created, all the created repositories shall be displayed under the 'Select Repository' drop-down
4. Clicking on the Clear button will clear the current repository information that was made in the UI and to delete any repository user has to select the Repository from the drop-down and click the 'Delete' button
 
<div id="bkmrk-last-updated%3A-july-1">---

Last updated: <span class="mc-variable General.NewDateTimeVariable variable">July 17, 2023</span>

If you have any feedback on this topic, please contact us at <documentation@appvance.ai>

</div>

# Configure an S3 Repository in AIQ

# Configure an S3 Repository in AIQ

Use an Amazon S3 repository when AIQ needs to read or write test assets, files, evidence, or integration payloads in AWS object storage. Corrected the title spelling and updated the page around current repository and AWS security practices.

## Configuration checklist

- Confirm AWS account, region, bucket name, prefix/path, encryption, and lifecycle policy.
- Prefer IAM roles, instance profiles, or temporary credentials over static access keys.
- Grant only the required S3 actions for the specific bucket and prefix.
- Use server-side encryption and customer-approved retention settings.
- Document ownership, cost tags, cleanup policy, and access-review cadence.

## Validation workflow

1. Validate read/write access with a small non-sensitive test file.
2. Run the AIQ workflow that uses the S3 repository.
3. Review AWS and AIQ logs for permission, region, bucket, path, or encryption errors.
4. Confirm lifecycle or cleanup rules do not remove required evidence too early.

*Last updated: October 9, 2026*

# Configure an FTP Repository in AIQ

# Configure an FTP Repository in AIQ

Use FTP repositories only when required by a customer environment. Prefer SFTP, HTTPS, or cloud repository options when security policy allows, because standard FTP does not encrypt credentials or file contents.

## Configuration checklist

- Confirm host, port, username, target folder, passive/active mode, and firewall requirements.
- Use a dedicated repository account with the minimum folder permissions required.
- Separate input, output, archive, and error folders when the workflow requires them.
- Document retention, cleanup, and file-naming expectations.
- Do not use FTP for sensitive data unless the customer has explicitly approved the risk.

## Validation workflow

1. Test connectivity from the AIQ environment or node that will access the repository.
2. Upload and download a small non-sensitive test file.
3. Run the AIQ workflow that reads or writes the repository.
4. Review logs for authentication, permission, path, timeout, or firewall errors.

*Last updated: October 9, 2026*

# Configure an SFTP Repository in AIQ

# Configure an SFTP Repository in AIQ

Configure an SFTP repository when AIQ needs to exchange files with a controlled external location. Use secure credentials, least-privilege access, and a clear folder structure for test assets and outputs.

## Configuration checklist

- Confirm the SFTP host, port, username, authentication method, and target folder.
- Use SSH keys or secured credentials according to the customer security policy.
- Grant the AIQ account only the folder permissions required by the workflow.
- Separate input, output, archive, and error folders when the process requires them.
- Document file naming, retention, and cleanup expectations.

## Validation workflow

1. Test connectivity from the AIQ environment or node that will access the repository.
2. Upload and download a small non-sensitive test file.
3. Run the AIQ workflow that reads or writes the repository.
4. Review logs for authentication, permission, path, or timeout errors.

*Last updated: October 8, 2026*

# Repository Troubleshooting


# Repository FAQ


# GitHub - Authenticating with SAML single sign-on

# Application Performance Monitoring Integration

# Application Performance Monitoring Integrations in AIQ

**Last reviewed:** September 24, 2026

Use this page as the entry point for AIQ integrations with APM tools such as AppDynamics, Dynatrace, New Relic, and Datadog.

## What changed in this article

- Use APM integrations to correlate AIQ execution windows with application health, transaction timing, and infrastructure signals.
- Confirm the exact APM product, application name, time zone, and metric scope before connecting a test run to monitoring data.
- Keep provider-specific setup in the dedicated integration article instead of duplicating controller URLs, tokens, or screenshots here.

## Validation workflow

1. Choose the APM provider used by the customer environment.
2. Validate that the AIQ test window and the APM monitoring window use the same time zone and naming convention.
3. Open the provider-specific article before entering credentials or connector details.

**Review note:** This overview was converted from a short link list into a routing page; it now separates AppDynamics, Dynatrace, New Relic, and Datadog setup paths.

---

Last updated: September 24, 2026

If you have feedback on this topic, contact <documentation@appvance.ai>.

# Integrate AIQ with Datadog APM

# Integrate AIQ with Datadog APM

Use Datadog APM integration when AIQ executions need to be correlated with application traces, infrastructure metrics, or service health data. Coordinate with the application and observability teams before enabling collection.

## Configuration checklist

- Confirm the Datadog site, API/application keys, agent endpoint, and environment tags.
- Use secured storage for keys and avoid printing them in AIQ output logs.
- Tag AIQ runs with useful identifiers such as environment, scenario, build, release, or execution ID.
- Verify that collected data does not include sensitive payloads or customer secrets.
- Align retention and dashboard ownership with the observability team.

## Validation workflow

1. Run a small AIQ execution that calls an instrumented application.
2. Confirm traces or metrics appear in Datadog with the expected tags.
3. Compare AIQ timing with Datadog service timing for the same test window.
4. Document dashboard links, tag conventions, and troubleshooting contacts.

*Last updated: October 8, 2026*

# Integration with AppDynamics (APM)

# Configure AppDynamics APM Integration

**Last reviewed:** September 24, 2026

Use this article when AIQ results need to be correlated with AppDynamics application, tier, node, or transaction metrics.

## What changed in this article

- Confirm the AppDynamics controller URL, account, application, tier, and metric path before saving the connector.
- Use a service account or approved token with the minimum access required to read monitoring data.
- Run a short AIQ scenario and compare timestamps against AppDynamics before using the integration in a customer report.

## Validation workflow

1. Collect the AppDynamics connection details from the monitoring owner.
2. Configure the AIQ integration with the approved controller and metric scope.
3. Verify that the expected AppDynamics data appears for the AIQ execution window.

**Review note:** Removed old “general APM” wording from this page and made it AppDynamics-specific so it does not overlap with the APM overview page.

---

Last updated: September 24, 2026

If you have feedback on this topic, contact <documentation@appvance.ai>.

# Configure AppDynamics Integration for AIQ Monitoring

# Configure AppDynamics Integration for AIQ Monitoring

**Last reviewed:** September 21, 2026

Use this page when AIQ performance testing needs to correlate execution data with AppDynamics monitoring. Configure only the minimum access required for the target environment.

## When to use this guidance

- AppDynamics is used to monitor the application under test.
- AIQ results need to be correlated with APM metrics.
- Operations teams have approved access to the monitoring tenant.

## Recommended approach

1. Confirm the AppDynamics controller URL, application, tier, and metric scope.
2. Create or use an approved read-only integration account or token.
3. Configure the AIQ global option or integration setting for AppDynamics.
4. Run a short test and verify that metrics align with the AIQ execution window.
5. Document metric names and dashboards used for analysis.

**Note:** Do not store APM credentials in screenshots or page notes.

---

Last updated: September 21, 2026

If you have feedback on this topic, contact <documentation@appvance.ai>.

# About AppDynamics

“The AppDynamics platform uniquely provides end-to-end visibility of business transactions - from the end-user to application to the database and infrastructure - in real-time. By making the Business Transaction (BT) the primary unit of management for software applications, the platform introduces a single, common language to break down silos between business (Biz), development (Dev), and operations (Ops).”

AppDynamics is a third-party platform that provides real-time monitoring, Get real-time, end-to-end management made for the most complex and distributed applications. AppDynamics APM helps you focus on what matters with features like application mapping, dynamic baselining, and code-level diagnostics, Appvance IQ is able to add this monitor configuration so they can be shown at our own resources usage reports based on AppDynamics monitoring.

We mostly use AppDynamics to monitor databases, this monitoring procedure is based on different metrics, in order to access AppDynamics, you need to have an AppDynamics account already configured and a controller up and running. The Controller is the one that allows you access AppDynamics control panel where you can monitor and take actions over your apps or databases being monitored, if you see no data on your Controller page, the same behavior will be reflected into AIQ so make sure to have some metrics to display.

This document is intended to show how to integrate the AppDynamics monitor into AIQ and which settings you should set before starting using AppDynamics with AIQ. So we will not be discussing how to configure the AppDynamics controller or any of its configuration settings, this document assumes that you already know how the basic AppDynamics settings are configured.

 ![](https://docs.appvance.net/uploads/images/gallery/2026-07/scaled-1680-/H8UJKcp7CkgYJkdX-0079cb945df5.png)

 ![](https://docs.appvance.net/uploads/images/gallery/2026-07/scaled-1680-/7nlxX9WFFiFTrQ8g-be85f93505db.png)

Click the application name, In this example MyApp, Click Analyze from the left pane.

 ![](https://docs.appvance.net/uploads/images/gallery/2026-07/scaled-1680-/KC3n5sLi80fX9fIK-3a269b0d6c77.png)

Double Click Metric Browser.

 ![](https://docs.appvance.net/uploads/images/gallery/2026-07/scaled-1680-/46JqhdzqMVS0A2CV-4843e5516ca2.png)

The left panel displays all the metric data that will be pulled on the Appvance IQ Global Options page. Users can right-click any of these metrics and select “Copy full path”, and it can be added as Property Value on the Options Page as seen below.

 ![](https://docs.appvance.net/uploads/images/gallery/2026-07/scaled-1680-/h8qZbbkV0hH02bjT-3c249ff9e5d4.png)

## Health Rules

Checking that option will provide details of all critical, warnings, and errors of health rules (defined by the user) of that application.

Health rules are created in the application itself. Users can create health rules like if there are more than 500 connections mark it as Critical, if there are more than 5000 connections, mark it as a warning, etc. All these are done in Appdynamics.

There is a feature in Appdynamics called Health Rule violations - Users can define these in AppD. In Appvance IQ reports, it will show either as a 1 or 0 depending on the outcome.

<div id="bkmrk-last-updated%3A-july-1">---

Last updated: <span class="mc-variable General.NewDateTimeVariable variable">July 18, 2023</span>

If you have any feedback on this topic, please contact us at <documentation@appvance.ai>

</div>

# AppDynamics Integration

 As mentioned earlier it is very easy and simple to Integrate AppDynamics in Appvance IQ.

1. After logging in successfully go to Global Options.
2. Under **Preferences** &gt; Click **APM Integration**
    
     ![](https://docs.appvance.net/uploads/images/gallery/2026-07/scaled-1680-/0f5wJg5887ym8ERl-0397264573b9.png)
3. Configure the following options:
    
    
    - Type: Select **AppDynamics** from the dropdown.
    - URL : is to simply provide the dashboard URL from AppDynamics of what you are looking for (Discussed below).
    - Name : is a text field that you can use to provide meaningful names for your Reports, say if you are monitoring Memory or CPU or something particular, you can name those with a corresponding URL from AppDynamics.
    - Time Range : Has values of 10, 30, and 60 minutes.
    - When a transaction is chosen at a given point in time (The time Range chosen is 10 mins), for example the below transaction happened at 12.41, and clicking the AppDynamics link will take you to that particular dashboard page or report page and the time range on the dashboard would be -5 minutes and + 5 minutes (i.e., 12.35 to 12.45)
        
        INTRO
        
         ![](https://docs.appvance.net/uploads/images/gallery/2026-07/scaled-1680-/X91NyDB7e87I3cNG-d7abd6b6bd6a.png)
        
        INTRO
        
         ![](https://docs.appvance.net/uploads/images/gallery/2026-07/scaled-1680-/wVt1nNjZnmdU7jFD-963f2f525008.png)
4. and buttons to Clear, Save and Delete.
5. Log in to your AppDynamics Account and choose an Application or a Server or a DB (that is already configured) based on what needs to be monitored
    
     ![](https://docs.appvance.net/uploads/images/gallery/2026-07/scaled-1680-/InpHA8v6PfjcExTX-566a436da722.png)
6. As seen in the below screenshot, Application Dashboard has been chosen, you can simply copy the URL from the address bar and paste it into the URL section of AppDynamics Integration and provide a meaningful name say 'Application Dashboard' and click Save
    
     ![](https://docs.appvance.net/uploads/images/gallery/2026-07/scaled-1680-/chfuRktsphlUpd5t-f20e2c08d450.png)
7. Below is the configuration made in Appvance IQ
    
     ![](https://docs.appvance.net/uploads/images/gallery/2026-07/scaled-1680-/9AbFO8iASd5DrCqL-f83c3863f0a7.png)
8. Click **Save**.
9. Once the configuration is saved, go to the Scenario Builder and create your performance test on the application, save and run the scenario.
    
    Note: No configuration changes are required in the Scenario Builder, it is required to save more percentage of logs in the Options panel of Scenario Builder so the Test case execution graph shows some data (Example: 10% logs)
10. While the test is running (The reports shall be available during the test run and after the test is complete as well), on the Analyze page, Select **Test Case Executions** from the drop-down, you will notice a lot of executions that is happening for the performance test. Select Iteration and Test case from the drop-down
    
     ![](https://docs.appvance.net/uploads/images/gallery/2026-07/scaled-1680-/wqHnVbudU5LlcnKO-560d3fd64718.png)
11. Click any of these small triangles that are plotted over the period of time and these are the executions that happened
12. You will notice buttons (with what was configured at the global options for AppDynamics) at the bottom for each of these executions, you can simply click this button which will take you to the New Relic dashboard page at that point in time
    
     ![](https://docs.appvance.net/uploads/images/gallery/2026-07/scaled-1680-/oCfaoEmFojtEL6wF-79f1abeca379.png)
    
    For the pages where credentials are required to log in to AppDynamics, it is required to provide the credentials.
13. Similarly, you can click any small triangle on this page and click the buttons to check the app performance over the period of time from AppDynamics.
    
    To add, any number of configurations or processes can be added to this list which shall be displayed on the same page which you can click during that time and go to AppDynamics to check the dashboard or the reports.
 
<div id="bkmrk-last-updated%3A-july-1">---

Last updated: <span class="mc-variable General.NewDateTimeVariable variable">July 18, 2023</span>

If you have any feedback on this topic, please contact us at <documentation@appvance.ai>

</div>

# Integration with Dynatrace (APM)

# Configure Dynatrace APM Integration

**Last reviewed:** September 24, 2026

Use this article when AIQ executions need to be reviewed alongside Dynatrace service, application, or synthetic monitoring data.

## What changed in this article

- Confirm the Dynatrace tenant URL, API token scope, monitored entity, and management zone before saving the integration.
- Use read-only API access where possible and avoid embedding tokens in article text or screenshots.
- Validate with a small execution so the AIQ run name and Dynatrace time range can be matched cleanly.

## Validation workflow

1. Get the tenant URL and token requirements from the Dynatrace administrator.
2. Map the AIQ execution to the correct Dynatrace entity or service.
3. Run a validation scenario and confirm Dynatrace metrics line up with AIQ start and end times.

**Review note:** Updated the page to focus on Dynatrace tenant/entity mapping rather than generic APM setup.

---

Last updated: September 24, 2026

If you have feedback on this topic, contact <documentation@appvance.ai>.

# Deploy Dynatrace

A single Dynatrace OneAgent monitors real user experience and all the technologies, services, and applications that run in your environment. Just install OneAgent.

<u>Dynatrace Agent for Windows:</u>

From your Dynatrace account, From the left navigation panel, go to 'Deploy Dynatrace'

Click Start Installation.

Select Windows as the platform

1. Download and run the installer on the target host, you will find the link to download the agent.
2. Restart the processes that you want to monitor.
 
<u>Dynatrace Agent for Linux:</u>

Installer type: x86/64

Run the installation script on each Linux machine that you want to monitor.

\#Use this command on the target host:

wget -O Dynatrace-OneAgent-Linux-1.141.205.sh "Your OneAgent URL"

\#Verify signature:

wget [https://ca.dynatrace.com/dt-root.cert.pem](https://ca.dynatrace.com/dt-root.cert.pem) ; ( echo 'Content-Type: multipart/signed; protocol="application/x-pkcs7-signature"; micalg="sha-256"; boundary="--SIGNED-INSTALLER"'; echo ; echo ; echo '----SIGNED-INSTALLER' ; cat Dynatrace-OneAgent-Linux-1.141.205.sh ) | openssl cms -verify -CAfile dt-root.cert.pem &gt; /dev/null

\#And run the installer with root rights:

/bin/sh Dynatrace-OneAgent-Linux-1.141.205.sh APP\_LOG\_CONTENT\_ACCESS=1

\#Restart the processes that you want to monitor.

<div id="bkmrk-last-updated%3A-april-">---

Last updated: <span class="mc-variable General.NewDateTimeVariable variable">April 14, 2023</span>

If you have any feedback on this topic, please contact us at <documentation@appvance.ai>

</div>

# Configure Dynatrace Integration for AIQ Monitoring

# Configure Dynatrace Integration for AIQ Monitoring

**Last reviewed:** September 21, 2026

Use this page when AIQ test results need to be correlated with Dynatrace metrics and traces. Coordinate tenant access with the monitoring owner.

## When to use this guidance

- Dynatrace monitors the system under test.
- AIQ performance results need APM context.
- You need to validate token scope, entity selection, and time correlation.

## Recommended approach

1. Confirm the Dynatrace tenant URL and target entities or management zones.
2. Create an approved API token with the minimum required read scope.
3. Configure AIQ with the Dynatrace endpoint and token according to the current version.
4. Run a short AIQ test and compare the execution time window with Dynatrace data.
5. Use consistent tags or test names to make executions easy to find.

**Note:** Protect Dynatrace tokens as secrets and rotate them according to policy.

---

Last updated: September 21, 2026

If you have feedback on this topic, contact <documentation@appvance.ai>.

# Integration with New Relic (APM)

# Integration with New Relic (APM)

(Assuming that the reader has New Relic installed and configured their target applications/Servers/Databases/load balancer etc in New Relic)

Integration of Appvance IQ and New Relic is just easy, please follow the below topic on how to configure, how to add New Relic configuration into Appvance IQ.

###  What is New Relic and why is it required? 

New Relic is a performance management solution, enabling developers to diagnose and fix application performance problems in real-time.

A running application is not just a bunch of code, the code also has to run on some production servers. It is just as important to ensure that your production boxes are behaving themselves as it is to make sure that your application code is performing. New Relic provides a less full-featured but very simple alternative when it comes to infrastructure monitoring.

Depending on the needs of your application, you may have a web component, database, load balancer, etc. Some of these may share the same box. But, once your application gets beyond a certain size, you will start putting some of these in their own boxes. As the number of boxes grows this can become a bit of a chore. It would be handy if you could have a way to find out about the health of all your boxes at once. This is exactly the problem that New Relic server dashboards solve. You get a snapshot of the health of all your production servers at once.

<div id="bkmrk-last-updated%3A-april-">---

Last updated: <span class="mc-variable General.NewDateTimeVariable variable">April 14, 2023</span>

If you have any feedback on this topic, please contact us at <documentation@appvance.ai>

</div>

# New Relic Java Server Installation

One of the pre-requisite is to have Tomcat/Jetty or a similar service to be installed and below are the instructions:

1. Download the Tomcat server from the below URL [https://tomcat.apache.org/download-80.cgi](https://tomcat.apache.org/download-80.cgi)
2. Once downloaded, set the Environment variable under User variables before installing the tomcat server
    
     ![](https://docs.appvance.net/uploads/images/gallery/2026-07/scaled-1680-/fARuZ8xjzxh9LM6R-27538ce9be8f.png)
3. If you want to change the port of the server (By default, the tomcat server starts with port 8080 and it is sometimes required to change the default port as other programs might be using that port - by default Appvance HTTP uses port 8080), navigate to the conf folder, edit the server file and change the port at line 69 as seen below (Ex: 7001)
    
     ![](https://docs.appvance.net/uploads/images/gallery/2026-07/scaled-1680-/4gUOAImJLaOjwnMc-3d14a1d9aa15.png) ![](https://docs.appvance.net/uploads/images/gallery/2026-07/scaled-1680-/qZO6Z2E5FdLaEoFn-2b569cdef3fe.png)
4. Open the command prompt, run the below command to start the server
    
     ![](https://docs.appvance.net/uploads/images/gallery/2026-07/scaled-1680-/hHKOhM0ttiXut1Tf-5b23689301ae.png)
5. Login to the New Relic website with your valid credentials.
    
    [https://login.newrelic.com/login](https://login.newrelic.com/login)
    
     ![](https://docs.appvance.net/uploads/images/gallery/2026-07/scaled-1680-/rbe5eXaVWT5vqZGh-81e7423790fd.png)
6. Click APM in the Leftmost Corner if you are going to use it for the first time, if not click the Add more button
    
     ![](https://docs.appvance.net/uploads/images/gallery/2026-07/scaled-1680-/qdJh06FS1lzSmzzf-b24e7c72f5c3.png) ![](https://docs.appvance.net/uploads/images/gallery/2026-07/scaled-1680-/8Iq3sW0PS1XJxpBm-960695979fd0.png)
7. Click Java
    
     ![](https://docs.appvance.net/uploads/images/gallery/2026-07/scaled-1680-/EUVnVTTLxUyNo0xS-afb730fc1da8.png) ![](https://docs.appvance.net/uploads/images/gallery/2026-07/scaled-1680-/fwJs4Ek547P970gq-69ef992758c6.png)
8. If your OS is windows, Click the Windows button and click download the Java agent.
    
    The new relic-java-3.39.1.zip file will get downloaded.
    
    Extract the newrelic-java-3.39.1.zip and copy the new relic folder and paste it inside the Java Server (Tomcat, Jetty, JBoss, etc.)
    
    Ex:
    
     ![](https://docs.appvance.net/uploads/images/gallery/2026-07/scaled-1680-/9Mb9k9ZY8ywS2oKR-c3beecdf2d74.png)
9. If you want to change Display Name, Navigate to the New relic folder, Edit the app name in 'newrelic.yml' file
    
     ![](https://docs.appvance.net/uploads/images/gallery/2026-07/scaled-1680-/Qt9H8OLq81gVinwD-d5ba99309209.png)
10. Open the Command Prompt with Administrator access
11. Navigate to the New relic folder and type the below command
    
    java -jar newrelic.jar install
    
     ![](https://docs.appvance.net/uploads/images/gallery/2026-07/scaled-1680-/UgFQ85tAl1lTkb70-0372d8a08b84.png) ![](https://docs.appvance.net/uploads/images/gallery/2026-07/scaled-1680-/4lgIpNCyjJELRXdK-82d67d94af40.png)
12. Start the Java Server (In our case it is Tomcat Server)
    
     ![](https://docs.appvance.net/uploads/images/gallery/2026-07/scaled-1680-/RaFxfJHOsYa5ooj3-070425c0a71e.png)
13. Perform the actions in the Application that uses the above one as a server
    
     ![](https://docs.appvance.net/uploads/images/gallery/2026-07/scaled-1680-/qdN7UmJbSe3tuMlU-f293670e0e2a.png)
14. Navigate to the New Relic Website and the name provided in the .yml file will get listed under the Application and clicking the application server, all the monitoring and dashboard graphs shall be displayed
 
 ![](https://docs.appvance.net/uploads/images/gallery/2026-07/scaled-1680-/kqXyRRVVrnPzHNmR-93fa770ef0d1.png)<div id="bkmrk-last-updated%3A-july-0">---

Last updated: <span class="mc-variable General.NewDateTimeVariable variable">July 03, 2023</span>

If you have any feedback on this topic, please contact us at <documentation@appvance.ai>

</div>

# Configure New Relic Integration for AIQ Monitoring

# Configure New Relic Integration for AIQ Monitoring

**Last reviewed:** September 21, 2026

Use this page when AIQ executions need to be reviewed alongside New Relic APM or infrastructure metrics.

## When to use this guidance

- New Relic monitors the application or infrastructure under test.
- AIQ reports need supporting APM evidence.
- You need to validate access, timing, and dashboard references.

## Recommended approach

1. Confirm the New Relic account, application, dashboard, and metric scope.
2. Create or select an approved key or account access method with least privilege.
3. Configure the AIQ integration or global option for New Relic according to your version.
4. Run a short validation execution and verify metrics appear for the same time window.
5. Document dashboard links or metric names used for performance analysis.

**Note:** Never paste New Relic keys or account secrets into documentation pages or test output.

---

Last updated: September 21, 2026

If you have feedback on this topic, contact <documentation@appvance.ai>.

# Cloud Config

# Cloud Config

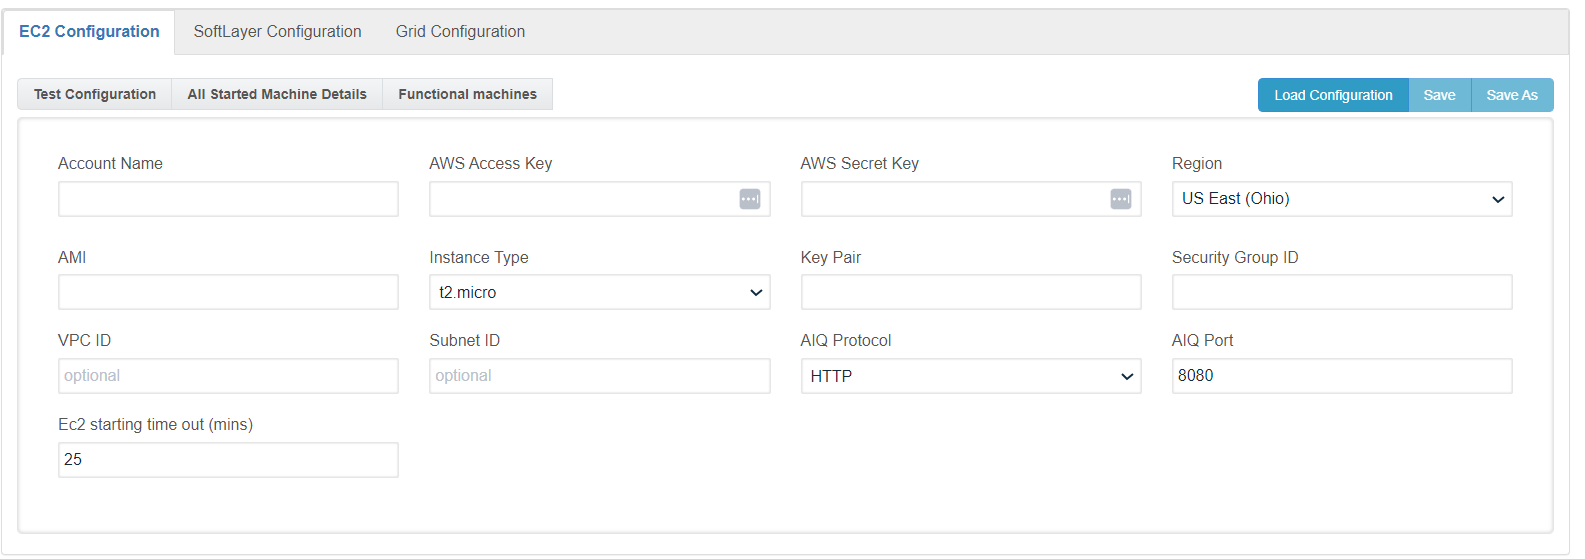
Use the Cloud Config page to configure and maintain:

- [onnEC2 Configuration ](https://docs.appvance.net/Content/AIQ/Global_Options/CloudConfig/Amazon_EC2_Configurator.htm)
- [Softlayer Configuration ](https://docs.appvance.net/Content/AIQ/Global_Options/CloudConfig/SoftLaye_Config.htm)
- [Grid Configuration ](https://docs.appvance.net/Content/AIQ/Global_Options/CloudConfig/Grid_Testing.htm)
 
 ![](https://docs.appvance.net/uploads/images/gallery/2026-07/scaled-1680-/Lw4C3x7hy68E8u72-b5d5ea102f7b.png)

<div id="bkmrk-last-updated%3A-july-1">---

Last updated: <span class="mc-variable General.NewDateTimeVariable variable">July 17, 2023</span>

If you have any feedback on this topic, please contact us at <documentation@appvance.ai>

</div>

# Amazon EC2 Configuration for AIQ

# Amazon EC2 Configuration for AIQ

Use this article when configuring Amazon EC2 resources for AIQ environments. Align instance sizing, networking, storage, security groups, and IAM access with the expected execution workload.

## Configuration checklist

- Select instance types based on Controller, Test Node, database, or supporting-service responsibilities.
- Configure VPC, subnet, security groups, DNS, and routing so AIQ components can communicate securely.
- Use encrypted volumes and plan disk size for logs, execution artifacts, browser caches, and database growth.
- Attach IAM roles instead of static access keys whenever possible.
- Tag resources with environment, owner, cost center, and lifecycle information.

## Validation workflow

1. Confirm required ports and hostnames from the Controller and Test Nodes.
2. Run AIQ login and small execution smoke tests.
3. Monitor CPU, memory, disk, and network metrics during the validation run.
4. Document AMI, instance type, storage, security group, and IAM role details.

*Last updated: October 8, 2026*

# Softlayer Configuration

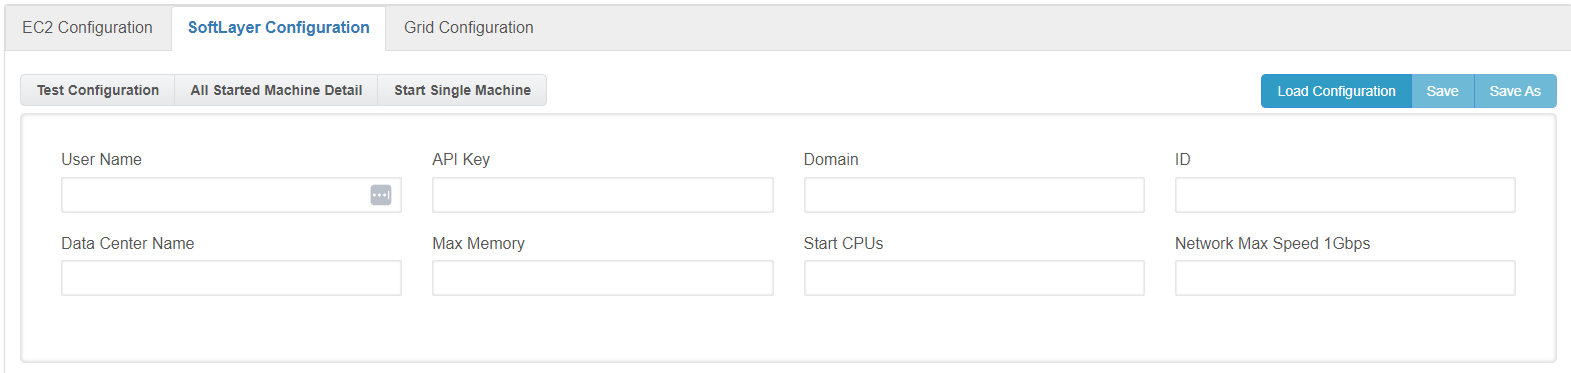
Use the Softlayer Cloud Configuration utility to deploy your test to an IBM Softlayer Cloud. Access the utility in the AIQ by clicking on the Options link from the Start Screen and navigating to Cloud Configuration tab

Also, there are options to Test the Configuration in the Softlayer Configuration service, including options to view a list of running instances, start and stop instances, and reboot instances.
 ![](https://docs.appvance.net/uploads/images/gallery/2026-07/scaled-1680-/SZjxcOJhN2bS5u06-5998139aee88.png)

The user has to provide the valid user name and API Key and click the button available, This will pull all the data centers available for the account provided. This is done by making a REST call to Softlayer and requesting all data centers, then populating the drop-down dynamically. So it’s always up to date.

AIQ provides the following options to run tests in a Cloud Testing environment.

- **User Name** The “User Name” field corresponds to the id used to log in to Softlayer Account from the web page
- **API Key** is a unique key the user has in order to execute REST calls through Softlayer’s REST API, if the user doesn’t know which its API Key is, it can ask for support on Softlayer’s portal page in order to obtain it
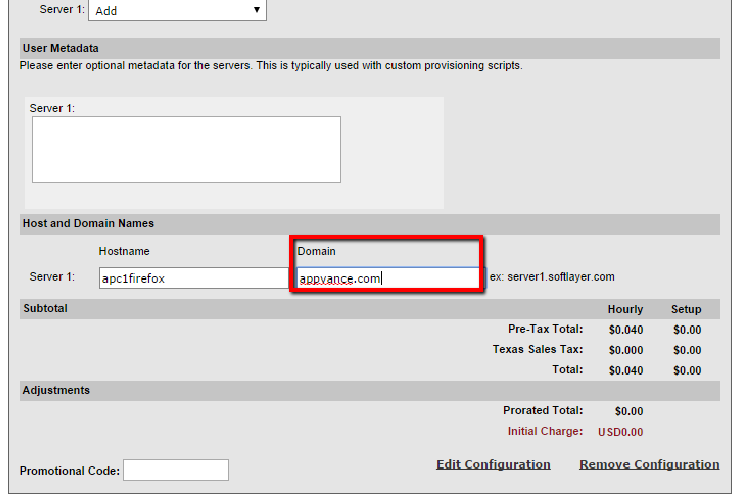
- **Domain** The “Domain” field is a required field that identifies the respective machine’s domain. We can get this info while creating a new CCI (Cloud Computing instance)
    
     ![](https://docs.appvance.net/uploads/images/gallery/2026-07/scaled-1680-/st2tyr1zjXQy4AmU-211c84e57a1a.png)
 
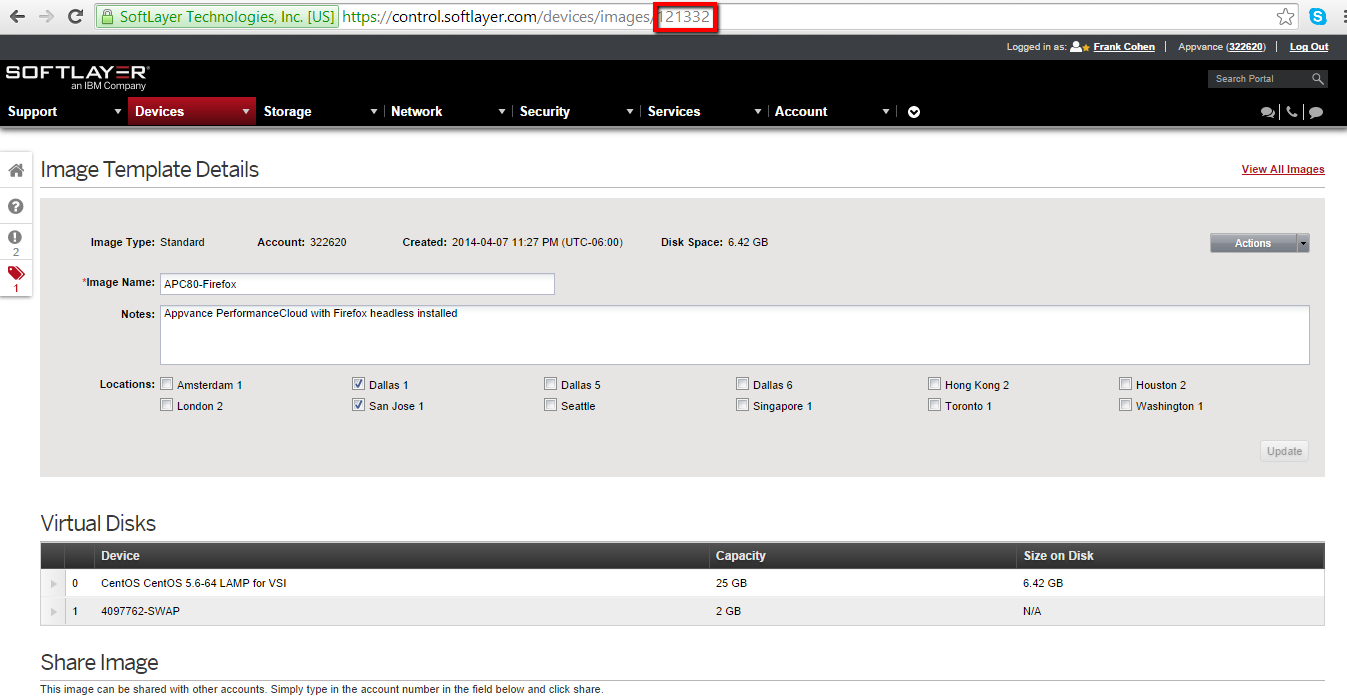
- **The ID** field is the image disk id taken for the machines creation process and also it’s used for searching functional machines. The ID can be optioned by navigating to Image, Under Devices &gt; Manage &gt; Images - Click the image disk, and the URL will display the ID. Ex:[https://control.softlayer.com/devices/images/121332](https://control.softlayer.com/devices/images/121332) , In this case, 121332 is the image ID.
    
     ![](https://docs.appvance.net/uploads/images/gallery/2026-07/scaled-1680-/1TfRk2JCvTYoboxd-1a71aaede848.png)
 
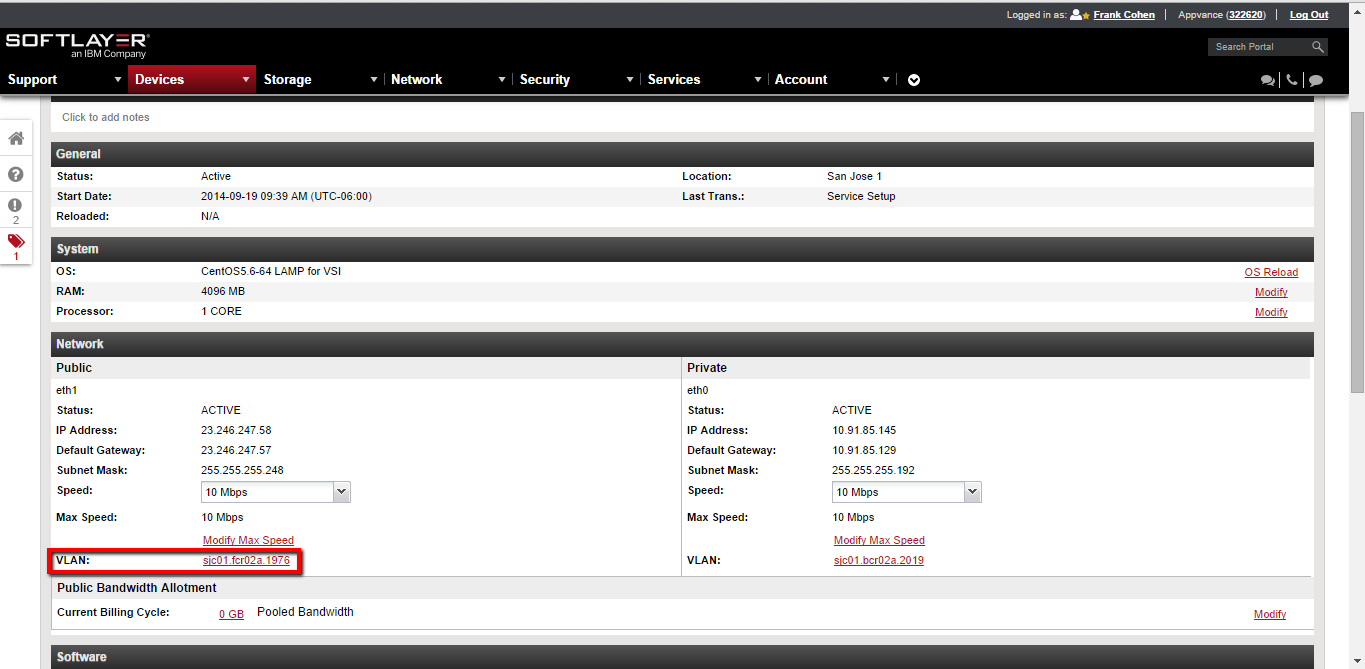
- **DataCenter Name** is a very important field, this field is the code used in Softlayer for identifying a respective datacenter, e.g.: “San Jose 1” datacenter’s name is “sjc01”. Click the created Device, and look for VLAN on the page: The example would look like VLAN:sjc01.fcr02a.1976, in this case, sjc01 is the DataCenter Name.
    
     ![](https://docs.appvance.net/uploads/images/gallery/2026-07/scaled-1680-/9PMZsHCIiwU1USMD-ee12d1805fcf.png)
 
- **Max Memory** field represents the amount of memory the machine will use (in Megabytes), e.g: 4096.
- Start CPU’s field which represents the amount of CPUs the machine will use.
 
**Tools Section**

This section has some functions related to the information provided in the configuration section previously mentioned.

The “Test Configuration” tool function is checking if the configuration provides is valid.

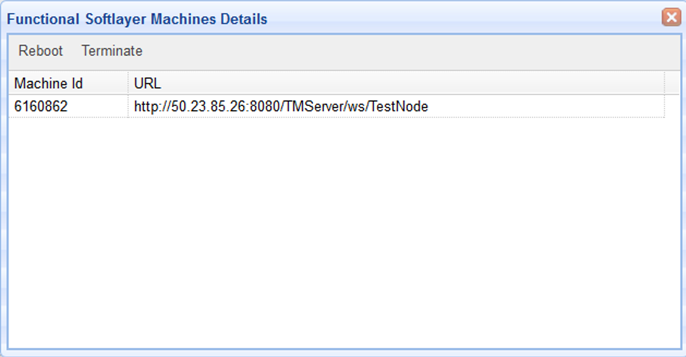
Then the “Functional Machines” tool opens a list of the machines that match the configuration.
 ![](https://docs.appvance.net/uploads/images/gallery/2026-07/scaled-1680-/yh0cl2YEqDqtKWmu-07f2bf1b84e0.png)

In this screen-shot shown the extension offers a couple of options, one is “Reboot”, which will execute a reboot call at an operating system level, usually this process takes a few minutes after selecting the option.

The other option is “Terminate” which deletes the selected machine, as the reboot process, takes some minutes and it is important for the user to take into consideration that all the information stored in the respective machine will be deleted.

Finally, the “Start Single Machine” tool is in charge of the machine creation process, the parameters for the new machine will be taken from the configuration specified by the user. As the “reboot” and “terminate” process, “start a machine” will take some time, usually minutes and hours sometimes.

Appvance provides the above values to customers using the Appvance OnDemand service. Contact [info@appvance.com](mailto:info@appvance.ai) for details.

<div id="bkmrk-last-updated%3A-july-1">---

Last updated: <span class="mc-variable General.NewDateTimeVariable variable">July 17, 2023</span>

If you have any feedback on this topic, please contact us at <documentation@appvance.ai>

</div>

# Grid Configuration

AIQ Grid technology deploys tests to a grid of TestNodes. These may be TestNodes installed in a rack of computers in your QA lab, in a partner's data center, and in the unused desktop computers of your office after hours.

AIQ Grid technology is ideal for automating test operations from a Continuous Integration environment. The CI platform starts an IQ test and IQ automatically provisions and deploys tests to the available TestNodes in your own Grid or in a Cloud Testing environment.

AIQ Grid works well in team development organizations. With Grid technology-enabled multiple AIQ users to run their test on the first available TestNodes.

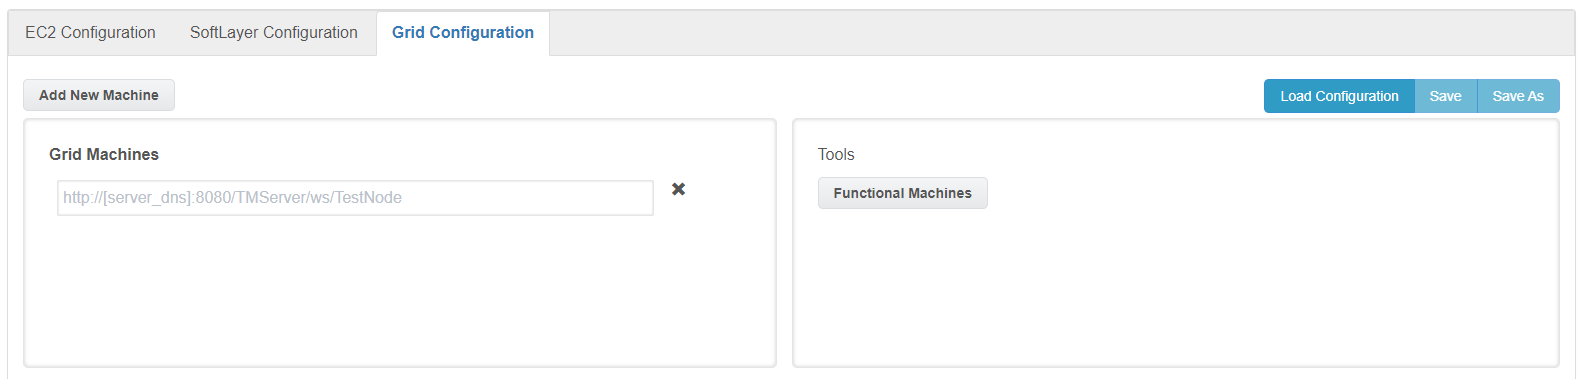
Use the Options link from the Start Screen and Navigate to Cloud Configuration. Provide the details of all the required fields like the Grid Machine Name
 ![](https://docs.appvance.net/uploads/images/gallery/2026-07/scaled-1680-/aT2UETk6e5gmqWai-b78bec23cf17.png)

**Grid Machines:** Provide the URL of the TestNodes of the grid machines where AIQ is installed. TestNode URL will be like "http://localhost:8080/TMServer/ws/TestNode", In place of localhost, provide the hostname of the grid machine.

**Add New Machine Button:** Use this button to add as many machines as required to create the Grid Configuration file.

**Functional Machines:** Will display the list of functional machines from the configuration file.

**Save and Save As:** Button can be used to save the configuration file. Files will be saved with .cloud extension.
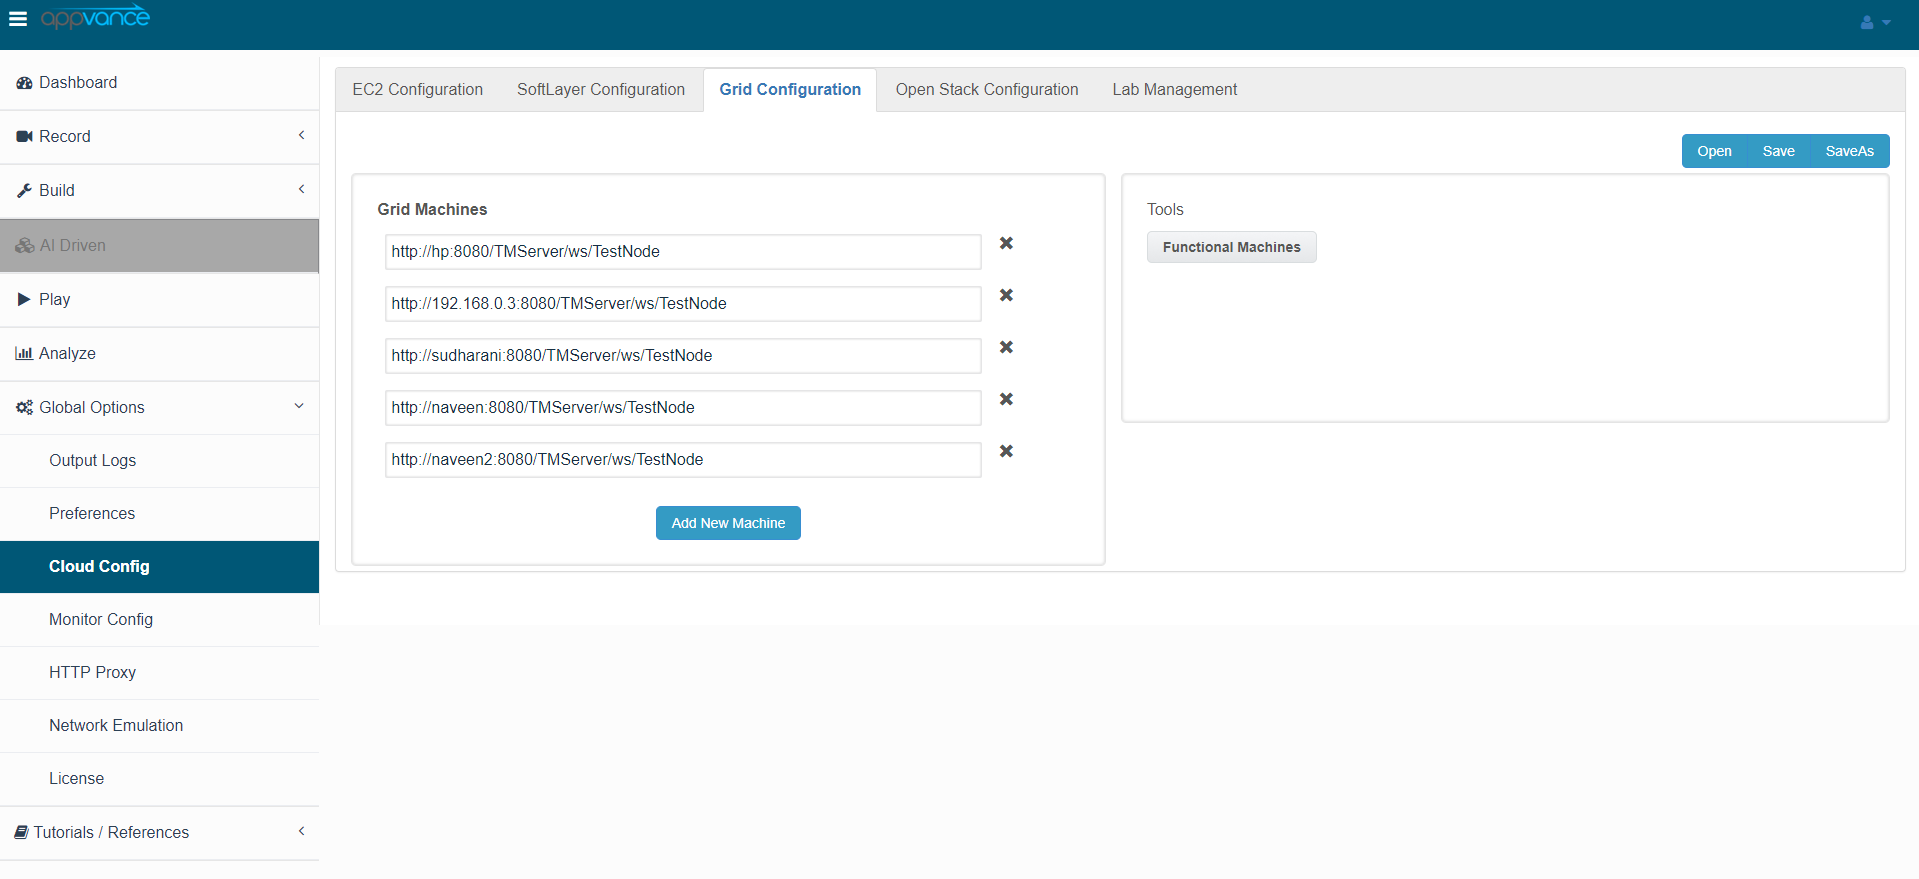
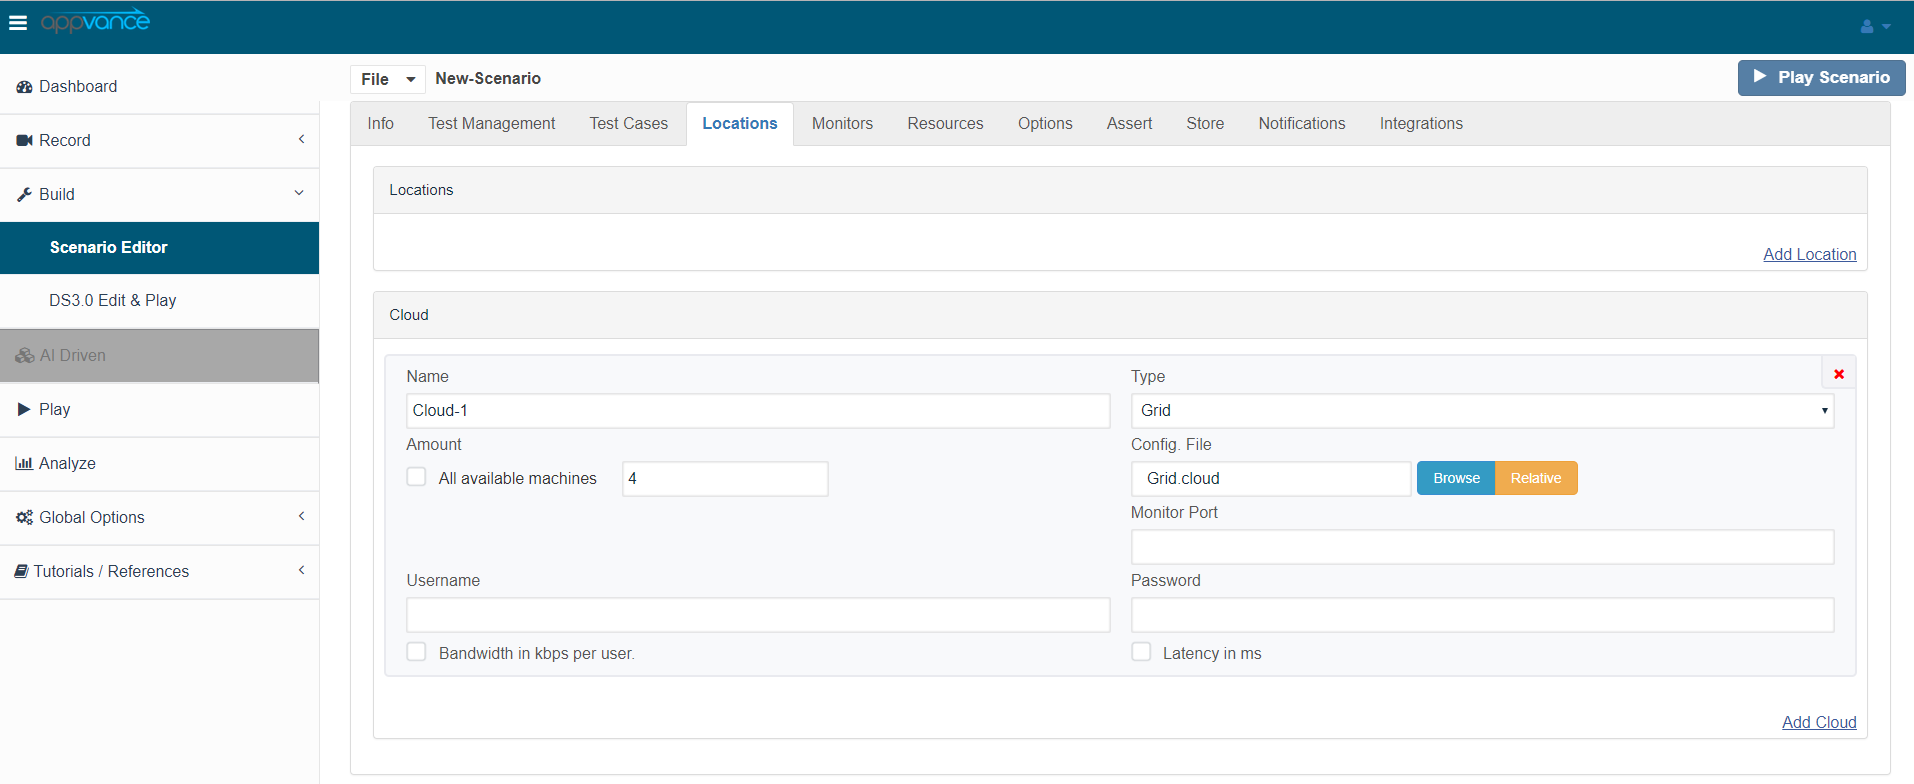
 ![](https://docs.appvance.net/uploads/images/gallery/2026-07/scaled-1680-/ZtJ7sb85w7hqySHB-1e887aca94a4.png) ![](https://docs.appvance.net/uploads/images/gallery/2026-07/scaled-1680-/fXIiW16G4Sefeuhi-9955f96bae32.png)Use the Appvance Scenario Builder to identify the grid to deploy your test. In the TestNodes tab use the Add Cloud command. Choose Grid in the Type pop-up menu. Choose the quantity of TestNodes in the quantity field. Choose the Grid configuration file using the Browse button. AIQ automatically uses the available TestNodes from the Grid configuration file to deploy and operate your test.

AIQ displays the status of the TestNodes in a controller window for the selected TestScenario as it operates the test. The Grid Configuration utility shows TestNode status as AIQ operates the test.

The Grid Configuration utility automatically updates the TestNode status every 30 seconds with Auto-Update selected. Use the Tools drop-down menu, to manually update the status.

### Cloud and Grid Environment Client Utilities

AIQ provides a Cloud Test client to identify cloud provider-specific security tokens, names, and parameters. AIQ provides integrated clients for Amazon EC2 and IBM Softlayer Cloud Testing environments.

<div id="bkmrk-last-updated%3A-july-1">---

Last updated: <span class="mc-variable General.NewDateTimeVariable variable">July 17, 2023</span>

If you have any feedback on this topic, please contact us at <documentation@appvance.ai>

</div>

# Admin Options

# Admin Options

The Admin Options page gives you access to various AIQ system administration functions. Each function is described in separate topics within this section.

<div class="MCMiniTocBox_0 miniToc nocontent" data-mc-depth="1" data-mc-toc="True" id="bkmrk-"> </div>These functions are restricted to users with Administrator level access.

<div id="bkmrk-last-updated%3A-july-1">---

Last updated: <span class="mc-variable General.NewDateTimeVariable variable">July 10, 2023</span>

If you have any feedback on this topic, please contact us at <documentation@appvance.ai>

</div>

# Results

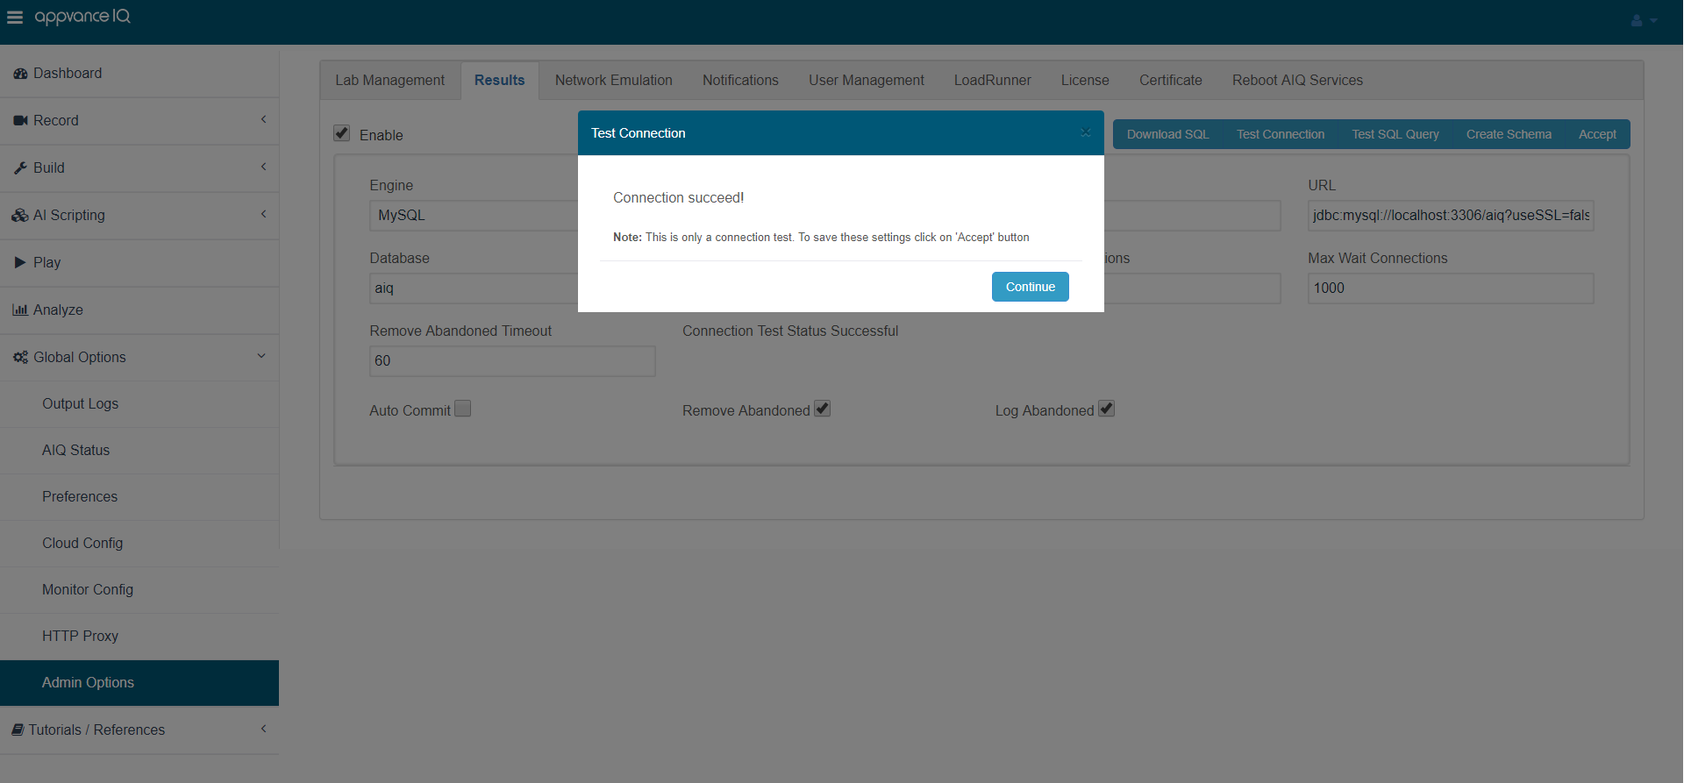
Appvance IQ uses a relational database (RDBMS) for its Repository. AIQ logs every test operation, test step, and monitored resource to the Repository. AIQ supports MYSQL and Oracle databases. It is required to configure the databases to store the results. The results page has the option to configure these databases in Appvance IQ.

## Configuring Database as Results Repository

1. Start Appvance IQ and login to Appvance IQ as an Administrator
2. Select the Admin Options tab from the Global Options
3. Select the Results tab
4. Click Enable check-box for all the options to show
5. Select MySQL or Oracle under Engine depending on what database needs to be configured
6. Provide valid user names and passwords for the database
7. URL of MYSQL or Oracle by default would be 'jdbc:mysql://localhost:3306/aiq?useSSL=false' or 'jdbc:oracle:thin:@localhost:1521:aiq' respectively. When the database is installed and configured in the same instance as the controller machine, then localhost could be used but has to be changed to a different DNS depending on the database URL.  
    An AWS RDS instance Endpoint URL would look like this: [sqlserver.c7nn5t4czzya.us-west-2.rds.amazonaws.com](http://sqlserver.c7nn5t4czzya.us-west-2.rds.amazonaws.com)
8. Provide the valid name of the database
9. Click Accept to see the changes being saved successfully
10. All other fields can be left as default
11. Click 'Test Connection' to see the message Connection Succeed!
 
 ![](https://docs.appvance.net/uploads/images/gallery/2026-07/scaled-1680-/YXPBp7zgtdOrFAhL-bab8b7a64f68.png)

<div id="bkmrk-last-updated%3A-july-1">---

Last updated: <span class="mc-variable General.NewDateTimeVariable variable">July 17, 2023</span>

If you have any feedback on this topic, please contact us at <documentation@appvance.ai>

</div>

# Network Emulation

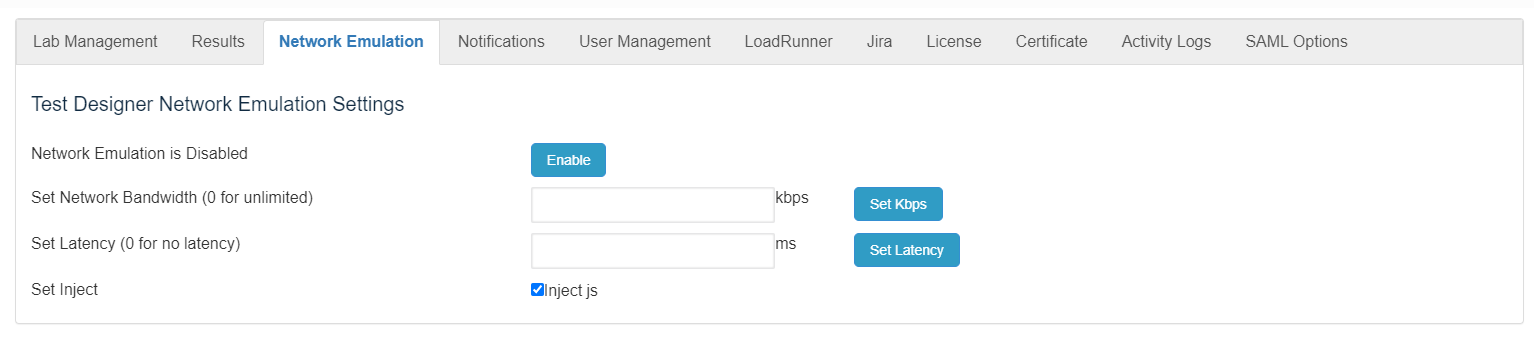
Use the **Network Emulation** page to enable or disable the use of network emulating for testing with AIQ. Test parameters such as bandwidth and latency can be configured from here.
 ![](https://docs.appvance.net/uploads/images/gallery/2026-07/scaled-1680-/x2ifMCpX5KnVaPVd-94dfef4fccc8.png)

Network emulation is a technique for testing the performance of real applications over a virtual network. This is different from network simulation where virtual models of traffic, network models, channels, and protocols are applied. The aim is to assess performance, predict the impact of change, or otherwise optimize technology decision-making.  
  
From [Wikipedia article on Network Emulation](https://en.wikipedia.org/wiki/Network_emulation)

<div id="bkmrk-last-updated%3A-july-1">---

Last updated: <span class="mc-variable General.NewDateTimeVariable variable">July 10, 2023</span>

If you have any feedback on this topic, please contact us at <documentation@appvance.ai>

</div>

# Notifications

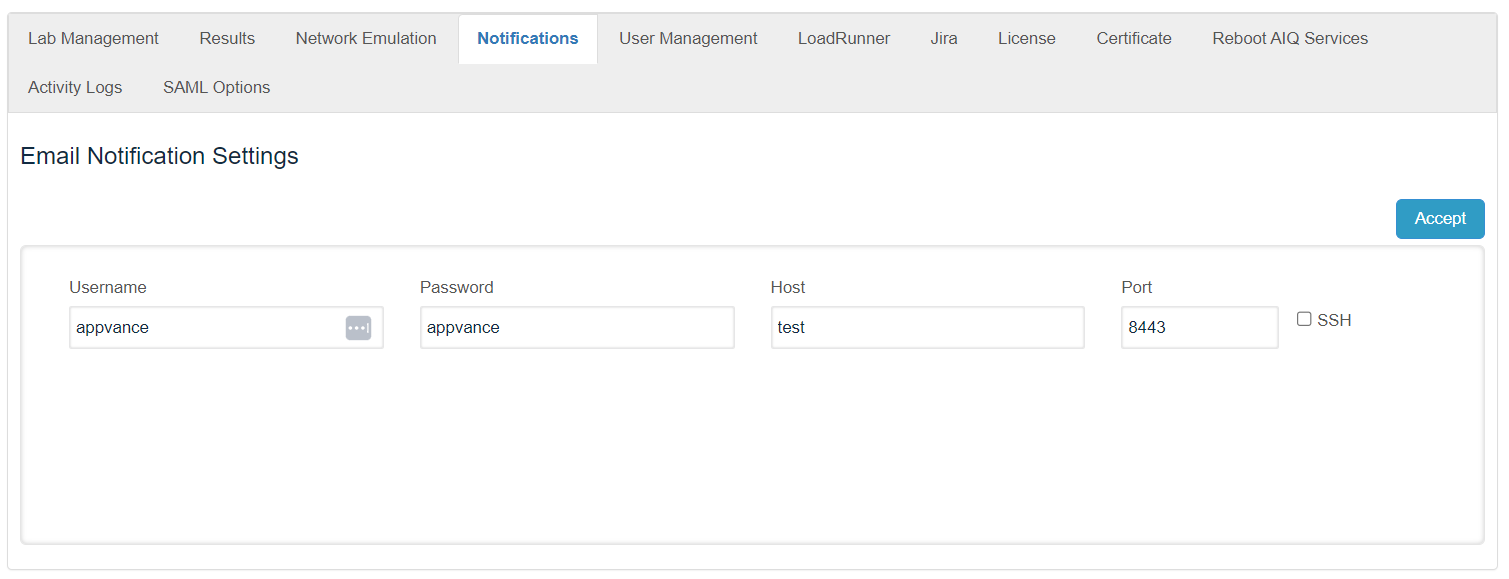
Use the **Notifications** page to determine which users receive notifications from the system.
 ![](https://docs.appvance.net/uploads/images/gallery/2026-07/scaled-1680-/uRyEN1OA1rLx5DRz-bbb3ced22611.png)

<div id="bkmrk-last-updated%3A-july-1">---

Last updated: <span class="mc-variable General.NewDateTimeVariable variable">July 17, 2023</span>

If you have any feedback on this topic, please contact us at <documentation@appvance.ai>

</div>

# Legacy LoadRunner Administration Settings

**Last reviewed:** September 29, 2026

Use this page only when maintaining AIQ administration settings for environments that still execute LoadRunner assets.

## What changed in this article

- Marked LoadRunner Admin as legacy administration content.
- Added checks for installation path, license availability, execution node access, environment variables, result storage, and permissions.
- Connected admin setup to the LoadRunner execution article so configuration is validated with a real test run.

## Validation workflow

1. Confirm the LoadRunner installation and license details with the tool owner.
2. Configure AIQ paths, node access, and environment settings needed for execution.
3. Run a controlled LoadRunner script and verify AIQ can collect the expected results.

**Review note:** This page now keeps admin settings separate from script creation and execution guidance.

---

Last updated: September 29, 2026

If you have feedback on this topic, contact <documentation@appvance.ai>.

# Jira Integration Administration

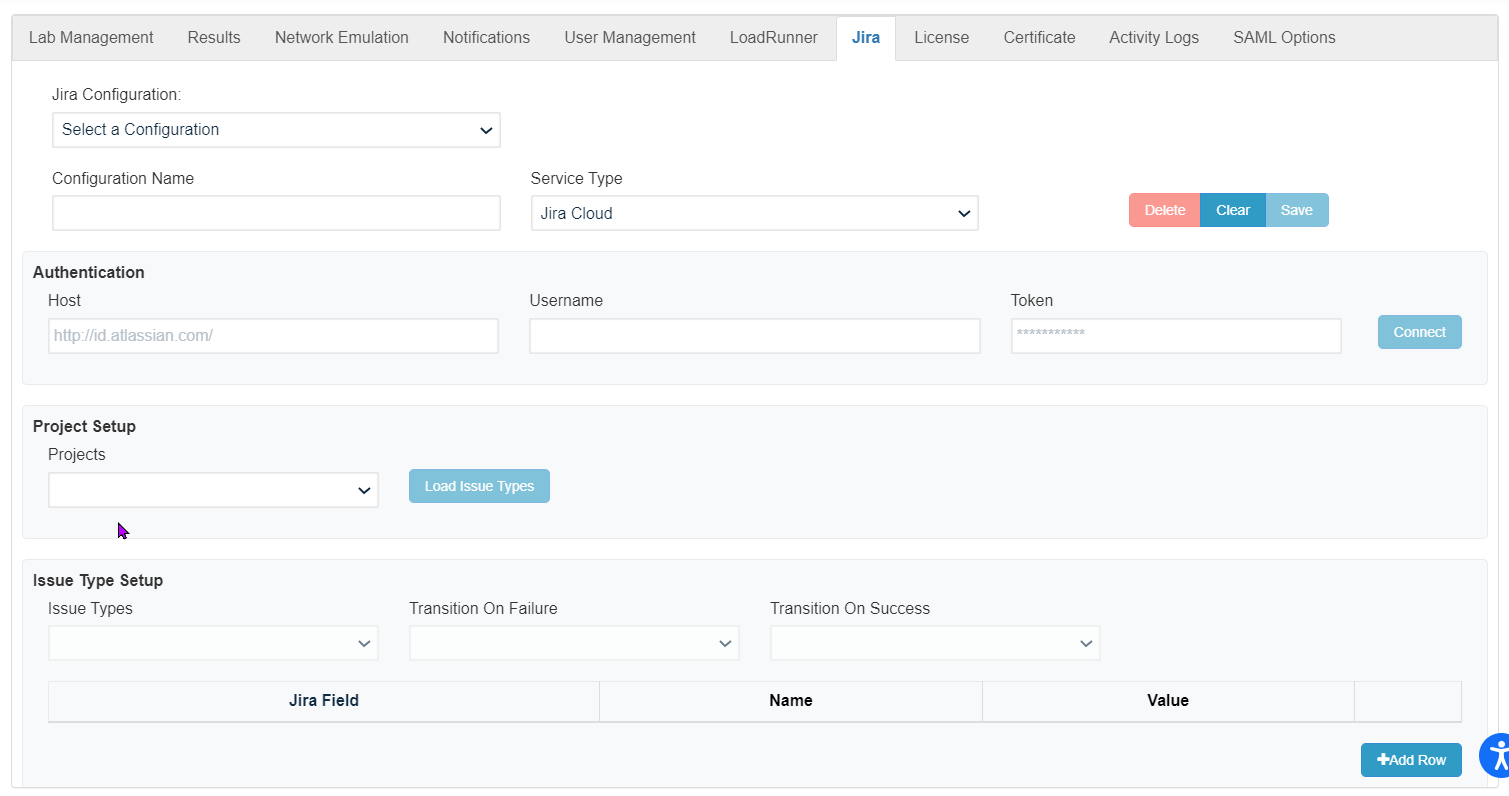
Use the Jira administration screen to maintain your integration with Atlassian Jira.

1. From AIQ navigate to **Global Options** &gt; **Admin Options**.
2. Select the **Jira** tab.
 
 ![](https://docs.appvance.net/uploads/images/gallery/2026-07/scaled-1680-/AL8r0arzZkb7i0pG-b8ce553f5cb2.png)

See [Integration with Atlassian Jira for information on configuring Jira.](https://docs.appvance.net/Content/AIQ/Integrations/AtlassianJira/Integration_with_Atlassian_Jira.htm)

<div id="bkmrk-last-updated%3A-july-1">---

Last updated: <span class="mc-variable General.NewDateTimeVariable variable">July 17, 2023</span>

If you have any feedback on this topic, please contact us at <documentation@appvance.ai>

</div>

# License

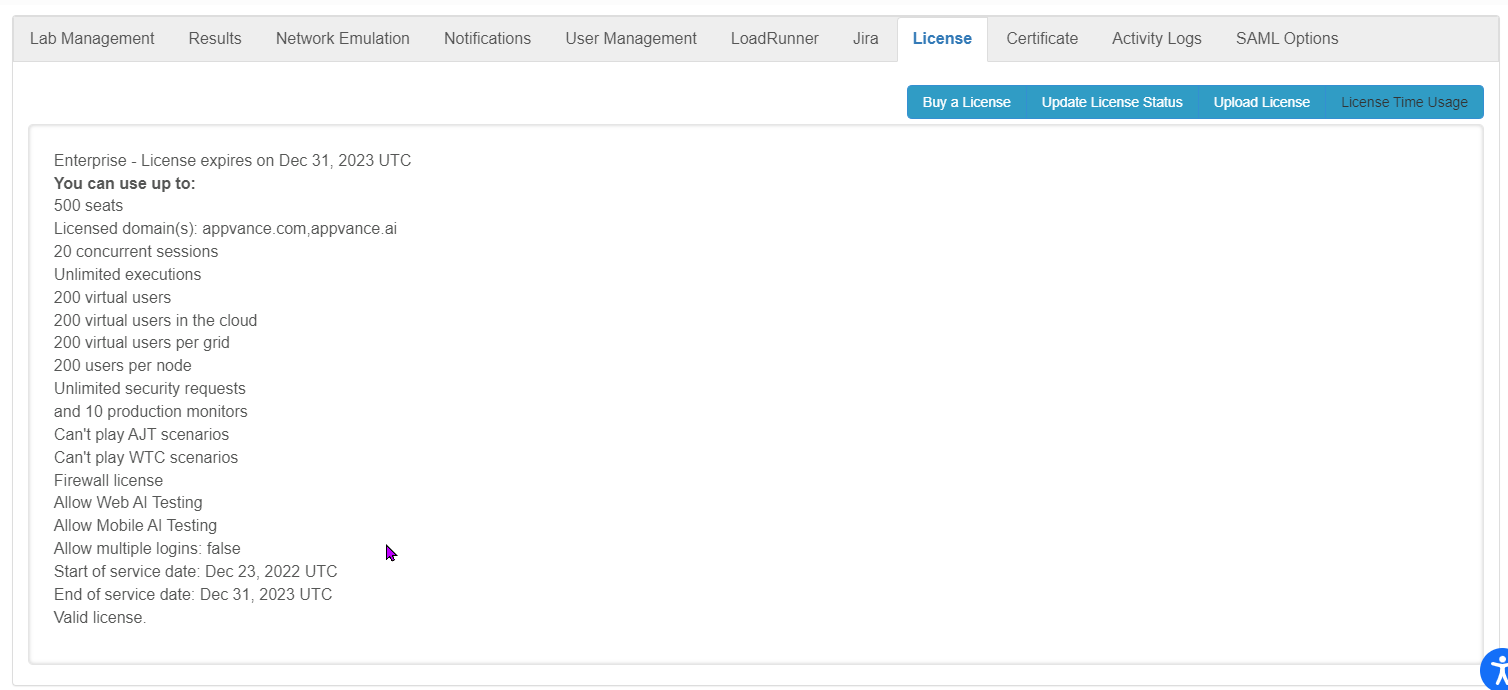
Appvance delivers the free trial version of Appvance IQ with a simple commercial license with:

- 100 virtual user minutes for 15 days with 5 virtual users
    
    
    - 5 virtual users in the cloud
    - 5 virtual users in the grid
    - 5 users per node
- 100 security requests
- 50 production monitors with no access to run any Appvance AI
- Access to Appvance support
- Access to resources such as:
    
    
    - Appvance User Guide
    - Training videos
    - Confluence wiki and and Knowledge Bases
 
 ![](https://docs.appvance.net/uploads/images/gallery/2026-07/scaled-1680-/ouH3AC5isSkIvb4i-a30f443b63aa.png)

Accessing the Licenses page requires Administrator level access.

The following options are available from this page:

- **Buy a License** opens the [Appvance](https://appvance.ai/) website. From there you can contact Appvance Support to investigate licensing details.
- **Update License Status** can be used to refresh a license and update the status of the license.
- **Upload License** is used to upload the license file (.lic) provided by Appvance. Clicking **Upload License** will open up the File Manager to browse for the license file that needs to be uploaded.
- **License Time Usage** downloads a report (in csv format) with information on all the scenarios that have been run, including the date and the virtual user minutes spent on each of the scenarios and the scenario file used.
 
<div id="bkmrk-last-updated%3A-july-1">---

Last updated: <span class="mc-variable General.NewDateTimeVariable variable">July 10, 2023</span>

If you have any feedback on this topic, please contact us at <documentation@appvance.ai>

</div>

# Certificate

Appvance IQ supports HTTPS and Secure Socket Layer (SSL) protocols. These protocols use the Java Cryptography Architecture to work with SSL certificates.

The AIQ protocol handler will throw an SSLHandshakeException when connecting to a server over SSL protocols when the server-side SSL certificate is unknown. AIQ, when accessing as a SAAS model, is required to update the certificate on the server machines.

### Configuring a Certificate

1. Login to AIQ as an Admin user.
2. Navigate to **Global Options** &gt; **Admin Options** &gt; **Certificate**.
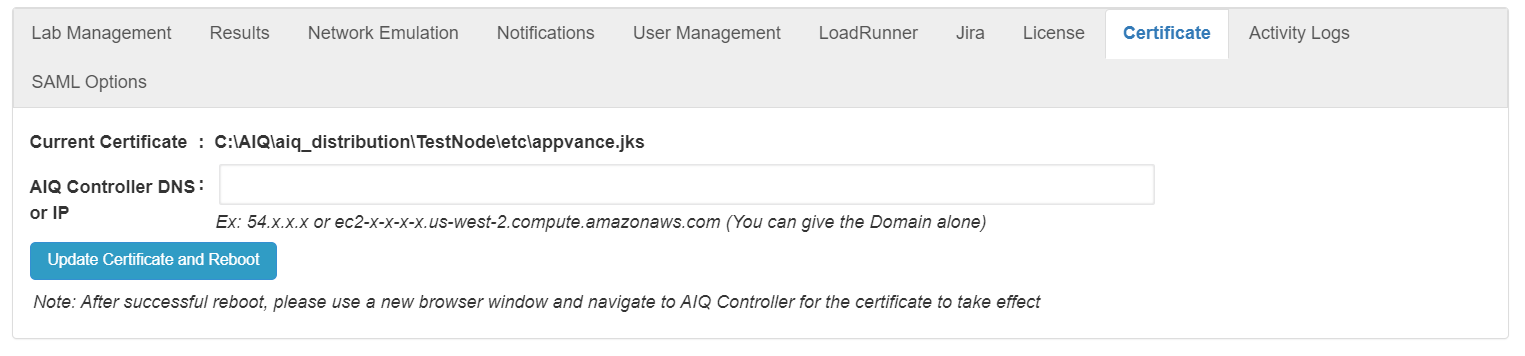
3. Provide the valid domain or IP address of the controller instance and click **Update Certificate and Reboot**.
    
     ![](https://docs.appvance.net/uploads/images/gallery/2026-07/scaled-1680-/fX43G98ZmpEANqnO-4abc20989cf3.png)
4. A new 'appvance.jks' certificate for the domain provided will be generated, and the controller instance will reboot.
5. After a successful reboot, please use a new browser window to navigate to the AIQ Controller for the certificate to take effect.
 
<div id="bkmrk-last-updated%3A-july-0">---

Last updated: <span class="mc-variable General.NewDateTimeVariable variable">July 07, 2023</span>

If you have any feedback on this topic, please contact us at <documentation@appvance.ai>

</div>

# Reboot AIQ Services

Use the Reboot AIQ Services screen to restart the AIQ services as needed.

1. Login to AIQ as an administrator user.
2. Navigate to **Global Options** &gt; **Admin Options** &gt; **Reboot AIQ Services**.
    
     ![](https://docs.appvance.net/uploads/images/gallery/2026-07/scaled-1680-/a2ujnuHV2bqYwMLq-56ccdbb2503c.png)
3. Click **Reboot AIQ Services**.
 
<div id="bkmrk-last-updated%3A-july-0">---

Last updated: <span class="mc-variable General.NewDateTimeVariable variable">July 07, 2023</span>

If you have any feedback on this topic, please contact us at <documentation@appvance.ai>

</div>

# Activity Logs

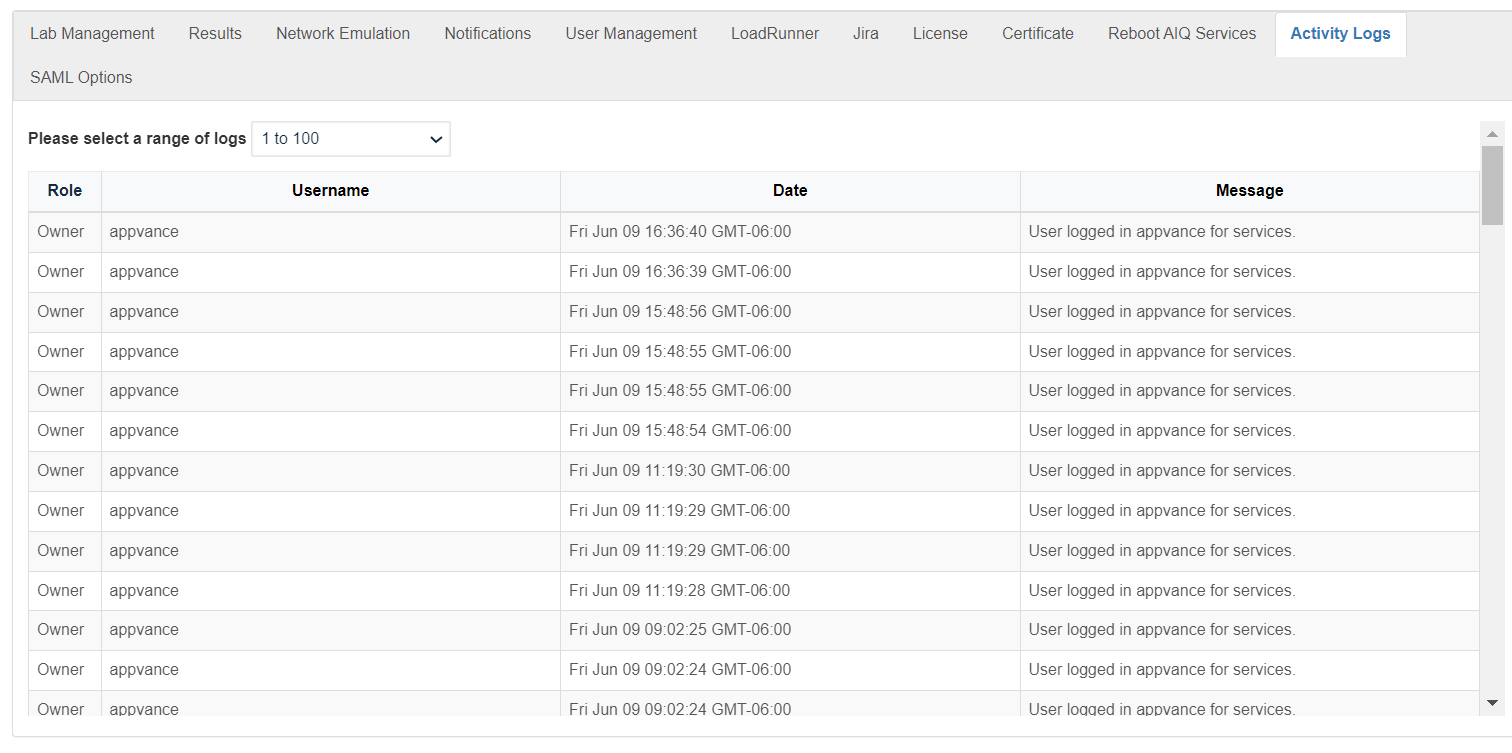
Use the **Activity Logs** screen to view AIQ system logs. From here you can see activity by role, user, date and the log message.

1. Login to AIQ as a user with administrator access.
2. Navigate to **Global Options** &gt; **Admin Options** &gt; **Activity Logs**.
    
     ![](https://docs.appvance.net/uploads/images/gallery/2026-07/scaled-1680-/2vRpB28cjuutyMoH-3556b2d934e6.png)
    
    
    - You can select a range of activity logs. The oldest logs are in the lowest range of numbers. The most recent logs are in the highest range of numbers.
    - You can sort the activity logs by:
        
        
        - Role
        - User Name
        - Date
        - Message
 
<div id="bkmrk-last-updated%3A-july-1">---

Last updated: <span class="mc-variable General.NewDateTimeVariable variable">July 17, 2023</span>

If you have any feedback on this topic, please contact us at <documentation@appvance.ai>

</div>

# SAML Options

SAML (Security Assertion Markup Language) enables you to access multiple web applications using one set of login credentials. This is also known as SSO (Single Sign-On).

Appvance AIQ supports SAML 2.0 protocol SSO. Appvance behaves as an application or service provider in a SAML SSO architecture.

It has been tested against SAML identity providers, including Okta ([&gt;http://okta.com](http://okta.com) ) and Auth0 ([&gt;https://auth0.com/](https://auth0.com/) ) and Akamai ([&gt;https://www.akamai.com/](https://www.akamai.com/)).

Full SAMLv2 specs can be found here [&gt;http://saml.xml.org/saml-specifications](http://saml.xml.org/saml-specifications)

Security overview of SAMLv2: [&gt;http://docs.oasis-open.org/security/saml/Post2.0/sstc-saml-tech-overview-2.0.html](http://docs.oasis-open.org/security/saml/Post2.0/sstc-saml-tech-overview-2.0.html)

##  Configuring SSO

When using SSO the standard login still applies. Only the appvance owner user can enable SSO.

1. Login to AIQ as an administrator user.
2. Navigate to **Global Options** &gt; **Admin Options** &gt; **SAML Options**.
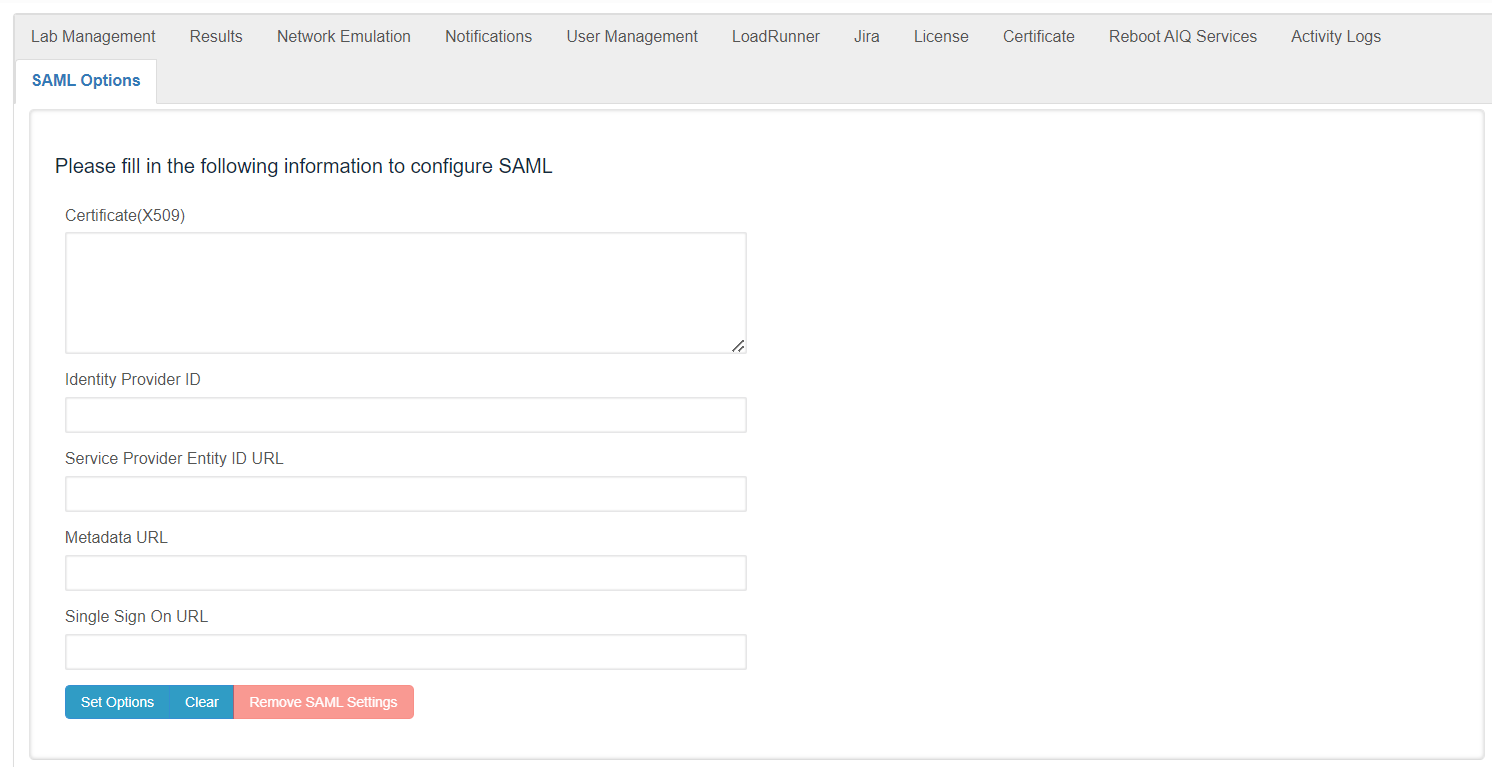
3. There you can define the SAML configuration
    
     ![](https://docs.appvance.net/uploads/images/gallery/2026-07/scaled-1680-/2isV2vdG5RvkC0YE-20560614d6be.png)
4. Every field is required. Following are the specs for each field. Configure the following fields:
    
    
    - **Certificate (X.509)** - This is the certificate of SAML usually they have the next format
        
        `-----BEGIN CERTIFICATE----- ... -----END CERTIFICATE-----`
    - **Identity Provider ID** - An Identity Provider is a federation partner that vouches for the identity of a user. The Identity Provider authenticates the user and provides an authentication token (that is, information that verifies the authenticity of the user)
    - **Service Provider Entity ID URL** - This is a service name configured in the SAML IDP. This is very important as SAML is a security environment, Appvance needs to have knowledge of the IDP endpoint but also IDP needs to be aware of SAML existence.
        
        Appvance uses the Service Provider Entity ID URL (also called audience restrictions) as the consumer URL.
    - **Metadata URL** - Some SAML IDP provides some configuration requirements, usually in a metadata URL. IF the IDP does not provide this field, you can use Single Sign-On URL
    - **Single Sign-On URL** - This is the URL the user will be redirected to if they choose to
5. Upon setting the values, the welcome page SSO button will become enabled. By default, it is disabled.
6. The SSO user's role is always “User”. They will start with the string “sso.” and the username provided by the SAML IDP service.
 
## Configuring your the Identity Provider

You will need to provide the following URL to the Identity Provider that points to your AIQ controller server (app service provider):

`https://<aiq controller DNS or IP>:8443/AppvanceServer/saml`

<div id="bkmrk-last-updated%3A-july-1">---

Last updated: <span class="mc-variable General.NewDateTimeVariable variable">July 17, 2023</span>

If you have any feedback on this topic, please contact us at <documentation@appvance.ai>

</div>

# Lab Management

# Lab Management in AIQ

# Lab Management in AIQ

Lab Management helps organize the environments, devices, browsers, nodes, and resources used by AIQ tests. Keep lab entries accurate so scheduled executions can find the correct capacity and environment details.

## Recommended guidance

- Use clear names for labs, nodes, devices, and environment groups.
- Record ownership, location, access requirements, and maintenance windows for shared resources.
- Keep device and node availability current so teams do not schedule work against unavailable capacity.
- Separate production-like, staging, and experimental resources when possible.
- Review permissions so only authorized users can change shared lab configuration.

## Operational workflow

1. Create or update the lab entry with the correct resource details.
2. Assign nodes, devices, or environment resources to the right group.
3. Run a small validation test to confirm the resource can be selected and used.
4. Update lab notes after upgrades, device swaps, or network changes.

*Last updated: October 8, 2026*

# Check AIQ Test Node Status

**Last reviewed:** September 30, 2026

Use this article to verify whether AIQ Test Nodes are online, healthy, and ready to execute scenarios.

## What changed in this article

- Shortened the title and aligned it with AIQ Test Node terminology.
- Added checks for online status, assigned capacity, browser/runtime availability, recent heartbeat, node logs, and execution queue symptoms.
- Added troubleshooting guidance for distinguishing node availability from scenario-level failures.

## Validation workflow

1. Check the Test Node list or admin view for online/offline status and recent heartbeat.
2. Confirm the node has the required browser, runtime, network access, and capacity for the target execution.
3. If a run fails, compare node logs and queue status before changing the scenario itself.

**Review note:** This page now gives a health-check workflow instead of only pointing at a UI location.

---

Last updated: September 30, 2026

If you have feedback on this topic, contact <documentation@appvance.ai>.

# Troubleshoot Lab Management Upgrade Issues

# Troubleshoot Lab Management Upgrade Issues

Use this article when Lab Management resources behave unexpectedly after an AIQ upgrade. Start by confirming whether the issue is data migration, permissions, node/device availability, or a stale browser/session state.

## Common checks

- Confirm the upgrade completed successfully and review migration logs for warnings.
- Verify that labs, devices, nodes, and resource groups still appear with the expected names and assignments.
- Check user roles and permissions for teams that can no longer access lab resources.
- Confirm nodes and devices are online and registered after the upgrade.
- Clear stale browser sessions only after confirming the backend data is correct.

## Resolution workflow

1. Capture the affected lab name, user, node/device, and exact symptom.
2. Compare the resource record with a known-good environment or backup when available.
3. Run a small execution against the affected lab resource.
4. Document any manual correction or support escalation in the change notes.

*Last updated: October 8, 2026*

# User Management

# User Management in AIQ

## Recommended guidance

Use User Management to control who can access AIQ projects, execute tests, manage configuration, and view results. Access should follow least privilege and should be reviewed whenever team membership, responsibilities, or environments change.

## Recommended controls

- Assign roles based on job responsibility, not convenience.
- Use named accounts instead of shared accounts whenever possible.
- Remove or disable accounts for users who no longer need access.
- Review administrators, project owners, and integration/service accounts regularly.
- Protect sensitive projects, credentials, DPLs, repositories, and execution evidence from unnecessary access.

## Operational checklist

1. Confirm the user identity, role, project access, and expected responsibilities.
2. Grant the minimum access required for the task.
3. Document exceptions such as temporary elevated access.
4. Audit inactive users and accounts tied to old integrations.
5. Escalate authentication or SSO issues with timestamps and affected accounts, without sharing passwords.

**Security reminder:** Do not paste passwords into tickets, chat messages, or documentation. Ask users to reset passwords or sign in through the approved login flow.

*Last updated: October 5, 2026*

# Changing Password

Click the ‘Change Password’ button to change the current default password to a new one. Provide the new password, confirm the password, and click the OK button.

Users should make sure of the following:

Passwords must satisfy the following requirements:

- At least 16 characters long
- At least one upper case letter
- At least one lower case letter
- At least one special character (!@#$%^&amp;\*.)
 
 ![](https://docs.appvance.net/uploads/images/gallery/2026-07/scaled-1680-/zXuc7F66JHveQz7q-b3a3c47d6236.png)

Log out from the application using the logout link from the start screen and log in again to take the new password into account.

<div id="bkmrk-last-updated%3A-may-04">---

Last updated: <span class="mc-variable General.NewDateTimeVariable variable">May 04, 2023</span>

If you have any feedback on this topic, please contact us at <documentation@appvance.ai>

</div>

# Adding Users

Login to Appvance IQ as an **ADMIN** and navigate to Options page &gt; Preferences &gt; Credentials and Click the ‘ADD NEW USER’ button.
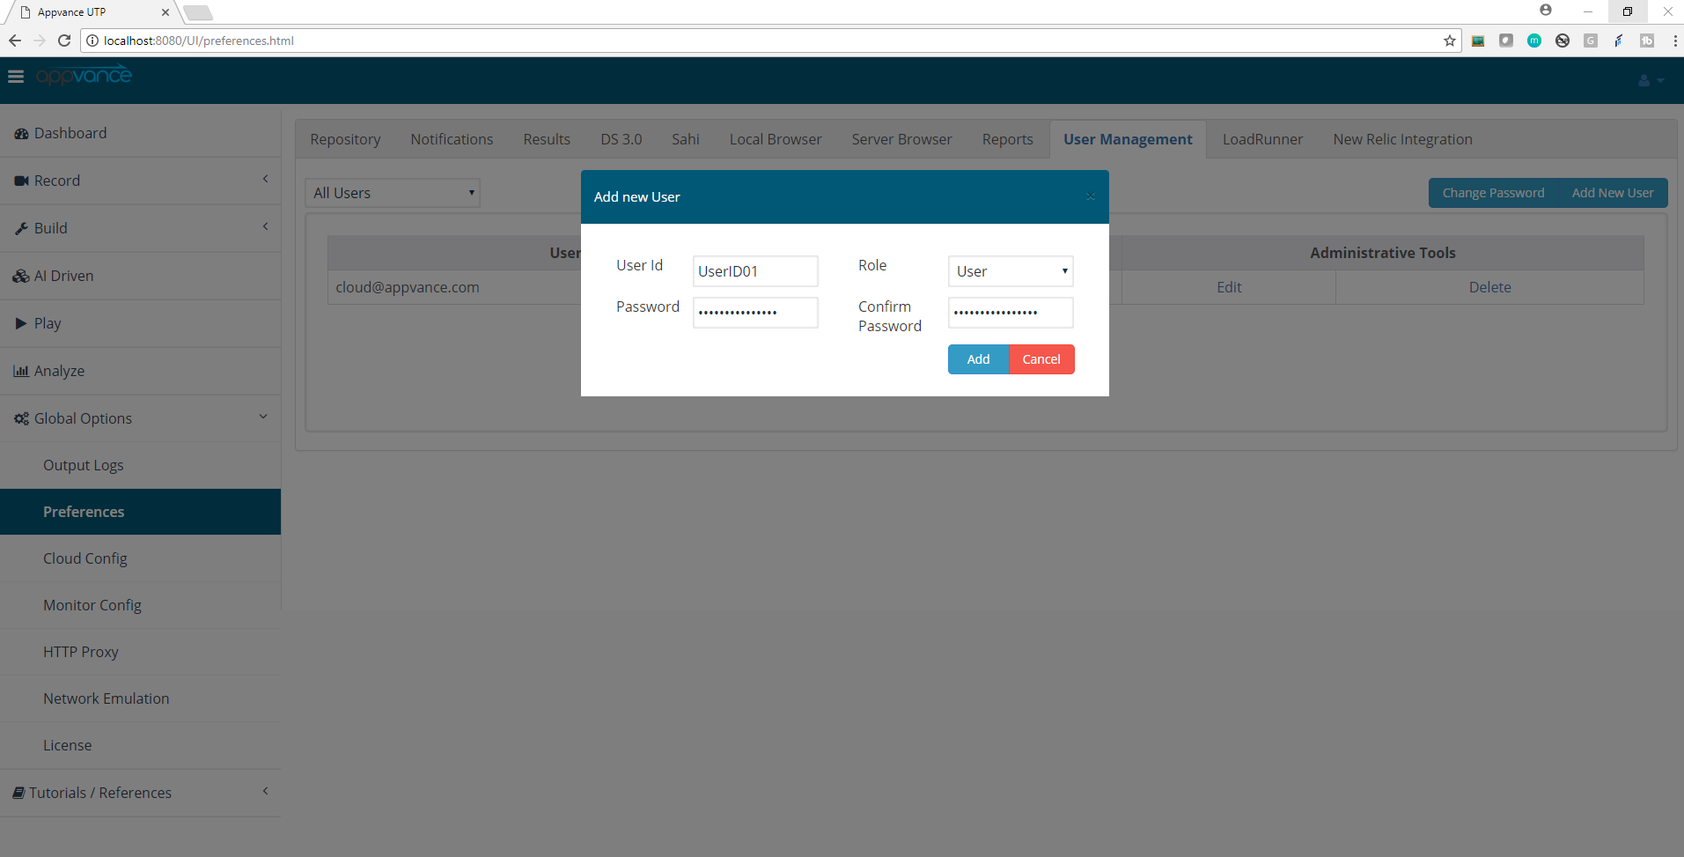
 ![](https://docs.appvance.net/uploads/images/gallery/2026-07/scaled-1680-/2qjIhn0WSakzarHP-97663da08538.png)

Provide the UserId of the new user and a default password for the user (which can be changed upon user login in), Select the Role of the User to be a User or Admin:

Admin: can add more users

User: cannot add any users.

Click Add to add the User.

Clicking Cancel will not add the user.
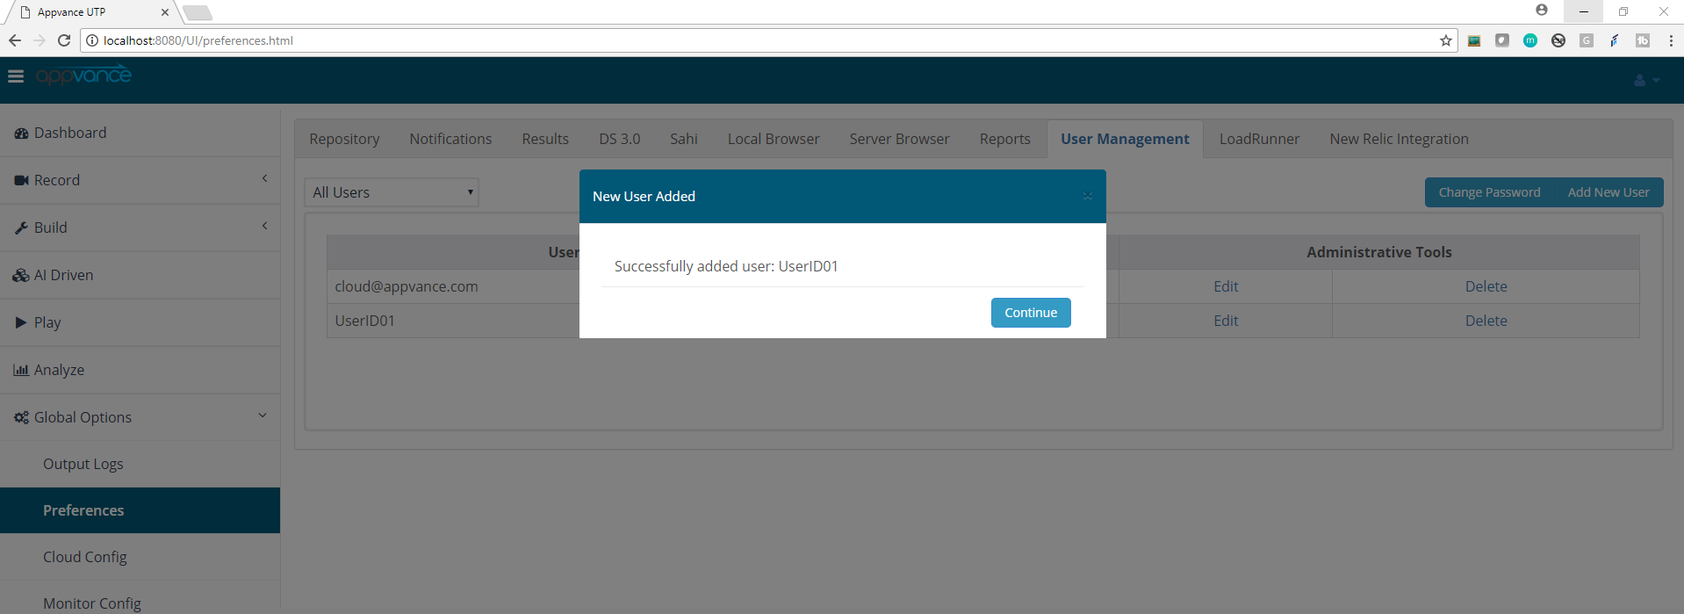
 ![](https://docs.appvance.net/uploads/images/gallery/2026-07/scaled-1680-/ZiCaAjS8YkyIlGjE-7ea1d3937c23.png)

Multiple users can be added the same way.

**<u>Adding users from File Upload</u>**

Starting from Appvance IQ 4.0.6 Release, you will now be able to upload the users using a CSV file.

The CSV file should have 4 columns, in the order of Username, Role, Password and Confirm Password, else the user would not be uploaded to the system and throw an error message.

From the same User Management page, click the "Upload users(s)" button which will open the browse window to select the created CSV file, the file can be either placed on the Server or can be uploaded to the Repository and can be accessed from the File Manager.

Users will not be uploaded when

- The format of the file is incorrect.
- The number of users is exceeding than defined in the license.
- The user domains are different than those defined in the license file.
 
<div id="bkmrk-last-updated%3A-june-0">---

Last updated: <span class="mc-variable General.NewDateTimeVariable variable">June 02, 2023</span>

If you have any feedback on this topic, please contact us at <documentation@appvance.ai>

</div>

# Changing Roles

Login to Appvance IQ as an **Admin** and navigate to Options page &gt; Preferences &gt; Credentials and Click the ‘Edit’ button in the same row as the user whose information needs to be edited.
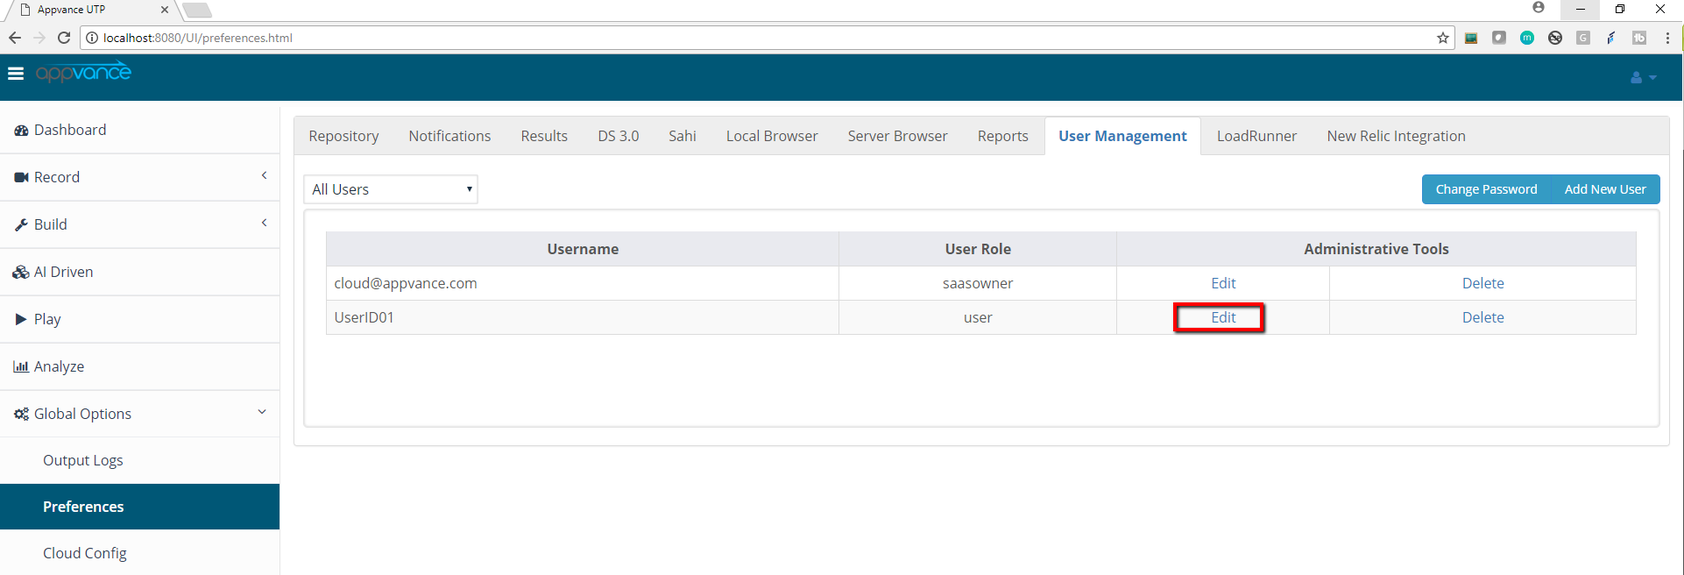
 ![](https://docs.appvance.net/uploads/images/gallery/2026-07/scaled-1680-/MjWPLyfhrKoOLvTQ-da5b99cd52ae.png)

Clicking the edit link will open a pop-up with the UserID and the Role, Role can be changed by selecting the Role from the drop-down and clicking on the Update button (Can be done only by Admin and not Users).
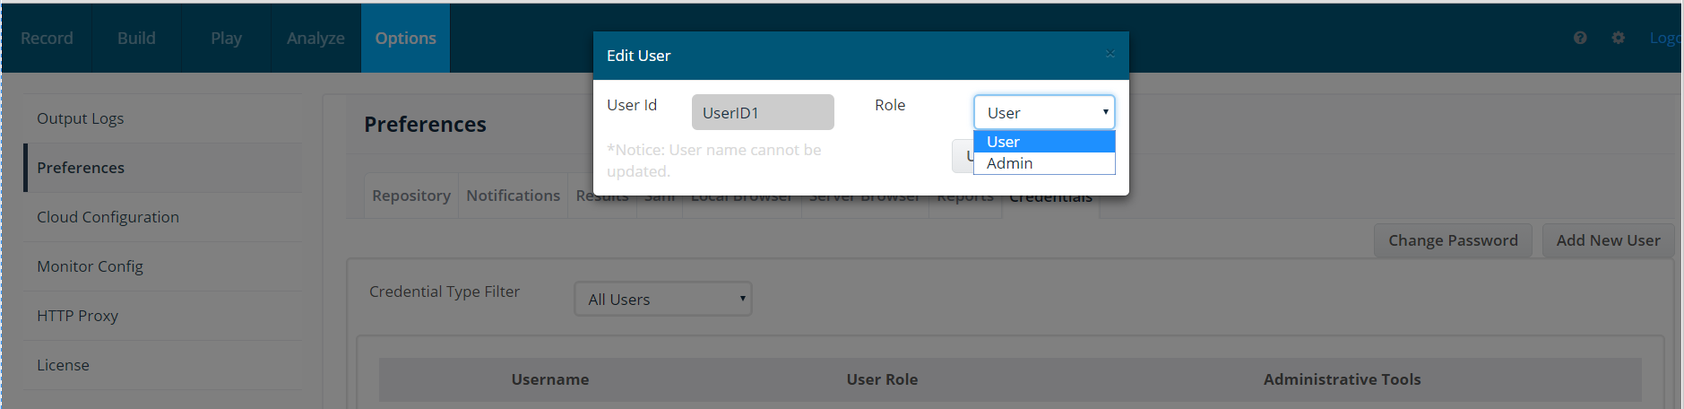
 ![](https://docs.appvance.net/uploads/images/gallery/2026-07/scaled-1680-/biIzwjYJwwWFvjas-1688a1a8c7db.png)

<div id="bkmrk-last-updated%3A-may-04">---

Last updated: <span class="mc-variable General.NewDateTimeVariable variable">May 04, 2023</span>

If you have any feedback on this topic, please contact us at <documentation@appvance.ai>

</div>

# Logging in as a User

Login to Appvance IQ as a **User** and navigate to the Global Options page &gt; Preferences &gt; Credentials &gt; Click Add and fill in the user details and click OK.

Users will get a message pop-up telling “Adding User: UserName failed Reason: You are not admin”

Users will be able to add members or the list of users will not be displayed.

Log Out: Click the Log out button from the Start-Screen to log out and close the session.

<div id="bkmrk-last-updated%3A-may-04">---

Last updated: <span class="mc-variable General.NewDateTimeVariable variable">May 04, 2023</span>

If you have any feedback on this topic, please contact us at <documentation@appvance.ai>

</div>

# Removing Users

Login to Appvance IQ as an **Admin** and navigate to Options page &gt; Preferences &gt; Credentials and Click the ‘Delete’ button on the same line of a user whom you want to delete.
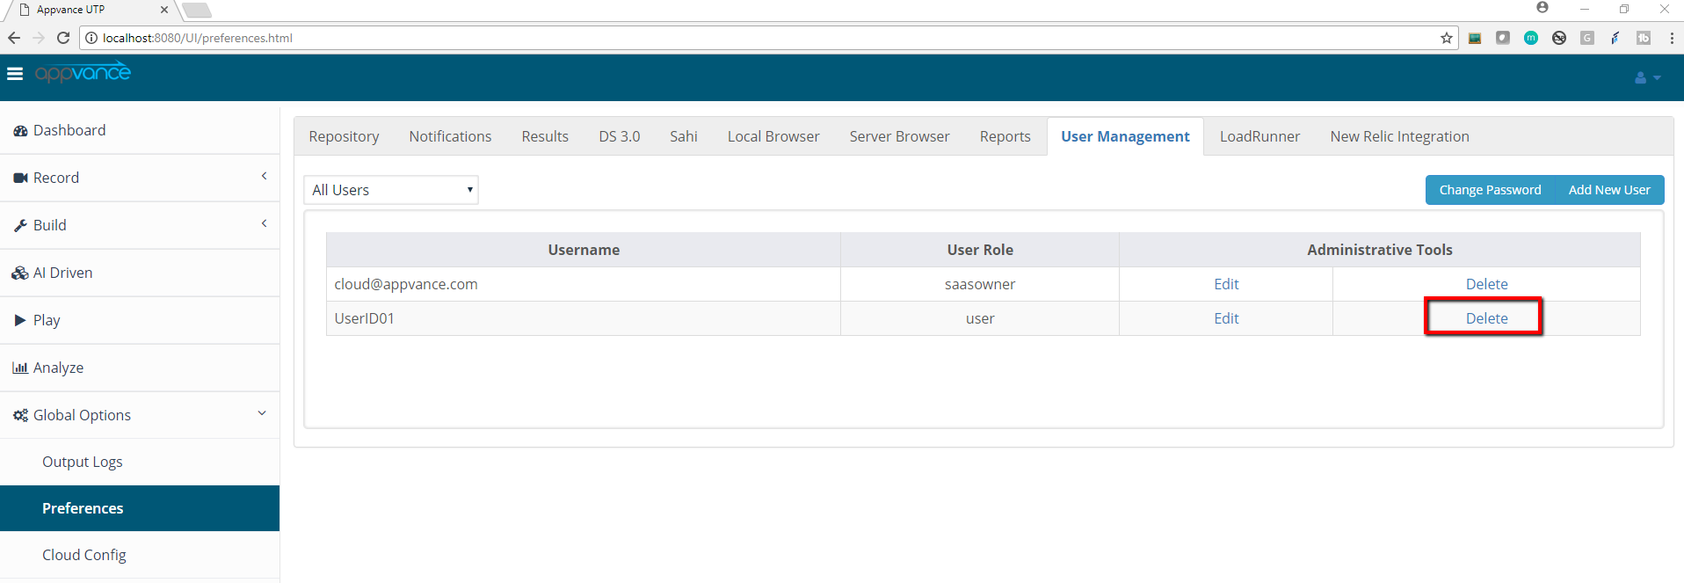
 ![](https://docs.appvance.net/uploads/images/gallery/2026-07/scaled-1680-/pc12NjFhQQ3gBpkG-76c4bfe1f567.png)

A confirmation message will pop up with a message “Are you sure you want to delete the user: Username”

Click 'Yes' to delete the User from the User list.

<div id="bkmrk-last-updated%3A-july-1">---

Last updated: <span class="mc-variable General.NewDateTimeVariable variable">July 10, 2023</span>

If you have any feedback on this topic, please contact us at <documentation@appvance.ai>

</div>

# Reset Password

Note: User passwords can only be reset when logged in as an Admin.

Login to Appvance IQ as an Admin and navigate to Global Options &gt; Admin Options &gt; User Management tab

 ![](https://docs.appvance.net/uploads/images/gallery/2026-07/scaled-1680-/HdUhV1HrF6AYLU8g-01338fb69cf9.png)

Under Administrative tools, look for the **Reset Password link**, every user will have this link.

Pick a user for whom the password has to be reset and click the **Reset password** link.
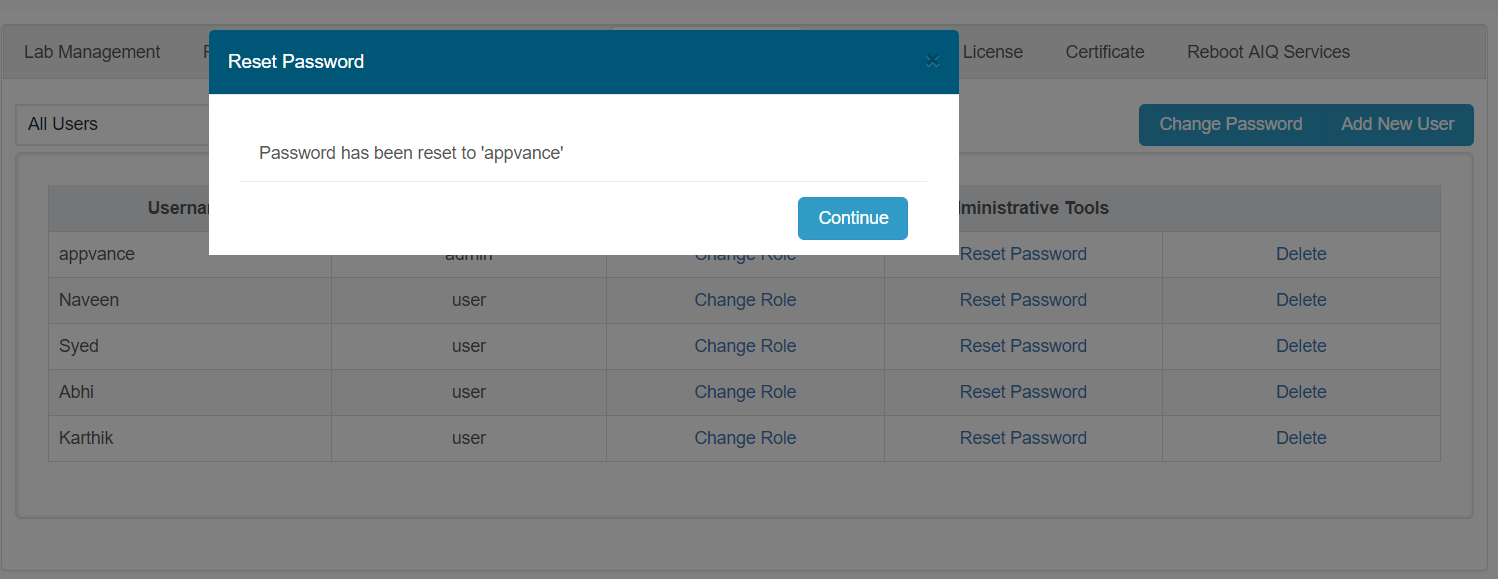
 ![](https://docs.appvance.net/uploads/images/gallery/2026-07/scaled-1680-/PTPowUruNgIq6Xza-a5a8619dfa5c.png)

The password for the user would be reset to 'appvance' - The user can re-login with 'appvance' as the password.

<div id="bkmrk-last-updated%3A-june-0">---

Last updated: <span class="mc-variable General.NewDateTimeVariable variable">June 02, 2023</span>

If you have any feedback on this topic, please contact us at <documentation@appvance.ai>

</div>