.
# CICD - TeamCity Integration
- Information within illustrates how to configure and run scenarios from TeamCity
- Applicable for both TeamCity installed locally as well as in the cloud
Setup a build in TeamCity: Configuration and pre-requisite:
TeamCity can be downloaded from this [location](https://www.jetbrains.com/teamcity/download/#section=section-get)
1. Download Links for the following are available at “[CI Jenkins](http://jenkins-ci.org/)”
2. After installation, TeamCity automatically launches using port 8080. Change the port to a different one (Example: 8087)
3. Install ANT using [http://ant.apache.org/bindownload.cgi](http://ant.apache.org/bindownload.cgi)
4. Download and install the appropriate file on your machine depending on the operating system used
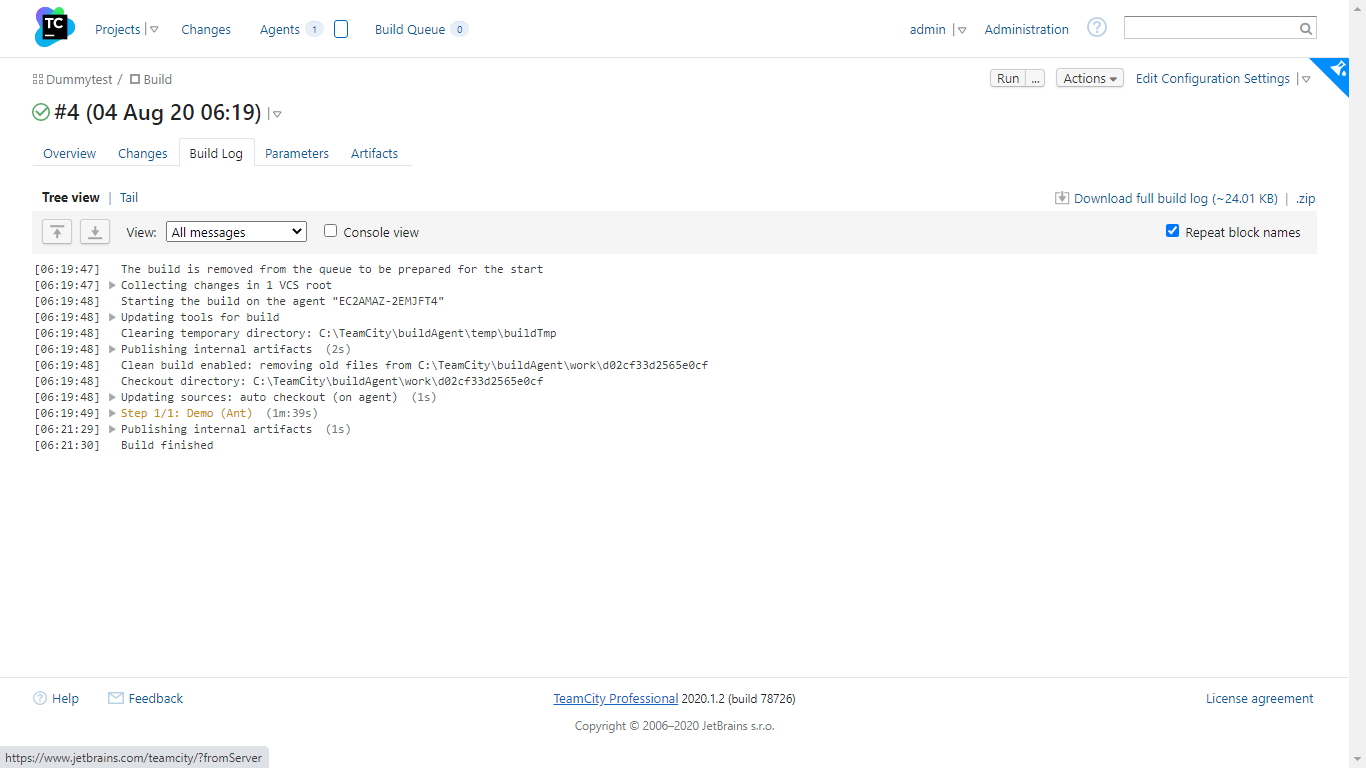
5. Login to TeamCity with your credentials
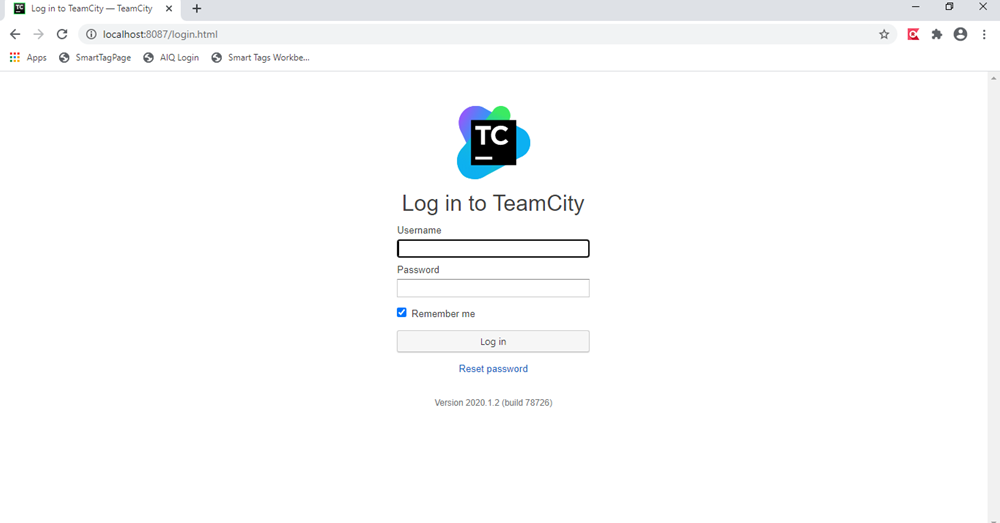
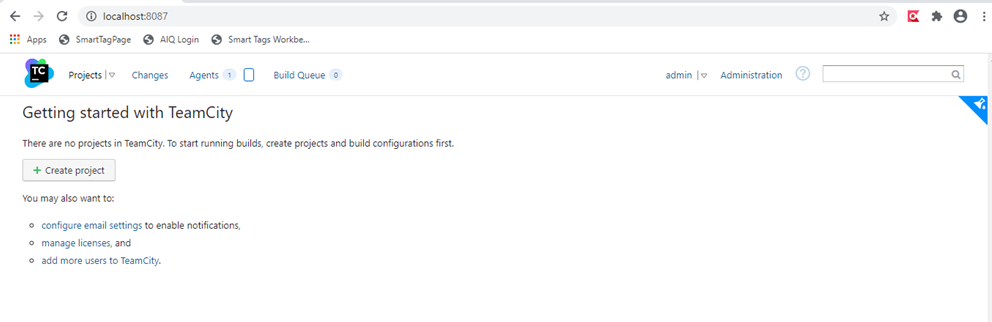
6. Once logged in, click the Project button to Create a project
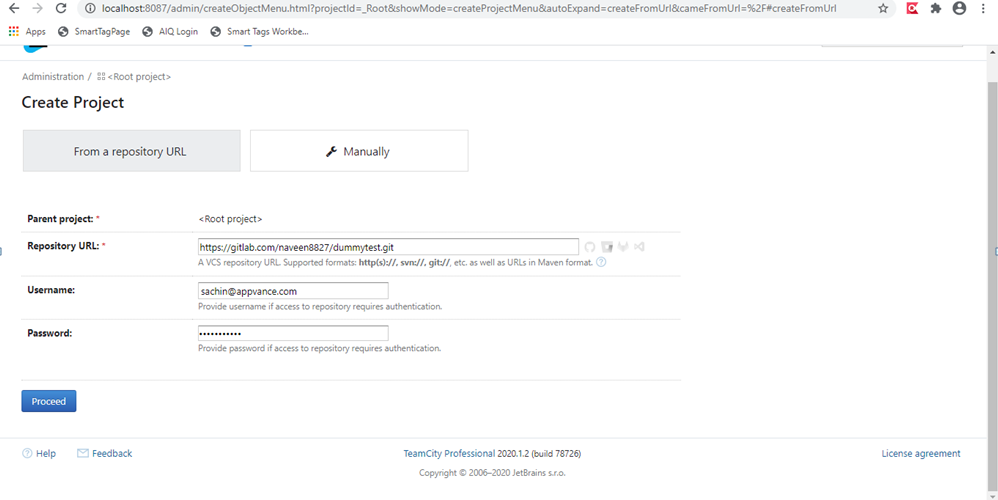
7. Click **From a Repository URL**, provide your GitLab creds and the repository URL, and Click **Proceed**
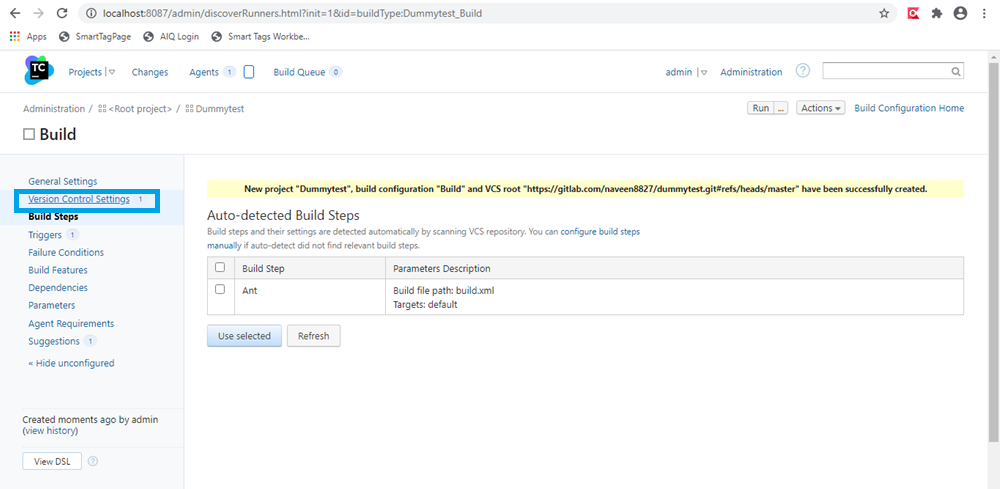
8. Click Version Control Settings
 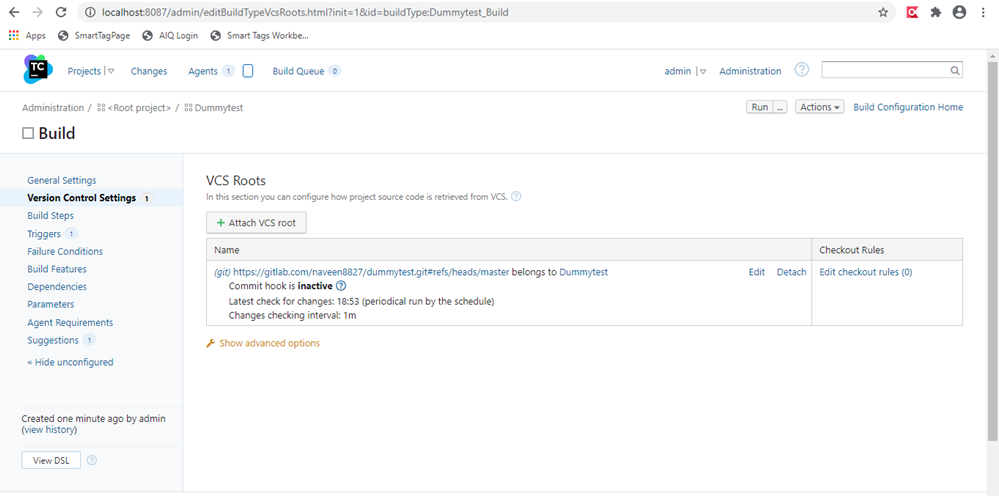
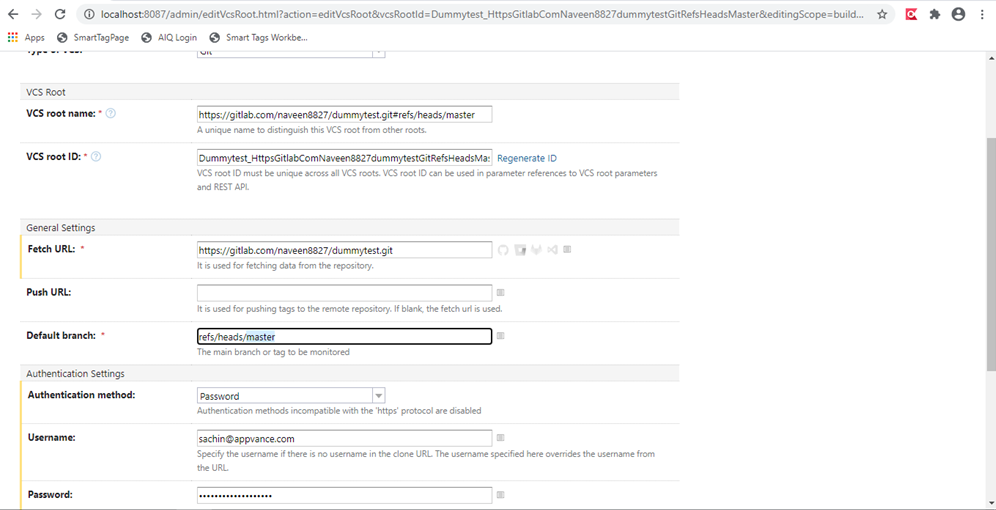
9. Click Edit and change the branch as per your requirements (Changed the Default Branch to Demo)
10. Click Build Steps and Add Build Step
11. Choose Runner Type as Ant
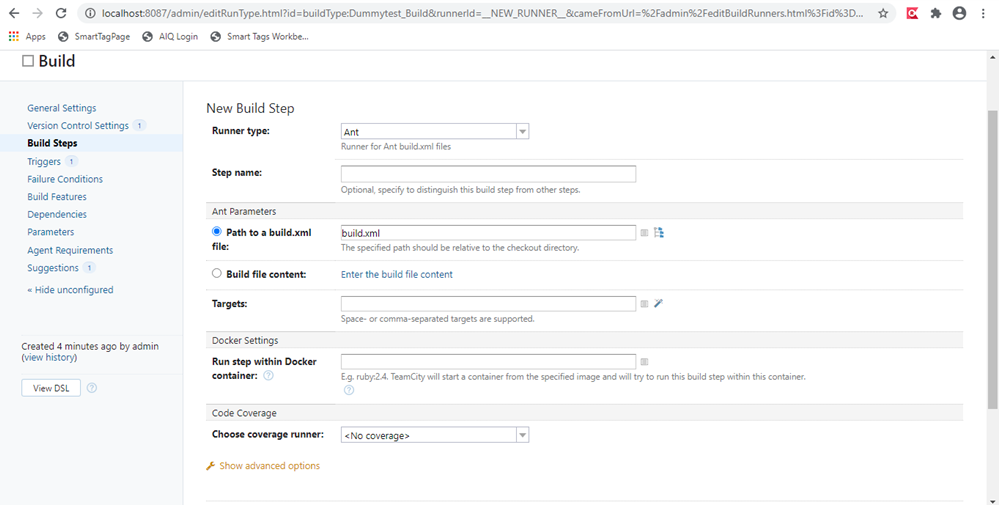
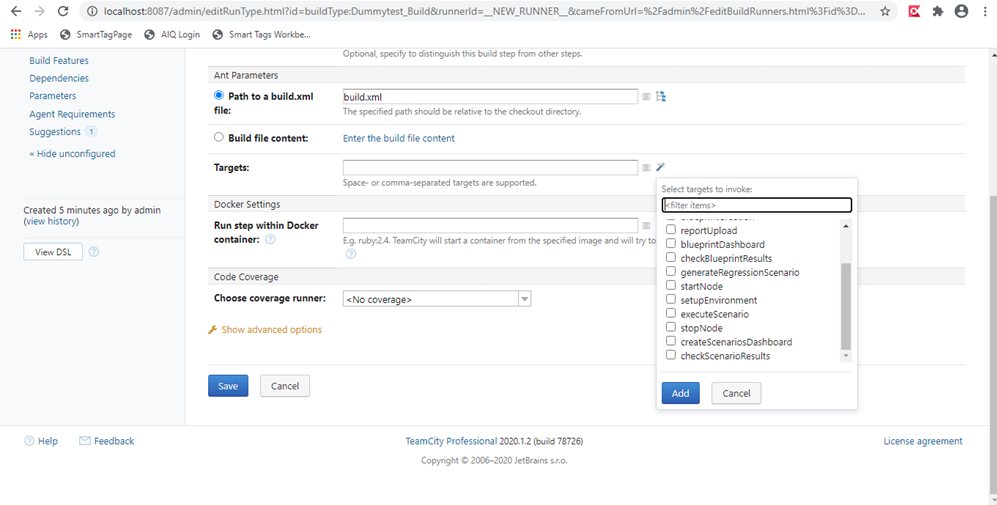
12. Choose the Targets by clicking the Edit Like button
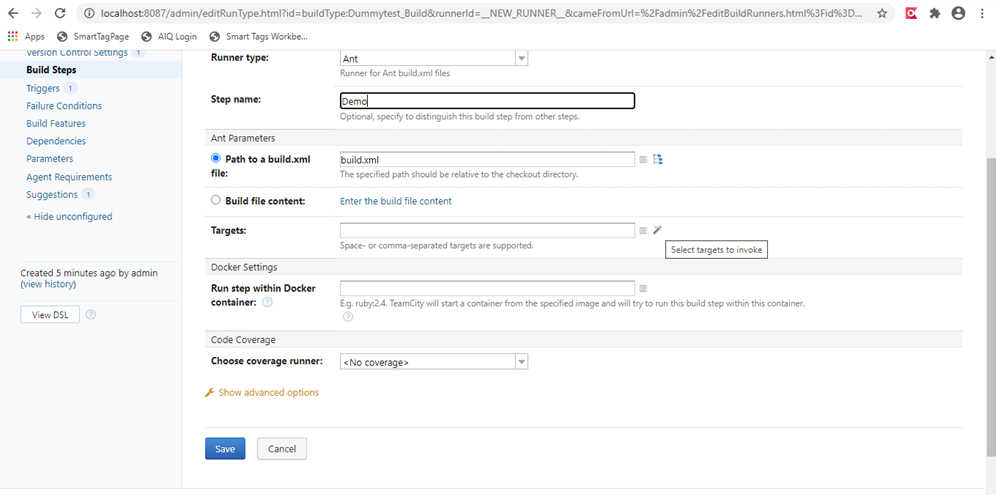 
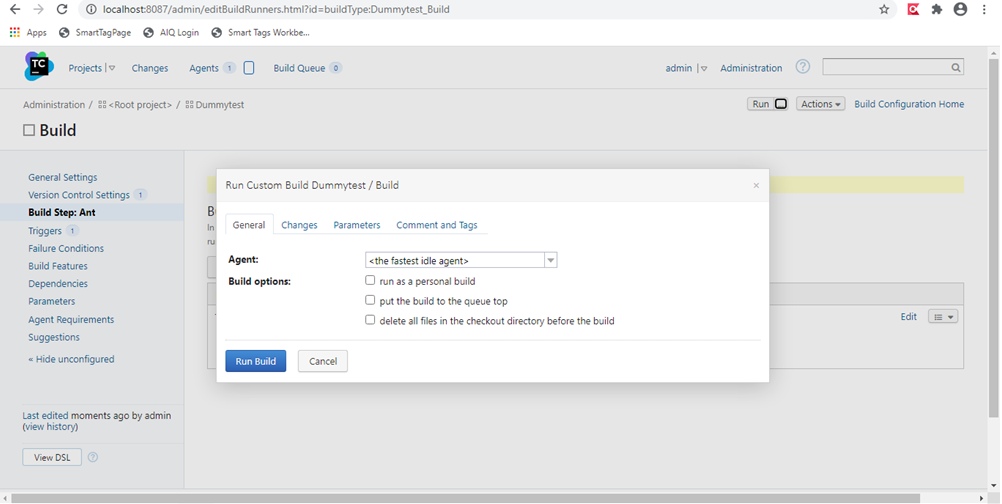
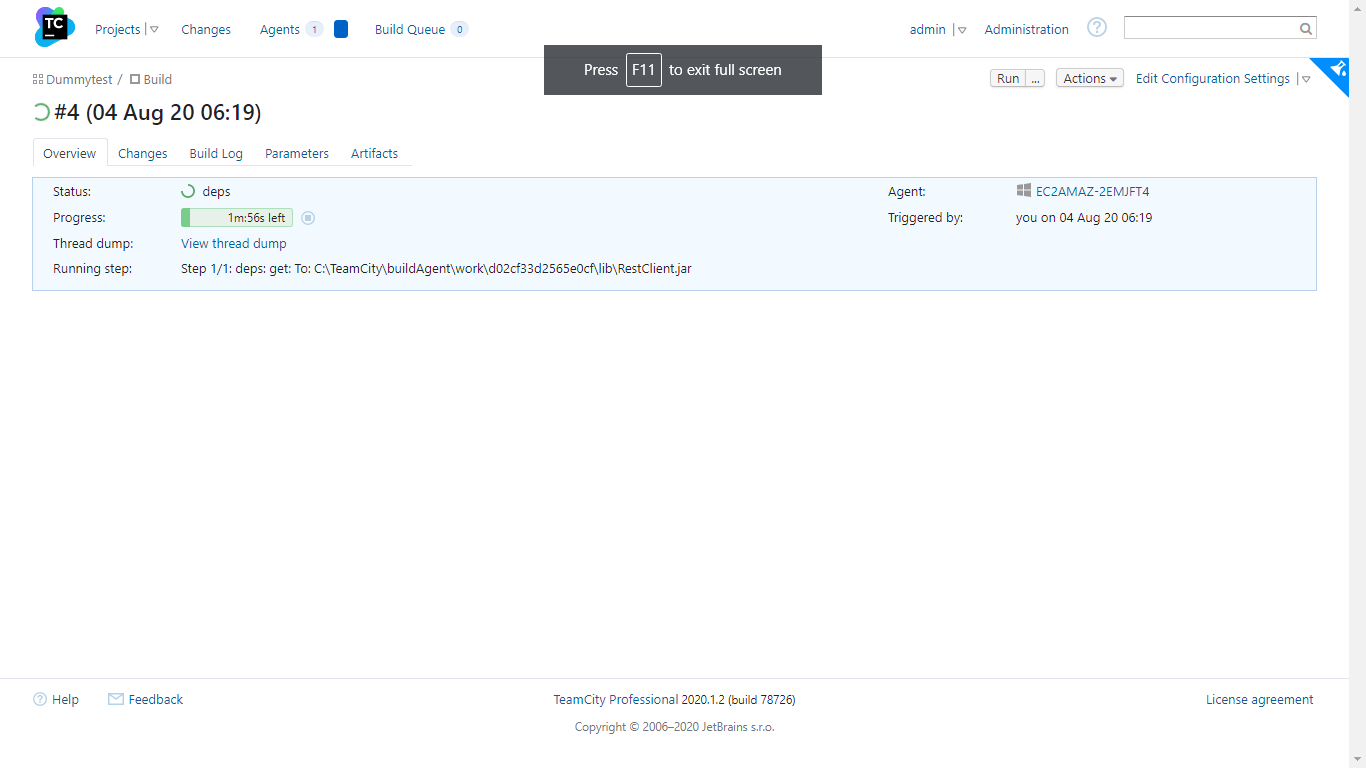
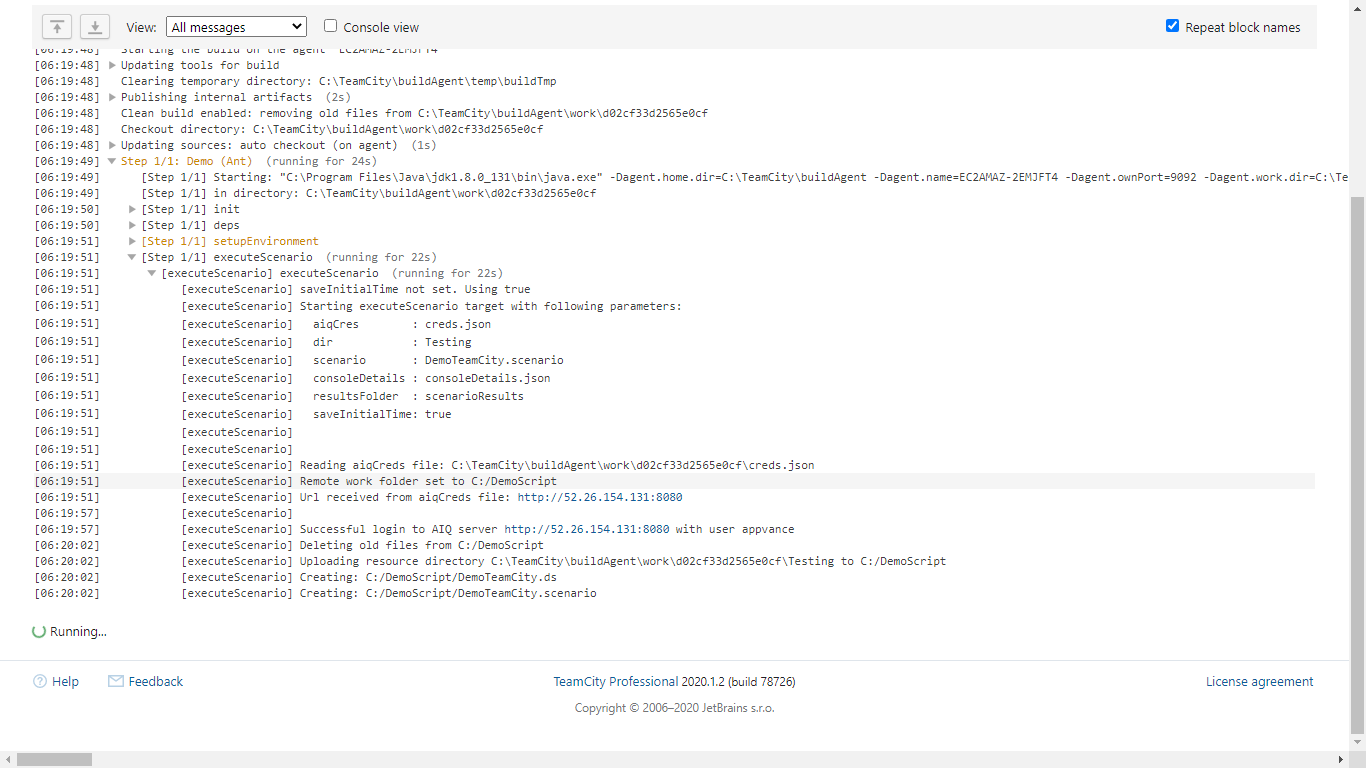
13. Click Run and choose the options
   **Now how does the git-lab project look and what are the files that need to be changed?**
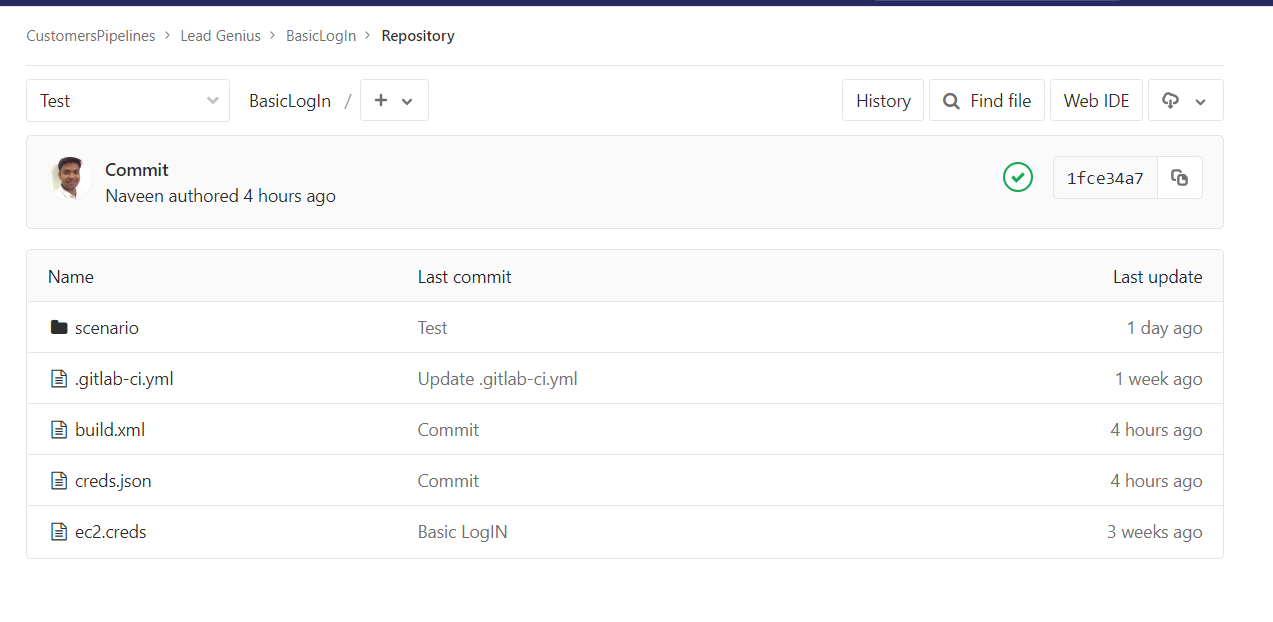Above is the screenshot of the project that was configured in Jenkins.
Build.xml File: Build.xml file and other files and the folder structure can be downloaded from [here](https://appvance-qa.s3-us-west-2.amazonaws.com/naveen/userguides/cicd/CICD_Pipeline_June2020.zip).
creds.json File:
{
"controller": {
"instances": \["i-0a8ede7xxxxx"\],
"ec2Creds": "ec2.creds",
"timeOut": 60,
"username": "AIQUSERNAME",
"password": "AIQPASSWORD",
"workFolder": "."
}
}
Basically has details about the controller machine and the credentials. Above can be used when we have the EC2 setup.
When we are running AIQ local builds, instances in the 2nd line could be replaced with "URL" and the full URL of the AIQ controller could be provided.
ec2.creds will have details of the Ec2 account: This can be used when we are using AIQ Controller on the EC2 machine and when your tests are run in the AWS cloud.
AWS\_ACCESS\_KEY\_ID=YOURAWSACCESSKEY
AWS\_SECRET\_ACCESS\_KEY=YOURAWSSECRETKEY
REGION:us-west-2.ec2.amazonaws.com
Look for Build Triggers and look for Invoke Ant.
Under Targets, call
- deps
- startNode
- createScenarioDashboard
- stopNode
Note: All the above are case-sensitive
---
Last updated: June 26, 2023
If you have any feedback on this topic, please contact us at
# CICD - Repository Alone
This guide shows CI/CD Integration without the use of any cloud services like S3 buckets to store the results and create the dashboard.
You can configure the repository to store test assets, the same Repository (Which could be any flavors of GIT or SVN) can be used to store all the test results and create dashboards.
Below are the steps that need to be followed.
1. Configure repository in AIQ under preferences > Repository. Please visit the Repository chapter to know more about how to configure repositories using HTTP or SSH
2. Below is the required folder structure and files
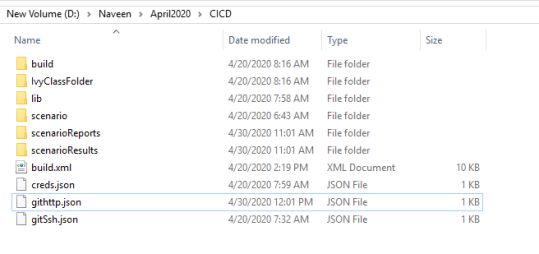
- lib will hold the Restclient.jar file.
- The scenario folder holds all the scenario files that are required to be run.
- scenarioReports and scenarioResults are the files that are required to store the results that will be uploaded to the git repo that is configured
- build.xml is the file that holds all the configuration details and the ant targets
- creds.json file holds the server details and login details of AIQ
- githttp.json file holds details of git repo to use along with HTTP credentials and branch details.
- gitSsh.json file holds details of the git repo, the URL, ssh credentials, and the branch details.
[Here](https://appvance-qa.s3-us-west-2.amazonaws.com/naveen/userguides/cicd/cicd_repo_alone.zip) is the zip of the above folder structure to download for reference
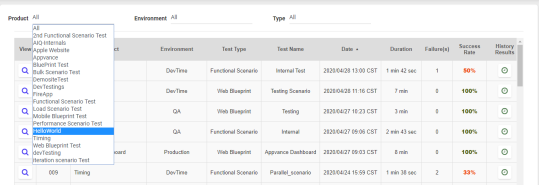
3. Configure build.xml with buildversion to use, specify product, specify customer name, specify an environment, specify dir, and the scenario file to use
If the AISG is going to be run, make changes accordingly and point to the abpt file from the freshly run AISG
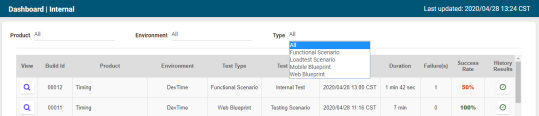
4. creds.json - provide the URL of AIQ services running, provide credentials of AIQ
5. Depending on SSH or HTTP, provide the details of the Repo, credentials, branch, sshPhrase, and sshKey in either githttp.json or gitSsh.json
Note: Depending on which file is being used, make the reference of that file in build.xml for the below-mentioned property
<property name="gitCredentials" value="githttp.json" />
Once all the changes are made and saved
Open command prompt of if this is driven from any CICD tools, run "blueprintDashboard" for creating dashboard report and "scenarioDashboard" for creating scenario dashboards
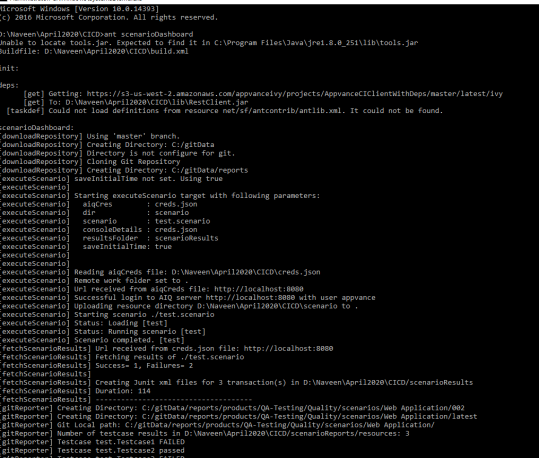 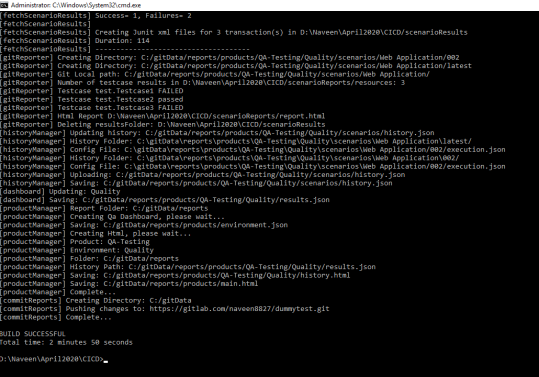
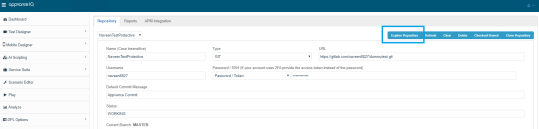
6. Once the build is successfully run, go to AIQ > Preferences > Repository
7. Click Explore Repository
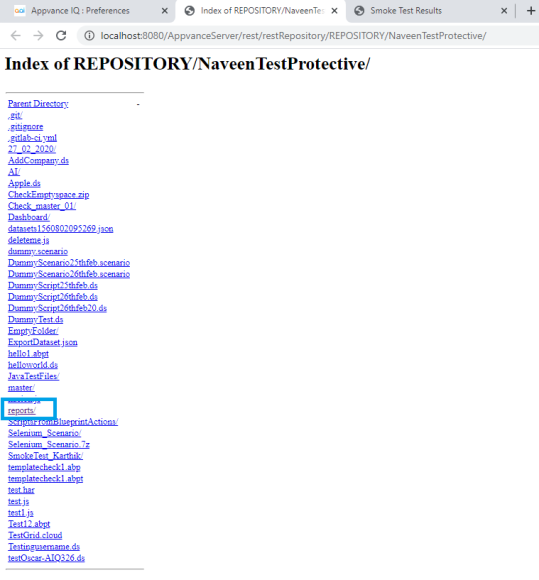
8. Look for the folder called reports
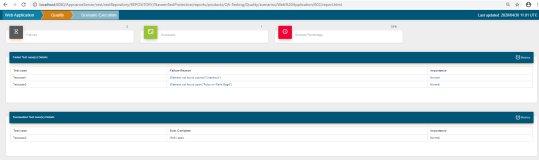
9. Click Reports> Products > main.html to have the dashboards created
---
Last updated: June 26, 2023
If you have any feedback on this topic, please contact us at
# CICD- AntTags
## Appvance IQ - CICD - All about Ant tags
Below is the list of all Ant tags/Java Class that is defined in build.xml file and their descriptions
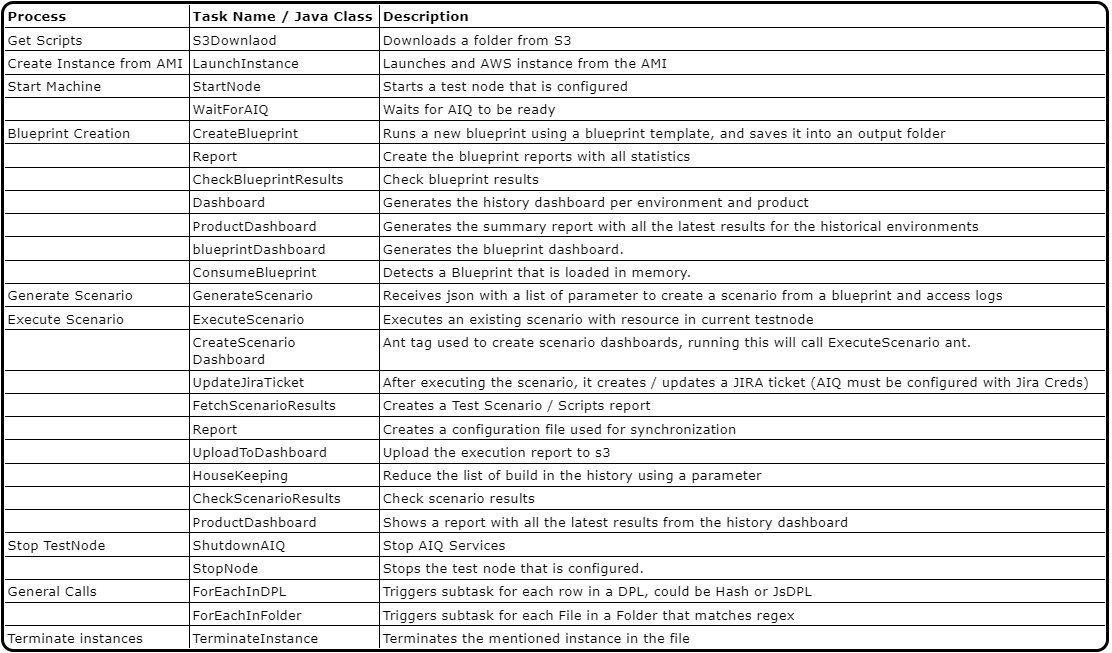Below are Ant Tasks and their descriptions and examples
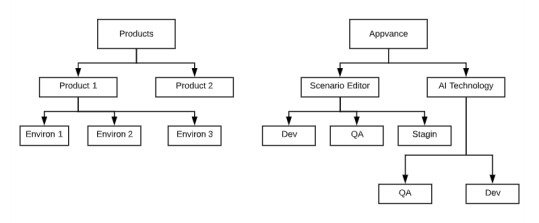
- S3Downlaod
- StartNode
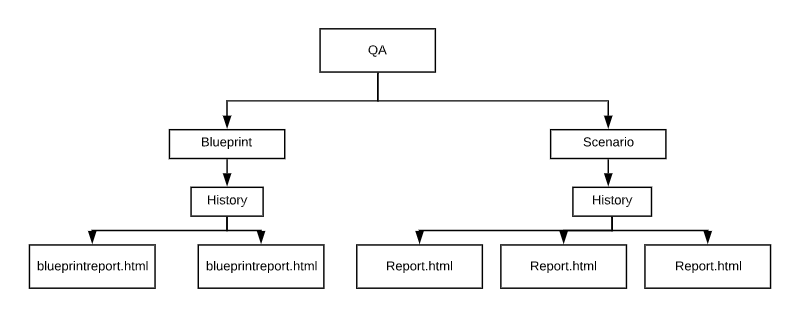
- WaitForAIQ
- CreateBlueprint
- Report (AISG)
- CheckBlueprintResults
- Dashboard (AISG)
- GenerateScenario
- ExecuteScenario
- UpdateJiraTicket
- FetchScenarioResults
- Report (Scenario)
- UploadToDashboard
- HouseKeeping
- CheckScenarioResults
- ProductDashboard
- ShutdownAIQ
- StopNode
- AddAIQUser
- ForEachInDPL
- UpdateBlueprintTemplate
- ForEachInFolder
- ExtractAutovalidations
- UpdateCSVValidations
- DownloadRepository
- GitReporter
- History Manager
- ProjectManager
- ProductManager
- UploadRepository
- Git Support
- ConsumeBlueprint
- FunctionalExecuter
- FunctionalReport
- Dashboard Git Support
- Terminate Instance
- Launch Instance
- UploadReportToS3
## **S3Downlaod**
Description
Downloads a folder from S3. Requires S3 credentials and an output file.
Input Parm
credentials: This points to the credentials file. It is a property file similar to
AWS\_ACCESS\_KEY\_ID=AKIA........
AWS\_SECRET\_ACCESS\_KEY=G8w...............
REGION:us-west-2.ec2.amazonaws.com
bucketBase: It is the AWS Bucket where the folder is located
localFolder: The folder where the file will be downloaded
remoteFolder: Remove the folder inside AWS Bucket
## **StartNode**
Description
Starts an AIQ Machine using the information in aiqCreds. Creates machine id in the generatedConfig file.
Input params
aiqCreds: Path of the configuration relative to the project (build.xml). Should have next format
{
"controller": {
"instances": \["i-07cb37f006XXXX"\],
"ec2Creds": "ec2.creds",
"timeOut": 60,
"username": "AIQUserName",
"password": "AIQPassword",
"workFolder": "."
}
}
ec2Creds is a creds file to connect to EC2, the format is
AWS\_ACCESS\_KEY\_ID=AKIA....
AWS\_SECRET\_ACCESS\_KEY=W96Axh4UqDl.....
REGION:us-west-2.ec2.amazonaws.com
- generatedConfig Path of the generated configuration file relative to the project (build.xml). Contains EC2 AMI information. Should have next format
```
{
```
```
"instanceId":"i-07cb37f006083a225",
```
```
"url":"http://ec2machine1:8080/TMServer/ws/TestNode"
```
```
}
```
## **WaitForAIQ**
Description
Waits until AIQ is ready
Input Params
- timeout: The timeout for this ant task in seconds. If AIQ is not ready after these seconds the task will fail. IF the parameter is not set the default value is 10 minutes
- aiqCreds: The AIQ credentials are in JSON format, the same format for running a scenario. The URL is optional. if not set. The Task will use the URL from consoleDetails
```
{
```
```
"controller":{
```
```
"url":"http://localhost:8080",
```
```
"username":"",
```
```
"password":""
```
```
}
```
```
}
```
- consoleDetails: File which contains URL if it is not set in aiqCreds
```
{
```
```
"url":"http://localhost:8080"
```
```
}
```
Output
AIQ should be ready and available otherwise the ant task will fail
## **CreateBlueprint**
Description: Creates a AISG.
Inputs
- projectName: "LeadGenius".
- template: "<Project-Folder>/blueprintTemplateFile.abpt".
- aiqCreds: "<Project-Folder>/localhost.json".
```
{
```
```
"controller":{
```
```
"url":"http://[ec2.machine.dns]:8080",
```
```
"username":"appvance",
```
```
"password":"appvance",
```
```
"workFolder":"/Users/[UserName]/workFolder" <--- for mac users
```
```
"workFolder":"c:/Users/administrator/workFolder" <--- for windows users
```
```
}
```
```
}
```
- outputFolder: "<Project-Output-Folder>/Output"
- forceNewScan: "true" // is defined as true
- requestMaxDuration: "2000"
- reportStatusCode: "300" for page updates
- customer: CustomerSample.com
- buildVersion: 0001
Ant Task Example
<taskdef name="createBlueprint" classname="com.appvance.ci.CreateBlueprint">
<classpath refid="RestClientLibPath" />
</taskdef>
<createBlueprint template="${template}" aiqCreds="${aiqCreds}" buildVersion="${buildVersion}" outputFolder="${blueprintResults}"
projectName="${projectName}" requestMaxDuration="4000" consoleDetails="${consoleDetails}" reportStatusCode="400" customer="${customer}" forceNewScan="true" />
Output
AISG is created inside outputFolder parameter
## Report (AISG)
Description
Creates a Dashboard report based on Junit results. It can handle integrations in the Junit results
Input Params
- fileConfig="generateRegressionScenario.json"
- aiqCreds="controller01.json"
- consoleDetails="consoleDetails.json"
- logsRemoteFolder="E:/Regression/Logs"
- projectName="moduleName"
- outputFolder="Output"
Output
Generates a Scenario and its scripts inside the Output folder
Ant Task Example
<taskdef name="uploadReportToS3" classname="com.appvance.AISG.UploadReportToS3">
<classpath refid="RestClientLibPath" />
</taskdef>
<uploadReportToS3 buildVersion="${buildVersion}" credentials="${awsCredentials}" bucketBase="${Bucket}" executionType="blueprints"
reportFolder="${blueprintResults}" environment="${environment}" product="${product}" />
## CheckBlueprintResults
Description
Checks AISG and fail if results are worse than expected
Input Params
- maxFailingRequests : max allowed number of requests with failing status codes. If not set, it will not be tested
- maxValidationFailures : max allowed number of AISG validations failures. If not set, it will not be tested
- minValidationRatio : minimum allowed percentage integer (1-100) that shows the ratio of succeeded validations. If not set, it will not be tested
Output
Fail if results are worse than expected
Ant Task Example
<taskdef name="checkBPResults" classname="com.appvance.AISG.CheckBlueprintResults">
<classpath refid="RestClientLibPath" />
</taskdef>
<checkBPResults maxFailingRequests="${maxFailingRequests}" maxValidationFailures="${maxValidationFailures}" minValidationRatio="${minValidationRatio}" reportFolder="${reports}" />
## Dashboard (AISG)
Description
Creates the history for the current branch and product using the AISG history.
Input params
- credentials="${awsCredentials}" s3 credentials
- customer="${customer}" customer name for description
- bucketBase="${Bucket}" s3 source to save data
- environment="${environment}" parameter used for classifying content
- executionType="blueprints" helps create an html with two tabs (for scenarios and for AISG content only)
- product="${product}" parameter used for classifying content
Output
Creates the AISG HTML for the history dashboard and uploads these all synchronized files to s3.
Ant Task Example
The first scenario saves the initial time and the second scenario is set to false to avoid overwriting it.
<taskdef name="dashboard" classname="com.appvance.AISG.BlueprintDashboard">
<classpath refid="RestClientLibPath" />
</taskdef>
<dashboard credentials="${awsCredentials}" customer="${customer}" bucketBase="${Bucket}" environment="${environment}" executionType="blueprints" product="${product}" />
## GenerateScenario
Description
Generates a regression scenario
Input Params
- fileConfig="generateRegressionScenario.json"
- aiqCreds="controller01.json"
- consoleDetails="consoleDetails.json"
- logsRemoteFolder="E:/Regression/Logs"
- projectName="moduleName"
- outputFolder="Output"
Output
Generates a Scenario and its scripts inside the Output folder
Ant Task Example
<taskdef name="genScenario" classname="com.appvance.ci.GenerateScenario">
<classpath refid="RestClientLibPath" />
</taskdef>
<genScenario fileConfig="${fileConfig}" aiqCreds="${aiqCreds}" consoleDetails="${consoleDetails}" logsRemoteFolder="${logsRemoteFolder}" projectName="${projectName}" outputFolder="${outputFolder}" />
## ExecuteScenario
Description
Executes a Scenario and, if saveIntitialTime is not true, timing information will be saved in results.properties file in the resultsFolder.
Input params
- aiqCreds: Path of the configuration relative to the project (build.xml). Should have the next format.
{
"controller": {
"instances": \["i-07cb37f006083a225"\],
"ec2Creds": "ec2.creds",
"timeOut": 60,
"username": "appvance",
"password": "appvance",
"workFolder": "."
}
}
- dir: Path to the scenario folder, current scenario folder value is "scenario"
- scenario: Name of the scenario to execute, example "LeadGenius\_31\_34\_TestEnv.scenario"
- resultsFolder: The place where results.properties are saved. It contains useful information to create reports and dashboards. By default, its value is "results".
- saveInitialTime: Indicates the results.properties file should be created in the result folder directory. By default it is true.
Output
The scenario should be completely executed and, if saveIntitialTime is not true, timing information will be saved in results.properties file in the resultsFolder.
Ant Task Example
The first scenario saves the initial time and the second scenario is set to false to avoid overwriting it.
<taskdef name="executeScenario" classname="com.appvance.ci.ExecuteScenario">
<classpath refid="RestClientLibPath" />
</taskdef>
<executeScenario aiqCreds="controller01.json" dir="${dir}" scenario="Scenarioname.scenario" consoleDetails="${consoleDetails}" resultsFolder="${scenarioResults}" />
UpdateJiraTicket
Description
Logs into Jira, and updates the ticket status, adding a comment based on the execution result file.
Input:
- jiraCreds: it is a JSON file with the next format:
{
"url": "httpS://.....",
"username": "userQA",
"password": "XXXXXXXX",
"destinationStatus" : {
"success": "done",
"failure": "in progress"
}
}
- ticketId: this is the identifier for the ticket to be updated.
- executionResult: the JSON file.
- updateStatus:
- maxFailures: maximum number of failures before considering the test fails.
- minSuccessPercentage: minimum percentage before considering the test fails.
Output:
These ant tags will log in to Jira, and it will update the ticket status by adding a comment based on the execution result file.
## FetchScenarioResults
Description
Save scenario results in the results folder. It will update the results.properties file inside the results folder with useful timing properties for report and dashboard creation.
Inputs
- aiqCreds: Path of the configuration relative to the project (build.xml). Should have the next format.
{
"controller": {
"instances": \["i-07cb37f006083a225"\],
"ec2Creds": "ec2.creds",
"timeOut": 60,
"username": "appvance",
"password": "appvance",
"workFolder": "."
}
}
- scenario: name of scenario to execute
- consoleDetails:
- resultsFolder: name of the folder to save result files. It should contain the results.properties file which contains useful timing properties for report and dashboard creation.
- stopOnFailure: boolean, this enables the process to continue or stop when fails.
Output
Save scenario results into the results folder parameter. The report.properties file will be updated with useful timing properties for report and dashboard creation.
Ant Task Example
<taskdef name="fetchScenarioResults" classname="com.appvance.ci.FetchScenarioResults" >
<classpath refid="RestClientLibPath"/>
</taskdef>
<fetchScenarioResults aiqCreds="creds.json" scenario="BasicScenario.scenario" consoleDetails ="params.json" stopOnFailure="false"/>
## Report (Scenario)
Description
Creates a Dashboard report based on Junit results. It can handle integrations in the Junit results
Input Params
- projectName="moduleName"
- resultsFolder="${scenarioResults}"
- reportFolder="${scenarioReports}"
- executionType="scenarios"
- environment="${environment}"
- consoleDetails="consoleDetails.json"
- product="${product}"
- buildVersion="${buildVersion}"
- bucketBase="${Bucket}"
- aiqCreds="controller01.json"
- credentials="${awsCredentials}"
Output
Generates a Scenario and its scripts inside the Output folder
Ant Task Example
<taskdef name="Report" classname="com.appvance.ci.Report">
<classpath refid="RestClientLibPath" />
</taskdef>
<Report projectName="${projectName}" resultsFolder="${scenarioResults}" reportFolder="${scenarioReports}" executionType="scenarios"
environment="${environment}" consoleDetails="${consoleDetails}" product="${product}" buildVersion="${buildVersion}" bucketBase="${Bucket}" aiqCreds="${aiqCreds}"credentials="${creds.json}" />
## UploadToDashboard
Description
This ant task uploads files.
Input Params
- bucketBase="${Bucket}"
- product="${product}"
- projectName="${projectName}"
- environment="${environment}"
- executionType="scenarios"
- credentials="${awsCredentials}"
- buildVersion="${buildVersion}"
- reportFolder="${scenarioReports}"
- consoleDetails="${consoleDetails}"
- aiqCreds="${aiqCreds}"
Output
No output, this ant task only uploads files
Ant Task Example
<taskdef name="uploadToDashboard" classname="com.appvance.ci.UploadToDashboard">
<classpath refid="RestClientLibPath" />
</taskdef>
<uploadToDashboard bucketBase="${Bucket}" product="${product}" projectName="${projectName}"
environment="${environment}" executionType="scenarios" credentials="${awsCredentials}" buildVersion="${buildVersion}"
reportFolder="${scenarioReports}" consoleDetails="${consoleDetails}" aiqCreds="${aiqCreds}" />
## HouseKeeping
Description
Keeps a max number of builds in s3
Input Params
- credentials="${awsCredentials}"
- keep="${MaxBuilds}"
- bucketBase="${Bucket}"
- executionType="scenarios"
- product="${product}"
- environment="${environment}"
Output
Keeps a max number of builds in s3
Ant Task Example
<taskdef name="HouseKeeping" classname="com.appvance.ci.HouseKeeping">
<classpath refid="RestClientLibPath" />
</taskdef>
<HouseKeeping credentials="${awsCredentials}" keep="${MaxBuilds}" bucketBase="${Bucket}" executionType="scenarios" product="${product}" environment="${environment}" />
## CheckScenarioResults
Description
Checks a set of JUnit results and fails if the results are worse than the expected in report.json file.
If ANY high-important TestCase fails, it will fail.
Even if every low importance fails, it won't fail because of this.
The minSucessRatio and maxFailingTestCases are applied to normal importance
Input Params
- reportFile: The dir where the JSON report is located. If not set the default is "report/report.json".
- minSuccessRatio: minimum allowed percentage integer (1-100) that shows the ratio of succeeded validations. If not set, it will not be tested
- maxAllowedFailures : max allowed failed test cases. If not set it will not be tested
Output
Checks a set of JUnit results and fails if the results are worse than expected. Will do nothing if the results are good enough.
Ant Task Example
<taskdef name="checkScenarioResults" classname="com.appvance.ivy.CheckScenarioResults" >
<classpath refid="IvyPath"/>
</taskdef>
<checkScenarioResults reportFile="report/report.json" minSucessRatio ="95" maxAllowedFailures ="5" />
## ProductDashboard
Description
Creates the main dashboard report for the CICD
- reportFile: The dir where the JSON report is located. If not set the default is "report/report.json".
- minSuccessRatio: minimum allowed percentage integer (1-100) that shows the ratio of succeeded validations. If not set, it will not be tested
- maxAllowedFailures : max allowed failed test cases. If not set it will not be testedSinchronize the historical files and create a report with the latest results for all the history
Input Params
- credentials="${awsCredentials}" AWS credentials
- bucketBase="${Bucket}" AWS path to locate files
- customer="${customer}" Customer description to show in the html
Output
Creates the main dashboard report for the CICD
Ant Task Example
<taskdef name="ProductDashboard" classname="com.appvance.ci.ProductsDashboard">
<classpath refid="RestClientLibPath" />
</taskdef>
<ProductDashboard credentials="${awsCredentials}" bucketBase="${Bucket}" customer="${customer}" />
## ShutdownAIQ
Description
Shutdown and AIQ Server based on specs from the configuration file
Input Params
- aiqCreds: The AIQ credentials are in JSON format, the same format for running a scenario. The URL is optional. if not set. The Task will use the URL from consoleDetails
{
"controller":{
"url":"http://localhost:8080",
"username":"appvance",
"password":"appvance"
}
}
- consoleDetails: File which contains URL if it is not set in aiqCreds
{
"url":"http://localhost:8080"
}
Output
AIQ should be stopped. If not the task will fail.
Ant Task Example
<target name="stopAIQ" depends="deps">
<taskdef name="shutdown" classname="com.appvance.ci.ShutdownAIQ">
<classpath refid="RestClientLibPath" />
</taskdef>
<shutdown
aiqCreds="${aiqCreds}"
consoleDetails="${consoleDetails}" />
</target>
StopNode
Description
Stops an AIQ Machine using the information in aiqCreds.
Input:
- aiqCreds:
{
"controller": {
"instances": \["i-07cb37f006083a225"\],
"ec2Creds": "ec2.creds",
"timeOut": 60,
"username": "appvance",
"password": "appvance",
"workFolder": "."
}
}
- dir: name of the scenario
- consoleDetails:
Ant Tag Example
<taskdef name="stopNode" classname="com.appvance.ci.StopNode">
<classpath refid="RestClientLibPath" />
</taskdef>
<stopNode aiqCreds="${aiqCreds}" consoleDetails="${consoleDetails}" />
## AddAIQUser
Description
Creates a user into AIQ.
Input Parm
- username="${username}"
- password="${password}"
- role="${role}" valid values: “Admin”, “User”
- aiqCreds="CICD/localhost.json"
Output
An user is created.
Ant Task Example
<target name="checkCreateUsers" depends="init">
<path id="TestPath">
<pathelement path="${javac.classpath}"/>
<pathelement path="${build.test.classes.dir}"/>
<pathelement path="${build.classes.dir}"/>
<pathelement location="dist/AppvanceCIClient.jar"/>
</path>
<taskdef name="forEachInDPL" classname="com.appvance.ci.ForEachInDPL" >
<classpath refid="TestPath"/>
</taskdef>
<taskdef name="addAIQUser" classname="com.appvance.ci.AddAIQUser" >
<classpath refid="TestPath"/>
</taskdef>
<forEachInDPL csv="test/com/appvance/ci/users.csv" >
<addAIQUser username="${username}" password="${password}" role="${role}" aiqCreds="CICD/localhost.json"/>
</forEachInDPL> </target>
## ForEachInDPL
Description:
Receives the DPL path, the DPL type, and a task list.
Input Params
csv: "CICD/templates.csv"
type: "JsDPL" || “HashDPL”
task=<updateBlueprintTemplate input="CICD/Legacy.mbpt" output="output/original-${template}.mbpt.json" type="none" />
<updateBlueprintTemplate input="output/original-${template}.mbpt.json"
Ant Task Example
<forEachInDPL csv="CICD/templates.csv" >
<updateBlueprintTemplate input="CICD/Legacy.mbpt" output="output/original-${template}.mbpt.json" type="none" />
<updateBlueprintTemplate input="output/original-${template}.mbpt.json"
output="output/dpl-${template}.mbpt.json"
resource="CICD/templates.csv"
type="updateDataset" />
</forEachInDPL>
## UpdateBlueprintTemplate
Description
Updates the Blueprint template.
Input Params
- input="output/original-${template}.mbpt.json"
- output="output/dpl-${template}.mbpt.json"
- resource="CICD/templates.csv"
- type="updateDataset"
Output
From a Blueprint template, it generates a list of modified Blueprint templates.
Ant Task Example
<target name="checkUpdateBlueprintTemplate" depends="init">
<path id="TestPath">
<pathelement path="${javac.classpath}"/>
<pathelement path="${build.test.classes.dir}"/>
<pathelement path="${build.classes.dir}"/>
<pathelement location="dist/AppvanceCIClient.jar"/>
</path>
<taskdef name="updateBlueprintTemplate" classname="com.appvance.AISG.UpdateBlueprintTemplate" >
<classpath refid="TestPath"/>
</taskdef>
<taskdef name="forEachInDPL" classname="com.appvance.ci.ForEachInDPL" >
<classpath refid="TestPath"/>
</taskdef>
<forEachInDPL csv="CICD/templates.csv" >
<updateBlueprintTemplate input="CICD/Legacy.mbpt" output="output/original-${template}.mbpt.json" type="none" />
<updateBlueprintTemplate input="output/original-${template}.mbpt.json"
output="output/dpl-${template}.mbpt.json"
resource="CICD/templates.csv"
type="updateDataset" />
</forEachInDPL>
</target>
## ForEachInFolder
Description
Processes a list of files, using a pattern to filter file types inside a folder, then executes a list of tasks.
Input Params
- folder = theFolder
- match = theMatch
<taskdef name="forEachInFolder" classname="com.appvance.ci.ForEachInFolder" >
<classpath refid="TestPath"/>
</taskdef>
Ant Task Example
<forEachInFolder folder="testfolder">
<echo message="Filename: ${filename}${line.separator}" file="output/ForEachFolder.txt" append="true" />
</forEachInFolder>
<forEachInFolder folder="testfolder" match =".\*.csv">
<echo message="Filename: ${filename}${line.separator}" file="output/ForEachMatch.txt" append="true" />
</forEachInFolder>
ExtractAutovalidations
## UpdateCSVValidations
Description
Updates a CSV file according to a pattern using a replacement string.
Input Parm
- type:
- Possible values for type:
- disable, enable, updateMatch.
- input:
- It is the CSV file path.
- output:
- match:
- replace:
Ant Task Example
<target name="updateCSV" depends="deps">
<taskdef name="updateCSVData" classname="com.appvance.AISG.UpdateCSVValidation">
<classpath refid="RestClientLibPath" />
</taskdef>
<updateCSVData
type="disable || enable || updateMatch"
input="folder"
output="outputFolder"
match="getData"
replace="getContent"
/>
</target>
## DownloadRepository
Description
Clones a git repository
Input Parm
- folder="c:/pathToFutureGitFolder"
- credentials= path to a json file with Git credentials, this is a json file as follows:
For https connection
{
"username": "\*\*\*\*\*@appvance.com",
"password": "\*\*\*\*\*\*\*",
"repository": "https://gitlab.com/pathtest/development.git ",
"branch": "branchName",
"sshPhrase": "";
"sshKey": ""
}
For ssh connection
{
"username": "theUser@appvance.com",
"password": "",
"repository": "git@gitlab.com:pathtest.git",
"branch": "master",
"sshPhrase": "thisIsMyKeyPharse"; // optional if not required by git
"sshKey": "pathToprivateKeyFile"
}
Output
Git repository is cloned in to file system
Ant Task Example
<taskdef name="downloadRepository" classname="com.appvance.ci.git.DownloadRepository">
<classpath refid="RestClientLibPath" />
</taskdef>
<downloadRepository folder="${localEmptyFolder}" credentials="${gitCredentialsFile}" />
## GitReporter
Description
Generates internal Statistics
Input Parm
- folder="${localEmptyFolder}" // location for local dashboard files
- reportFolder= "${blueprintResults}"
- environment="${environment}"
- executionType="blueprints" // valid values "blueprints" || "scenarios"
- projectName="${projectName}"
- buildVersion="${buildVersion}"
- product="${product}"
- resultsFolder= "" // for AISG keep it blank, for scenario you may enter "ScenarioResults"
Output
Updates the statistics for local files
Ant Task Example
<taskdef name="gitReporter" classname="com.appvance.ci.git.GitReporter">
<classpath refid="RestClientLibPath" />
</taskdef>
<gitReporter
folder="${localEmpyFolder}"
reportFolder= "${blueprintResults}"
environment="${environment}"
executionType="blueprints"
projectName="${projectName}"
buildVersion="${buildVersion}"
product="${product}"
resultsFolder= ""
/>
## History Manager
Description
Generates internal Statistics
Input Params
- folder="${localEmpyFolder}" // location for local dashboard files
- product="${product}"
- environment="${environment}"
- buildVersion="${buildVersion}"
- executionType="blueprints" // valid values "blueprints" || "scenarios"
- projectName="${projectName}"
Output
Updates the statistics for local files
Ant Task Example
<taskdef name="historyManager" classname="com.appvance.ci.git.HistoryManager">
<classpath refid="RestClientLibPath" />
</taskdef>
<historyManager
folder="${localEmpyFolder}"
product="${product}"
environment="${environment}"
buildVersion="${buildVersion}"
executionType="blueprints"
projectName="${projectName}"
/>
## ProjectManager
Description
Generates internal Statistics
Input Params
- folder="${localEmpyFolder}" // location for local dashboard files
- buildVersion="${buildVersion}"
- product="${product}"
- environment="${environment}"
- executionType="blueprints" // valid values "blueprints" || "scenarios"
- customer="${customer}"
Output
Updates the statistics for local files
Ant Task Example
<taskdef name="dashboard" classname="com.appvance.ci.git.ProjectManager">
<classpath refid="RestClientLibPath" />
</taskdef>
<dashboard
folder="${localEmpyFolder}"
buildVersion="${buildVersion}"
product="${product}"
environment="${environment}"
executionType="blueprints"
customer="${customer}"
/>
## ProductManager
Description
Generates internal Statistics
Input Parm
- folder="${localEmpyFolder}" // location for local dashboard files
- customer="${customer}"
Output
Updates the statistics for local files
Ant Task Example
<taskdef name="productManager" classname="com.appvance.ci.git.ProductManager">
<classpath refid="RestClientLibPath" />
</taskdef>
<productManager
folder="${localEmpyFolder}"
customer="${customer}"
/>
UploadRepository
Description
Commits changes into a git repository
Input Parm
- credentials="${gitCredentials}"
- folder="${localEmpyFolder}" // location for local dashboard files
- customer="${customer}"
Output
Updates the statistics for local files
Ant Task Example
<taskdef name="commitReports" classname="com.appvance.ci.git.UploadRepository">
<classpath refid="RestClientLibPath" />
</taskdef>
<commitReports
credentials="${gitCredentials}"
folder="${localEmpyFolder}"
customer="${customer}"
/>
**ConsumeBlueprint**
Description
Detects a AISG that is loaded in memory.
Input Parm
aiqCreds="${aiqCreds}"
it’s the JSON file that contains the IQ credentials.
{
"controller":{
"url":"http://\[ec2.machine.dns\]:8080",
"username":"appvance",
"password":"appvance",
"workFolder":"/Users/\[UserName\]/workFolder" <--- for mac users
"workFolder":"c:/Users/administrator/workFolder" <--- for windows users
}
}
buildVersion="001" // define the number of copilation according to the pipeline number.
outputFolder="blueprintResults" //it’s the folder where is going to be downloaded the reports.
projectName="aProjectName" //the name that discribes to of the projet
requestMaxDuration="4000" //maximum duration per request
consoleDetails="${consoleDetails}" //
reportStatusCode="400" // minimum expected error code.
customer="${customer}" // it’s a name that describes to the customer.
Output
c:\\Builds\\Resources\\\[blueprint-name\].abp
Ant Task Example
<target name="blueprintConsume" depends="ivyDeps">
<taskdef name="consumeBlueprint" classname="com.appvance.ci.ConsumeBlueprint">
<classpath refid="RestClientLibPath" />
</taskdef>
<consumeBlueprint
aiqCreds="${aiqCreds}"
buildVersion="${buildVersion}"
outputFolder="${blueprintResults}"
projectName="${projectName}"
requestMaxDuration="4000"
consoleDetails="${consoleDetails}"
reportStatusCode="400"
customer="${customer}" />
</target>
**FunctionalExecuter**
Description
This Ant task runs complex functional scenarios.
This Ant task does not require AIQ, but it requires Test Designer if the script uses it. You can create a report from the results of the ant task using the FunctionalReport ant task (FunctionalReport )
Qualified Class Name
com.appvance.ci.functional.FunctionalExecuter
Input Params
<taskdef name="functionalExecuter" classname="com.appvance.ci.functional.FunctionalExecuter" >
<classpath refid="CIPath"/>
</taskdef>
<functionalExecuter maxThread="1" resultFolder="${resultFolder}" testclass="${testclass}" />
The Locker & Bridge Variable support
If scripts have variables in the locker or the bridge, it is important to notice they required some details in the script java class but no change is required in the script itself
@Test
public void doFirstTestBroken() {
//Somewhere in the script this happens
new TheLocker().put("myVar", "MyValue");
//Leave the script
}
@Test(dependsOnMethods = {"doFirstTestBroken"})
public void doSecondTestBroken() {
/\*\*
- This is NOT 100% to succeed IT could succeed times, if you have
- Only 1 thread BUT if you have multiple threads, the first thread could run
- Different TestCase and
- maxThread take a look!!! if maxThread=1 this will
- Always work but it is not guaranteed to work with many threads
- <functionalExecuter maxThread="10" resultFolder="p10${resultFolder}" testclass="${testclassParallel}" />
\*/
//Fresh thread will run this piece
Assert.assertEquals("MyValue", new TheLocker().get("myVar"));
}
// --------------------------------------------------------------------------------
// -- DO NOT WORRY, our Shiny new Appvance CI Runner can do this and much more
// -- IF the scripts save the data in the locker you need to move it to a
// -- local variables and back to the locker for the next script
// -----------------------------------------------------------------------------
private Object myVar;
@Test
public void doFirstTestFixed() {
//Somewhere in the script this happends
new TheLocker().put("myVar", "MyValue");
//..
// Now before leaving we put it in a script level variable
myVar = new TheLocker().get("myVar");
}
@Test(dependsOnMethods = {"doFirstTestFixed"})
public void doSecondTestFixed() {
/\*\*
- As we do not want to change the script, so we retrieve it from local
- script and add it to the locker of this thread\*
\*/
new TheLocker().put("myVar", myVar);
//Eventually the script will read it from
Assert.assertEquals("MyValue", new TheLocker().get("myVar"));
}
//------------------------------------------------
//-- For ServiceSuiteBrige & TestDesginer bridge variables
//-- Solution is simpler, you keep the bridge as Java Class variables
//--------------------------------------------------
@Test
public void doFirstServiceSuiteBridgeBroken() throws Exception {
ServiceSuiteBridge bridge = new ServiceSuiteBridge();
bridge.put("myVar", "myValue");
}
@Test(dependsOnMethods = {"doFirstServiceSuiteBridgeBroken"})
public void doSecondServiceSuiteBridgeBroken() throws Exception {
ServiceSuiteBridge bridge = new ServiceSuiteBridge();
//This will aalways fail because brige is new object
Assert.assertEquals("myValue", bridge.getVariable("myVar"));
}
//---------------------------------
// Solution is to have a setup
//---------------------------------
private ServiceSuiteBridge serviceSuiteBridge;
@BeforeClass
public void setup() throws Exception {
serviceSuiteBridge = new ServiceSuiteBridge();
}
@Test
public void doFirstServiceSuiteBridgeFixed() throws Exception {
serviceSuiteBridge.put("myVar", "myValue");
}
@Test(dependsOnMethods = {"doFirstServiceSuiteBridgeFixed"})
public void doSecondServiceSuiteBridgeFixed() throws Exception {
//This is fine as long as doFirstServiceSuiteBridgeFixed do not branch!
//CAREFULL with multiple threads accessing this bridge at the same time
// If you need to branch use same approach as the locker, save variables
//as Java class variables
Assert.assertEquals("myValue", serviceSuiteBridge.getVariable("myVar"))
## **FunctionalReport**
Definition
These Ant tags create a report for the Appvance CI Complex Functional Runner (FunctionalExecuter ).
Qualified Class Name
com.appvance.ci.functional.FunctionalReport
Input Params
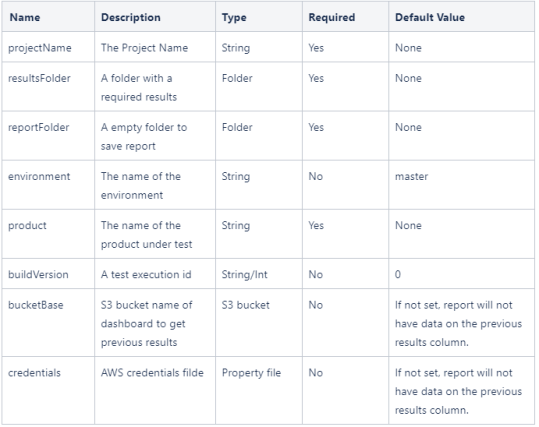credentials File will be similar to this
AWS\_ACCESS\_KEY\_ID=XXX
AWS\_SECRET\_ACCESS\_KEY=XXX
REGION:us-west-2.ec2.amazonaws.com
Ouput
Upon successful ant task, the “reportFolder” will contain a correctly generated report of the execution based on the results inside the “resultsFolder”.
If the bucketBase & credentials are set, the task will find previous executions (if any) inside Amazon AWS to fill the results column.
Ant Task Example
<taskdef name="Report" classname="com.appvance.ci.functional.FunctionalReport">
<classpath refid="CIPath" />
</taskdef>
<Report
projectName="${projectName}"
resultsFolder="${resultFolder}"
reportFolder="${reportFolder}"
environment="${environment}"
credentials="${awsCredentials}"
product="${product}"
buildVersion="${buildVersion}"
bucketBase="${Bucket}" />
## **Dashboard Git Support**
A sample of targets that are added to your build.xml will enable you to run scenarios and AISG and upload the results to a GIT repository.
You will need to provide GIT credentials in a credentials JSON file pointed by the gitCredentials property
## **Terminate Instance**
Terminates an ec2 instance using the instance id coming from the console details file.
Input
{
"instanceId": "i-TheInstanceId",
"url": "http://\[some domain goes here\]:8080/TMServer/ws/TestNode"
}
Cloud File
This XML file can be encrypted by AIQ or visible in plain text, this file is required to establish a connection with AWS
<?xml version="1.0" encoding="UTF-8"?>
<cloud type="EC2" version="1">
<config-param key="AIQProtocol" value="http"/>
<config-param key="AIQPort" value="8080"/>
<config-param key="AccountName" value="XXX"/>
<config-param key="AWSKey" value="XXX"/>
<config-param key="AWSSecretAcessKey" value="XXX//XX"/>
<config-param key="AMI" value="ami-XX"/>
<config-param key="InstanceType" value="t2.xlarge"/>
<config-param key="KeyPair" value="XX"/>
<config-param key="Security" value="sg-XX"/>
<config-param key="AWSRegion" value="http://us-west-2.ec2.amazonaws.com "/>
<config-param key="vpcId" value="vpc-XX"/>
<config-param key="subnetId" value="subnet-XX"/>
</cloud>
Tag Definition
<target name="TerminateInstance" depends="deps">
<taskdef name="TerminateInstance" classname="com.appvance.ci.TerminateInstance">
<classpath refid="RestClientLibPath" />
</taskdef>
<LaunchInstance
testNodeDetails="${testNodeDetails}"
cloudFile="${cloudFile}"/>
</target>
Output
There is no output since the instance is terminated and all processes are completed.
## **Launch Instance**
This tag can create an ec2 instance from an existing AMI.
Note:
The AMI should have everything configured:
- AIQ running as a service
- Database fully installed
Inputs:
Cloud File created with AIQ:
AWS Creds
Note:
These three fields are required.
AWS\_ACCESS\_KEY\_ID=AKIAZ\*\*\*\*\*\*
AWS\_SECRET\_ACCESS\_KEY=eFK\*\*\*\*\*ojk/7ZCNb1fk\*\*\*\*\*Lq
REGION=us-west-2.ec2.amazonaws.com
Cloud File
This xml file can be encrypted by AIQ or visible in plain text
<?xml version="1.0" encoding="UTF-8"?>
<cloud type="EC2" version="1">
<config-param key="AIQProtocol" value="http"/>
<config-param key="AIQPort" value="8080"/>
<config-param key="AccountName" value="XXX"/>
<config-param key="AWSKey" value="XXX"/>
<config-param key="AWSSecretAcessKey" value="\*\*\*\*\*\*\*\*"/>
<config-param key="AMI" value="ami-XXX"/>
<config-param key="InstanceType" value="t2.xlarge"/>
<config-param key="KeyPair" value="XXX"/>
<config-param key="Security" value="sg-XXX"/>
<config-param key="AWSRegion" value="http://us-west-2.ec2.amazonaws.com "/>
<config-param key="vpcId" value="vpc-XXX"/>
<config-param key="subnetId" value="subnet-XXX"/>
</cloud>
Tag Definition
<target name="LaunchInstance" depends="deps">
<taskdef name="LaunchInstance" classname="com.appvance.ci.LaunchInstance">
<classpath refid="RestClientLibPath" />
</taskdef>
<LaunchInstance
aiqCreds="${aiqCreds}"
credentials="${awsCredentials}"
testNodeDetails="${testNodeDetails}"
cloudFile="${cloudFile}"/>
</target>
Output
Updates the ConsoleDetails File:
{
"instanceId": "\[auto generated instance ID\]",
"url": "http://\[auto generated domain\]:8080/TMServer/ws/TestNode"
}
## **UploadReportToS3**
Description
Creates a Dashboard report based on Junit results. It can handle integrations in the Junit results
Qualified Class Name:
com.appvance.AISG.UploadReportToS3
Input Params
- fileConfig="generateRegressionScenario.json"
- aiqCreds="controller01.json"
- consoleDetails="consoleDetails.json"
- logsRemoteFolder="E:/Regression/Logs"
- projectName="moduleName"
- outputFolder="Output"
Output
Generates a Scenario and its scripts inside the Output folder
Ant Task Example
<taskdef name="uploadReportToS3" classname="com.appvance.AISG.UploadReportToS3">
<classpath refid="RestClientLibPath" />
</taskdef>
<uploadReportToS3 buildVersion="${buildVersion}" credentials="${awsCredentials}" bucketBase="${Bucket}" executionType="blueprints"
reportFolder="${blueprintResults}" environment="${environment}" product="${product}" />
---
Last updated: June 26, 2023
If you have any feedback on this topic, please contact us at
# CICD - Dashboards
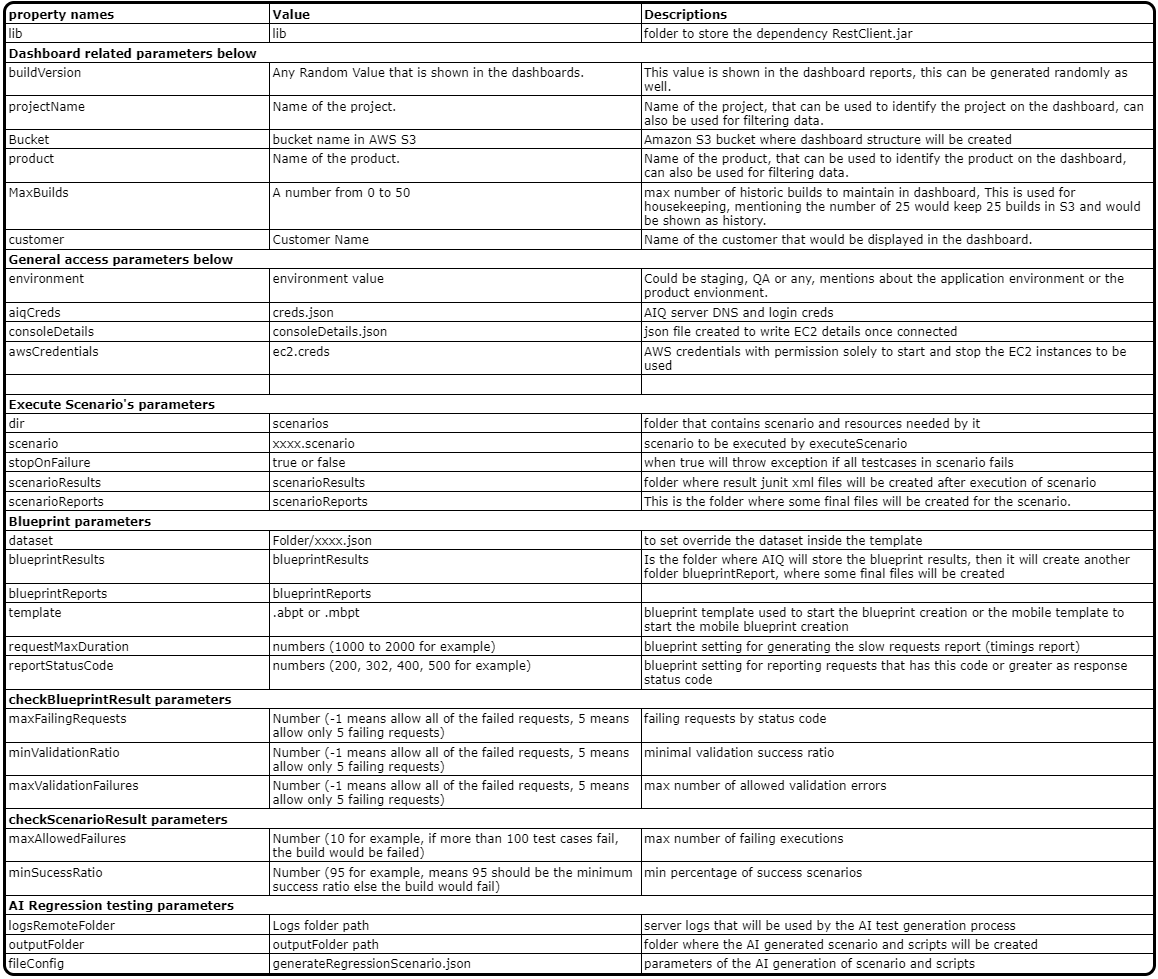Dashboards Explained:
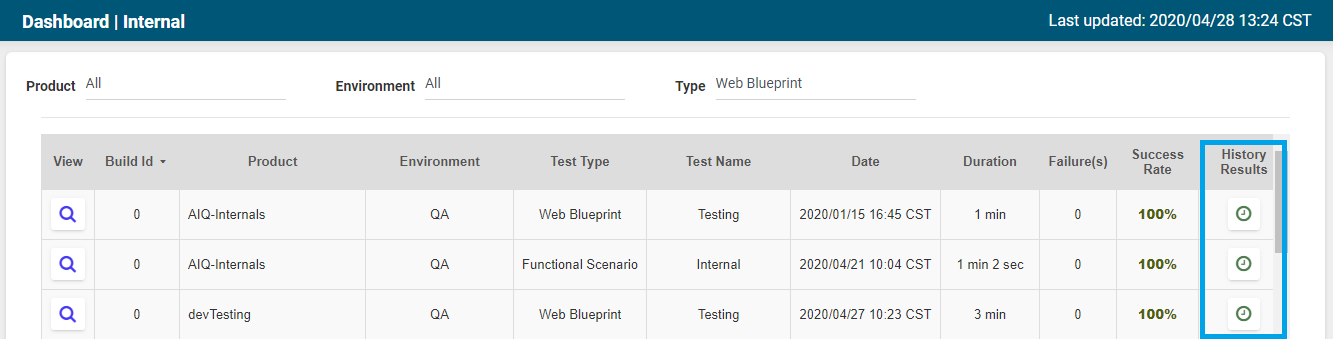
The main dashboard looks like the below:
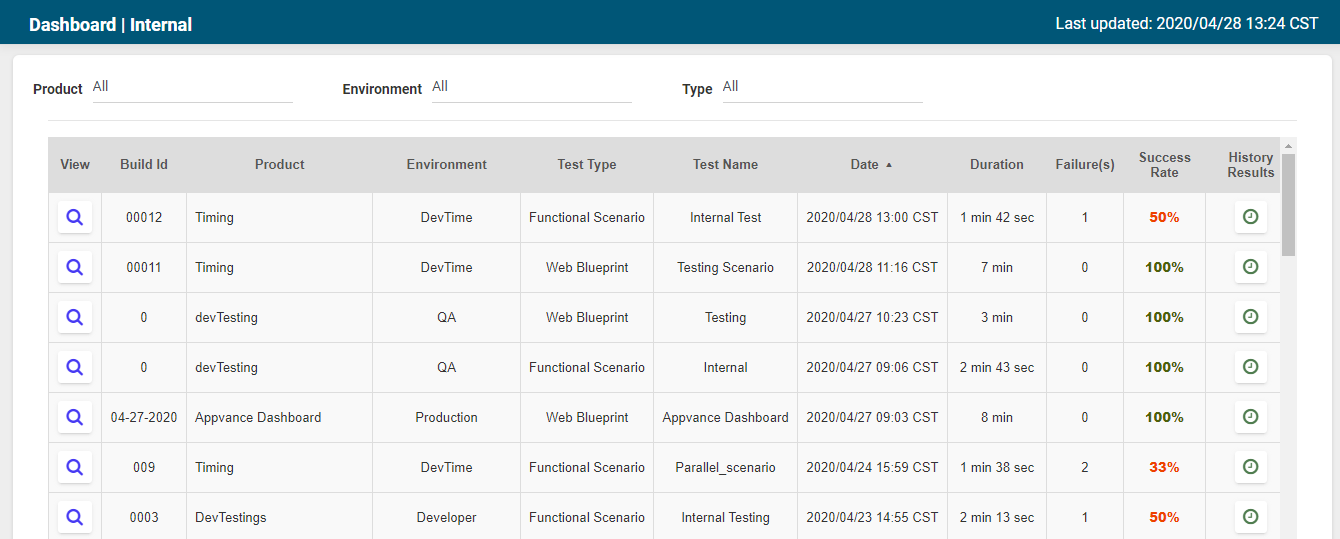1. The main dashboard will have all the entries for the scenarios and the AISG run for the application under test
2. The top right will have last updated with the date and time
3. Product is a drop-down field that lists out all the products of the dashboard, remember product was a property that was set in build.xml, and based on the provided value, a dashboard would be created
4. The environment is again a drop-down field that lists out all the environments, remember environment is again a property that was set in build.xml, and based on the provided value, dashboards would be created or updated
5. Type Lists out all the test types, like functional scenarios, AISG etc
6. Build id - is again is a value provided in build.xml, it can be driven to be dynamically generated from other tools like Jenkins.
From Jenkins:
buildNumber=Appvance$BUILD\_NUMBER
$BUILD\_NUMBER is an inbuilt method that creates a build number by itself so every time a pipeline is run, a number would be appended to Appvance (Example: Appvance01)
Within Build.xml:
Below example shows picking today's date as the build number which is defined inside build.xml as shown below:
<property name="buildVersion" value="${TODAY\_MY}" />
<tstamp>
<format property="TODAY\_MY" pattern="MM-dd-yyyy" locale="en,US" />
</tstamp>
7. Test Name - It is the name of the test scenario name/AISG execution name
8. Date - Date of when the AISG or the test scenario was run
9. Duration - is the pipeline duration
10. Failures - will show the number of script failures for scenarios and the number of validation failures for AISG
11. Success Rate - Success rates in percentage for both Scenarios and AISG
12. Toggle Columns - You have options to toggle columns with Build Id, Product, Environment
**Products and Environments:**
**Environments:**
**History Results:**
Click the icon for each of the entries under History Results to check the history results for a scenario run based on product/Environment/Test Type (AISG or Scenario)
AISG:
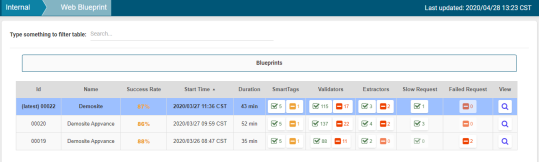1. It has a search option on top so you can search for something specific, like dates, build number, etc
2. ID is the same as the build number
3. Name is the name of the AISG
4. Success rate gives the success rate of the AISG, if there are some validation failures, those can be checked using Validators
5. Start Time - shows when the AISG was started
6. Duration - shows how long the AISG was run
7. SmartTags - shows all the SmartTags that were used in the Green tick box and also the ones that are not used in the orange box. You can click them for a quick view
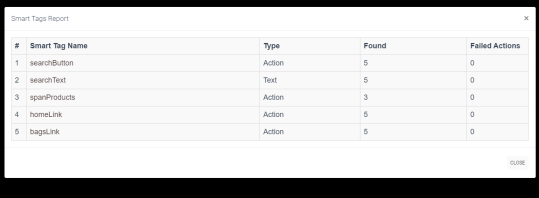
8. Validations - will list all the successful validations and the failed validations, just like SmartTags, you can open the quick view to list out all the validations that were passed and all the validations that were failed
9. Extractions - will list all the successful and failed extractions and you can use the quick view to see the list of successful extractions and the failed ones
10. Slow requests - Depending on the user entry in the build.xml to filter out the slow responses (like 2000 msecs) - this will list out all the slow requests
11. Failed Requests - Depending on the user entry in the build.xml to filter out all the failed requests (302 and above) - this will list out all the failed requests
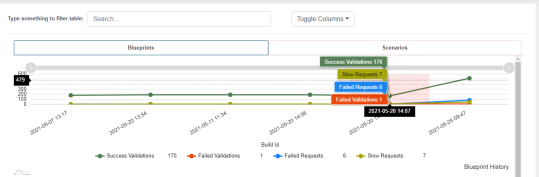
The graph shows successful and failed validations, slow and failing requests over a period of time. You can mouse hover on both graphs to get more details.
View:
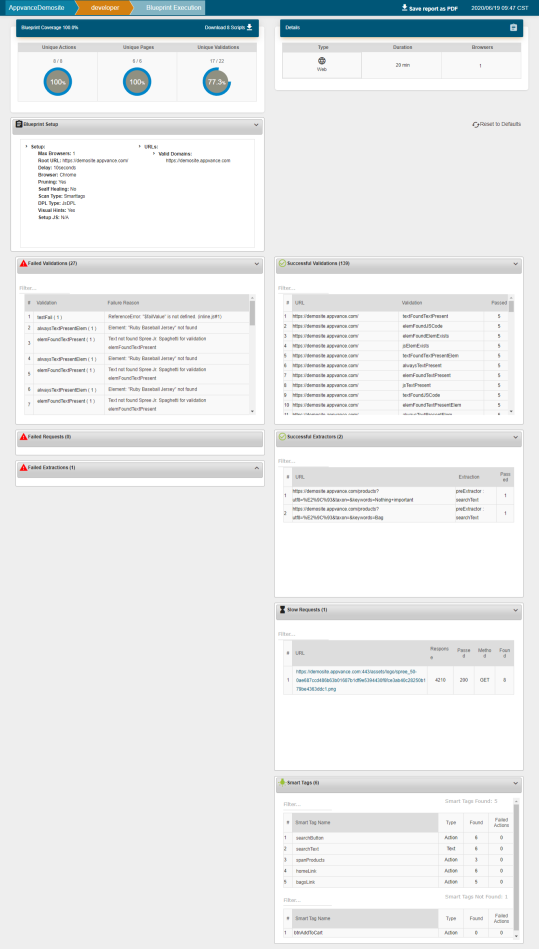1. Test Coverage shows all the Unique Actions created, Unique pages found statistics and total scripts created, and an option to download all the JS scripts created from the AISG
Coverage is basically:
The list of unique actions is divided by total actions, The list of unique pages divis ided by total pages found, then both results are summarized and divided into 2, so the coverage is an average of the percentage of actions and pages found, Just those values are considered to generate the final value.
2. AISG section details will show the AISG type (Web or Mobile), AISG duration in minutes, and the number of browsers
3. Below sections - Failed Validations, Failed Requests, Failed Extractions, Successful Validations, Successful Extractions, Slow Requests, SmartTags-All can be expanded and collapsed
4. These sections can be dragged and dropped based on user needs, like dragging all the failed sections to one side and all the successful sections to the other side, even if the browser is refreshed, these sections stay as the user made changes
5. Reset to Defaults can be used to re-arrange the sections as default options
6. Each of the sections will have a Filter option to filter out based on the needs
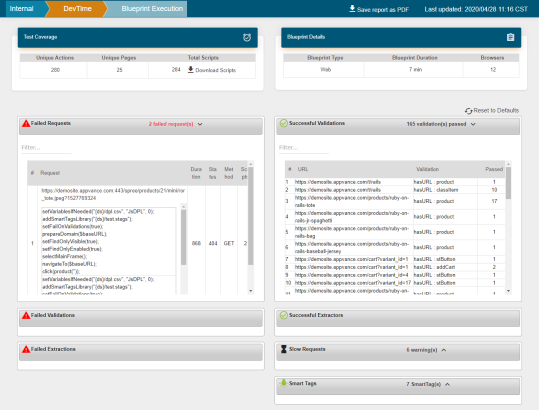
7. Under failed requests, you can expand a particular request and copy the generated script which can be pasted in JS Edit & Play to be replayed back. The same applies to slow requests as well.
8. The entire report can be downloaded as pdf using **Save report as PDF**on top of the page next to the Last updated
Scenarios:
1. Just like a AISG, a search option is available to filter out the entries
2. ID is the build-id
3. NameThen is the scenario name
4. Type shows if it is a functional, performance, or bulk scenario type
5. Initial Time - This shows when the scenario started executing
6. Success/Failure - This shows the list of success test cases and failed test cases, you can click the quick view to see the full list
7. Success percentage - This shows the success percentage
8. Duration - This shows the duration of the scenario run from AIQ. When scenarios are run in parallel, the duration will show the duration of the scenario which took longer. When scenarios are run in sequence, the duration will show the duration of all the scenarios summed up.
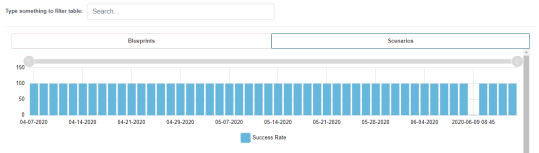You will also be able to view the graphs of history on the success and failure of the scenarios over a period of time
View:
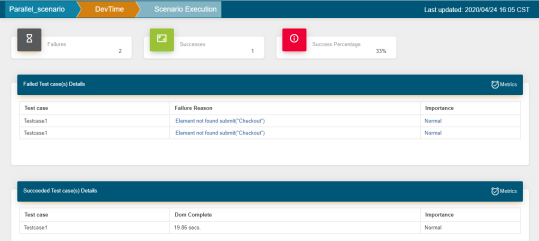1. On top, it lists out the total Failures, Successes, and Success Percentages
2. Failed test case detailed section lists all the test cases that were failed and a one-line Failure reason with the importance set in the Scenario Editor test case section
3. You can expand each of the test cases to look at more details on the failure like Steps, script and resources to download, Failure snapshot, Instant replay to download, Failure snapshot of step highlighted, Trace, and error logs
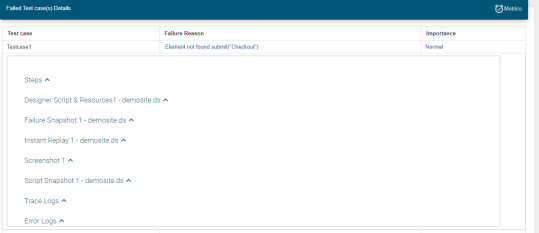
4. Each of the above details can be expanded to look into more details
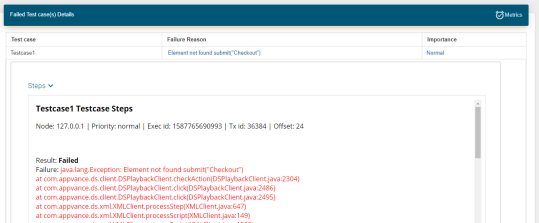 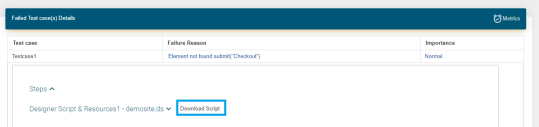 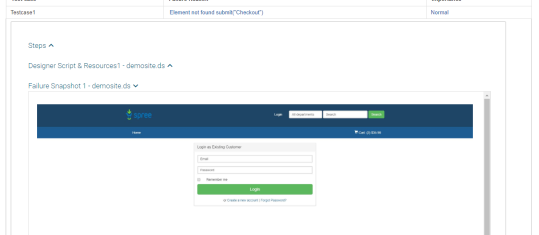 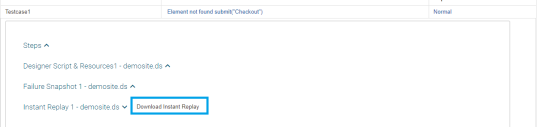
5. The success test case will have the same details excluding the failed screen-shots and failed error logs
6. Previous 5 Execution Pass or Fail - This will give details about a test case consistency over the last 5 executions
Min Actions and Min Pages:
This is an optional field, but if you want to enable it on the dashboards, you should make the following changes.
Based on the entries from the user, min pages, and min actions, the build would be marked as success or failure.
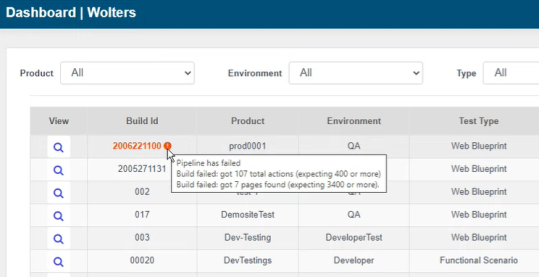In order to have these changes on dashboards, please modify the build.xml as follows:
All these parameters are required in order to fully display this feature.
<property name="minSuccessRate" value="95" /> //minSuccessRate to skip set to “0“ zero
<property name="minActions" value="40" /> // set the minimum expected actions in the AISG, minActions to skip set to -1
<property name="minPages" value="30" /> // set the minimum expected pages in the AISG, minPages to skip set to -1
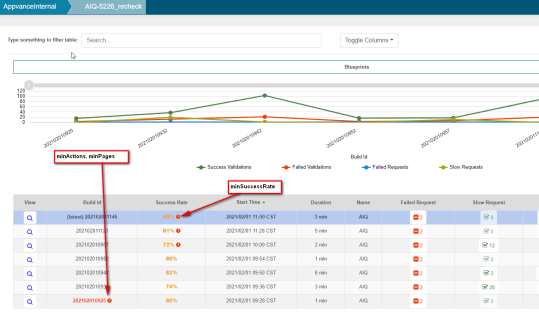This would be used in the below ant tags.
- createBlueprint
- consumeBlueprint
- checkBlueprintResults
---
Last updated: August 14, 2023
If you have any feedback on this topic, please contact us at
# CI/CD: Optimize Disk Space on AIQ Controller and Test Nodes
# CI/CD: Optimize Disk Space on AIQ Controller and Test Nodes
Use this article when CI/CD activity or frequent AIQ executions consume disk space on the Controller or Test Nodes. Clean up only approved files and keep execution evidence required for reporting or troubleshooting.
## Common disk consumers
- Execution artifacts, screenshots, videos, logs, and downloaded files.
- Browser caches, temporary folders, package-manager caches, and build outputs.
- Old installers, archived reports, and unused test assets.
- Database backups or exports stored on the same host.
## Safe cleanup workflow
1. Measure disk usage before deleting anything.
2. Confirm the retention requirement for evidence, reports, logs, and backups.
3. Remove only files that match the approved cleanup target and date range.
4. Automate cleanup through CI/CD or scheduled maintenance only after the manual process is verified.
5. Run a small AIQ execution afterward to confirm the node and controller still operate normally.
**Warning:** Do not delete active execution folders, current logs needed for troubleshooting, or database files unless the maintenance plan explicitly covers them.
*Last updated: October 8, 2026*
# CI/CD FAQ for AIQ Integrations
# CI/CD FAQ for AIQ Integrations
**Last reviewed:** September 21, 2026
This FAQ summarizes common questions for running AIQ tests from CI/CD pipelines. Use current integrations such as Jenkins, GitHub Actions, and command-line execution.
## When to use this guidance
- You are wiring AIQ tests into a build or release pipeline.
- You need to pass parameters, trigger executions, and collect results.
- You are replacing older CI references with current terminology.
## Recommended approach
1. Decide which pipeline system will trigger AIQ and what environment it targets.
2. Store AIQ credentials or tokens in the CI/CD secret store.
3. Pass project, scenario, dataset, environment, and threshold parameters explicitly.
4. Publish execution IDs, reports, and failure summaries back to the pipeline.
5. Use exit codes or quality gates so failed tests block releases when appropriate.
**Note:** Retire duplicate CI pages when they repeat this FAQ without adding tool-specific steps.
---
Last updated: September 21, 2026
If you have feedback on this topic, contact .