# JMeter Integration and Testing
# JMeter Integration and Testing
Contents:
- [Running JMeter Scripts](/books/integrations/page/running-jmeter-scripts)
- [Correlation in JMeter with an Example](/books/integrations/page/correlation-in-jmeter-with-an-example)
- [Data Enabling in JMeter](/books/integrations/page/data-enabling-in-jmeter)
- [JMeter FAQ](/books/integrations/page/jmeter-faq)
# Running JMeter Scripts
Appvance IQ is a system that supports running many test types like SoapUI, Selenium, Appvance Designer Script, Java, Groovy, and more.
SoapUI support was removed in release 5.2.0 of AIQ.
In addition to the above list, AIQ also supports running JMeter scripts. Below are the steps that we need to follow to run the JMeter scripts from AIQ.
1. Navigate to the AIQ Home screen and click Build
2. Click File ->New to create a new scenario
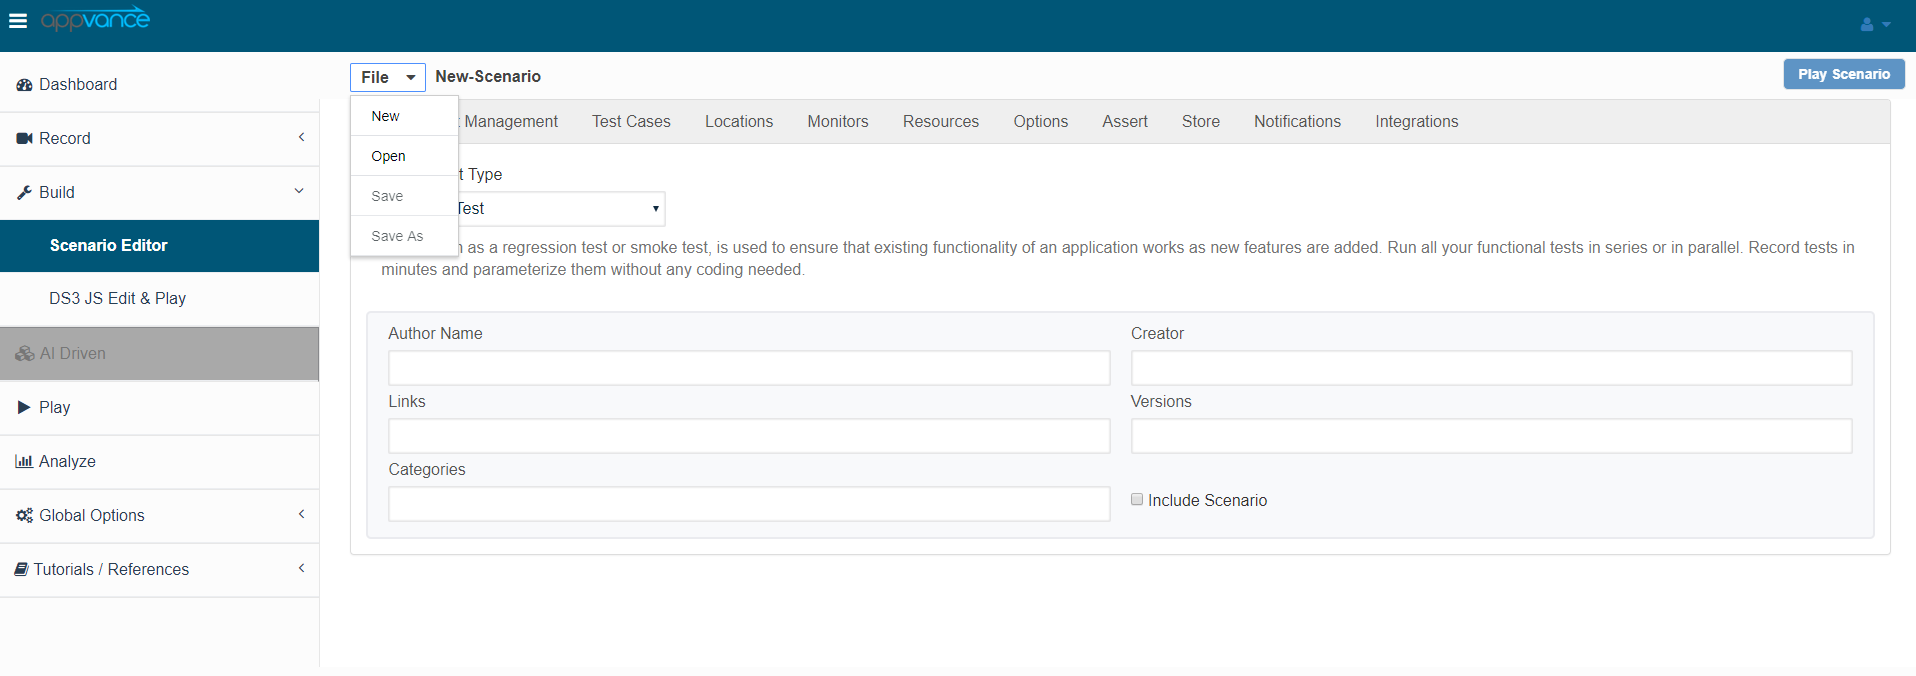
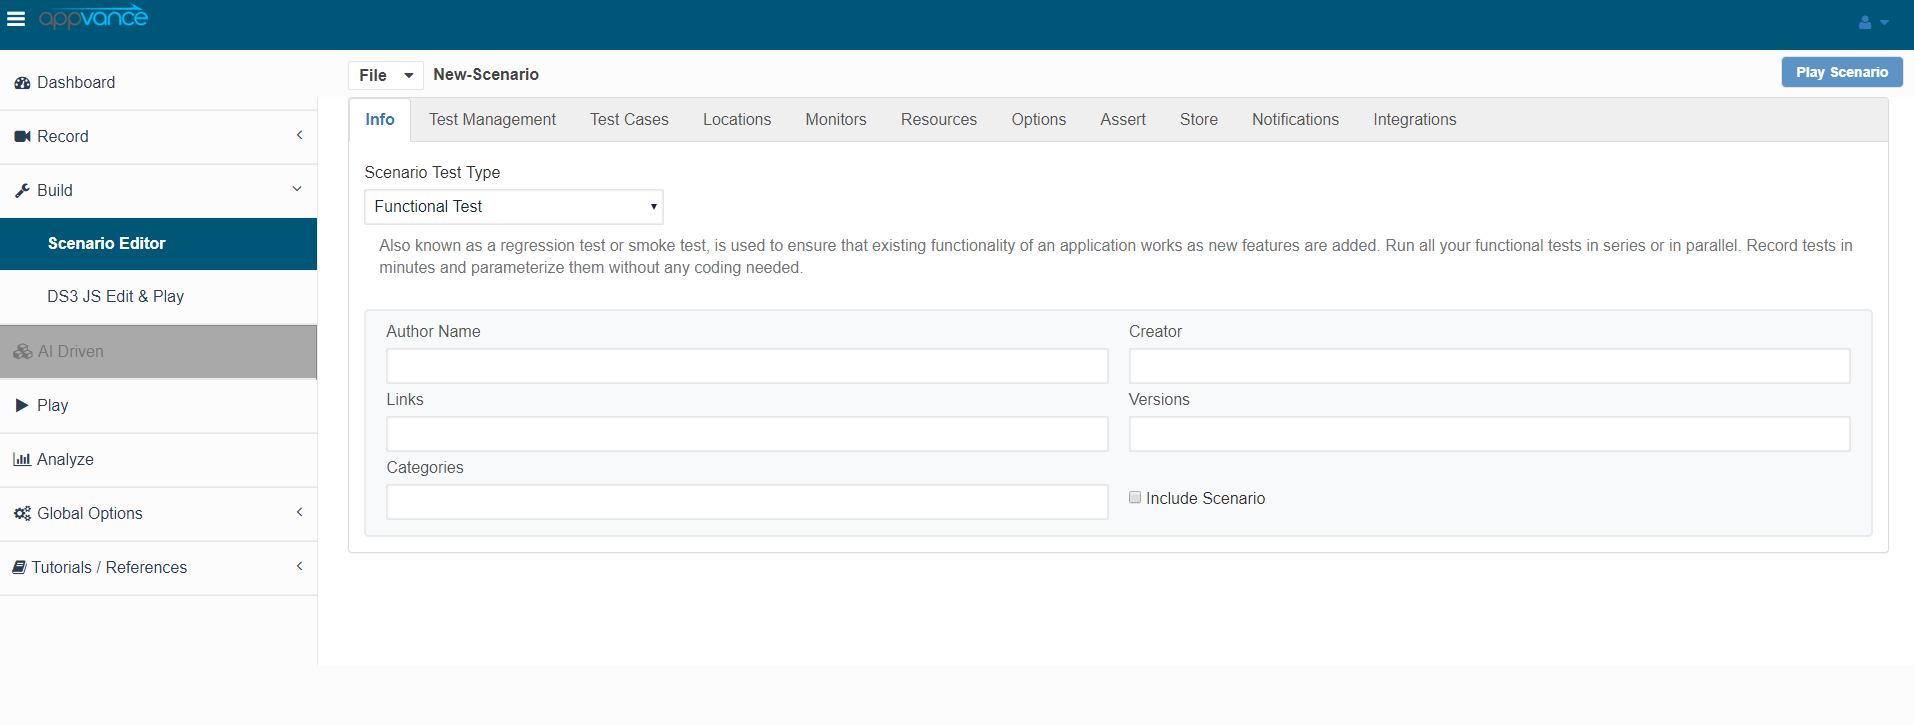
3. Select Functional Test from the Scenario Test Type drop-down
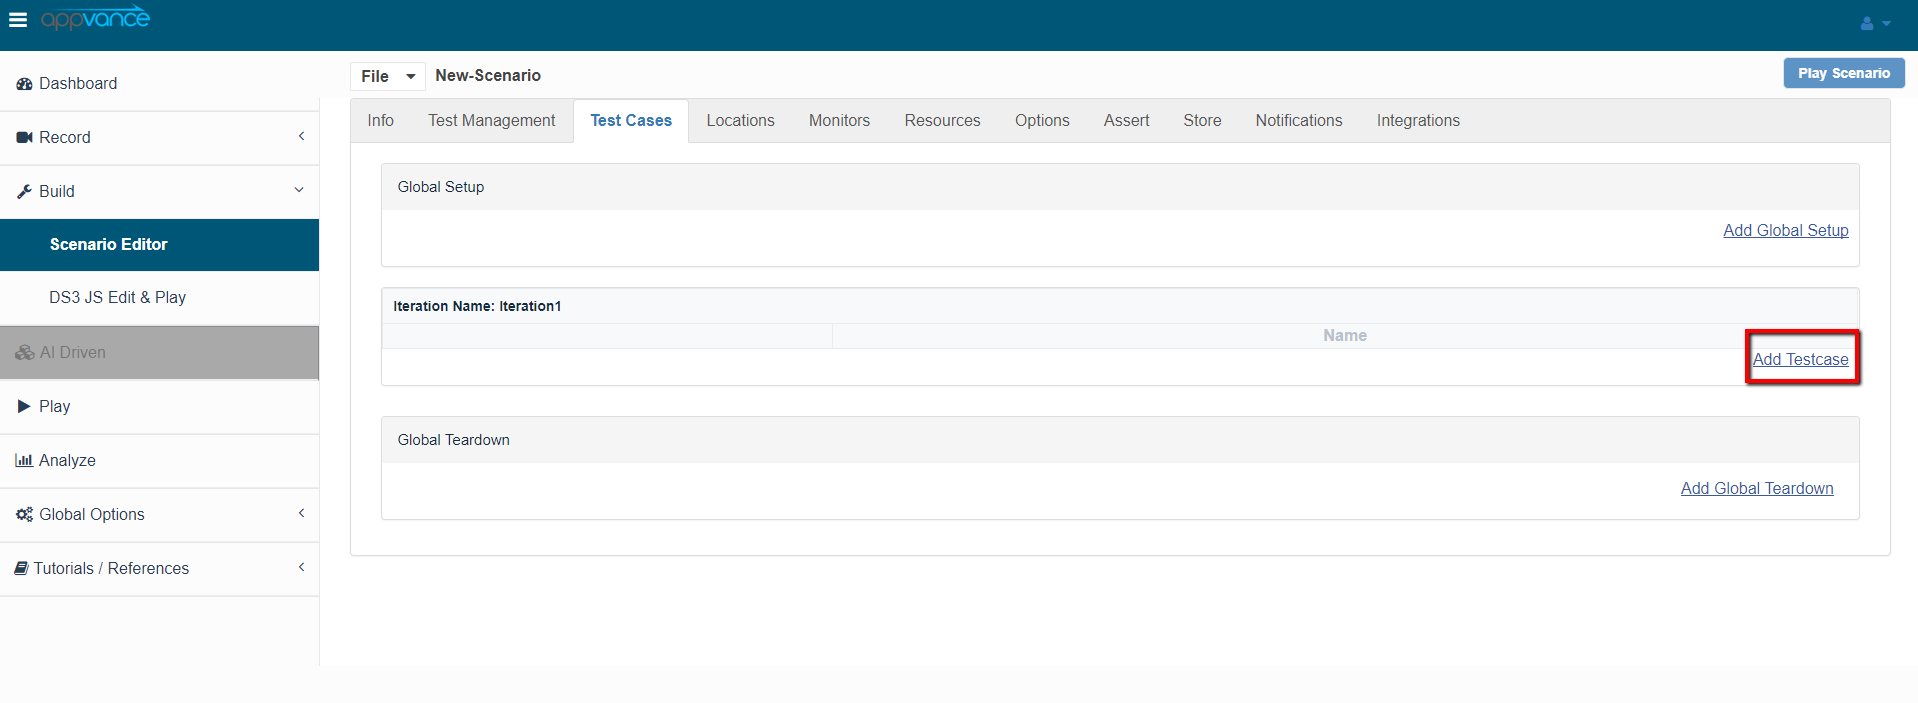
4. Click the Test Cases tab and click the link for Add test case as shown below in the screenshot
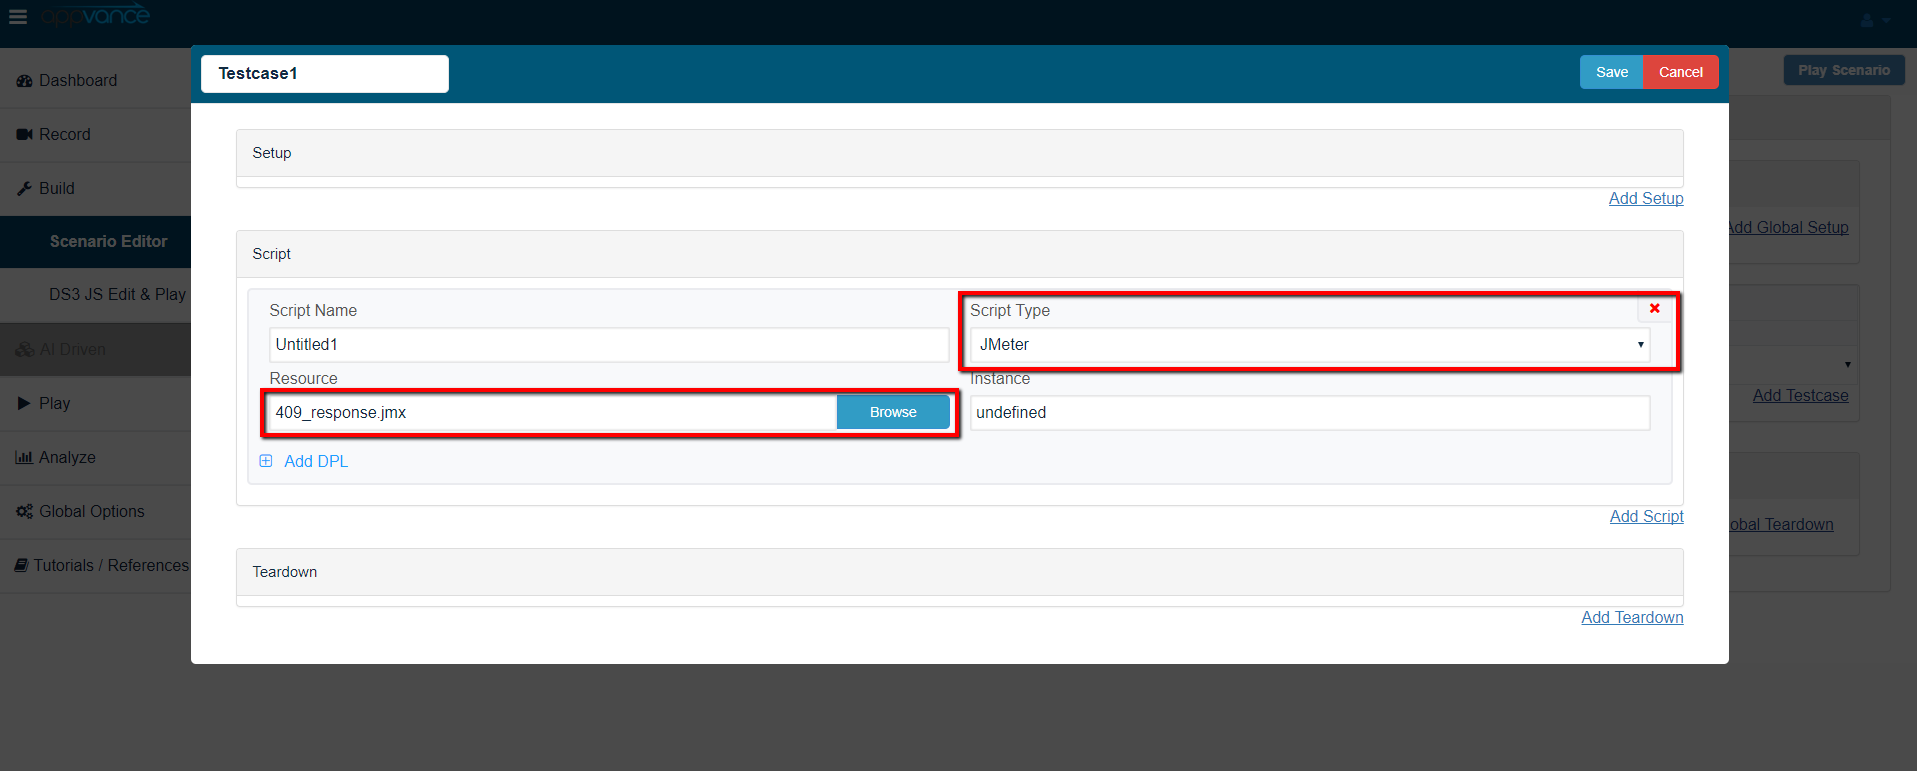
5. Browse the JMeter script, the JMX file, and save the test case
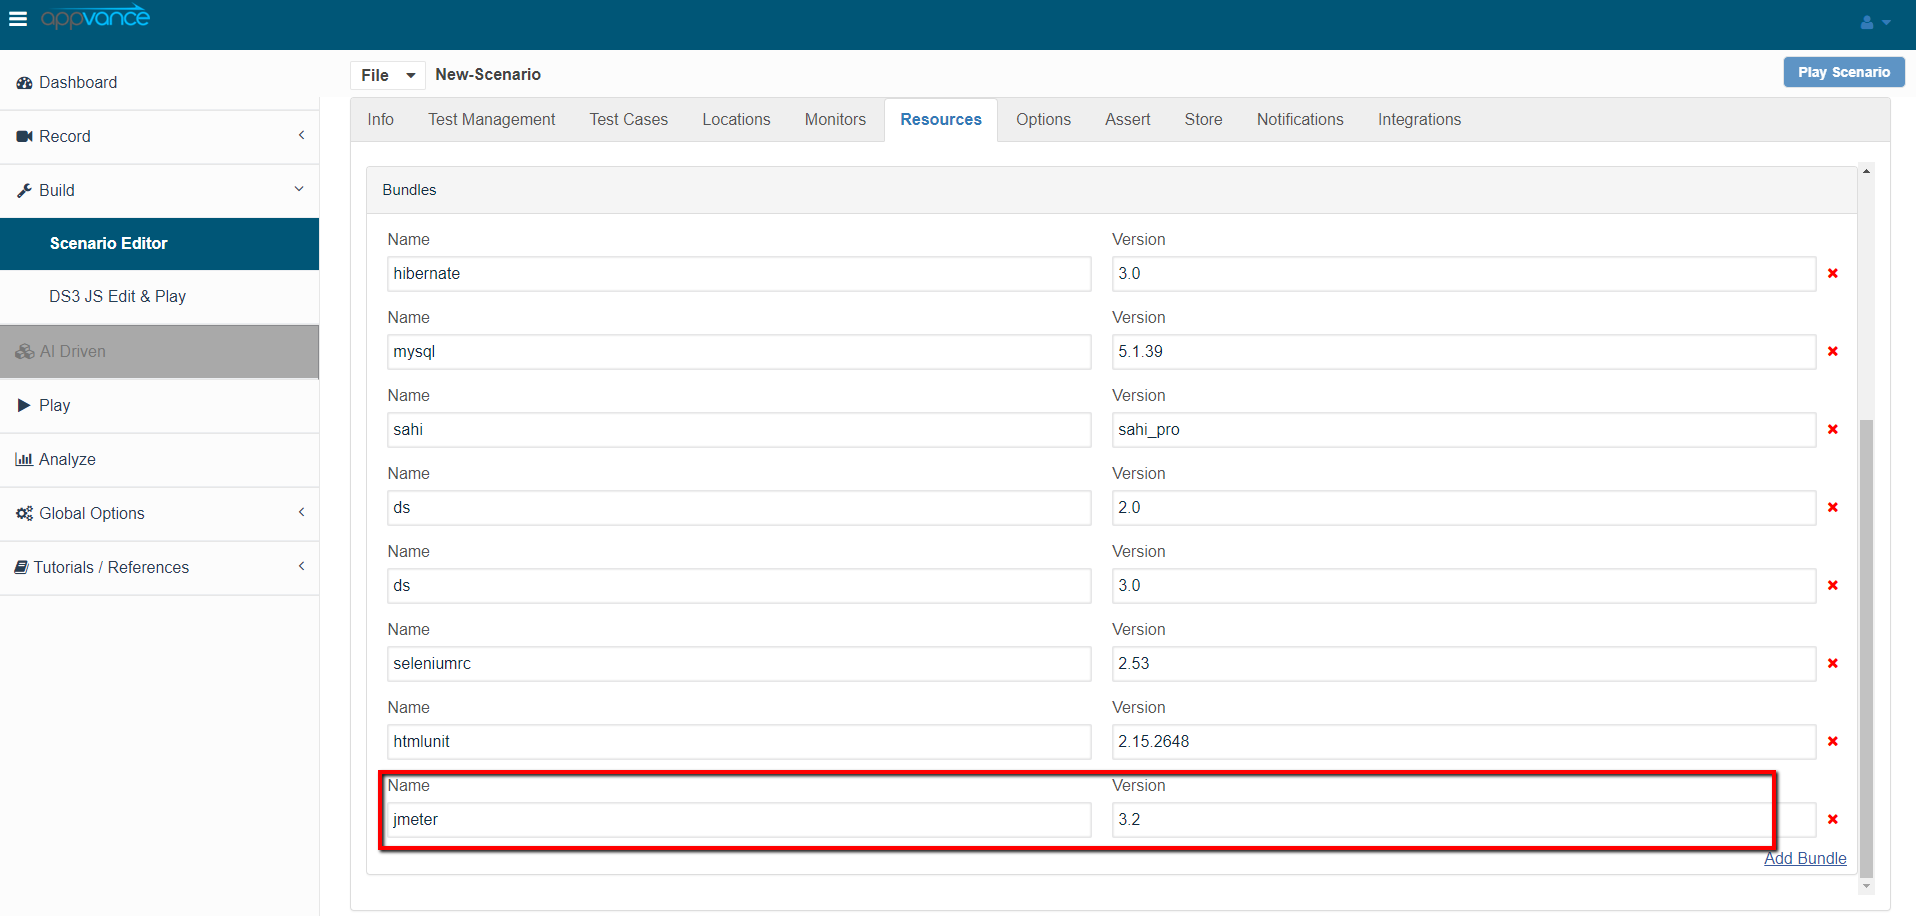
6. Navigate to Resources and make sure the JMeter bundle with version 3.2 is added by default
7. Also make sure the resources are added with name, Type, and the correct path of the file as seen in the below screenshot
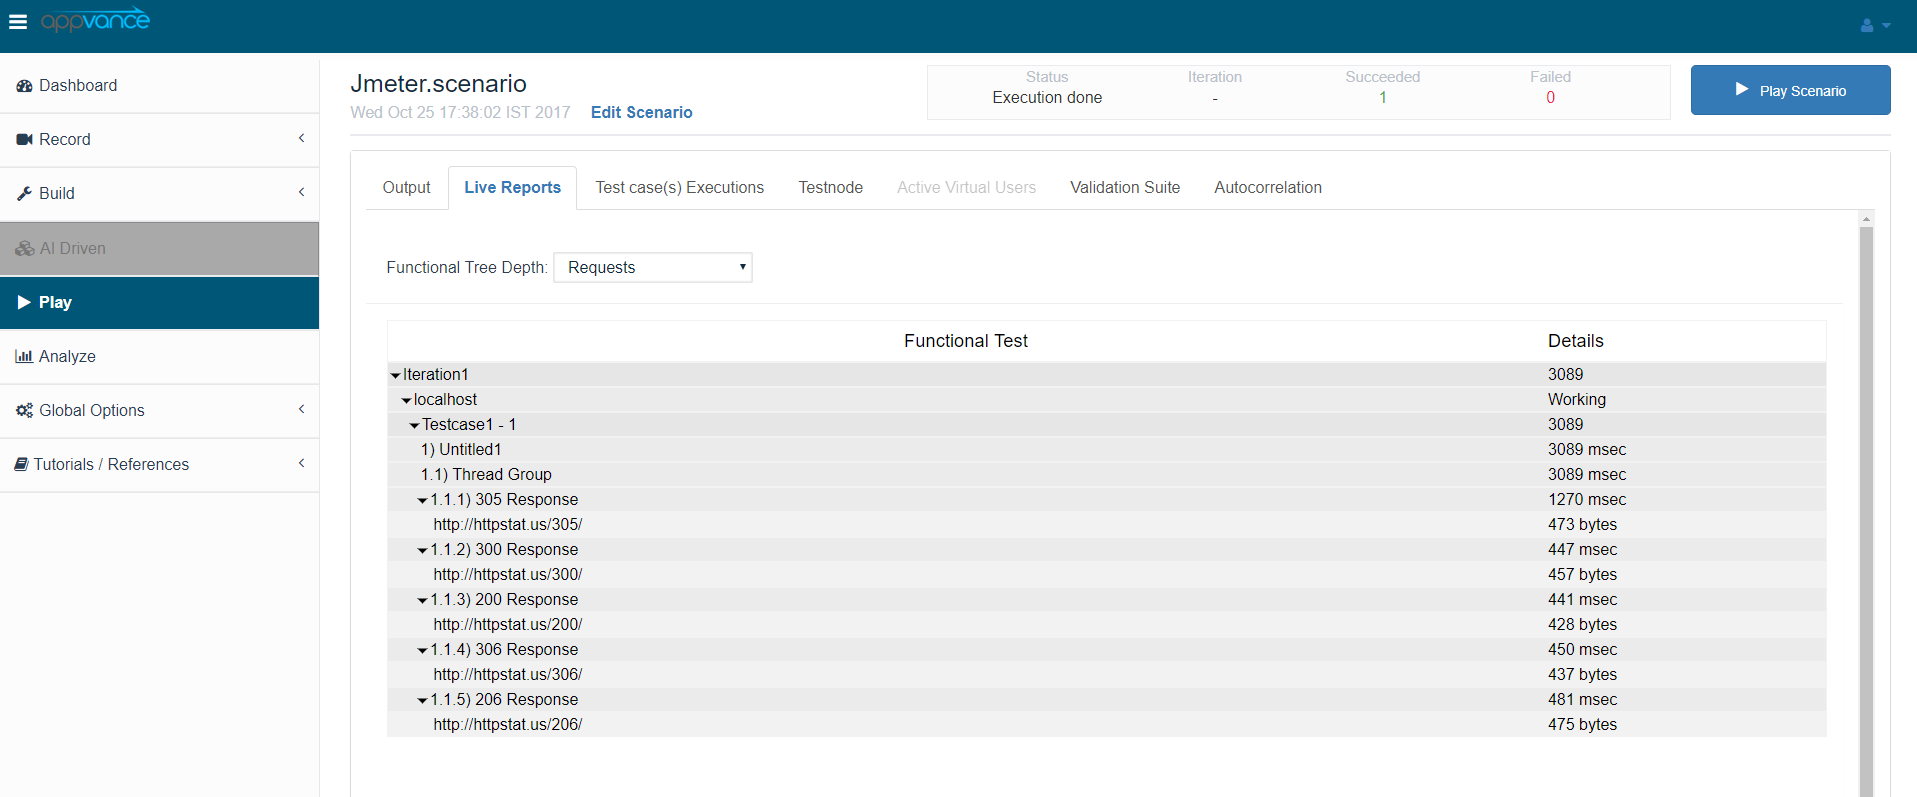
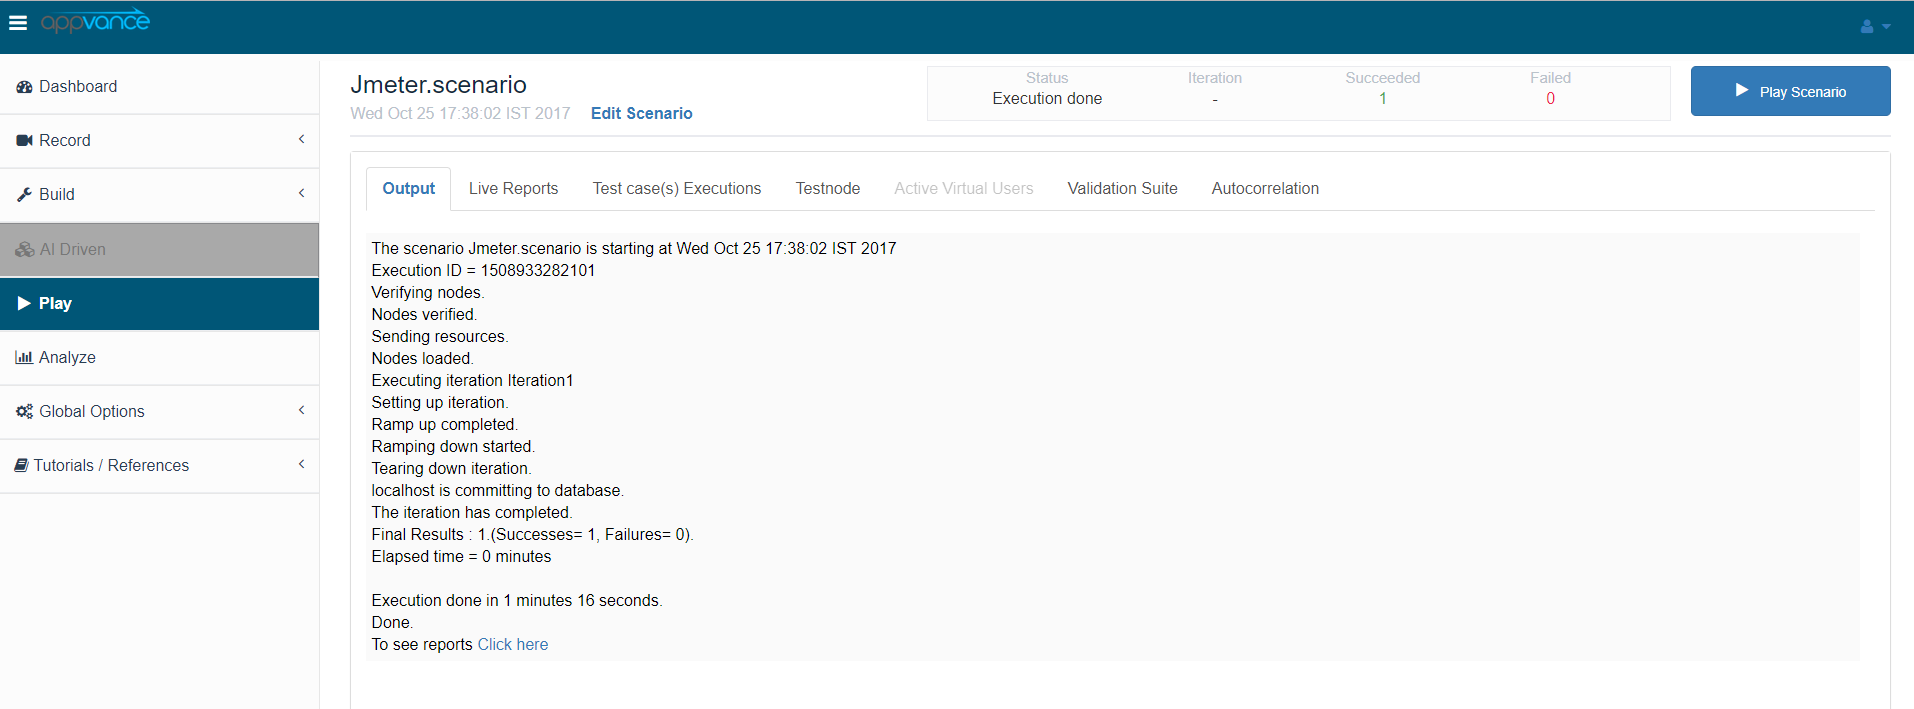
8. Click Play Scenario from the top navigation bar and the Controller window will open in a new tab that displays the tests running and will display the pass/fail status of the tests upon the test completion as seen in the below screen-shot. The left part shows the steps and the duration in milliseconds and the right side shows the test run status under the Output tab. On The transactions tab, we can find the request/response and an error tab to drill down further
9. Click the Click here link to get to the list of Reports that Unified Test Platform supports
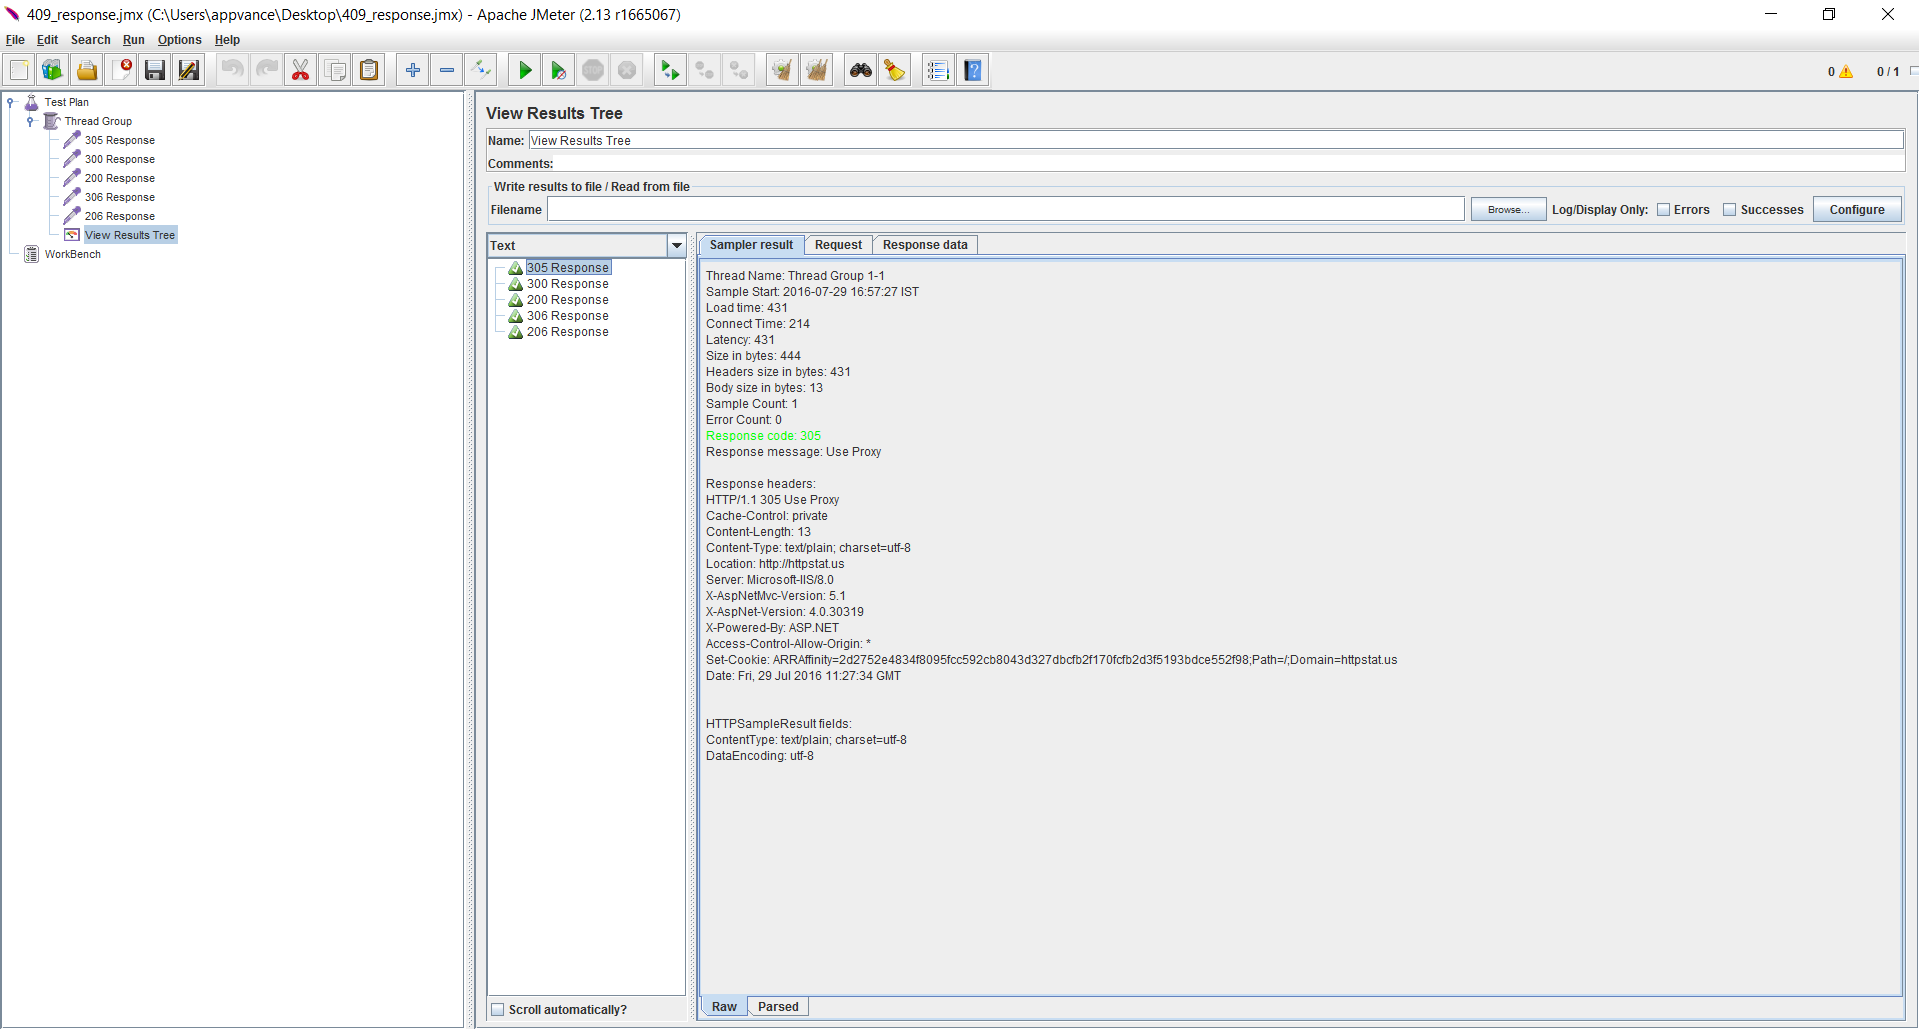
10. You can also cross verify the same by running the tests using Apache JMeter
---
Last updated: July 25, 2024
If you have any feedback on this topic, please contact us at
# Correlation in JMeter with an Example
What is correlation and why it is required?
Correlation is the most important aspect of scripting. It generally includes fetching dynamic data from preceding requests/calls and posting it to the subsequent requests.
Let's take an example to find out why exactly we need correlation
Suppose we have recorded a scenario in which
- The user enters login details and clicks the OK button
- The home page opens and the user takes further actions
Now, if we just playback this script, the test will fail even for a single user. This is because of the authentication mechanism used. When we log in to a website, session variables are dynamically created. These session variables are passed to the subsequent requests and help validation and authentication of the actions performed. So, one cannot just record and playback the requests having these variables. Here, we need to correlate the web requests with the dynamic variables. And for correlation, we need to use the "Regular Expression Extractor" which makes use of regular expressions.
A brief insight into regular expressions
Regular expressions are used to fetch data from a string based on a search pattern. Basically, what we do is in order to extract any value (generally a dynamically created value) from a string (text response), we define a left bound of the variable than some wildcard characters and then a right bound (Left Bound)(Wildcard Characters)(Right Bound)
For example: If we have a text response like;
.......\_\_EVENTVALIDATION"value="weriudflsdfspdfusdjfsisdpfjpsdfohsdihffgdfgpdfjsdjfpj" />...
And we need to extract the value of the Event validation variable using regular expressions; the regular expression for the same will be
\_\_EVENTVALIDATION" value="(.+?)" />
where, Left Bound = \_\_EVENTVALIDATION" value="
Wildcard characters = (.+?)
Right Bound = " />
If you do not want to get deeper into regular expressions, then the wildcard characters (.+?) would suffice in most cases.
For more information on regular expressions and meaning of each wild card character visit;
[http://www.regular-expressions.info/tutorialcnt.html](http://www.regular-expressions.info/tutorialcnt.html)
Regular Expression Extractor
Coming back to JMeter, consider an example where we have two operations-
1. The user launch website
2. The user fills in details and clicks on the OK button
Now, the call user launch website creates a dynamic variable event validation that we can check in the Response Data tab of the "View Result Tree" listener for the call. The value of this variable is then passed to a subsequent call related to "User fill details and click OK button" as an HTTP post parameter.
Steps for correlating the Event validation values
1. Run the script containing both the above-stated operations
2. Go to the Response tab (Text mode) in the "View Result Tree" listener of the "User launch website" operation. BTW, we see the second operation "User fill details and click OK button" in red because it is not yet correlated
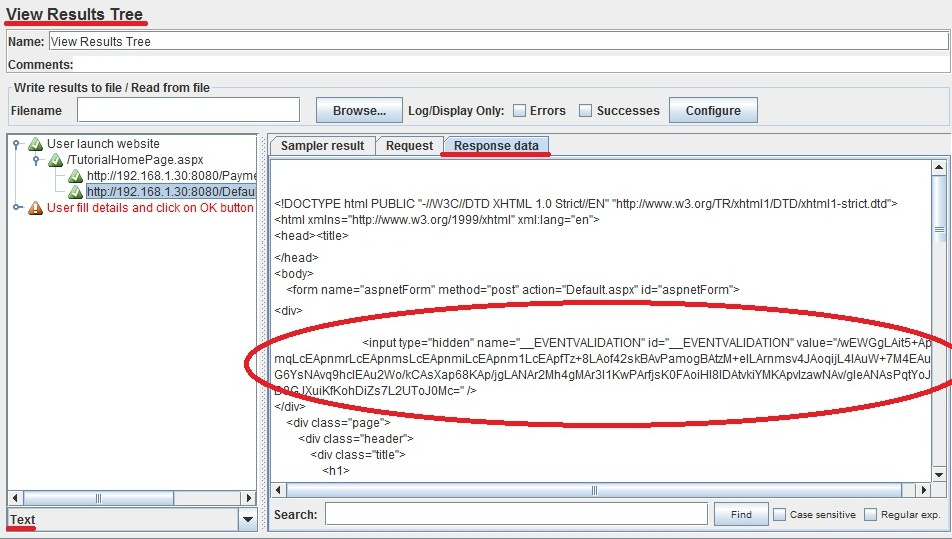
3. Create a Regular expression for extracting the value of the Event validation variable's value. As stated above the R.E. for this will be-
\_\_EVENTVALIDATION" value="(.+?)" />
4. Go to HTTP request under "User Launch Website" transaction controller -> Add -> Post Processor -> Regular Expression Extractor.
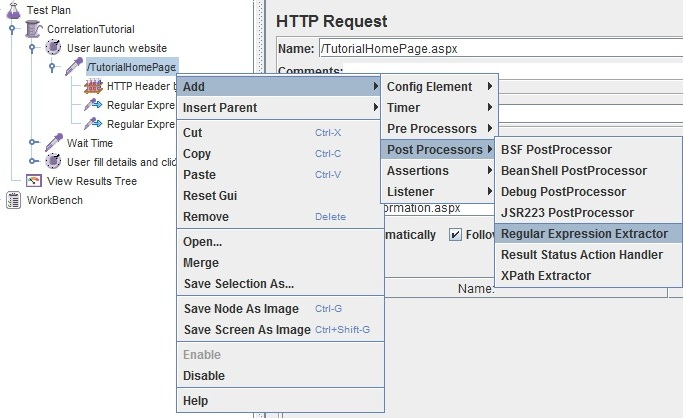
Adding "Regular Expression Extractor" control
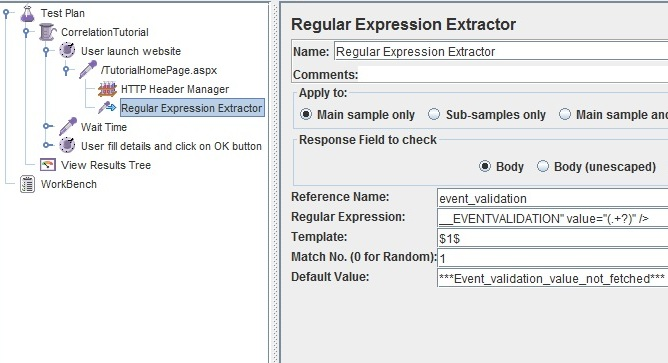
R.E. Extractor Parameters Filled
5. The reference name inserted is the name of the variable created that will capture the Event validation value generated by the HTTP request under the "User launch website" operation
6. Now pass this variable to the subsequent HTTP request under "User fill details and click OK button" as a post request- overriding the already present hard-coded value of the Event Validation variable.
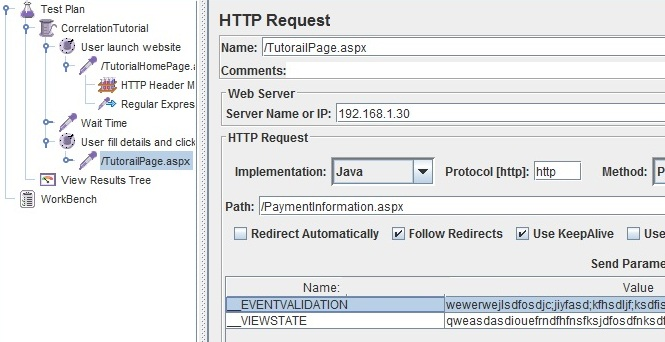
Request without correlation (Hardcoded values)
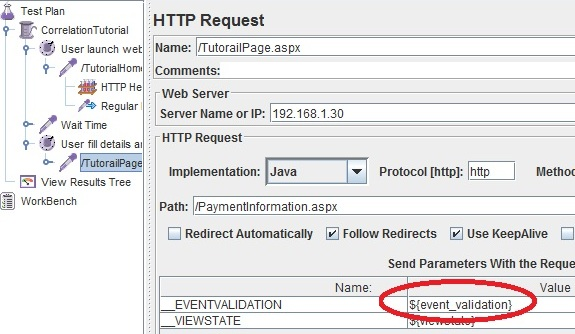
Request with correlation (Dynamic values)
7. Run the test plan again. All green? That's it.
This was all about correlation. In order to get a good understanding of correlation (or scripting for that matter), we need to have a good understanding of two things- the dynamic variables generated by the programming languages and Regular expressions.
**SPREE APP**
Let us take a working example of a Spree App where we will be recording the application and then correlating it
The URL for this Spree App is given below :
http://52.42.228.15:8888/
We will be using the above URL to record the below actions
1. Navigating to the home page
2. Navigating to the Login page
3. Entering credentials and clicking on Submit
4. Clicking on ruby-on-rails-tote
5. Adding to Cart
6. Clicking on Products
7. Clicking on apache-baseball-jersey
8. Adding to Cart
9. Clicking on MyAccount
10. Navigating to the Home page
11. Logging out
Actions from Step 5 to Step 7 may be repeated depending on the requirement of the user. Once the above action is recorded user runs the recorded and checks the Output as shown below.
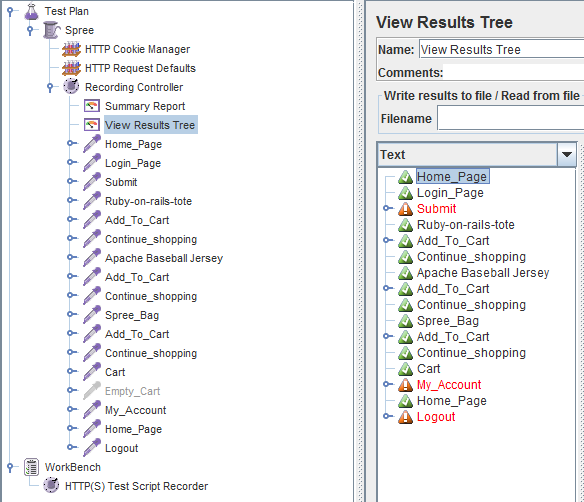As you can see from the above screen-shot there are a few requests like “Submit”, “My Account” and “Logout” that have failed.
By Checking the “Login Page” response data we find that there is an authentication token that is generated that is unique and should be used for all the failed transactions. The screenshot is given below.
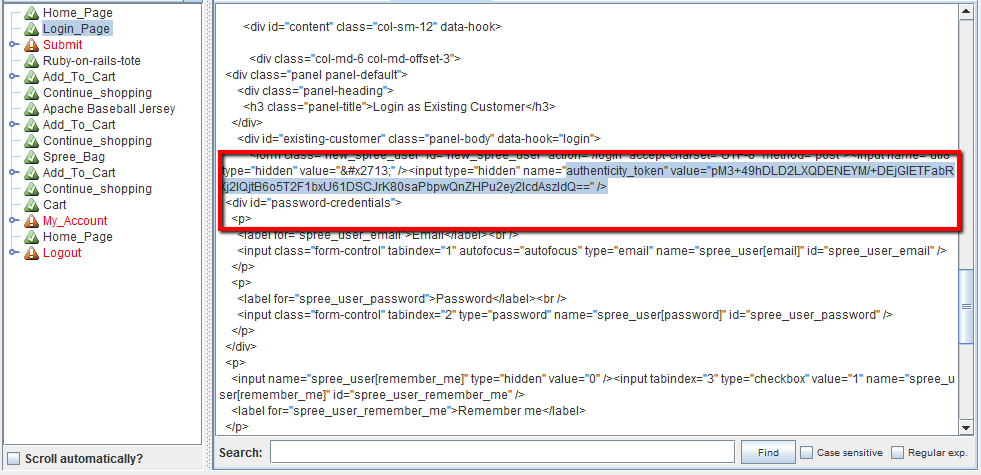As shown above we will have to use the Regular Expression extractor to extract the token and to be used in the Submit transaction.
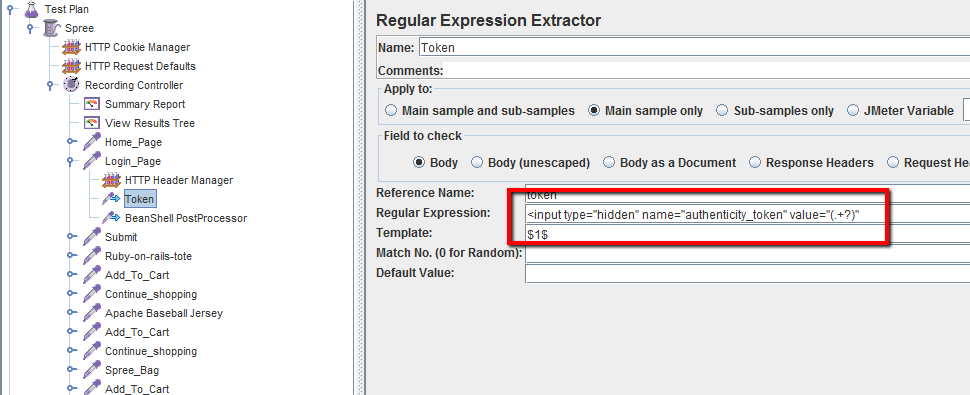The Reference name should be noted and the same should be used in the Submit transaction as shown below.
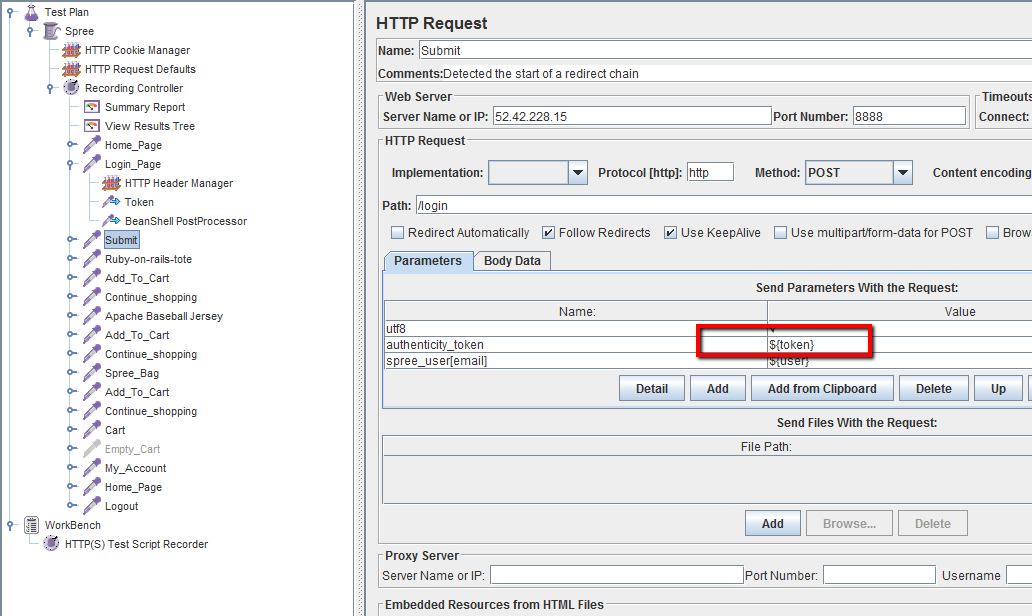Replace the same in the transaction which needs the Authenticity token. Save the script and run the test again.
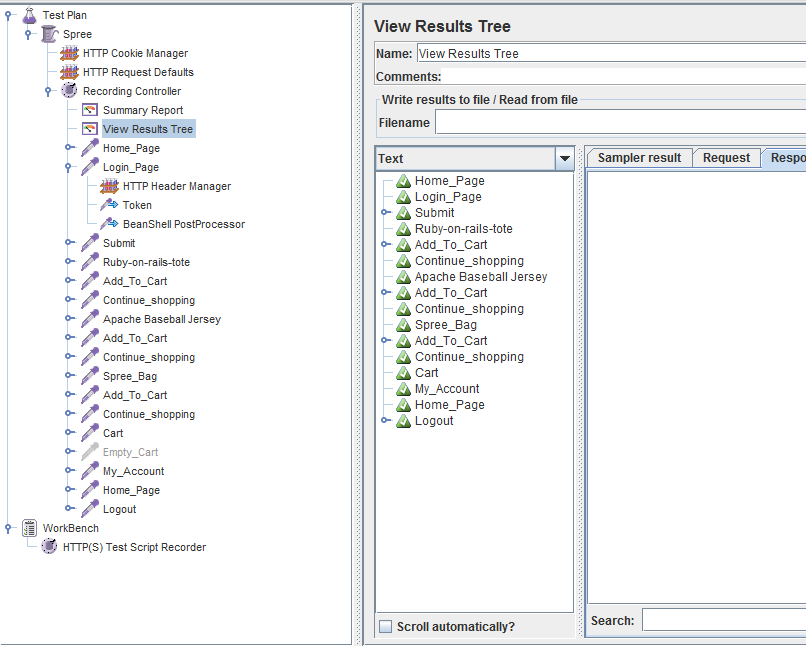Since we have extracted the token and used it in the transactions wherever necessary all the steps would now pass.
---
Last updated: October 16, 2026
# Data Enabling in JMeter
We will follow the below steps to Data enable the JMeter script and run it successfully in AIQ.
1. Create a JMeter script that works fine in JMeter and run the same in AIQ to make sure that the script is working fine. The screenshot of the working script is given below
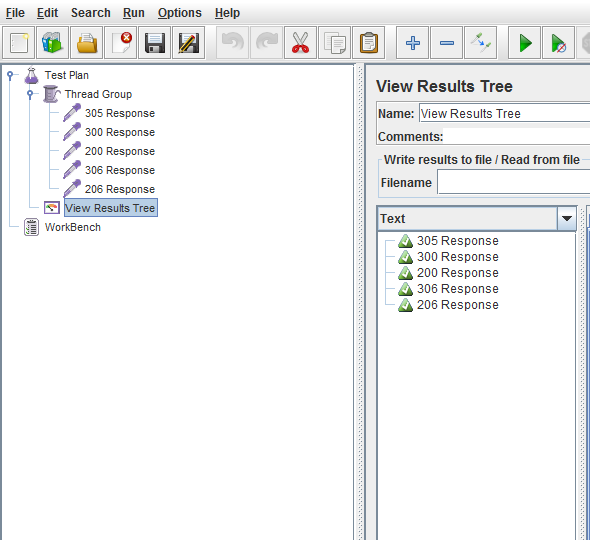
As from the above example, there are multiple websites that are used in the script. We can store all the above websites in a CSV sheet and have JMeter access the websites from the CSV sheet. The next step would be to data enable the JMeter script and make sure it runs fine.
2. The next step would be to remove all the individual websites and store that in a CSV sheet and create a single HTTP request and have it access the website from the CSV. Please follow the below steps
Create a CSV sheet with "Sites" as the column name and all the website details below it as shown below
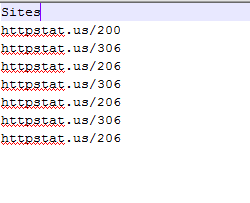
Add a CSV Data set config and enter the following details
Right-click the thread group - Select Add - Select Config element - Select CSV Data Set Config.
Note: Please make sure to use the data.csv file in the same location as the .jmx project and also CSV Data Set Config should be available on top of HTTP Request.
Filename: Enter the name of the file
File encoding: Should be left blank
Variable Names: Should be left blank, If given data will be picked from the first column and the first entry in the CSV "SItes" will be picked and the script will fail
Delimiter: Comma
Add a new HTTP Request Sampler and Use the column name of the CSV sheet in the "Server Name or IP" as shown below
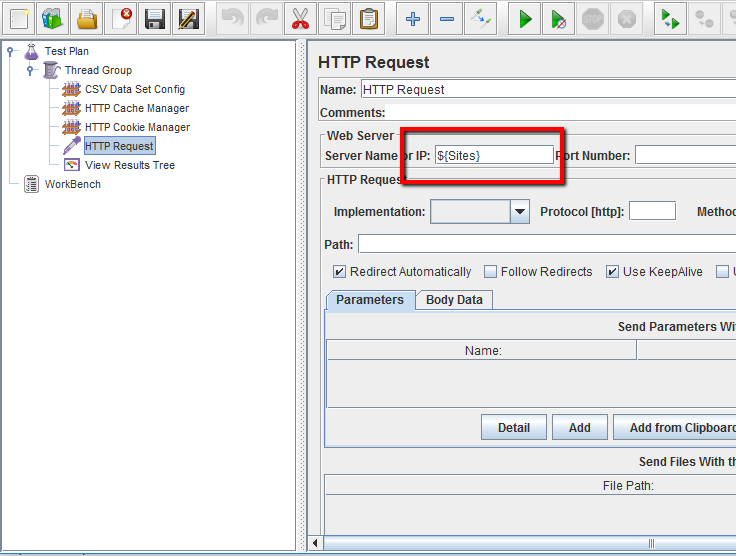
Once the above setting is done the script is data enabled successfully. Run the script and check in the results tree
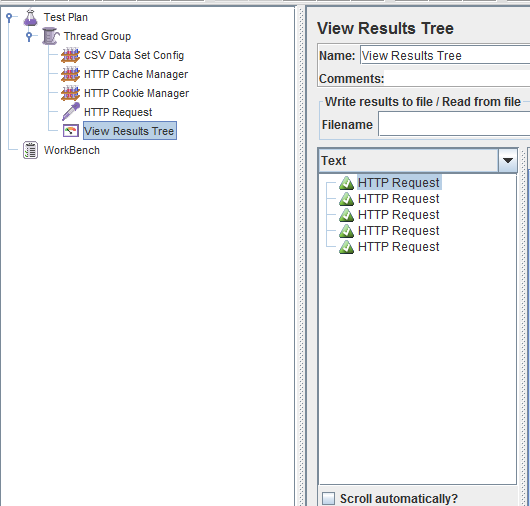
All the values from the CSV have been picked successfully.
3. Run the Same script in AIQ. Steps are given below
Login to AIQ and click Build and Click File→New
Select the Scenario test type as the Performance test
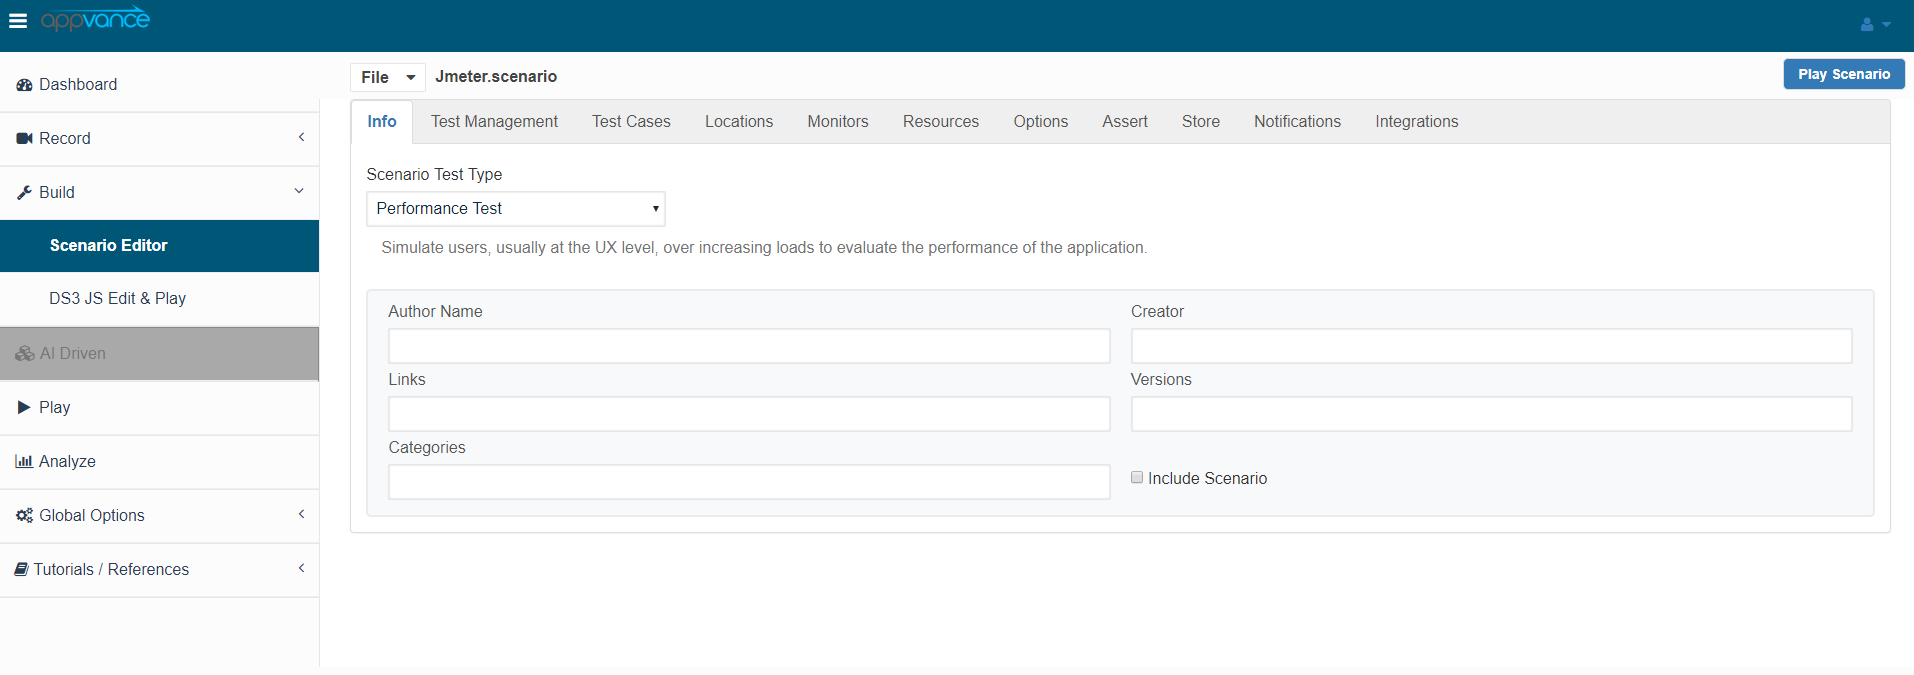
Select the completion criteria as "Executions per user"
Go to the Test cases tab and click "Edit" browse the JMeter script and select the JMeter file
Go to Resources Click "Add Data Source" and browse the CSV file
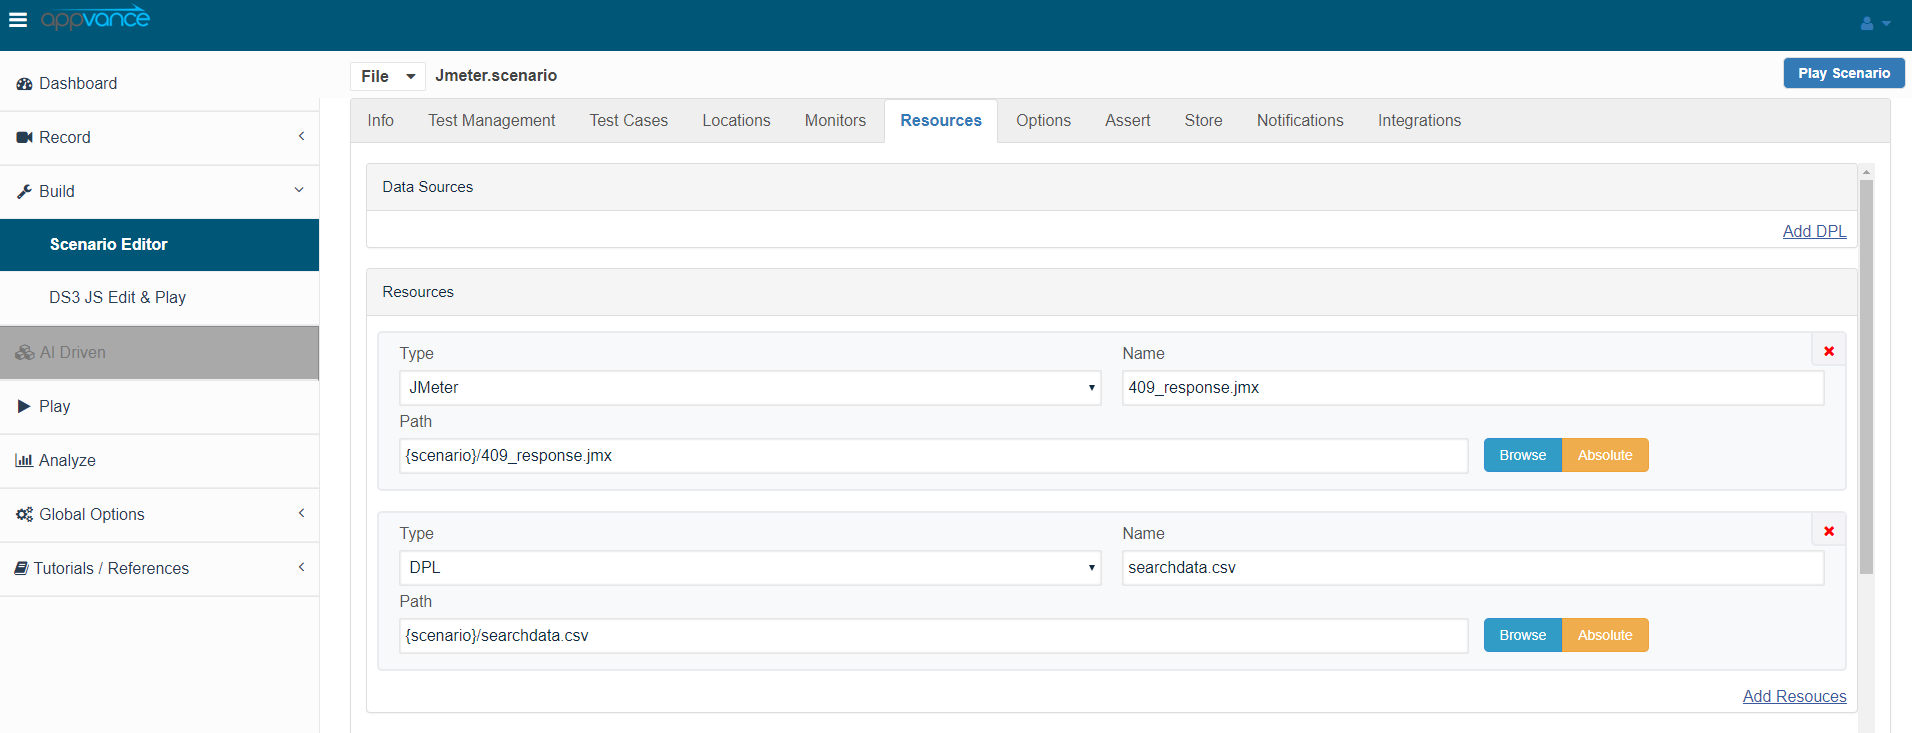
Save the scenario and run the test.
Check the controller page and verify if the data is getting pulled from the CSV
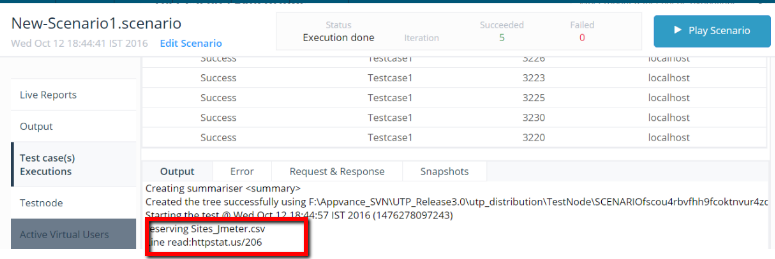
For Appvance IQ Reporting purposes, instead of reporting different values of a data-enabled script that causes duplicate entries, the parametrized step can be displayed as a variable name that way it does not show them as different steps instead it shows as a summary of those steps just like Appvance IQ designer enabled scripts, below are the steps for the same:
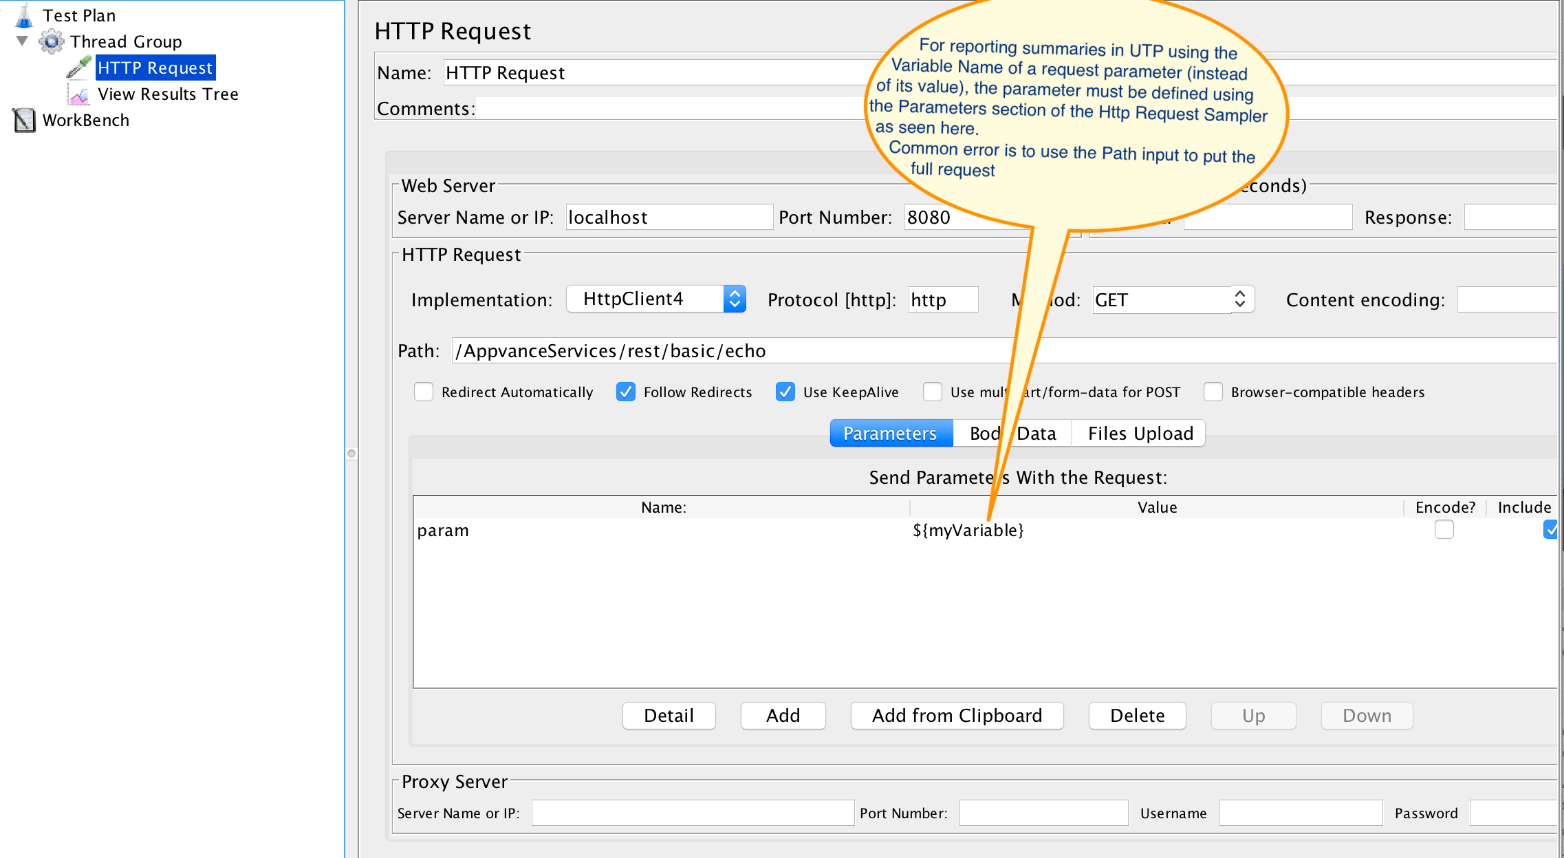
The usage recommendation for dynamic parameters on how to add parameters so the Appvance IQ report will report the variable and not the different values. Basically, you have the URL's path and a parameters section. You should not put the query part in the path if you want to get a proper report using variable in Appvance IQ. The URL query parameters should go in the parameter section, for both POST and GET requests.
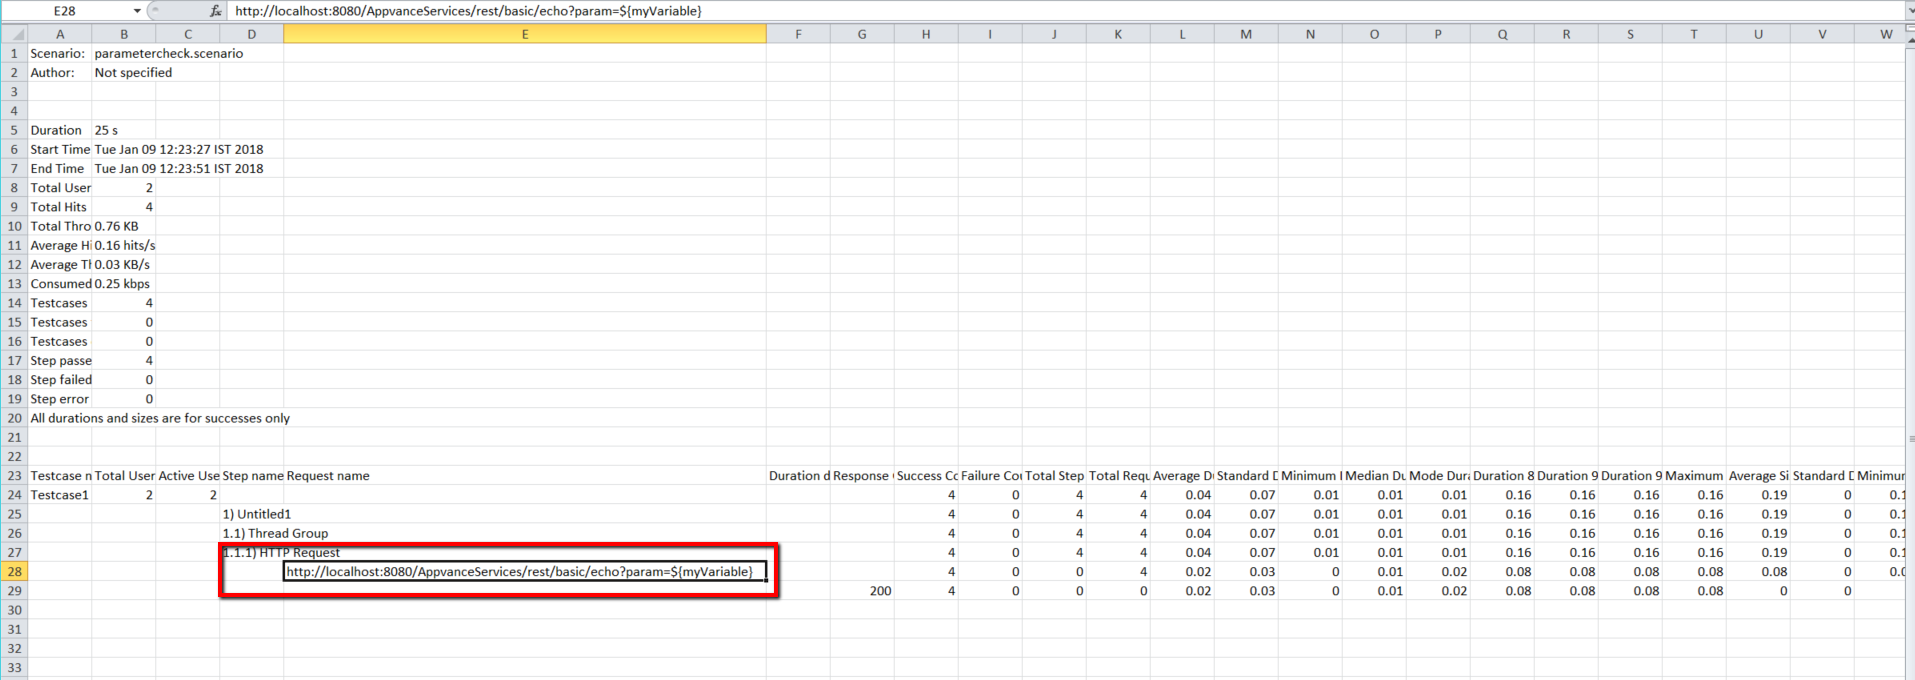
You can notice in the below reporting, it displays as one step else this would have been displayed as 4 different steps with 4 different values taken from the datasheet.
---
Last updated: October 16, 2026
If you have any feedback on this topic, please contact us at
# JMeter FAQ
1. File Downloads from JMeter
2. How to run Jmeter DB script in AIQ
3. Jmeter - Java.lang.RuntimeException: Could not find the TestPlan class! Getting this error while running the scenario from AIQ.
4. JMeter - Note able to see the transactions in the Reports or Test Controller.
5. Jmeter - Steps Average duration calculation in Appvance IQ
6. Jmeter: Error while running MySQL DB script
7. Running JMeter Scripts in AIQ - Best Practices
8. File Downloads from JMeter
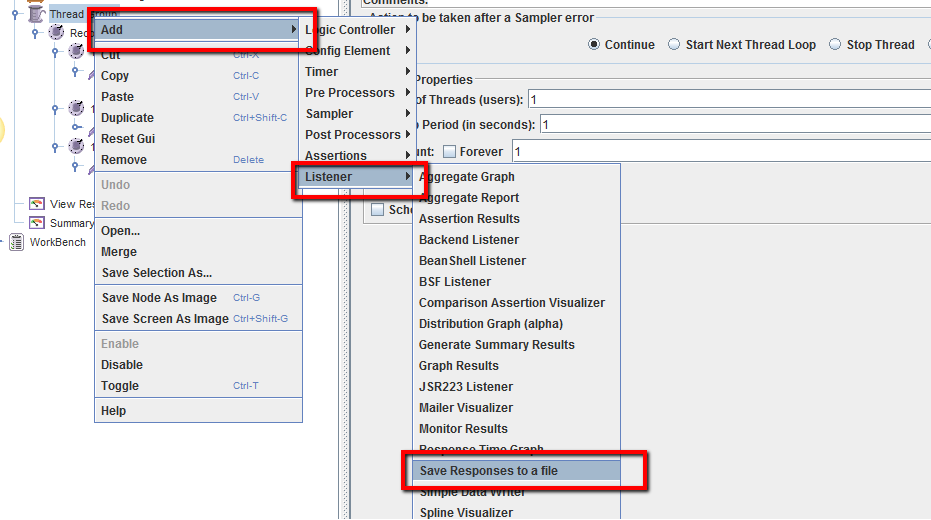
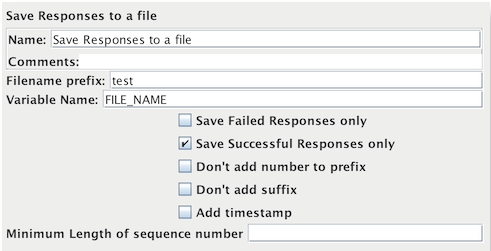
1. In JMeter, we need to add a "Save Responses to a file" listener to save the file downloads, we can provide a file name prefix or even the directory path for the download file.
Please refer to below screenshot on how to add "Save Responses to a file" Listener
For each sample in its scope, it will create a file of the response Data. The file name is created from the specified prefix, plus a number (unless this is disabled, see below). The file extension is created from the document type if known. If not known, the file extension is set to 'unknown'. If numbering is disabled, and adding a suffix is disabled, then the file prefix is taken as the entire file name. This allows a fixed file name to be generated if required. The generated file name is stored in the sample response and can be saved in the test log output file if required.
The current sample is saved first, followed by any sub-samples (child samples). If a variable name is provided, then the names of the files are saved in the order that the sub-samples appear. See below.
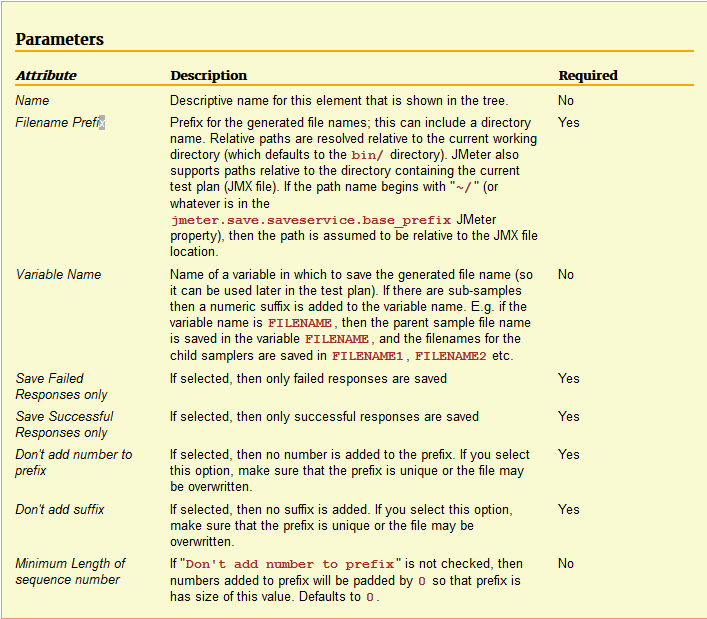
Please find below the detailed description of the parameters used
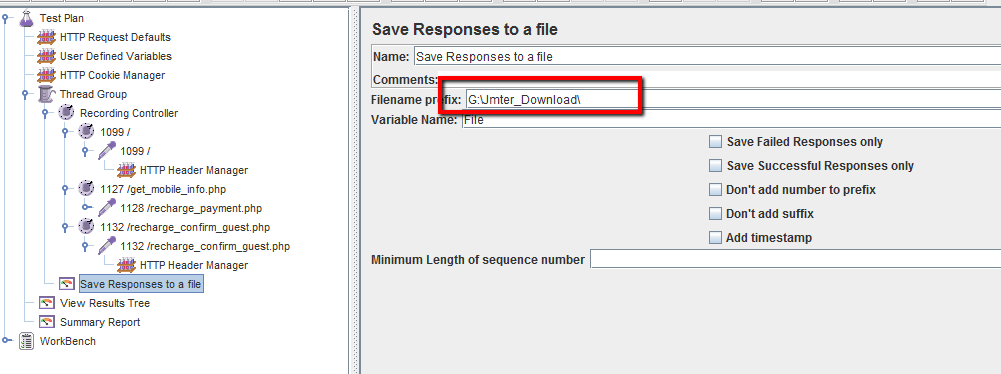
Without providing the path, the file gets saved in the "JMeter/bin" directory.
We can mention the path in the "Save Responses to a file" listener as seen below and this script can be used in Appvance IQ.
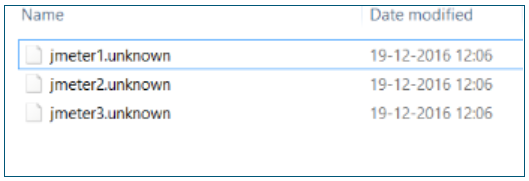
File downloaded after running the scenario from Appvance IQ
9. 
How to run Jmeter DB script in AIQ
1. We assume that the reader has knowledge of how to create a scenario and run the test in AIQ
The user creates a new scenario and selects a functional test
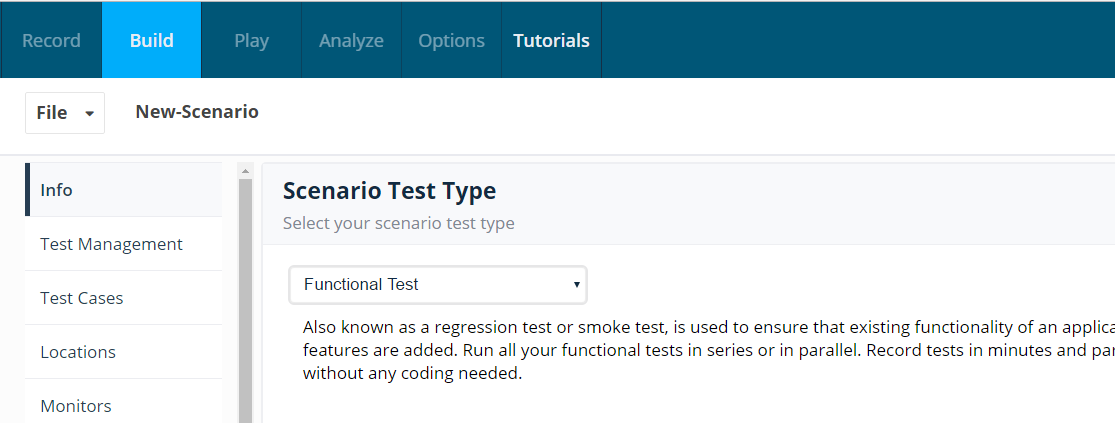
Navigates to Test case tab and selects Test type as "Jmeter" and attaches the Jmeter script which ran successfully in Jmeter
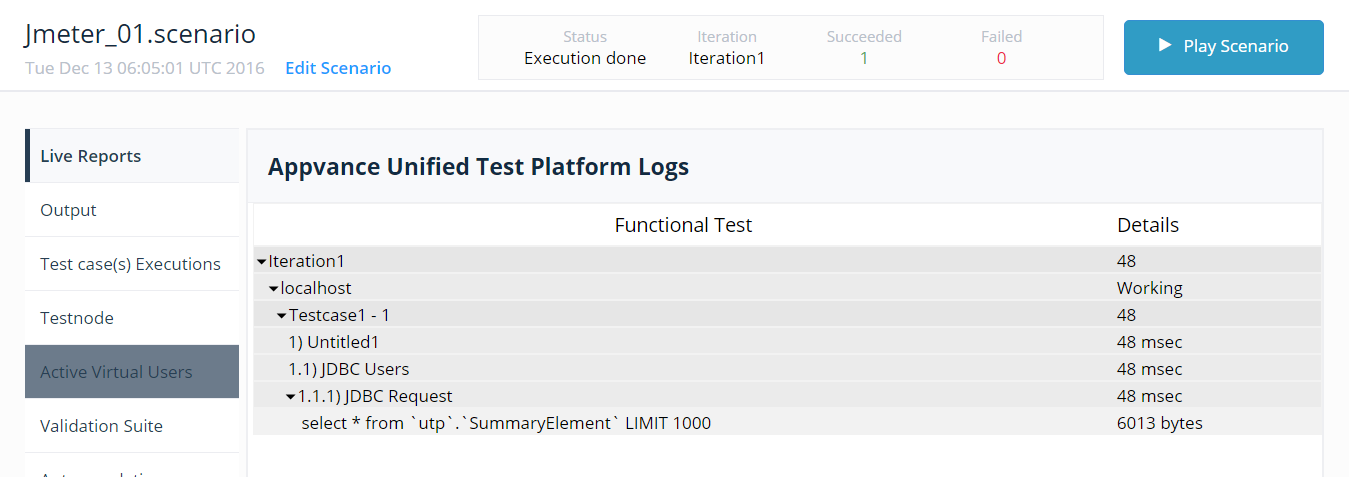
User now saves the scenario and runs the tests and navigates to Test Controller screen and verifies the output
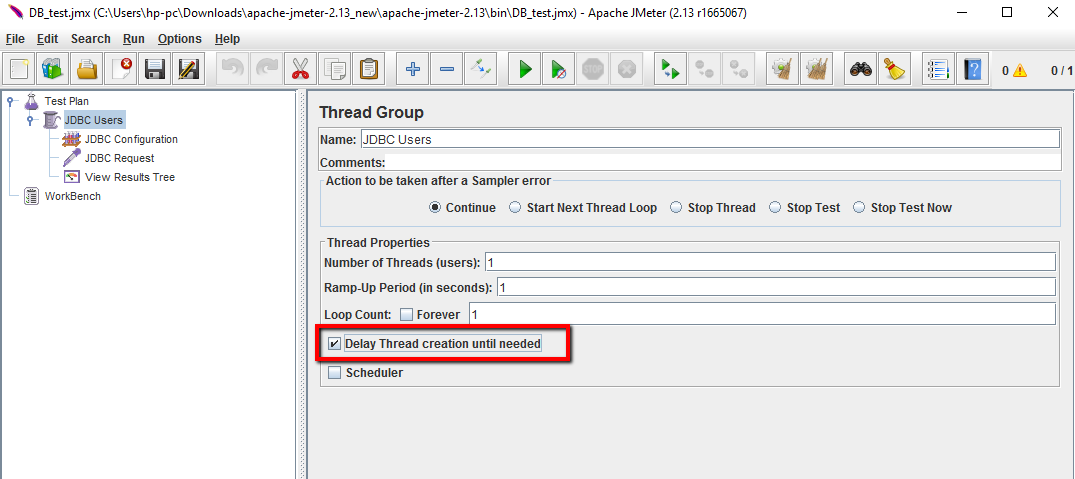
In the above scenario we are running a simple functional test in AIQ. However if the user wants to run a Load test we will have to make some changes in the Jmeter script. The below screenshot highlights the changes that needs to be done to run the Load test in AIQ.
Need to check in the Thread Group the option Delay Thread Creation Until Needed. Once the changes is made we can go ahead and save the script.
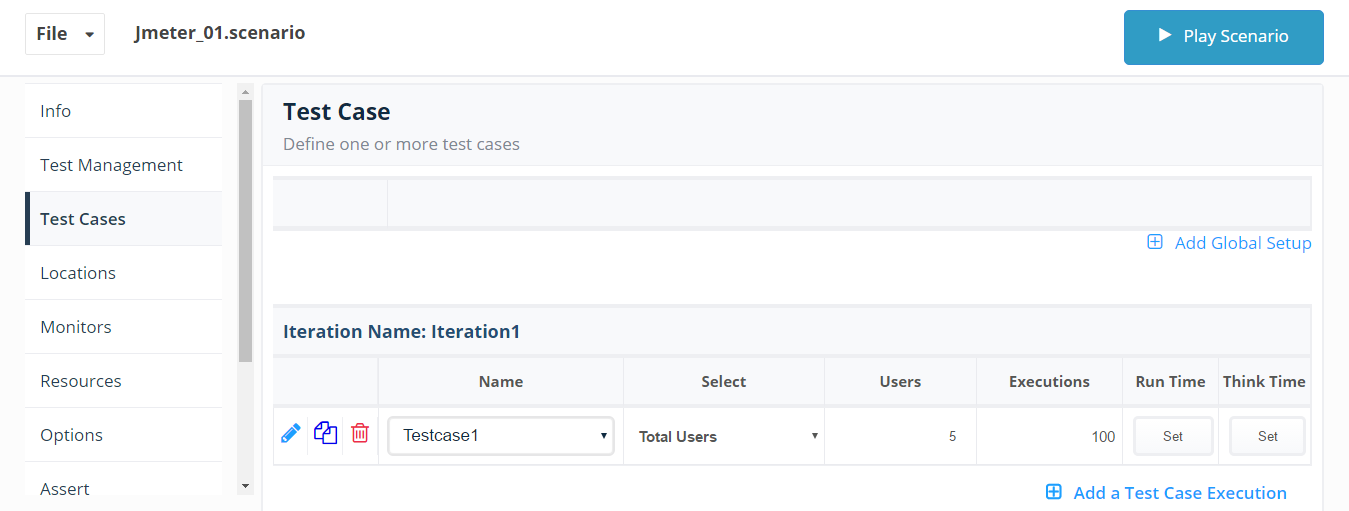
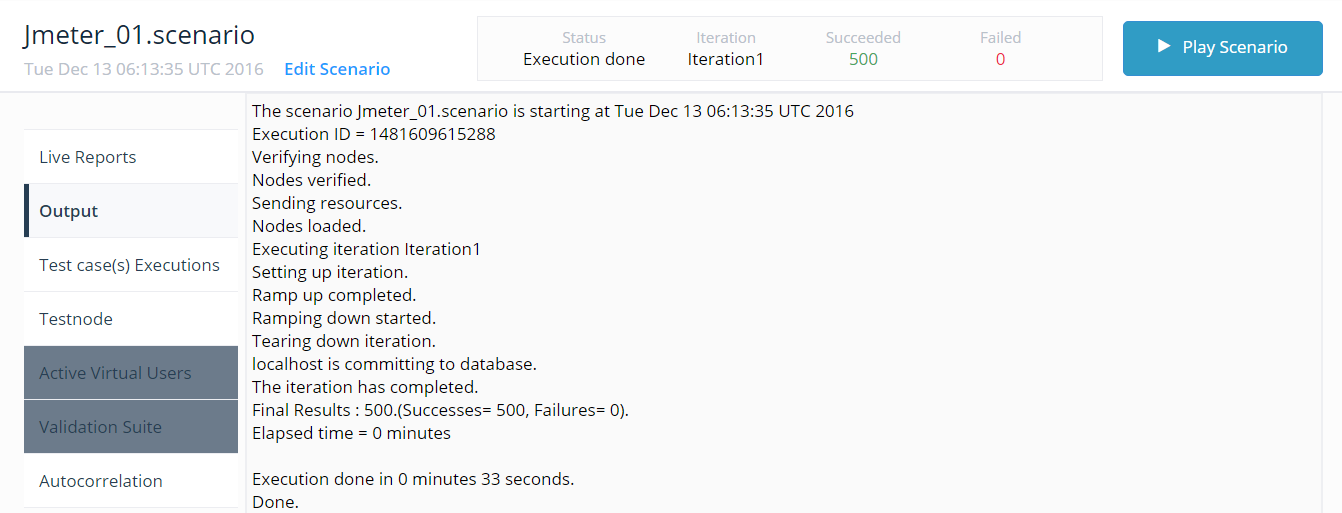
User creates a Load test scenario with 5 users and 100 executions
10. 
Jmeter - Java.lang.RuntimeException: Could not find the TestPlan class! Getting this error while running the scenario from AIQ
1. Solution : Please add htmlunit - 2.15.2648 bundle.
Navigate to Scenario builder and open the scenario created.
Navigate to Resource Panel and click Add bundle.
Add htmlunit with version as 2.15.2648, Save and Re-run the scenario.
11. JMeter - Note able to see the transactions in the Reports or Test Controller
1. Resolution: Add a new bundle 'httpclient' with value '4.3.4' in the Resources panel of the Scenario Builder, Save and re-run the scenario to see the results in Reports as well as in Test Controller
12. Jmeter - Steps Average duration calculation in Appvance IQ
1. The below example gives a detailed explanation of how Step's average duration is calculated in the Jmeter-Appvance IQ combination.
1.3 TC01\_DealID\_03 - Average duration is 1.33 secs
All the requests below and calculations are shown below.
Number of Success transaction \* Average duration of each request
72\*10.92 = 786.24
37\*3.23 = 119.51
36\*2.15 = 77.4
37\*0.93 = 34.41
36\*0.9 = 32.4
580\*0.04 = 23.2
36\*0.48 = 17.28
36\*1.88 = 67.68
Addition of all the successful transactions.
72+37+36+37+36+580+36+36 = 870
786.24 + 119.51 + 77.4 + 34.41 + 32.4 + 23.2 + 17.28 + 67.68 = 1158.2
1158.2/870 = 1.33
13. Jmeter: Error while running MySQL DB script
1. The user tries to run a MySQL DB script in Jmeter and receives the below error
Java.sql.SQLException: No suitable driver found for jdbc:mysql://localhost:3306/apc
The error message is self-explanatory stating that there is no suitable driver for running the MySQL script. For the script to run successfully we need to download the MySQL connector jar file and place it under the lib folder of Jmeter
For Ex:
If the Jmeter is in the C folder we need to place the mysql-connector-java-5.1.37-bin.jar in C:\\Program Files\\apache-jmeter-2.13\\lib
Download link :
[http://dev.mysql.com/downloads/connector/j/](http://dev.mysql.com/downloads/connector/j/)
and download the Zip file, Extract the file and copy the mysql-connector-java-5.1.37-bin.jar and place it in the lib folder of Jmeter
14. Running JMeter Scripts in AIQ - Best Practices
1. Disable the "View Result Tree" listener during the Load test in AIQ. Because it consumes more memory and causes JMeter running to run out of memory
1. Disable any other listeners from the Jmeter script before running it in AIQ
2. The number of Threads should be given 1 in Jmeter when running performance tests in AIQ because this will add up to the iterations
3. Better to give Ramp-up as 0 in Jmeter
4. Same as Number of Threads, loop count to be given as 1 by default
5. Thread group - Use continue, Stop test now accordingly, using stop now will stop all other remaining threads when a thread is a failure
---
Last updated: October 16, 2026
If you have any feedback on this topic, please contact us at