# 8.2 - Test Designer API Reference
Test Designer API Reference
# Relational Accessor Functions
The relational accessor functions specifiy that elements should be searched for in relation to a specified element.
- [in](Relational_Accessor/Releational_in.htm)
# IN
in is a DOM relation API that mentions that the element should be searched within another element.
Example:

- [near](Relational_Accessor/Relational_near.htm)
# near
The near API is a DOM relational marker that specifies that the element should be searched near another element.
The near accessor works best when you are looking for an element within the proximity of the selected reference point.
The near accessor identifies the center point of the nearby elements and calculates the distance between the center point of the reference point and the nearby objects in all directions.
## Example

On this example page, the reference point is the highlighted link “Label page“.
- If you want to use the near accessor to reach the nearest object, use : `link(0,near("Label Page"))`
- That will identify “Headings test“ as the nearest object
- If you want to locate the second nearest object, use: `link(1,near("Label Page"))`
- This will identify “Take Page screenshot test“ as the nearest object.
- The number used before the near statement (`#,near`) determines the order in which the system will go and find near objects.
- The \_near and \_below locators use x,y coordinates

JavaScript Example
```javascript
navigateTo("https://www.apple.com/");
_click(_link("ac-gn-link ac-gn-link-mac"));
_click(_link("ac-gn-link ac-gn-link-iphone",_near(_link("/ipad/"))));
_click(_link("/ipad/"));
_click(_span("chapternav-label[1]",_near(_link("/ipad/"))));
```
- [above and below](Relational_Accessor/Relational_above_below_right_left.htm)
# above / below
Just like in and near - above, below, rightOf, and leftOf can be used as relational accessors to give you more options to make the accessor or the step more robust.
This mostly would be useful in working with tables.
## Syntax
Syntax is same as in and near relational API's.
```
_rightOfcell("Tote",_rightOf(strong("Type"))) _leftOfstrong("Type",_leftOf(cell("Tote"))) _abovestrong("Type",_above(strong("Size"))) _belowstrong("Size",_below(strong("Type")))
```
```
```

## Exported JavaScript
```
navigateTo("https://demosite.appvance.com/"); click(span("Ruby on Rails Tote")); setDescription("Using in Relational Accessor"); click(span("Products",_in(link("/products")))); click(span("Ruby on Rails Tote")); setDescription("Using rightOf Relational Accessor"); assertExists(cell("Tote",_rightOf(strong("Type")))); setDescription("Using leftOf Relational Accessor"); assertExists(strong("Type",_leftOf(cell("Tote")))); setDescription("Using above Relational Accessor"); assertExists(strong("Type",_above(strong("Size")))); setDescription("Using below Relational Accessor"); assertExists(strong("Type",_leftOf(ds.cell("Tote"))));
```
- [rightOf and leftOf](Relational_Accessor/Relational_above_below_right_left.htm)
# rightOf / leftOf
Just like in and near - above, below, rightOf, and leftOf can be used as relational accessors to give you more options to make the accessor or the step more robust.
This mostly would be useful in working with tables.
## Syntax
Syntax is same as in and near relational API's.
```javascript
_rightOfcell("Tote",_rightOf(strong("Type")))
_leftOfstrong("Type",_leftOf(cell("Tote")))
_abovestrong("Type",_above(strong("Size")))
_belowstrong("Size",_below(strong("Type")))
```
```
```

## Exported JavaScript
```javascript
navigateTo("https://demosite.appvance.com/");
click(span("Ruby on Rails Tote"));
setDescription("Using in Relational Accessor");
click(span("Products",_in(link("/products"))));
click(span("Ruby on Rails Tote"));
setDescription("Using rightOf Relational Accessor");
assertExists(cell("Tote",_rightOf(strong("Type"))));
setDescription("Using leftOf Relational Accessor");
assertExists(strong("Type",_leftOf(cell("Tote"))));
setDescription("Using above Relational Accessor");
assertExists(strong("Type",_above(strong("Size"))));
setDescription("Using below Relational Accessor");
assertExists(strong("Type",_leftOf(ds.cell("Tote"))));
```
---
If you have any feedback on this topic, please contact us at
# Calling Native Message Box
You should be careful with these actions, as they will stop browser execution until the user closes the message box.
These should not be used for any CI Process.
## alert
alert(String:message)
Will trigger a native alert
## confirm
confirm(String:message)
Will trigger a native confirm
## prompt
prompt(String:prompt,String:defualtValue);
Will trigger a native prompt
## print
Will trigger a native print dialog
---
Last updated: June 02, 2023
If you have any feedback on this topic, please contact us at
# Fuzzy Logic and Regex Locators
On certain dynamic sites, using strict locators is most of the time challenging and also changing. A strict locator is a locator of an element that should match complete an attribute or a text, meaning it should always match ID or class, etc, or with the complete text of the element.
Test Designer offers the use of Fuzzy and Regex Locators which will help in handling any dynamic contents of any web application.
Example:
Below is one example of a dynamic locator where the heading would keep changing.
heading1("Build office's profile")
Edit the recorded step to replace the accessor with the right expected text value, or a portion of it using the square brackets or in Regex
heading1(\["This is a significative portion of the expected text"\]) //This is Fuzzy Logic
or
heading1(/.\*This is a significative portion of the expected text./); // IMPORTANT: Regular Expression SHOULD NOT be enclosed in quotes, otherwise will be treated as a string }}
---
Last updated: April 24, 2023
If you have any feedback on this topic, please contact us at
# Using Default JavaScript Methods
# Using default JavaScript methods like new Date().getYear(), Math.random()
Sometimes it is required to use some default JavaScript methods like the date functions, or even when we need to generate some random number that can be used to set value and also to generate a random number followed by a name, etc, In these and many cases JavaScript methods would come handy.
The example below shows you a simple usage of date methods and also a random number generation method that is stored in a variable and can be used in Set Values or any Assertions.

In this example, you would notice the usage of date methods and they are being stored in a variable and also the use of random method along with the name Appvance which generates texts like 'Appvance852' with a random number ranging from 1 to 1000 which could be used as a value in an API says 'Set Value'
Example:
eval("'Test'+ Math.floor(Math.random()\*1000)");
eval("'Test'+ Math.floor(Math.random()\*1000)") + '@appvance.com';
Similarly, many other JavaScript methods could be used this way in Test Designer IDE.


JavaScript:
```javascript
navigateTo("SahiTest ");
click(link("demo"));
click(link("Form Test"));
var var1=eval("new Date().toISOString()");
log(var1);
var var2=eval("new Date().getYear()");
log(var2);
var var3=eval("new Date().getDay()");
log(var3);
var var4=eval("new Date().getMonth()");
log(var4);
setValue(textbox("t1"),var1);
setValue(byXPath('//form/table/tbody/tr[3]/td[2]/input'),"2435");
setValue(textbox("name"),"name");
```
# Keyboard Press Events
Keyboard Press Events
- Enter
- Tab
- Home
- Delete
- Shift+Home+Delete
- Esc
- CTRL+B
- Down
- Up
- Page\_Down
- Left
- F2
- Copy
- Paste
- Enter
- Tab
- Home
- Delete
- Shift+Home+Delete
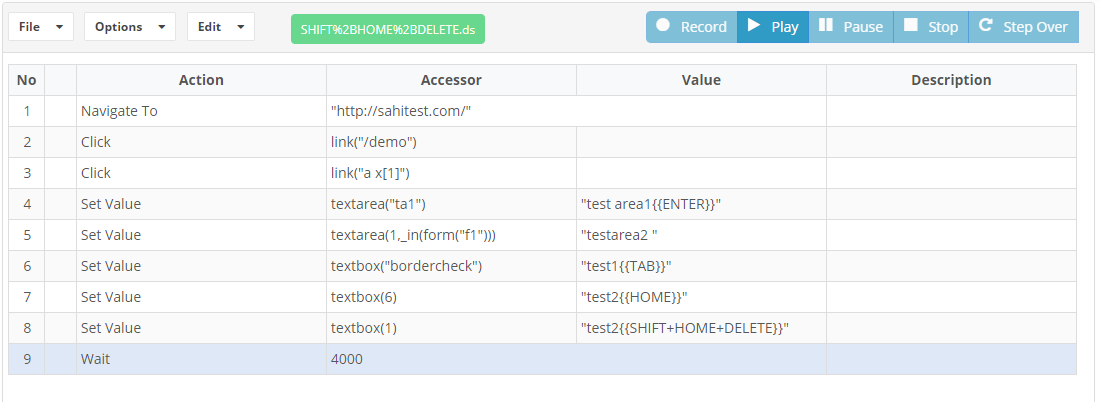
All of the mentioned KeyPress events are supported. All of them are associated with a search box, where you want to enter the keyboard after setting the text in a text field, pressing tab after setting the text in a text field to go to the next element on the page when there is no option on the page to click after setting the value.
[](https://docs.appvance.net/uploads/images/gallery/2026-08/jn8XicZ6oA6kulA8-image.png)
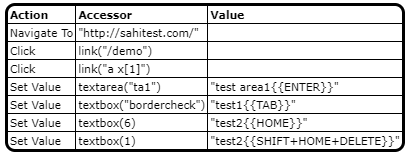
The home button can be used to point the mouse to the first character and delete deletes the first character when used in combination of Home, Shift+Home+Delete combination will delete all the contents that are set in the text field which is used for some validations.
[](https://docs.appvance.net/uploads/images/gallery/2026-08/fvsw5CHKJIpHXzpF-image.png)
Esc
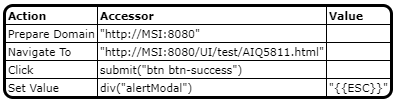
There could be instances where you would want to press the Keyboard Esc for closing the pop up for example.
Test Designer supports pressing Esc from the keyboard.
[](https://docs.appvance.net/uploads/images/gallery/2026-08/mdizeXlLuAMVnbvL-image.png)
Javascript example:
```javascript
setSearchRetries(3);
prepareDomain("http://MSI:8080");
navigateTo("http://MSI:8080/UI/test/AIQ5811.html");
click(submit("btn btn-success"));
setValue(div("alertModal"),"{{ESC}}");
```
- CTRL+B
- Down
- Up
- Page\_Down
- Left
- F2
- Copy
- Paste
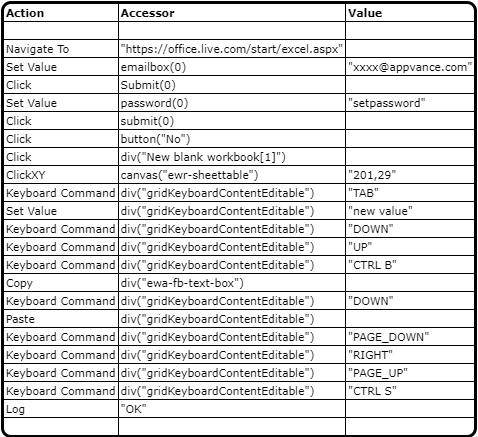
Test Designer supports keyboard events of all the above keyboards, below is the example of the usage.
[](https://docs.appvance.net/uploads/images/gallery/2026-08/oHcjsA6VudCPzHGC-image.png)
Javascript example:
```javascript
navigateTo("https://office.live.com/start/excel.aspx");
setValue(emailbox(0),"xxxx@appvance.com");
click(submit(0));
setDescription("provide password in double quotes");
setValue(password(0),);
click(submit(0));
click(button("No"));
click(div("New blank workbook[1]"));
wait(5000);
setDescription("Clicking some cell");
clickXY(canvas("ewr-sheettable"),"201,29");
assertExists(canvas("ewr-sheettable"));
keyboardCommand(setValue(div("gridKeyboardContentEditable"),"new value");
keyboardCommand(div("gridKeyboardContentEditable"),"DOWN");
keyboardCommand(div("gridKeyboardContentEditable"),"UP");
keyboardCommand(div("gridKeyboardContentEditable"),"CTRL B");
copy(div("ewa-fb-text-box"));
keyboardCommand(div("gridKeyboardContentEditable"),"DOWN");
paste(div("gridKeyboardContentEditable"));
keyboardCommand(div("gridKeyboardContentEditable"),"PAGE_DOWN");
keyboardCommand(div("gridKeyboardContentEditable"),"RIGHT");
keyboardCommand(div("gridKeyboardContentEditable"),"PAGE_UP");
keyboardCommand(div("gridKeyboardContentEditable"),"CTRL S");
keyboardCommand(div("gridKeyboardContentEditable"),"CTRL V");
log("OK");
```
# Navigation Functions Reference
Use this article as a reference for navigation-related functions in legacy Test Designer API content and current Scenario Editor maintenance work.
## What changed in this article
- Kept the reference title but clarified its role as API/reference material.
- Added context that legacy Test Designer function references should be validated against current Scenario Editor behavior before reuse.
- Added checks for target URL, browser state, waits, navigation timing, error handling, and evidence after navigation.
## Validation workflow
1. Confirm the navigation function and target state expected by the scenario.
2. Add appropriate waits or validation after navigation so the next step does not race the browser.
3. Review output, screenshots, and browser state if navigation fails or lands on an unexpected page.
**Review note:** This page remains reference material and should not be expanded into a full tutorial.
---
Last updated: October 5, 2026
If you have feedback on this topic, contact .
# Browser Message Box API Reference
## Recommended guidance
Use browser message box APIs only when a test must handle JavaScript alerts, confirms, or prompts during playback. Validate behavior in the current Scenario Editor runtime because older Test Designer API examples may depend on legacy browser behavior.
## Message box types
- **Alert:** informational dialog that usually requires OK.
- **Confirm:** dialog that expects accept or dismiss behavior.
- **Prompt:** dialog that may require entering controlled text before accepting.
## Validation checklist
1. Confirm the dialog is application-generated, not a browser permission or security prompt.
2. Trigger the dialog in a controlled test environment.
3. Handle the dialog before continuing to steps that depend on the page state.
4. Assert the expected application result after accepting, dismissing, or entering prompt text.
5. Avoid using dialog handling to bypass browser security warnings or customer controls.
**Legacy note:** Keep old API names only when maintaining existing scripts. New documentation should describe the behavior in Scenario Editor terms.
*Last updated: October 6, 2026*
# API Test Designer Building Blocks
Appvance IQ Test Designer provides a collection of building blocks that can be combined to create automated tests and performance scenarios. Each building block provides a specific capability, such as sending HTTP requests, validating responses, controlling test flow, working with test data, executing JavaScript, or interacting with external services.
Building blocks are added to a test by selecting them from the **Building Blocks** panel and configuring their properties according to the requirements of the test.
This section provides an overview of the available building blocks. Each building block has its own page with detailed information about its purpose, configuration options, and usage examples.
## Request and Service Blocks
These building blocks allow tests to interact with web services and APIs.
- **REST Request** — Sends HTTP requests to REST-based services.
- **SOAP Request** — Sends requests to SOAP-based services.
- **Verify** — Validates values returned by a request or another test step.
REST requests support the standard HTTP methods:
- GET
- POST
- PUT
- PATCH
- DELETE
Test Designer also provides import options for creating requests from existing definitions:
- **Import cURL**
- **Import REST**
- **Import SOAP**
## Flow Control Blocks
Flow control blocks determine how and when test steps are executed.
- **Condition** — Executes steps based on a condition.
- **For Each** — Repeats a group of steps for each item in a collection.
- **For Loop** — Repeats steps a specified number of times.
- **While** — Repeats steps while a condition remains true.
- **Group** — Organizes related test steps into a logical group.
- **Delay** — Introduces a wait period during test execution.
## Data and Configuration Blocks
These blocks provide mechanisms for supplying, managing, and reusing test data.
- **Data File** — Provides test data from an external data file.
- **Global Params** — Defines parameters that can be shared across a test.
- **Locker** — Stores and retrieves values for reuse during test execution.
- **Include** — Includes reusable content or functionality in a test.
## Database and Integration Blocks
These blocks allow tests to interact with external systems and data sources.
- **SQL** — Executes SQL operations against a configured database.
- **Proxy** — Configures proxy-related behavior for test execution.
## Scripting and Specialized Blocks
These blocks provide additional capabilities for custom logic and specialized test interactions.
- **JavaScript** — Executes JavaScript code as part of a test.
- **OCR** — Uses optical character recognition to identify and process text from supported content.
## Building Block Workflow
Building blocks can be combined to create complete test flows. For example, a test might:
1. Read test data from a **Data File**.
2. Send a request using a **REST Request**.
3. Use **Verify** to validate the response.
4. Use a **Condition** to determine the next step.
5. Execute additional requests or logic inside a **For Loop**.
6. Store values in the **Locker** for use by subsequent steps.
The appropriate combination of building blocks depends on the type of application being tested and the behavior that the test needs to reproduce or validate.
The following pages describe each building block in detail, including its configuration, supported options, and examples of how it can be used in a test.
---
**Last updated:** August 12, 2026
If you have feedback about this topic, please contact .
# System Dialog Functions for Scenario Editor Scripts
**Last reviewed:** September 24, 2026
System dialog functions help Scenario Editor scripts respond to browser or operating-system prompts that appear during a test.
## What changed in this article
- Use these functions only for dialogs that are expected and repeatable in the target workflow.
- Prefer application-level controls when possible; system dialogs can vary by browser, operating system, and permissions.
- Add screenshots or output evidence when troubleshooting inconsistent dialog behavior.
## Validation workflow
1. Identify the exact dialog text and when it appears during playback.
2. Use the appropriate dialog function in the Scenario Editor script.
3. Replay the scenario on the target browser and node to confirm the dialog is handled consistently.
**Review note:** Updated terminology from older designer wording to Scenario Editor and clarified that system dialogs can be environment-dependent.
---
Last updated: September 24, 2026
If you have feedback on this topic, contact .
# General Functions
# Add Network Library
This API could be used to add your created network library using network library workbench, network library will have a .netx extension and any step using the network library will be accessing this particular file.
After selecting this action, you can double click the Accessor which shows options to browse the file and also to make the path absolute or relative.

# Add SmartTag Library
This API is similar to that of Network Library which can be used to browse the SmartTag library created for a target application using SmartTag workbench. This has a .stags extension, and any step that uses the SmartTag library will access this particular file for details.
After selecting this action, you can double click the Accessor which shows options to browse the file and also to make the path absolute or relative.

# Alert
Alerts the message on the browser, This is a handy Action API used for debugging purposes more like a logging API, it alerts with the message on the browser or can be used to check what is stored in a variable during run time.
Do not leave Alert APIs in actual production scripts because it needs user input to proceed further in the script.


## Javascript example
```javascript
navigateTo("http://www.apple.com ");
click(link("ac-gn-link ac-gn-link-iphone"));
click(heading4("typography-headline-reduced"));
var var1=isVisible(heading4("typography-headline-reduced"));
var val2=;
alert(var1);
if (var1==true){
click(link("ac-gn-link ac-gn-link-watch"));
}
```
# Assert
Assert Contains Text
As the name suggests, assert contains text checks for a string in the target element and logs success or failure.
It will log the step details if the assertion passes else it logs as a failure if the expected string or reg-ex is not part of the text content of a given element with a proper explanation and stops the script playback.
Note: Do not use this in an if condition as it does not return any value, and throws an exception if the assertion fails.
The example below and Usage:

The accessor column shows the HTML DOM Element of the web page.
The value column shows the Expected String, Regular expressions can also be used.