.
# Data-Drive Wait Values in Scenario Editor
# Data-Drive Wait Values in Scenario Editor
Use data-driven wait values only when different test data genuinely requires different timing. Prefer conditional waits based on application state whenever possible.
## When data-driven waits make sense
- Different workflows have documented processing windows.
- External systems return at different approved polling intervals.
- The timing value is part of the test data model and needs traceability.
## Good practices
1. Store timing values in an approved DPL or test data source.
2. Use clear field names such as waitTimeoutSeconds or pollingIntervalSeconds.
3. Set maximum limits so bad data does not create excessive waits.
4. Review repeated wait failures before increasing data-driven timing values.
**Last updated:** September 9, 2026
# Validate Scrolling Reaches the Bottom of a Page
# Validate Scrolling Reaches the Bottom of a Page
Use this pattern when a Scenario Editor test must confirm that the browser reached the bottom of a page, list, or scrollable container. This is common for lazy-loaded content, terms pages, infinite scroll, or long result lists.
## Recommended checks
- Validate a stable element that appears only near the bottom.
- Check that lazy-loaded content has finished loading before continuing.
- Use a container-specific check if the page has multiple scrollable areas.
- Avoid assuming that one scroll action always reaches the bottom on every viewport.
## Validation workflow
1. Scroll toward the target area.
2. Wait for the expected bottom marker, footer, or final item.
3. Assert that the expected element or content is visible.
4. Capture output if the page continues loading or the target never appears.
**Last updated:** September 9, 2026
# How to escape special characters in Designer
What do we do when we encounter a special character and we have to assert it in a designer script ?
Lets take the below Example:
User navigates to the Apple website and tries to do a assert on iphone page and finds that the iphone 7 has special character " just before 7. So the user now has to assert iPhone"7 which contains a special character just before 7.
We can "\\" to escape the special character and run the script successfully.
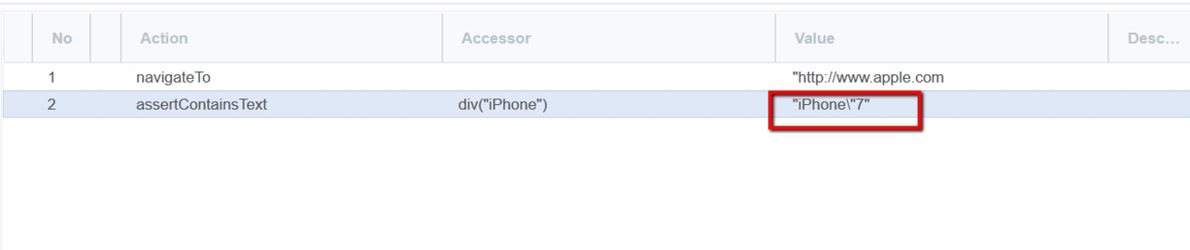
For characters that are usually treated specially, '\\' indicates that the next character is not special and should be interpreted literally.
---
Last updated: June 26, 2023
If you have any feedback on this topic, please contact us at
# Close Browser Windows in Scenario Editor
# Close Browser Windows in Scenario Editor
Use this guidance when a Scenario Editor test opens a second browser window, tab, or popup and must return to the main application flow. Keep window handling explicit so the test does not continue in the wrong context.
## Recommended workflow
1. Trigger the action that opens the new window or tab.
2. Wait for the expected window, tab, or popup to be available.
3. Validate or capture the needed content.
4. Close the secondary window and switch back to the original context.
5. Validate that the next step runs in the intended page.
## Good practices
- Use clear step names that identify the window being handled.
- Avoid relying on window order if titles or URLs can be validated.
- Capture output when popup behavior fails or is blocked by the browser.
**Last updated:** September 9, 2026
# How to handle Multiple DPL files in Test Designer IDE
We can add multiple DPL files in Test Designer IDE. Once the user adds one of the DPL files in Data tab User can still add other DPL files if any with the help of API that is already available for Hash DPL and JS DPL.
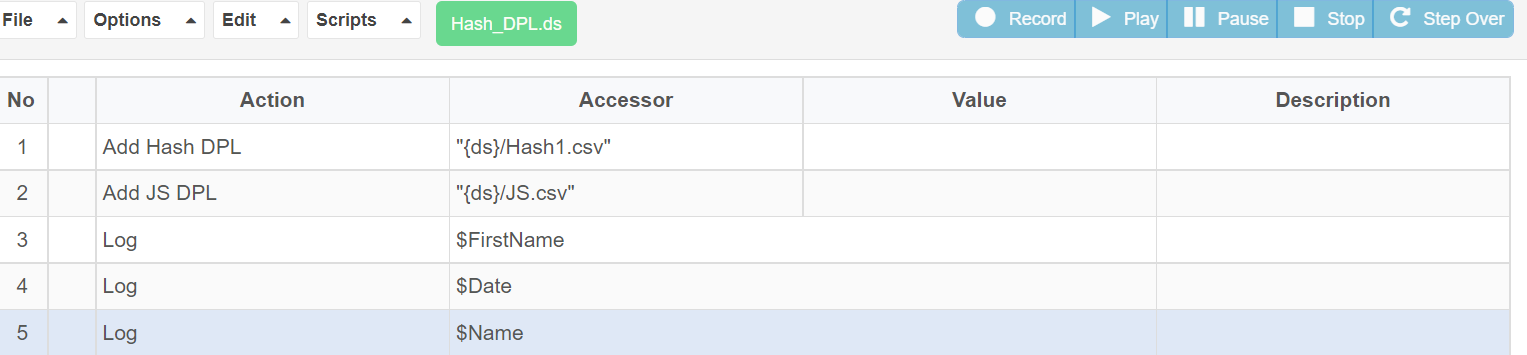With the help of the above API called “Add Hash DPL” and “Add JS DPL”. User can add multiple DPL’s in the IDE.
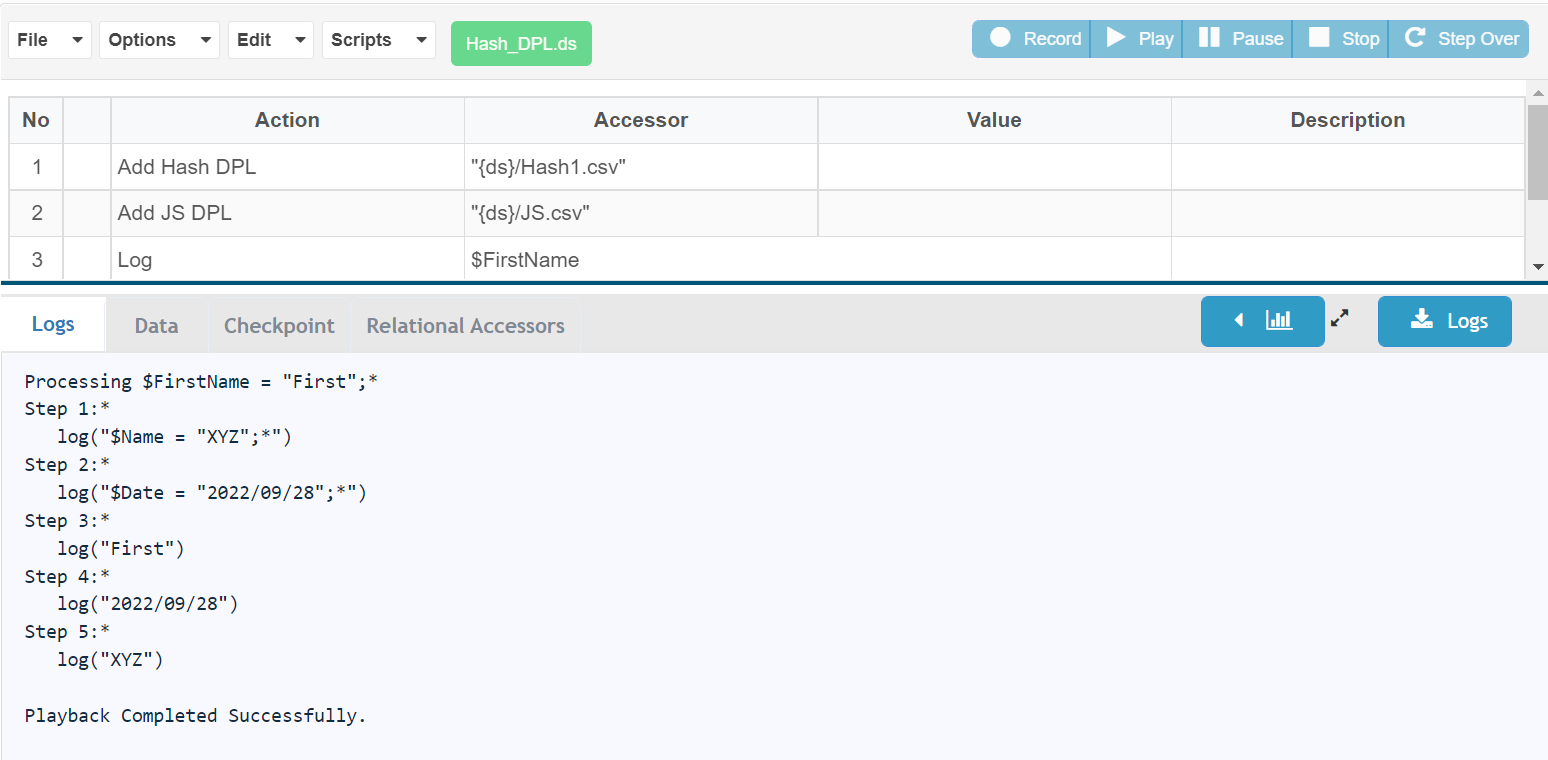
Below is the screenshot for the successful execution of the same
---
Last updated: June 26, 2023
If you have any feedback on this topic, please contact us at
# How to handle pop-ups in a website using designer?
The user will not be knowing when exactly the window might be popped up and has to handle the popup with an if condition so that, if a particular message or a link or an image is present in the popup and the user recognizes that particular element and has to take necessary decisions. Here is an example for the mentioned situation and its implementation in Appvance Designer.
Consider user navigates to [www.appvance.com](http://www.appvance.com). The user might get a pop up sometimes and sometimes not. Hence we have used an If condition with the Appvance Designer API (\_isVisible\_Heading("Sign up for email updates")) which returns the Boolean value based on the presence of the heading "Sign up for email updates". If the condition is true, then the further actions are performed on the popup and if the condition is false, the span of If condition is skipped for further continuation of the script.
Here is the script attached for the above mentioned example
[Popup.ds](../../../Resources/Images/GeneralGraphics/Popup.ds)
---
Last updated: July 03, 2023
If you have any feedback on this topic, please contact us at
# How to hold and free toast message
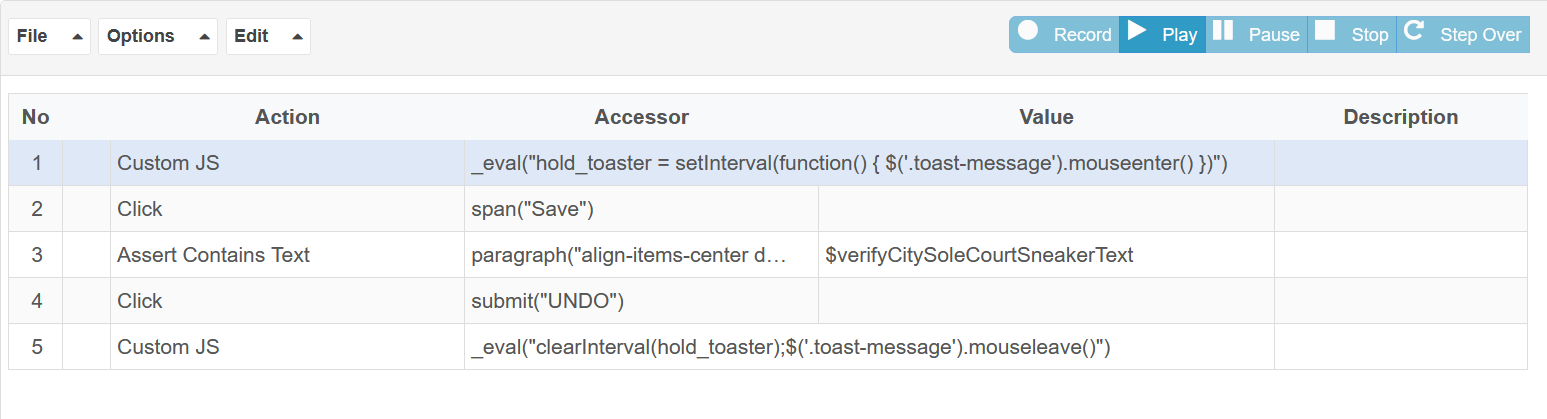
To hold toast message \_eval("hold\_toaster = setInterval(function() { $('.toast-message').mouseenter() })")
To free toast message \_eval("clearInterval(hold\_toaster);$('.toast-message').mouseleave()")
Note: “toast-message“ is a class name. If toast message is getting disappeared after click some element of toast message then no need to use a step to free toast message
---
Last updated: June 26, 2023
If you have any feedback on this topic, please contact us at
# How to parameterize files for the file upload feature?
Question:
How to parameterize files for the file upload feature? (Like we have a random set of files as test data for upload)
Attached is the Test designer script and associated files that can be used for testing which was created on a public-facing site.
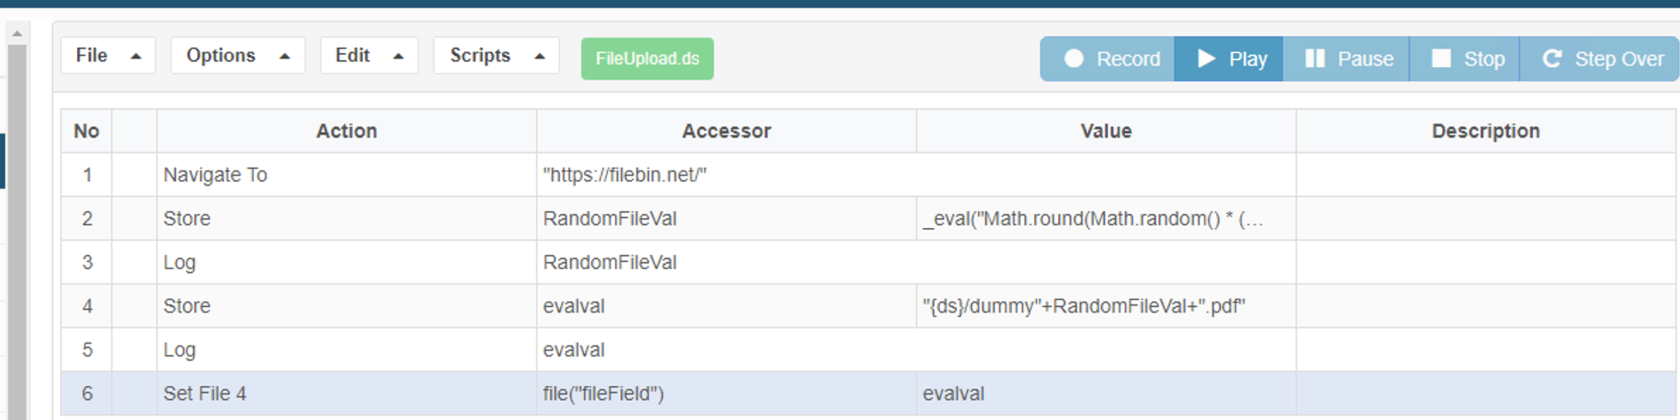
This example has files (5 different files) that are followed by numbers like filename1, 2, and so on.
By making use of Math.floor, we can generate random numbers as needed and can be passed to grab the files on the run, this way every time it runs, it will generate a random number, and based on the generated number, it will pick up the file from the resources.
Below is an example screenshot for test designer steps.
This file contains a sample script: [FileUpload.zip](../../../Resources/Scripts/FileUpload.zip)
---
Last updated: June 26, 2023
If you have any feedback on this topic, please contact us at
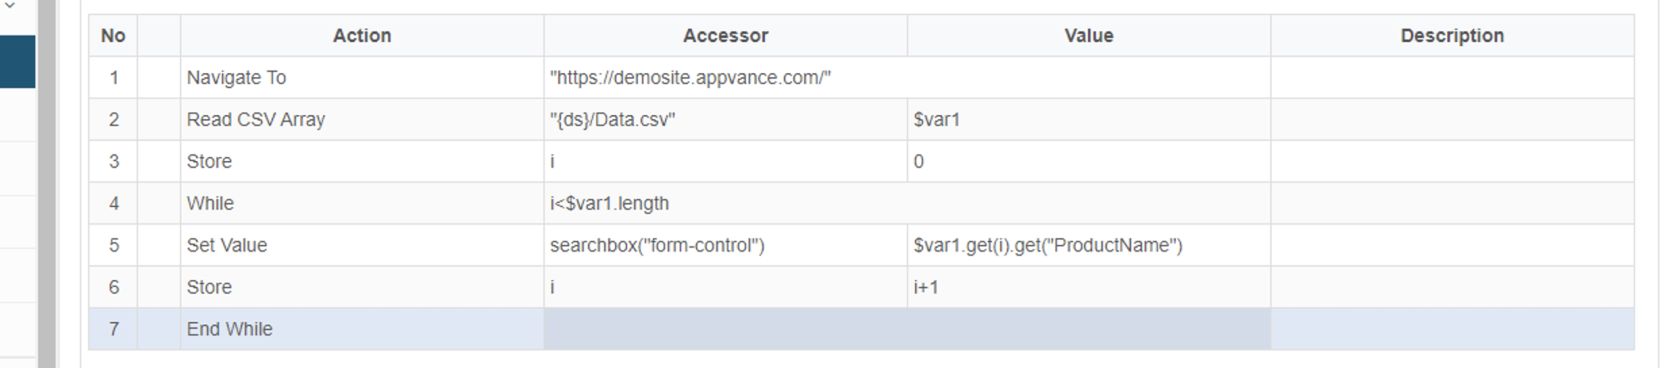
# How to Read and Write multiple rows from the CSV file?
var Account = readCSVListHashMap("{ds}/Account.csv");
var ini=0;
var i=0;
var $data = new Array();
$data.push(\["Email", "Password","PhoneNumber","Date","Month","Year"\])
while (ini<Account.length){
var Email=Account.get(ini).get("Email");
var Password=Account.get(ini).get("Password");
var PhoneNumber=Account.get(ini).get("PhoneNumber");
var Date=Account.get(ini).get("Date");
var Month=Account.get(ini).get("Month");
var Year=Account.get(ini).get("Year");
log(Email);
var file="{ds}/Result.csv";
$data.push(\[Email,Password,PhoneNumber,Date,Month,Year\])
var ini=ini+1;
};
writeCSV(file, $data);
---
Last updated: June 26, 2023
If you have any feedback on this topic, please contact us at
# How to remove all extra spacing between words?
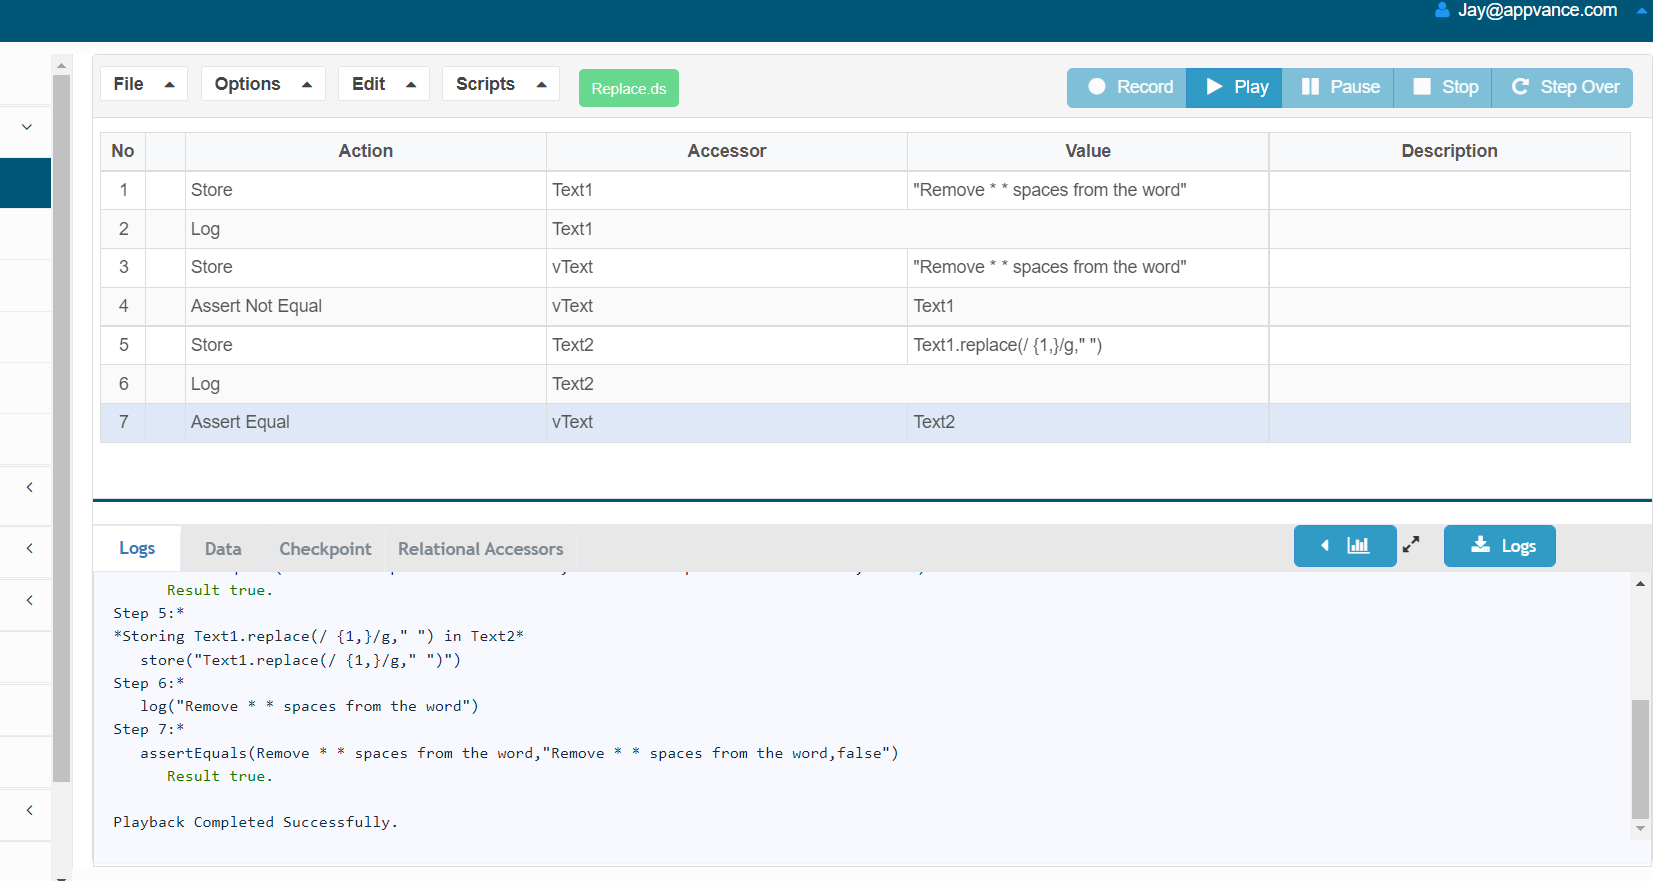
Text1.replace(/ {1,}/g," ")
The `g` at the end of the RegExp means: global, ie match and replace all occurrences.
---
Last updated: June 26, 2023
If you have any feedback on this topic, please contact us at
# How to retrieve all the elements on a page
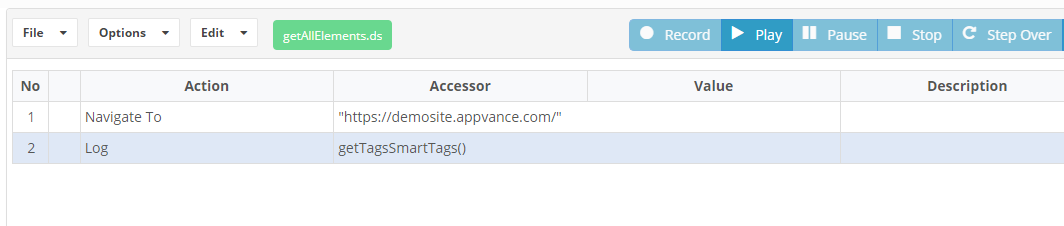
Please use the following line of code in test designer IDE that will log all the elements on a given page.
getTagsSmartTags() API will get all the elements of a web page.
---
Last updated: June 26, 2023
If you have any feedback on this topic, please contact us at
# How to retrieve the only number from a string?
Suppose there is a pop-up like below which has a combination of text and Numbers and if we want to retrieve only Numbers
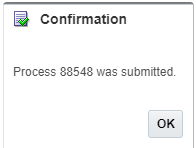Then we can use the below code to fetch only Numbers
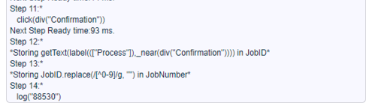
Store the content into a variable and apply to replace(/\[^0-9\]/g, "") to the string and it will fetch only Numbers present in the string
Code Snippet
Logs from DS3
---
Last updated: June 26, 2023
If you have any feedback on this topic, please contact us at
# How to retrieve value between 2 characters?
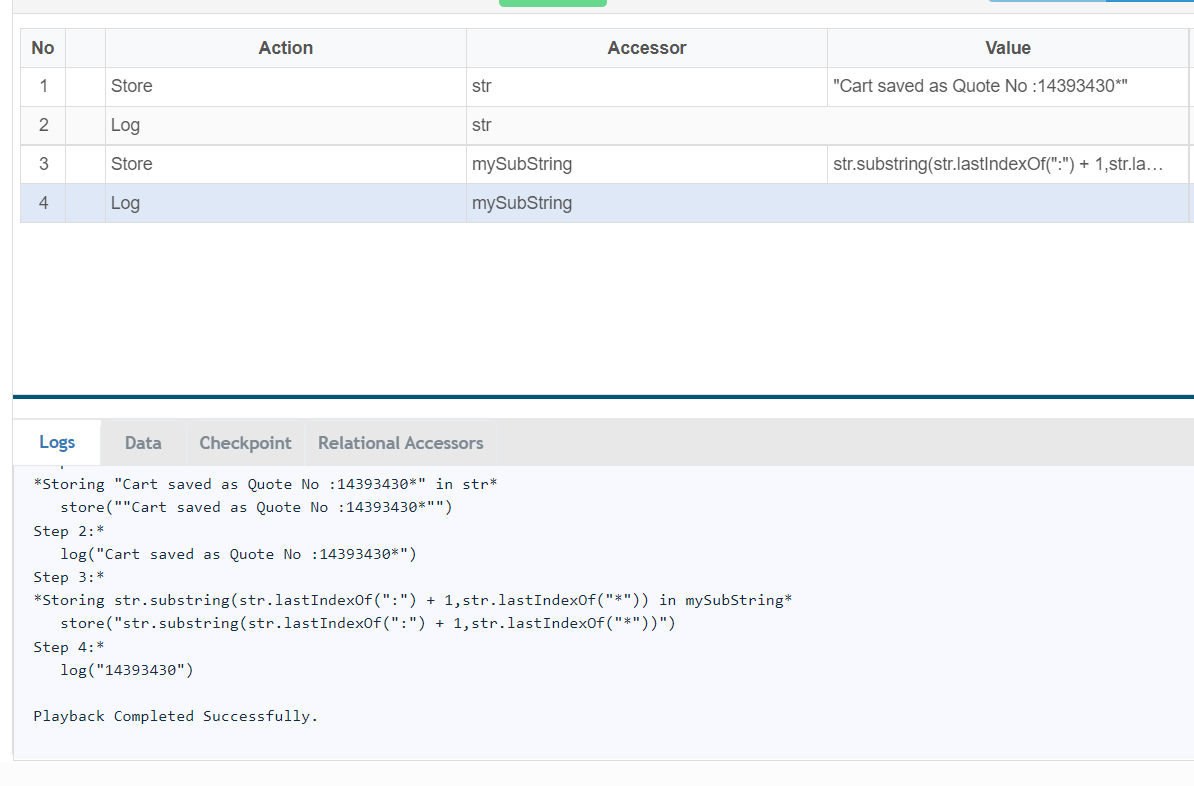
var str="Cart saved as Quote No :14393430\*";
var mySubString = str.substring(str.lastIndexOf(":") + 1,str.lastIndexOf("\*"));
You can use the below code to retrieve the value between ":" and "\*"
---
Last updated: June 26, 2023
If you have any feedback on this topic, please contact us at
# How to stop the Sahi logging feature in Appvance IQ.
While I am running sahi/designer based vusers in Appvance IQ, sahi logs are taking up lot of disk space (sometimes 100 GB in 3 to 4 days).
How can we disable the traffic logs that are written to this folder?
/AIQ/sahi/userdata/logs/traffic
**Solution:**
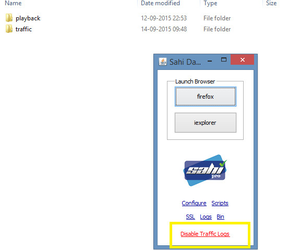
Kill all java process, Start sahi dashboard alone in the below given path.
Please try disabling the traffic logs by launching sahi dashboard(/AIQ/sahi/userdata/bin/start\_dashboard.bat).
Restart Appvance IQ.
---
Last updated: June 26, 2023
If you have any feedback on this topic, please contact us at
# How to trim a string value from a string?
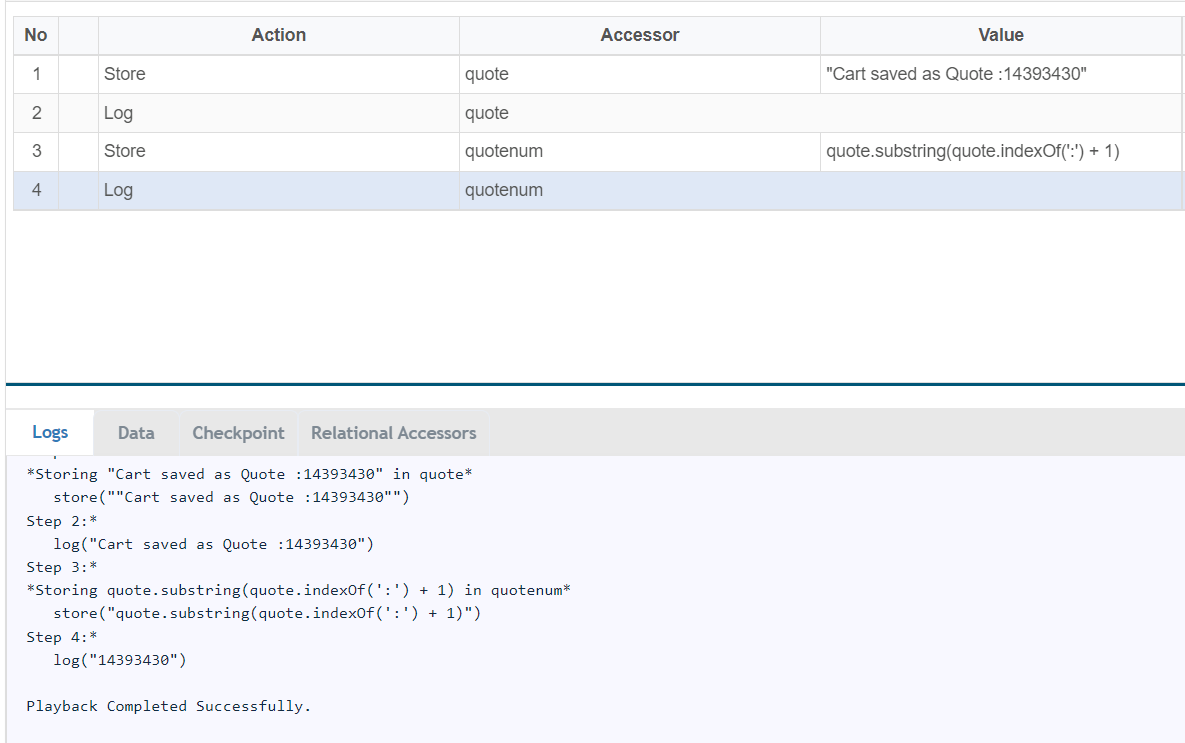
For example: Need only " 14393430" from the string "Cart saved as Quote : 14393430" use the below function:
var quote = "Cart saved as Quote : 14393430"
var quotenum=quote.substring(quote.indexOf(':') + 1)
---
Last updated: June 26, 2023
If you have any feedback on this topic, please contact us at
# How to use custom functions from JS file in Test Designer
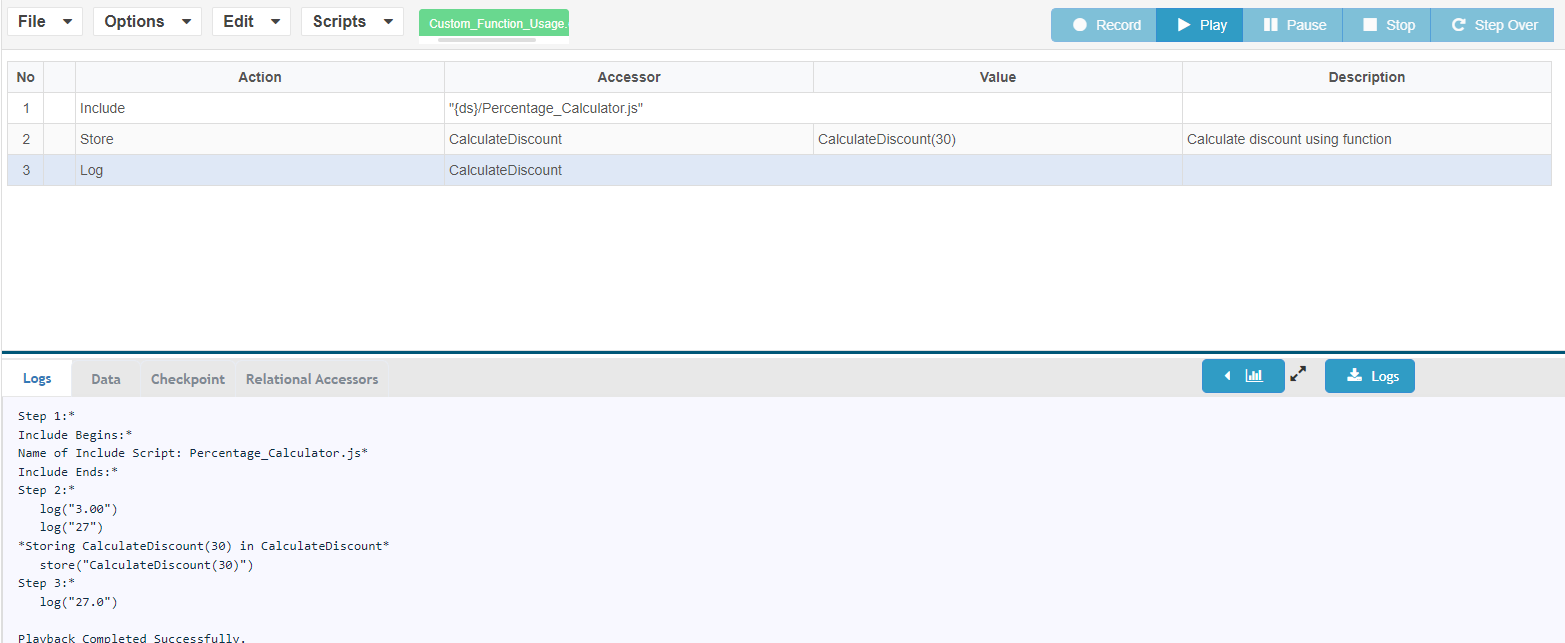
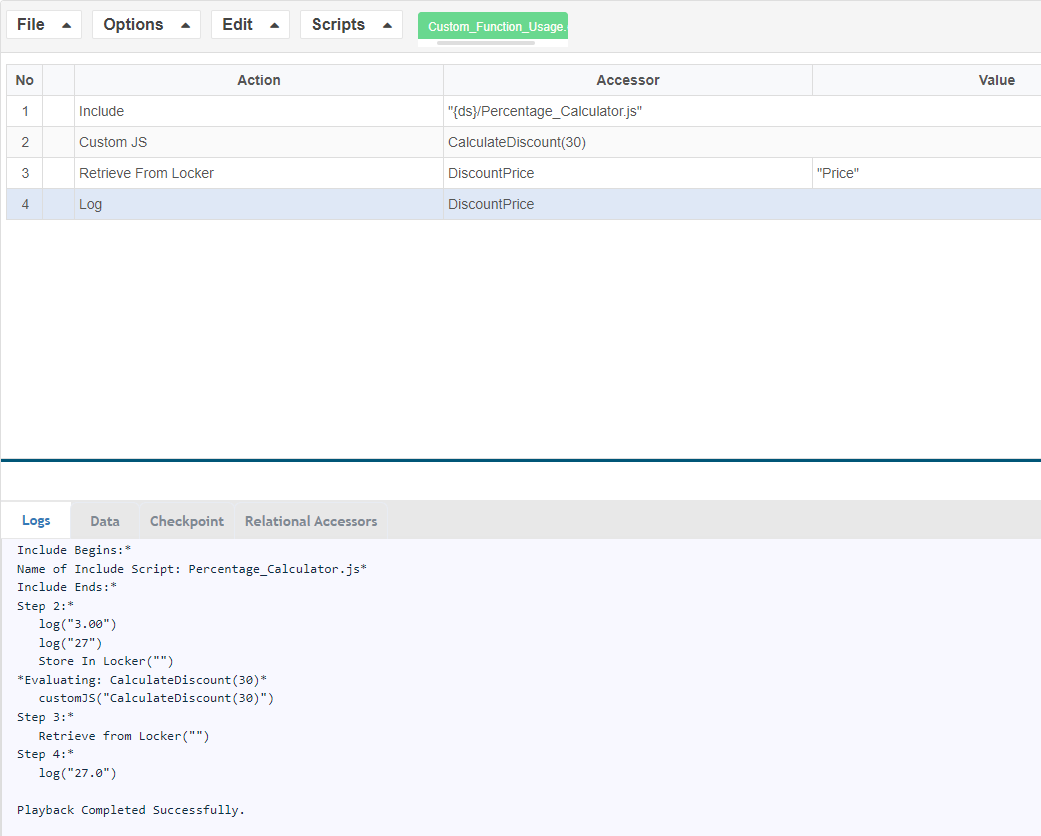
1. We are calling the JS function from the DS script and it returns the values after evaluation
The JS function that we have created is shown below
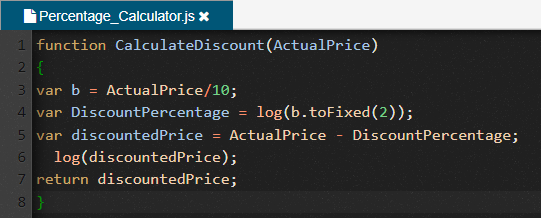This function will calculate a 10% discount on a Price that is entered. The usage of function in TD script is shown below
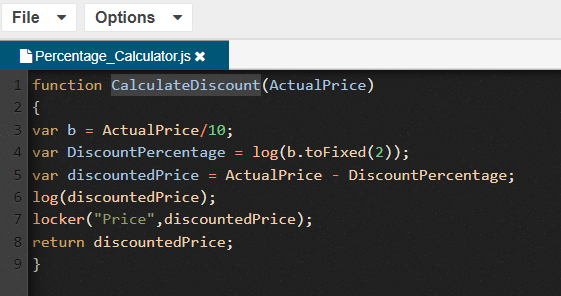
2\. We can also make use of the Custom JS action in DS and then fetch the value using the locker
 ---
Last updated: June 26, 2023
If you have any feedback on this topic, please contact us at
# How to Validate whether the video is played back?
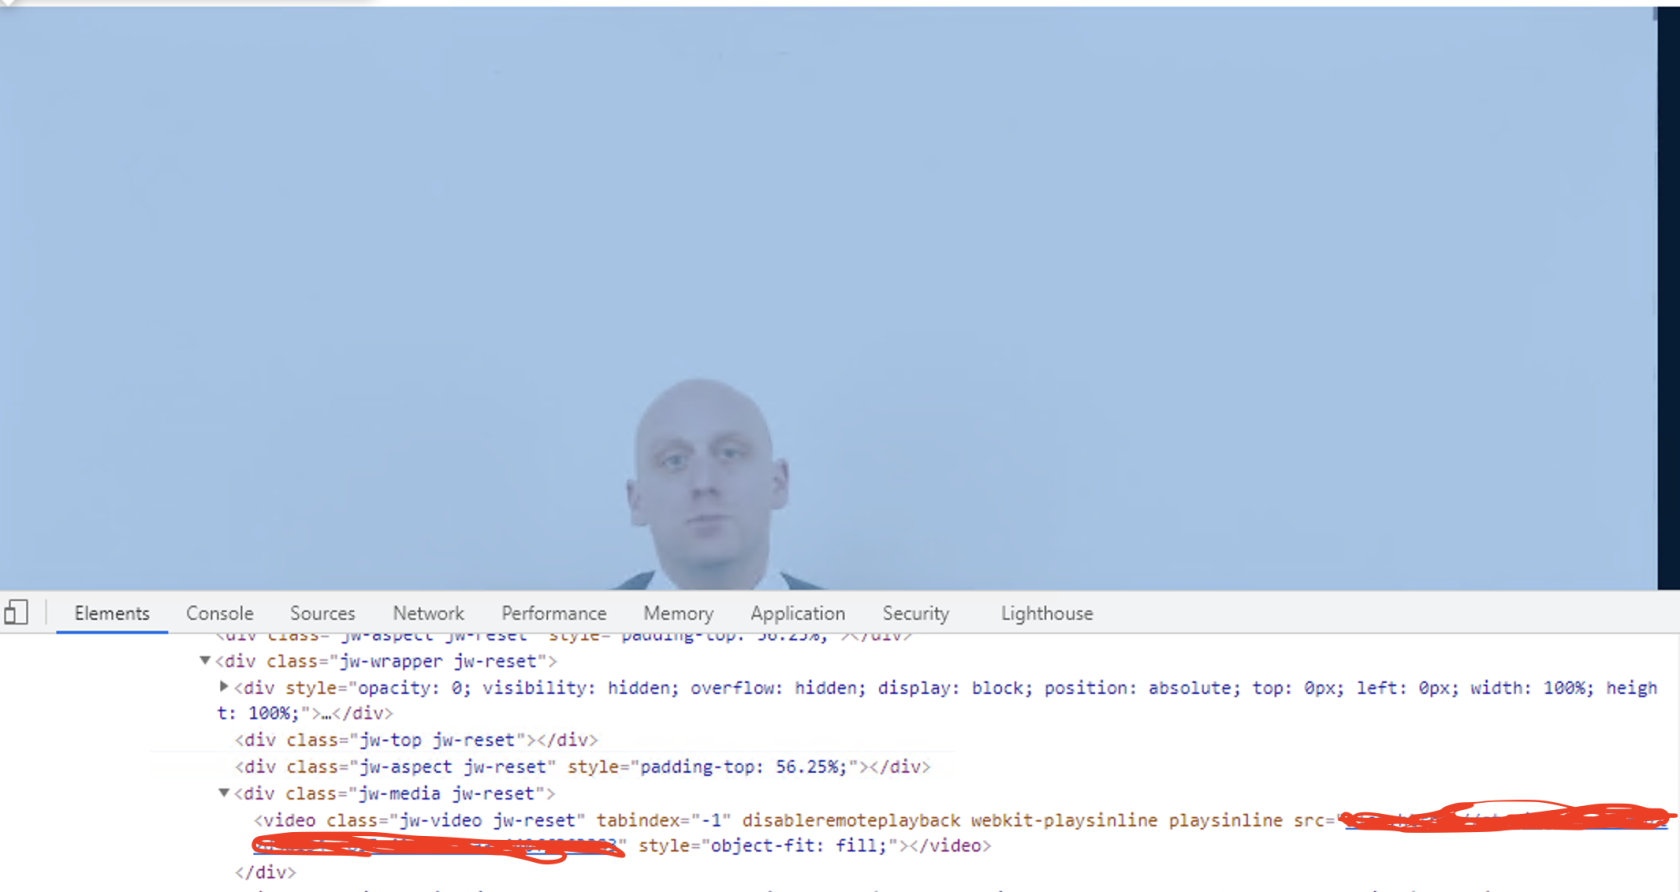
\_eval('document.getElementsByClassName("jw-video jw-reset")\[0\].currentTime')
Look for the Video tag in the DOM and use the class or id of it.
 ---
Last updated: June 26, 2023
If you have any feedback on this topic, please contact us at
# Verify Checkbox Checked and Unchecked States
**Last reviewed:** September 28, 2026
Use this article when a Scenario Editor validation needs to confirm whether a checkbox is selected or cleared.
## What changed in this article
- Cleaned up the title punctuation and changed it into a direct validation task.
- Added guidance to validate checkbox state through the DOM/property value instead of relying only on visual appearance.
- Added caution for custom checkbox controls where aria-checked, checked, class names, or hidden inputs may differ.
## Validation workflow
1. Inspect whether the checkbox is native HTML or a custom UI control.
2. Validate the correct state attribute or property for checked/unchecked behavior.
3. Replay the step after toggling the checkbox both ways to confirm the assertion fails and passes correctly.
**Review note:** Added custom-control guidance because modern web apps often style checkboxes in ways that hide the real state.
---
Last updated: September 28, 2026
If you have feedback on this topic, contact .
# How to verify Sorting Functionality
You can use a JavaScript function to verify whether the values displayed in a table are sorted in ascending or descending order.
The following example retrieves the values from a table column, stores them in an array, and compares each value with the next value to determine the sorting order.
```javascript
function Sortingverify()
{
var rowlength = _eval("ds$('tbody tr').length");
log(rowlength);
var i = 0;
var values = [];
while (i <= rowlength - 1)
{
var cellClassName = "slds-truncate uiOutputTextArea[" + i + "]";
assertExists(span(cellClassName));
values.push(getText(span(cellClassName)));
i = i + 2;
}
log("Number of values: " + values.length);
if (values.length > 0)
{
sortCheck(values);
}
}
function sortCheck(arr)
{
var ascending = true;
var descending = true;
for (var i = 0; i < arr.length - 1; i++)
{
log("Comparing: " + arr[i] + " and " + arr[i + 1]);
if (arr[i] > arr[i + 1])
{
ascending = false;
}
if (arr[i] < arr[i + 1])
{
descending = false;
}
}
if (arr.length == 1)
{
log("Only one row exists.");
}
else if (ascending && !descending)
{
log("Ascending order.");
}
else if (descending && !ascending)
{
log("Descending order.");
}
else if (ascending && descending)
{
log("All values are the same.");
}
else
{
log("Values are not sorted.");
}
}
```
### How it works
1. The script determines the number of rows in the table.
2. It retrieves the values from the target column and stores them in an array.
3. Each value is compared with the following value.
4. The script determines whether the values are:
- **Ascending** — each value is less than or equal to the next value.
- **Descending** — each value is greater than or equal to the next value.
- **All the same** — all values are identical.
- **Not sorted** — the values do not follow a consistent order.
For example:
```text
Apple
Banana
Orange
```
returns:
```text
Ascending order.
```
While:
```text
Orange
Banana
Apple
```
returns:
```text
Descending order.
```
If the values are:
```text
Apple
Orange
Banana
```
the script reports:
```text
Values are not sorted.
```
> **Note:** The `i = i + 2` increment is specific to the DOM structure used by the original example. If the target page uses a different HTML structure, the selector and increment may need to be adjusted accordingly.
---
Last updated: **August 17, 2026**
If you have any feedback on this topic, please contact us at .
# How to verify the disabled button?
To verify the disabled button where XML syntax is like below:
<button type="button" disabled>Add Comment</button>
Use the below code to verify disabled:
---
Last updated: June 26, 2023
If you have any feedback on this topic, please contact us at
# Include functionality in Appvance Designer
To reuse a function from one script in another, we include the relevant script using the **include** Action from Appvance Designer.
**Usage**: **include relative:-**<filename>
This will be helpful in shortening your designer scripts.
Call other scripts as functions. This will let users to include other designer script at any given step as shown in below screenshot.
In the example below, note:
- The prefix : **relative:-** just before the login.ds filename on the Value column.
- This script can be executed only in the Scenario Builder.
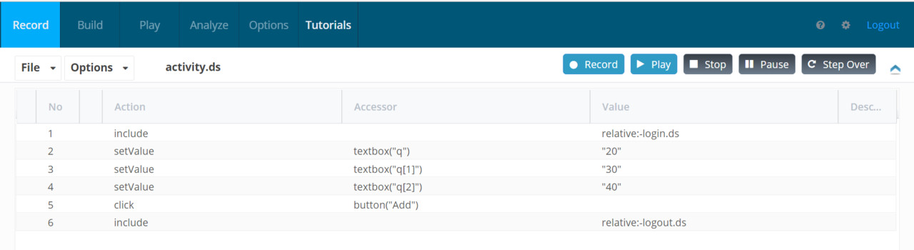
In the Scenario Builder it can be added as shown below
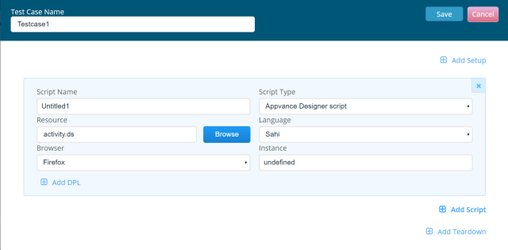
The other dependent designer scripts can be added in resources section.
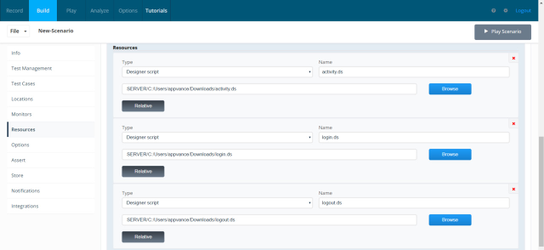
An Example Designer script is attached is this article as well for reference.
[activity.ds](../../../Resources/Images/GeneralGraphics/activity.ds)
[login.ds](../../../Resources/Images/GeneralGraphics/login.ds)
[logout.ds](../../../Resources/Images/GeneralGraphics/logout.ds)
---
Last updated: July 03, 2023
If you have any feedback on this topic, please contact us at
# Latency in AssertExists.
We need to do load testing of our web page. I have a designer script that checks 30 components on the page using assetExists. Appvance is taking up to 1 second to perform each assert check so using it for load testing is not feasible. The assert check should take microseconds to complete.
Response:
In an assertexists, Appvance IQ waits until the page is settled to guarantee the element is present.
This is so at any load the script is still valid.
---
Last updated: June 02, 2023
If you have any feedback on this topic, please contact us at
# Log Specific Errors During Scenario Execution
**Last reviewed:** September 29, 2026
Use this article when a Scenario Editor test needs to capture targeted errors for debugging or reporting.
## What changed in this article
- Changed the vague title into an execution logging task.
- Added guidance for capturing step context, input data, browser state, response details, and assertion messages.
- Added caution to avoid logging secrets, tokens, passwords, or customer-sensitive payloads.
## Validation workflow
1. Decide which error condition needs explicit logging and where it occurs in the scenario.
2. Log the minimum useful context: step name, data row, expected value, actual value, and relevant output.
3. Review execution output to confirm the log helps diagnose the failure without exposing sensitive data.
**Review note:** Added data-safety guidance so error logging is useful but not noisy or risky.
---
Last updated: September 29, 2026
If you have feedback on this topic, contact .
# Pagination - How to search items in a page with multiple paginations
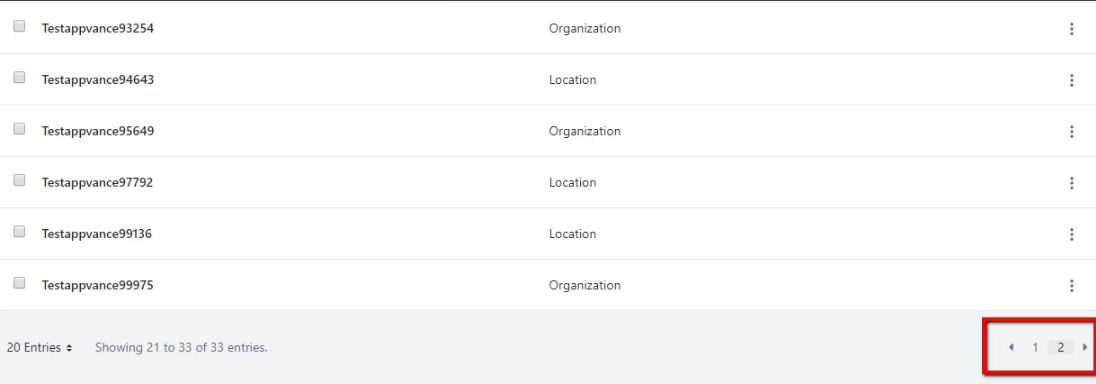
If you want to search for a specificstring, "Testappvance15860" for example, and if is not found then it should click on the next page.
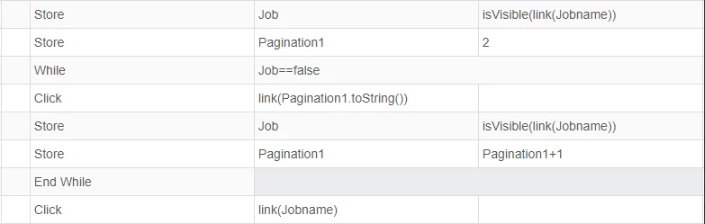
The code will search for the string in the page if the string is not found then it will click on the next pagination
The Js Code is given below
```
var Job=isVisible(link(Jobname));
var Pagination=2;
log(Pagination.toString());
while (Job==false){
click(link(Pagination.toString()));
var Job=isVisible(link(Jobname));
var Pagination=Pagination+1;
}
click(link(Jobname));
```
---
Last updated: June 01, 2023
If you have any feedback on this topic, please contact us at
# Self-Healing Questions for Scenario Editor
**Last reviewed:** September 30, 2026
Use this article as a focused FAQ for Scenario Editor self-healing behavior, review expectations, and locator maintenance.
## What changed in this article
- Replaced Test Designer terminology with Scenario Editor and changed the title into a self-healing FAQ.
- Added guidance that self-healing suggestions should be reviewed rather than accepted blindly.
- Clarified that self-healing helps locator drift but does not replace stable locator design, assertions, or functional maintenance.
## Validation workflow
1. Review the original locator, the suggested healed locator, and the page context before accepting a change.
2. Replay the scenario to confirm the healed locator selects the intended element consistently.
3. Update the scenario or locator strategy if repeated healing indicates unstable application markup.
**Review note:** This article now complements the self-healing support page without duplicating its accessor inventory.
---
Last updated: September 30, 2026
If you have feedback on this topic, contact .
# Regular Expression in Appvance Designer.
Query:
We need a generic statement for the below accessor.
cell("AddImage/Attachment for Issue # 40")
As in the 40 will be replaced by any random number.
Solution:
Here are some of the reg ex that you can give a try.
cell("AddImage/Attachment for Issue #/")
cell("AddImage/Attachment for Issue/")
cell("AddImage/")
cell("AddImage/Attachment for Issue #/[0-9]/").
---
Last updated: June 02, 2023
If you have any feedback on this topic, please contact us at
# Solutions to common Test Designer IDE Challenges
Most of the times click and record can solve your testing needs. But also it is not rare that due to the “scripting” oriented description of the use cases to implement, the tester is faced with the challenge to approach the automation from a scripting angle.
This document provides some examples of scenarios where a little coding like steps are needed to speed up some automation requirements implementation using IDE.
If you are facing AI automation challenges please take a look at [Useful smartags workbench custom actions and other js examples.
**Solutions to Common Test Designer IDE Challenges**](https://docs.appvance.net/Content/AIQ/General_KB_Articles/Useful_smartags_workbench_custom_actions_and_other_js_examples.htm)
#### Numbers: convert parts of a string value to a floating number
```
// Suppose you have a span with the value $19.99 but you need validate the number is greated than 15.
Store | $stringValue | getText(span("carttotal")) // "$19.99"Store | $floatingValue | parseFloat($stringValue.substring(1)) // removes the $ then convertes "19.99" to a floating number
Assert Greater Than | $floatingValue | 15
```
```
// When needing to perform math operation so often you need to convert a number in string format to an actual integer
Store | $integerValue | parseInt(span("item-quantity"))
```
```
// Assuming the table has an id myTable you can get the number of rows in the IDE using:
Store | $rowsQuantity | _eval("ds$('#myTable tbody > tr').length")
or
Store | $rowsQuantity | getLength("ds$('#myTable tbody > tr')")
```
```
// Assuming the table has an id myTable you can get the number of rows in the IDE using:
Store | $rowsQuantity | getLength("#myTable tbody > tr")
```
```
// You can use the jQuery index() function to find the column index of a table that contains certain text "MyHeader". REF: https://api.jquery.com/index/
Store | $columnIndex | _eval("ds$('thead th:contains(MyHeader)').index()")+1
```
```
// If you need to iterate over a table column to process the contents of a certain column you can use above functions to get the total number of
// rows in the table and the column that has the appropiate heade and then:
Store | $rowIndex | 1
While | $rowIndex < $rowsQuantity
Store | $cellValue | _eval("ds$('tbody tr:nth-child("+$rowIndex+") td:nth-child("+$columnIndex+")').text()")
[ do something with $cellValue ]
Store | $rowIndex | $rowIndex + 1
End While
```
```
// If the application does not provide a button to close the window, need to insert
// the link and click it with following lines.
CustomJS | "ds$('body').append('
aiq-close')"Click | link("aiq-close")
```
```
Store | $url | getAttribute(link("id"),"href")
```
```
Set FindOnlyEnabled | false |
Store | submitdis | getAttribute(button("cancellation-submit"),"disabled")
Set FindOnlyEnabled | true |
Assert Equal | submitdis | "disabled"
```
```
Get from Whiteboard | $caseNum | "CaseNumber"Click | link("Case Search") |
Set Value | textbox("form-control") | $caseNum
Click | submit("Search") |
Store | caseName | getText(cell(1,_near(span(["caseNameLabel"]))))
Click | link($caseNum) |
Select Window | caseName |
```
---
Last updated: July 03, 2023
If you have any feedback on this topic, please contact us at
# Group Step Statistics at a Higher Summary Level
**Last reviewed:** September 28, 2026
Use this article when execution results need grouped step statistics for easier analysis and reporting.
## What changed in this article
- Rewrote the title for clarity and made the purpose about grouped result analysis.
- Added guidance on grouping related steps by business transaction, flow, or validation section.
- Added a warning that grouping should not hide critical step-level failures or timing outliers.
## Validation workflow
1. Identify which steps belong to the same business action or transaction.
2. Apply grouping/naming consistently before running the scenario.
3. Review both grouped statistics and individual step details after execution.
**Review note:** The page now balances summary-level reporting with the need to preserve detailed failure evidence.
---
Last updated: September 28, 2026
If you have feedback on this topic, contact .
# Test Designer 3: HTML5 and Web Application Compatibility
Test Designer 3 supports modern HTML5-based web applications and many of the technologies commonly used to build interactive web applications.
HTML5 introduced new HTML elements, attributes, APIs, and browser behaviors, while the broader modern web platform includes technologies such as JavaScript, CSS, browser APIs, and client-side frameworks.
For additional information about HTML and the web platform, see:
- [WHATWG HTML Standard](https://html.spec.whatwg.org/)
- [MDN HTML Documentation](https://developer.mozilla.org/en-US/docs/Web/Guide/HTML/HTML5)
## HTML5 Compatibility
Test Designer supports most commonly used HTML5 features. However, compatibility can depend on how an application implements its UI components and JavaScript event handling.
Modern web applications can trigger actions through multiple mechanisms. For example, an application may use standard browser events, JavaScript event handlers, CSS pseudo-classes, custom components, or framework-specific event processing.
As a result, an action that works with a standard HTML element may behave differently when the same functionality is implemented through a custom component or JavaScript framework.
### Click Actions
Test Designer provides multiple methods for interacting with clickable elements, including `click` and `click2`.
In most cases, the standard `click` action is sufficient. However, some applications implement additional JavaScript behavior or custom event handling that may require an alternative click method.
For example, an application may perform additional processing through JavaScript or use CSS pseudo-classes and framework-specific event handlers.
For more information about CSS pseudo-classes, see the [MDN CSS pseudo-classes documentation](https://developer.mozilla.org/en-US/docs/Web/CSS/Pseudo-classes).
If a standard click action does not produce the expected behavior, try the alternative click method or use an action specifically designed for the application's implementation.
### File Upload
HTML5 does not prescribe a single implementation pattern for file-upload interactions across all web applications.
Applications may implement file selection using standard HTML elements, JavaScript, custom components, or framework-specific controls.
To accommodate these implementations, Test Designer provides multiple `setFiles` methods. The appropriate method depends on how the application's file-upload component is implemented.
If a file-upload action does not work as expected, verify the underlying HTML element and the application's JavaScript implementation, then select the appropriate `setFiles` method.
## Authentication Support
Test Designer supports the following authentication mechanisms:
- Basic Authentication
- NTLM Authentication
- Cookie-Based Authentication
- Digest Authentication
- ADFS with Kerberos Authentication
- Active Directory Authentication
- ADFS with NTLM Authentication when ADFS Extended Protection token checking is disabled
- ADFS with Negotiate Authentication when ADFS Extended Protection token checking is enabled
### AIQ Authentication
Authentication to the AIQ application itself can be configured using:
- Internal AIQ credentials
- LDAP authentication, which requires additional configuration
These authentication mechanisms are separate from authentication used by the web applications being automated.
## Record and Playback Considerations
Test Designer uses browser instrumentation and injection mechanisms to provide recording and playback capabilities.
Certain application security mechanisms can interfere with these capabilities.
### Man-in-the-Middle Detection
Applications or security tools that detect man-in-the-middle (MITM) activity may prevent Test Designer from recording, injecting, or interacting with a page correctly.
If an application uses certificate pinning, traffic inspection, or other mechanisms designed to detect intercepted browser traffic, additional configuration may be required.
### Browser Certificate Validation
Test Designer may use certificates as part of its browser instrumentation and traffic interception mechanisms.
Depending on the browser and application configuration, certificate validation can prevent a page from loading correctly or cause the browser to display certificate warnings.
For example, browsers may reject certificates that do not match the certificate expected for a particular domain.
If a page displays an invalid-certificate error when accessed through Test Designer, verify the browser certificate configuration and the application's security policies.
## JavaScript Framework Support
Test Designer 3 has been tested with commonly used JavaScript frameworks and web technologies, including:
- React
- AngularJS
- Angular
- jQuery
- ExtJS
- Bootstrap
Support for a framework does not necessarily guarantee compatibility with every application built with that framework.
Framework implementations can vary significantly, and applications may use custom components, third-party libraries, proprietary event handling, or newer framework versions that behave differently from the versions originally tested.
## Compatibility Considerations
Although Test Designer is designed to support modern HTML5 applications and commonly used web frameworks, compatibility can depend on several factors, including:
- Browser version
- Framework version
- Application architecture
- Custom JavaScript event handling
- Custom web components
- Security and certificate policies
- Third-party browser extensions
- Application-specific DOM behavior
- Framework-specific event handling
New framework releases, major version changes, forks, and highly customized implementations may require additional validation.
When an application does not behave as expected, first determine whether the behavior is specific to the application's implementation or to the underlying framework.
## Support and Feature Requests
Appvance continuously evaluates compatibility with modern web technologies and commonly used frameworks.
If you encounter a web application that does not behave as expected in Test Designer, provide the relevant application details, the Test Designer action being used, and the observed behavior when submitting a support request.
Feature requests and compatibility issues can be submitted through the available Appvance support channels.
---
**Last updated: August 25, 2026**
If you have any feedback about this topic, please contact .
# Using setFile in Test Designer with Relative Paths
setFile action in designer is used to set a file in the file input field.
Form elements of type "file" cannot be populated using javascript on the browser.
Appvance designer has a workaround for handling file uploads, designer intercepts the request in the proxy, reads the file off the file system and inserts it into the multi-part request.
The file has to be present on that path on the machine running Appvance AIQ.
By using relative paths, the files can be sent to all the test node machines running Appvance AIQ so the files need not be moved to all the testnode instances.
Below designer script example shows the same:
Scenario: Image need to be uploaded to my web application and need to run performance test on several test nodes without moving the files manually to all the test node machines.
Images or any folder was created in the same place as the designer script, in my case 'FileUpload.ds' script is located in /Appvance AIQ/MyScripts folder and a folder by name 'Images' was created inside MyScripts folder.
Designer:
- setFile in designer should have the path "Images/photo.JPG" as seen in the below screen shot.

Scenario Builder:
- Create the scenario by browsing the designer script created.
- Go to Resources and select the Images folder as seen below.
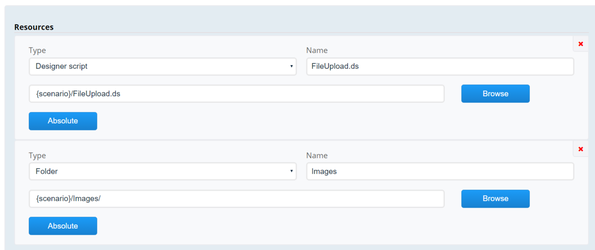
- Save and play the scenario!
Note: In the locations panel, user can provide any location to run this particular scenario or can use the cloud files to initialise any cloud machine and run the scenario, all the resource files will be copied over to the test node machines!
---
Last updated: June 26, 2023
If you have any feedback on this topic, please contact us at
# Using while loop in Test Designer 2.0
Attached example designer script will show how to use while loop in designer script.
[whileLoop.ds](../../../Resources/Images/GeneralGraphics/whileLoop.ds)
---
Last updated: June 26, 2023
If you have any feedback on this topic, please contact us at
# Using writeCSVFile API in Sahi.
Below code example shows how to use writeCSVFile API.
```
_navigateTo("http://localhost:8080/Appvance/login.html");
_setValue(_textbox("username"), "appvance");
_setValue(_password("password"), "appvance");
_click(_submit("Login"));
//user function
var htmlelement1 = "username";
var value1 = "appvance";
var htmlelement2 = "password";
var value2 = "appvance";
//capture elements and write to CSV
var array = [[htmlelement1,value1],[htmlelement2,value2]];
_writeCSVFile(array, "elements1.csv", true);
//another way of declaring array and writing to CSV
var $datatowrite1 = [];
$datatowrite1[0] = [htmlelement1,value1];
$datatowrite1[1] = [htmlelement2,value2];
_writeCSVFile($datatowrite1, "elements.csv", true);
_writeCSVFile($data, "userinfo.csv", true); // overwrites data into userinfo.csv
To get value of some element below step can be used.
var value1 = "_getText(_div("/someclass/"))";
===============================================
writeFile
_writeFile("Value", "FilePath"); // appends second line in file
```
```
---
Last updated: March 09, 2023
If you have any feedback on this topic, please contact us at
# Working Around Asynchronous Popups
Asynchronous ads and popups are becoming more common on commerce sites. Many of the dialogs can be closed by simply re-forcing focus back to the main portion of the page.
Manually adding a focus step prior to each action in places where a modal popup may appear, ensures you can gracefully continue without error or interruption.
# Example
The following site always displays a modal, at an unpredicted time. The site however discontinues trying to display once the user leaves the main page. The focus action is used prior to the planned action to ensure the planned action occurs without error.
This can be accomplished in one of two ways:
## Approach 1: Using Two Separate Steps

## Approach 2: Using eval()

## Sample Designer Script
[](../../../Resources/Images/GeneralGraphics/shopping_checkForModal.ds)
---
Last updated: July 03, 2023
If you have any feedback on this topic, please contact us at
# Which JavaScript version is supported?
GraalVM JavaScript implements JavaScript as prescribed in the ECMAScript (ECMA-262) specification. It is fully compatible with the [ECMAScript 2021 specification](https://262.ecma-international.org/12.0/) (sometimes referred to as the 12th edition or “ES12”).
---
Last updated: March 09, 2023
If you have any feedback on this topic, please contact us at
# Browsers Not Listed When Clicking Record
## Issue
When you click **Record** in Test Designer, the expected browsers are not listed.
## Solution
### 1. Verify the browser paths
Make sure the browser executable paths configured in Test Designer are correct.
1. Open the `config` folder in your local Test Designer installation:
`TestDesigner/NetworkProxy/config`
2. Locate and open the `global.json` file.
3. Find the browser and platform that are experiencing the issue.
4. Verify that the configured browser executable path matches the actual location of the browser executable on your system.
5. If the path is incorrect, update it to the correct browser installation path.
### 2. Restart Test Designer as Administrator
After verifying or updating the browser paths:
1. Close Test Designer.
2. Restart Test Designer using **Run as administrator**.
3. Click **Record** and verify that the expected browsers are now listed.
---
**Last updated:** August 19, 2026
If you have any feedback on this topic, please contact us at .
1. Make sure the browser paths are correct. Open the /TestDesinger/NetworkProxy/config folder inside the Test Designer local installation and find the global.json. Scroll down and find the browser and platform that is giving problems. Verify that the listed paths for the browser executables are matching the browser program location in your system.
2. Restart Test Designer as Admin.
# Handle Browser Location Permission Prompts
# Handle Browser Location Permission Prompts
Browser permission prompts can interrupt Scenario Editor executions. Configure location permission behavior intentionally before the run instead of treating the prompt as an ordinary application dialog.
## Recommended approach
- Confirm whether the test requires real, mocked, or blocked location behavior.
- Use approved browser/profile configuration for the execution environment.
- Document the expected permission state with the scenario or environment notes.
- Do not grant browser permissions in production or shared environments without approval.
## Troubleshooting
1. Check whether the prompt is from the browser, the operating system, or the application.
2. Confirm the Test Node browser profile matches the intended permission state.
3. Review output and screenshots when a prompt blocks execution.
4. Prefer environment configuration over fragile click automation on browser prompts.
**Last updated:** September 9, 2026
# How to get the downloaded files in test designer?
The solution to this is using a function known as getDownloadedFiles(). This particular function is used to get the downloaded files. It can be passed through a variable. This function can be used as shown below:
var \[\] filedownloadedList = getDownloadedFiles(),
To get the file path from the downloaded list, use as below:
var filepath = fileDownloadedList.getJSONObject(0).getString("path")
where “fileDownloadedList” is a variable that has been used to store the downloaded file. This function is fetching the path of the downloaded file and stores it in a variable.
---
Last updated: June 26, 2023
If you have any feedback on this topic, please contact us at
# Self-Healing Support in Scenario Editor
Self-Healing Support in Scenario Editor
Self-healing can help Scenario Editor recover when a locator changes between runs. AIQ evaluates the recorded locator and available execution evidence to recommend an alternative when supported.
Use self-healing as a review aid, not as a substitute for maintaining reliable locators. Validate any proposed change in Scenario Editor before accepting it.
Supported actions and locator behavior can vary by AIQ release and browser technology. Consult the release-specific Scenario Editor documentation for the authoritative supported-accessor list.
Last updated: September 14, 2026
If you have any feedback on this topic, please contact us at documentation@appvance.ai
# Authentication Mechanisms in AIQ Tests
## Recommended guidance
Design authentication in AIQ tests so credentials, sessions, tokens, and test accounts are controlled, repeatable, and safe to use. Authentication steps should reflect the application under test and should not expose passwords or tokens in documentation, logs, screenshots, or scenario code.
## Common approaches
- UI login through Scenario Editor when the login flow is part of the test objective.
- Service Suite authentication for API tokens, OAuth flows, or setup calls.
- Pre-created test accounts with known permissions and reset procedures.
- Session setup or teardown steps that keep each run independent.
## Best practices
1. Use dedicated test accounts instead of personal or production accounts.
2. Store secrets in approved secure locations, not in visible steps or shared notes.
3. Validate multi-factor, SSO, captcha, or conditional-access requirements before automation.
4. Clear sessions when tests must start from a known state.
5. Document account role, environment, and cleanup expectations without revealing credentials.
*Last updated: October 6, 2026*
# Handle Validation Failures and Continue Scenario Execution
**Last reviewed:** September 30, 2026
Use this article when a Scenario Editor test should record a validation failure, continue safely, and leave clear evidence for review.
## What changed in this article
- Rewrote the question-style title into a clear Scenario Editor failure-handling task.
- Added guidance on soft validation versus hard stop decisions, cleanup actions, screenshots/logs, and result evidence.
- Clarified that continuing after a failure should be intentional and should not hide defects or corrupt downstream steps.
## Validation workflow
1. Decide whether the validation failure is safe to continue past or should stop the scenario immediately.
2. Capture evidence such as message text, screenshot, output log entry, or response payload before continuing.
3. Add cleanup or guard steps so later actions do not depend on a failed state.
**Review note:** This page now explains controlled continuation instead of simply bypassing failures.
---
Last updated: September 30, 2026
If you have feedback on this topic, contact .
# How can use a wild card when part of the identifier is always changing?
## Question
How can I use a wild card when part of the identifier is always changing?
How can I find an object, if part of the name is always changing?
## Resolution
A quick way to work with accessors, or objects where a portion of the name or attribute is dynamic, is to use the **Fuzzy Logic** syntax. By simply enclosing the string in quotes with **\[ \]**, AIQ will treat that portion as a contains search, and not require a complete match.
Read more about Fuzzy Logic in our documentation
Need more complex pattern matching? Learn how to use Regular Expressions here
---
Last updated: June 02, 2023
If you have any feedback on this topic, please contact us at
# SmartTags: Using a custom getName Method
## Problem
As a user, I want to customize how AIQ finds and interacts with a specific element type in my application
## Resolution
Teach AIQ how to best identify and interact with your specific element type using SmartTag Rules and Actions.
## Related Topics
Knowledge Base Articles
- [Understanding your Application with SmartTags ](https://docs.appvance.net/Content/AIQ/TestDesigner/TestDesigner2_3_KB/Understanding_your_Application___with_SmartTags__.htm)
- [Useful smartags workbench custom actions and other js examples ](https://docs.appvance.net/Content/AIQ/General_KB_Articles/Useful_smartags_workbench_custom_actions_and_other_js_examples.htm)
Documentation
- [Test Designer API Reference ](https://docs.appvance.net/Content/AIQ/TechRef/TestDesignerAPIRef/API_References_New/API%20Reference.htm)
```
var theElement = ds$(element);
// attributes to try and in a given order
let arr = ["name", "placeholder"];
for (let i = 0; i < arr.length; i++) {
try {
var accessorValue = theElement.attr(arr[i]);
if (typeof accessorValue !== 'undefined') {
accessorValue = accessorValue.trim().replace(/(\r\n|\n|\r|\t)/g,"");
break;
}
} catch(e) {
// maybe the element doesn't contain the attribute
}
}
if (typeof name === 'undefined') {
accessorValue = "UNKNOWN";
}
return accessorValue;
```
```
var htmlElement = ds$(element);
var name = htmlElement.attr('id');
if (typeof name === 'undefined') {
name = "";
}
if (name === "") {
name = htmlElement.attr("text");
}
if (typeof name === 'undefined') {
name = "";
}
if (name === "") {
name = htmlElement.attr("name");
}
if (typeof name === 'undefined') {
name = "";
}
if (name === "") {
name = "UNDEFINED"; // if nothing works, clearly denote as UNDEFINED
}
return name.replace(/(\r\n|\n|\r|\t)/g, "").trim();
```
---
Last updated: July 03, 2023
If you have any feedback on this topic, please contact us at
# Maximizing the number of concurrent browsers
For performance testing, you can increase the number of concurrent Chrome browsers that can run on an AIQ Test Node by optimizing the node's compute and storage resources.
The maximum number of concurrent browsers depends on the application under test, the complexity of the test, browser activity, available CPU and memory, and storage performance.
As a general starting point, an AWS EC2 node using standard EBS storage may support approximately **20 to 30 concurrent Chrome browsers**. Higher concurrency can be achieved by using EC2 instance types that provide local NVMe SSD instance storage and by configuring AIQ to use that storage.
> **Important:** These numbers are guidelines, not fixed limits. The appropriate browser count must be determined through performance testing with the application under test.
## Using NVMe SSD Instance Storage
Storage I/O can become a bottleneck when running a large number of concurrent browsers. Browser processes generate significant disk activity, including cache and temporary-file operations.
AWS EC2 instance types such as the **m6id** family include local NVMe SSD instance storage. For example, current AWS specifications list:
- `m6id.2xlarge`: 8 vCPUs, 32 GiB memory, 474 GB NVMe SSD
- `m6id.4xlarge`: 16 vCPUs, 64 GiB memory, 950 GB NVMe SSD
These NVMe SSD volumes provide substantially higher I/O performance than typical baseline EBS configurations.
### Important considerations
NVMe instance storage is **ephemeral**. Data stored on an instance store volume persists only for the lifetime of the associated EC2 instance. It should therefore be treated as temporary working storage rather than permanent storage.
AIQ files, configuration files, or other data that must survive an instance stop or termination should remain on persistent storage.
Because the NVMe storage is not persistent, the node must prepare the storage and copy the required AIQ files to it each time the instance is initialized.
## Configuring AIQ to Use NVMe Storage
The recommended setup uses an initialization script, such as `nvme_setup.sh`, to prepare the performance node.
The script should:
1. Detect and mount the available NVMe instance-store device.
2. Copy the GraalVM installation to the NVMe storage.
3. Copy the `aiq_distribution` directory to the NVMe storage.
4. Configure Chrome to use a local cache directory on the NVMe storage.
5. Start AIQ from the NVMe storage.
The Chrome configuration can be added to:
`aiq_distribution/NetworkProxy/config/global.json`
Add the following configuration:
```json
{
"name": "experimentalDS3",
"value": "--disk-cache-dir=cache||--disk-cache-size=1"
}
```
This configuration redirects the Chrome disk cache to the local storage used by the AIQ node.
## Setting Up an AWS EC2 Performance Node
### 1. Prepare the NVMe setup script
Add the `nvme_setup.sh` script to the AIQ distribution on the EC2 instance.
The script should detect the available NVMe instance-store volume, mount it, and copy the required AIQ and GraalVM directories to the local storage.
The original script assumes that AIQ is installed in:
```text
/opt/aiq/aiq_distribution
```
If AIQ is installed in another location, update the script accordingly.
> **Note:** The exact NVMe device name can vary between EC2 instance types and operating systems. The setup script should detect the device rather than assuming a fixed device name.
### 2. Configure Chrome disk caching
Modify:
```text
aiq_distribution/NetworkProxy/config/global.json
```
Add:
```json
{
"name": "experimentalDS3",
"value": "--disk-cache-dir=cache||--disk-cache-size=1"
}
```
The cache directory should reside on the NVMe-backed AIQ installation.
### 3. Start AIQ using systemd
For Linux performance nodes, start AIQ through a `systemd` service rather than `/etc/rc.local`.
Using `systemd` also allows you to increase operating-system resource limits. This is particularly important when running many concurrent browsers because the default per-process file descriptor limit may be too low.
Create:
```text
/etc/systemd/system/appvance.service
```
Use the following configuration and adjust the paths and Java version for the environment:
```ini
[Unit]
Description=Start Appvance IQ services
After=syslog.target
[Service]
Environment=PATH=/opt/graalvm-ce-java11-21.3.3.1/bin:/sbin:/bin:/usr/sbin:/usr/bin
Environment=JAVA_HOME=/opt/graalvm-ce-java11-21.3.3.1
User=ec2-user
Type=simple
LimitNOFILE=10000000
LimitNPROC=20000
ExecStart=/bin/bash /opt/aiq/aiq_distribution/TestNode/nvme_setup.sh
WorkingDirectory=/opt/aiq/aiq_distribution/TestNode
TimeoutStartSec=0
[Install]
WantedBy=multi-user.target
```
> **Note:** Verify the Java/GraalVM version and installation path before using this configuration. The paths above are examples from the original configuration and may not match the AIQ version installed on your node.
After creating the service, run:
```bash
sudo systemctl daemon-reload
sudo systemctl enable appvance
sudo systemctl start appvance
```
To verify the service:
```bash
sudo systemctl status appvance
```
The original article contains a typo (`systemclt enable`). The correct command is:
```bash
systemctl enable appvance
```
## Resource Limits
When increasing browser concurrency, make sure the operating system can support the required number of processes and open files.
The example service uses:
```ini
LimitNOFILE=10000000
LimitNPROC=20000
```
These values are intentionally high and should be validated against the requirements of the specific environment. Increasing limits does not by itself guarantee higher browser concurrency; CPU, memory, storage I/O, network capacity, and the application under test can all become bottlenecks.
## Example Concurrency Results
The original performance testing produced the following results:
| EC2 Instance
| Concurrent Chrome Browsers
|
|---|
| `m6id.2xlarge`
| 40
|
| `m6id.4xlarge`
| 80
|
These results were obtained with a Test Designer test case and should be treated as **example performance results rather than guaranteed capacity**.
Actual concurrency can vary depending on:
- Application complexity
- Number and type of requests generated by each browser
- JavaScript execution
- Browser memory consumption
- CPU utilization
- Network traffic
- Test data
- AIQ configuration
- Chrome version
- Operating-system configuration
- Storage performance
For this reason, perform a capacity test before selecting the final number of concurrent browsers for a performance environment.
## Amazon Linux Version
The original version of this article specifically targeted **Amazon Linux 2**.
**Amazon Linux 2 reached end of life on June 30, 2026.** AWS recommends migrating to **Amazon Linux 2023**.
Therefore, new performance nodes should use an AWS-supported operating system and the corresponding AIQ installation and startup configuration.
If an existing environment still uses Amazon Linux 2, treat the configuration in this article as a legacy setup and plan migration to Amazon Linux 2023.
## EBS Storage Considerations
EBS performance depends on the volume type and its provisioned performance.
For example, Amazon EBS `gp3` volumes provide a baseline of **3,000 IOPS and 125 MiB/s throughput**, with additional IOPS and throughput available through provisioning.
Therefore, the storage bottleneck should not be described simply as a limitation of a "60 GB EBS volume." When investigating concurrency limitations, monitor the actual EBS IOPS, throughput, latency, and utilization of the node.
For workloads that generate substantial browser disk activity, local NVMe instance storage can be an effective way to reduce EBS-related storage contention.
## Troubleshooting and Capacity Testing
If increasing the number of browsers causes execution failures or significantly longer response times, monitor the following resources during the test:
1. CPU utilization
2. Memory utilization
3. EBS IOPS and throughput
4. NVMe utilization
5. Disk latency
6. Network utilization
7. Number of open files
8. Number of running processes
9. Chrome memory consumption
10. AIQ/Test Node logs
Increase concurrency gradually rather than immediately configuring the maximum expected browser count.
For example:
```text
20 browsers → 40 browsers → 60 browsers → 80 browsers
```
At each level, verify that the node remains stable and that response times and error rates remain within the requirements of the performance test.
---
**Last updated: September 2, 2026**
If you have any feedback on this topic, please contact us at .
# Understand Step Duration Calculations in Scenario Editor
**Last reviewed:** September 29, 2026
Use this article to choose and interpret AIQ step-duration metrics such as DOM Complete, Server Response Complete, Full Page Loaded, Script Time, Ajax Time, and Next Step Ready.
## What changed in this article
- Replaced Test Designer/Web Designer wording with Scenario Editor terminology while keeping browser PerformanceNavigationTiming context.
- Clarified which timings come from the browser and which are calculated by AIQ, including the SPA behavior where browser timings may return 0.
- Added guidance that Script Time is often closer to perceived user duration, while Ajax Time is mostly retained for backward compatibility.
## Validation workflow
1. Select the timing option that matches the question being answered: browser timing, user-perceived step time, or SPA readiness.
2. Compare AIQ output with browser performance timing only for browser-provided metrics.
3. Document the selected timing option when sharing reports so reviewers interpret duration values correctly.
**Review note:** This update keeps the technical timing distinctions but removes older Designer/Web Designer naming and fixes readability around asynchronous behavior.
---
Last updated: September 29, 2026
If you have feedback on this topic, contact .
# Troubleshoot Iteration Summary Error Messages
**Last reviewed:** September 28, 2026
Use this article when an AIQ execution shows an iteration-summary error and the team needs to identify whether it came from data, playback, or reporting.
## What changed in this article
- Changed the article from a vague error-message title into a troubleshooting workflow.
- Added checks for DPL row availability, failed assertions, step-level output, report generation timing, and execution logs.
- Clarified that the iteration summary is an investigation entry point, not the only source of failure evidence.
## Validation workflow
1. Open the failed execution and compare the iteration summary with the step output.
2. Check whether the failing iteration maps to a specific DPL row or input value.
3. Review report/output logs before changing the scenario logic.
**Review note:** This now helps triage data-driven iteration failures instead of just naming the error.
---
Last updated: September 28, 2026
If you have feedback on this topic, contact .
# Capture and Validate Tooltips in Scenario Editor
**Last reviewed:** September 29, 2026
Use this article when a Scenario Editor test needs to trigger, capture, and validate tooltip text.
## What changed in this article
- Replaced Test Designer wording with Scenario Editor terminology.
- Added guidance to distinguish native title tooltips, ARIA/toolkit tooltips, and custom DOM tooltip components.
- Added timing and hover/focus validation checks so flaky tooltip assertions are easier to diagnose.
## Validation workflow
1. Identify whether the tooltip appears on hover, focus, or click and whether it is native or custom HTML.
2. Capture the tooltip text or attribute after the UI has displayed it.
3. Replay the step with timing checks and confirm the assertion fails when expected text changes.
**Review note:** Modernized the tooltip workflow and added custom component handling for current web apps.
---
Last updated: September 29, 2026
If you have feedback on this topic, contact .
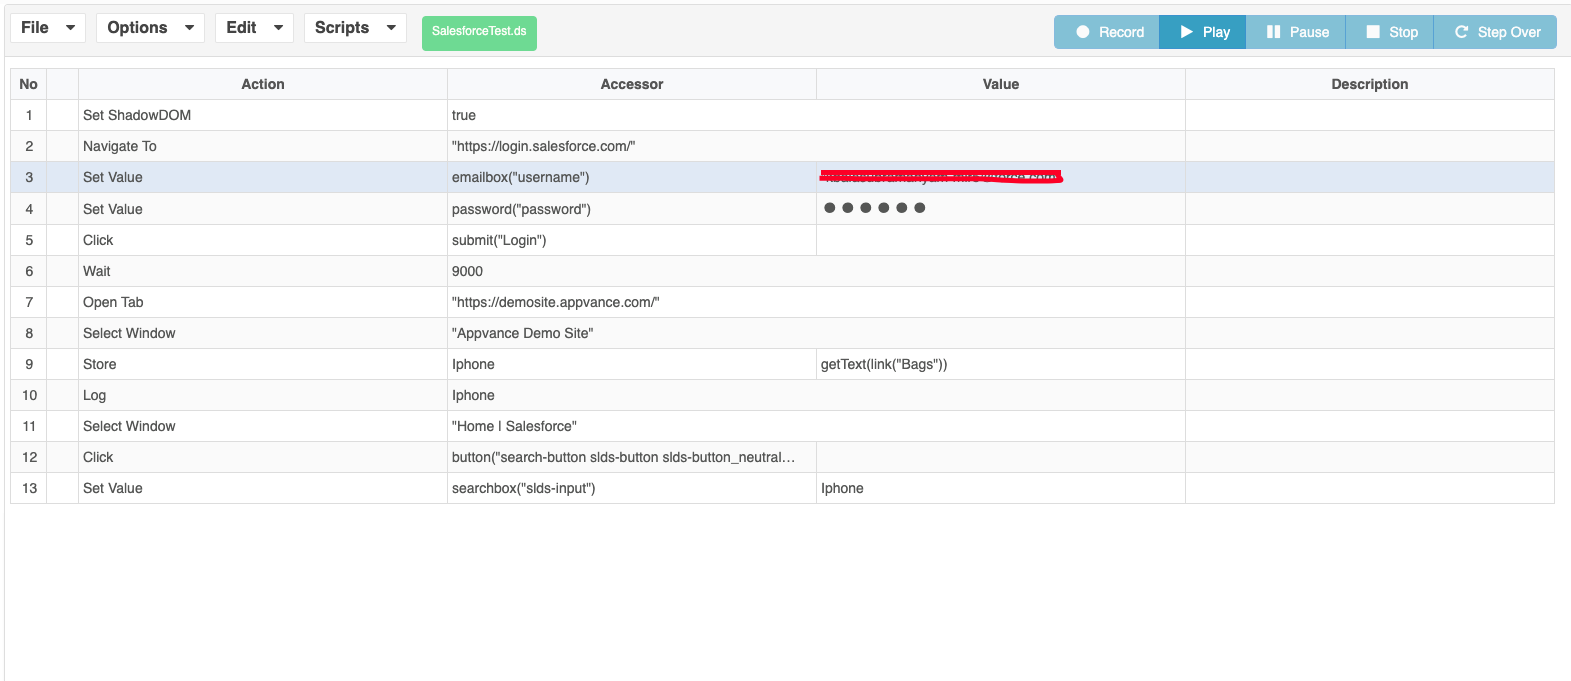
# How to access two different application at the same time in a single script.
1. Navigate to any URL Eg: [https://demosite.appvance.com/](https://demosite.appvance.com/)
2. Perform some steps
3. Add new action called “Open Tab” and add a URL “[https://www.apple.com/](https://www.apple.com/) “
4. Store any value for any element on the page
5. Use Select Window action and go to 1st URL i.e [https://demosite.appvance.com/](https://demosite.appvance.com/)
6. Click on the search text field icon on the Appvance Demo site app
7. Use the Variable on the text field which was stored in the Apple website
8. You will be able to search with the created variable in 2nd application
9. User can use Select Window to move Back and Forth in both the applications.
---
Last updated: June 01, 2023
If you have any feedback on this topic, please contact us at
# How to find the X Y Coordinates
function alertMousePos(event) {
alert(
"X: " + event.clientX +
" - Y: " + event.clientY);
}
document.addEventListener("click", alertMousePos);
1. Just copy and paste the above code into the browser’s console and press the ‘Enter’ key.
2. Now click on wherever on the page- An alert will get displayed with x and y values -- It gets the x, and y coordinates of the click of the mouse pointer. Note - Any console (Normal browser or test designer browser) should work, but advisable to use the Test Designer browser in maximized state.
---
Last updated: June 02, 2023
If you have any feedback on this topic, please contact us at
# How to perform Mouse Over action using Toggle Style API From Test Designer
We have the below two APIs to perform mouse over from Test Designer
- Mouse Over
- Toggle Style
**MouseOver using Toggle Style Action**
Add the below step with the accessor which needs to be Mouse over
1. Select API as **Toggle Style** from the scripts step
2. Add the Accessor which needs to mouse over
3. Add **“hover“** in the value column
**Example Screenshot**

---
Last updated: June 01, 2023
If you have any feedback on this topic, please contact us at
# Verify Whether a User Exists in the Database
**Last reviewed:** September 29, 2026
Use this article when a Scenario Editor or Service Suite validation needs to confirm whether a specific user record exists in a database.
## What changed in this article
- Rewrote the question-style title into a database validation task.
- Added checks for parameterized queries, database connection settings, permissions, expected row count, and negative-case validation.
- Added a safety note to avoid logging passwords, tokens, email addresses, or sensitive user attributes from query results.
## Validation workflow
1. Identify the unique user key to validate, such as username, user ID, or test email.
2. Run a parameterized query through the approved AIQ database/service workflow.
3. Assert the expected row count or field value, then run a negative case to confirm the validation can fail correctly.
**Review note:** The article now focuses on safe database validation instead of a broad yes/no question.
---
Last updated: September 29, 2026
If you have feedback on this topic, contact .
# Validate Color of an Object
This is an example of a script that detects the color of a specific object and then uses conditional statements to compare it to a reference color.
### Web Designer Script
This is the AIQ designer test script to accomplish this validation. The script uses the `GetCssValue` function.
See [getCssValue for more information about the function.](https://docs.appvance.net/Content/AIQ/TechRef/TestDesignerAPIRef/API_References_New/General/APIRef_GetCSSValue.htm)
The example script uses the Appvance demo site. The object that the script is the comparing color of is a footer which contains the price of an item.
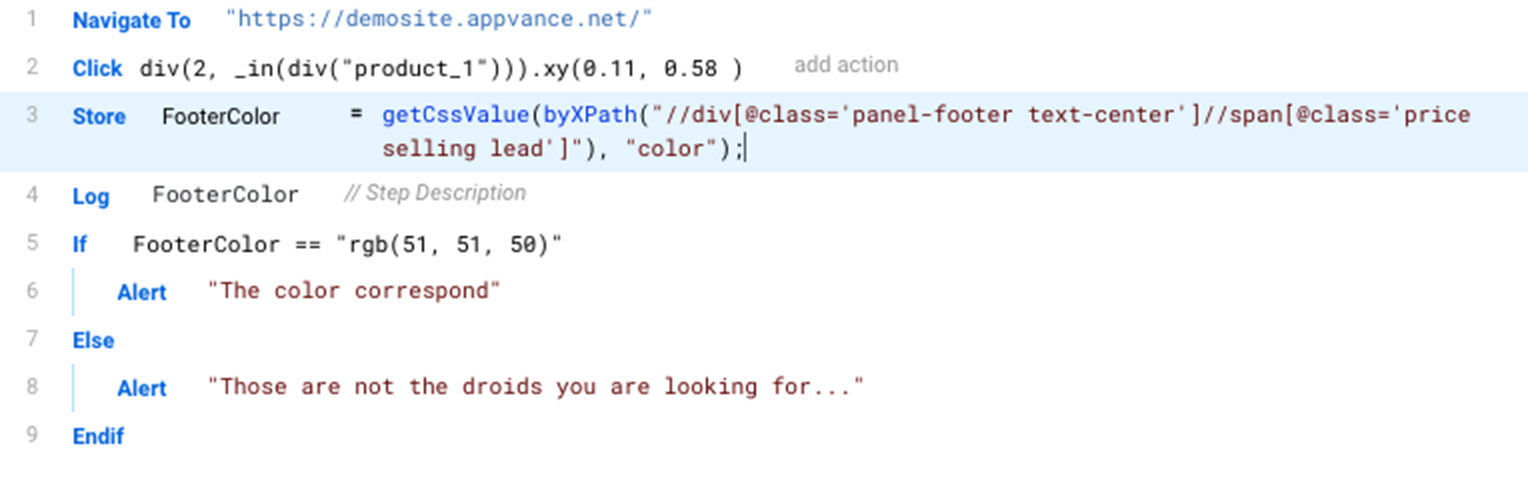
Download a copy of this script from: [ColorCheckExample.ds](../../Resources/Scripts/ColorCheckExample.ds)
### JS Code
For reference, this is the corresponding java script code for the ColorCheckExample test script.
```
/**
* @aiq.webdesigner
* This script requires AIQ Web Designer
*/
setShadowDOM(true);
navigateTo("https://demosite.appvance.net/");
click(fallback(`div(2, _in(div("product_1"))).xy(0.11, 0.58 )`,
`div(2, _in(div({'id':'product_1'}))).xy(0.11, 0.58 )`,
`div("panel-footer text-center").xy(0.11, 0.58 )`,
`div("$15.99").xy(0.11, 0.58 )`,
`byXPath("//div[@id='product_1']/div/div[2]").xy(0.11, 0.58 )`,
`byXPath('//*[@class="panel-footer text-center"]').xy(0.11, 0.58 )`,
`byXPath('/html/body/div[2]/div/div/div/div[2]/div/div/div[2]').xy(0.11, 0.58 )`,
`byXPath("id('product_1')/div[@class='panel panel-default']/div[@class='panel-footer text-center']").xy(0.11, 0.58 )`,
`byJQuery('div[class="row"] > div[class="col-md-3 col-sm-6 col-xs-6 product-list-item"] > div[class="panel panel-default"] > div[class="panel-footer text-center"]').xy(0.11, 0.58 )`,
`byJQuery('#product_1 > .panel.panel-default > .panel-footer.text-center').xy(0.11, 0.58 )`));
var FooterColor=getCssValue(byXPath("//div[@class='panel-footer text-center']//span[@class='price selling lead']"), "color");
log(FooterColor);
if (FooterColor == "rgb(51, 51, 50)"){
alert("The color correspond");
}
else {
alert(“Those are not the droids you are looking for");
}
```
---
Last updated: February 25, 2025
If you have any feedback on this topic, please contact us at
# MFA Authentication Automation Guidance
**Last reviewed:** September 30, 2026
Use this article to decide how AIQ tests should handle applications protected by multi-factor authentication.
## What changed in this article
- Reframed MFA automation around approved test-environment patterns instead of bypassing or weakening MFA.
- Added guidance for test accounts, pre-authorized sessions, API token flows, IdP test policies, and audit requirements.
- Added a warning that real user OTPs, personal devices, and production MFA prompts should not be automated in shared tests.
## Validation workflow
1. Confirm the approved MFA strategy with the application owner or identity team before building the scenario.
2. Use a controlled test account, test IdP policy, or token-based flow that is explicitly approved for automation.
3. Record evidence of the authentication path without logging OTPs, recovery codes, personal phone numbers, or secrets.
**Review note:** This page now treats MFA as a security control to coordinate around, not a popup to defeat.
---
Last updated: September 30, 2026
If you have feedback on this topic, contact .
# Create Multiple Orders and Write Order IDs to a Repository CSV
**Last reviewed:** September 30, 2026
Use this article when a Scenario Editor test needs to create multiple records and persist generated order IDs to a repository CSV for later validation or reuse.
## What changed in this article
- Shortened and corrected the long title while preserving the order-ID-to-CSV use case.
- Replaced Test Designer framing with Scenario Editor and repository CSV terminology.
- Added checks for CSV headers, append versus overwrite behavior, concurrency collisions, cleanup, and sensitive data masking.
## Validation workflow
1. Create the order records and capture each generated order ID from the response, UI, or service output.
2. Write only the required fields to the repository CSV with a clear header and deterministic file path.
3. Replay the consuming scenario and confirm it reads the expected rows without duplicate or stale IDs.
**Review note:** This page now focuses on the data handoff pattern and calls out concurrency risks when multiple runs write to the same CSV.
---
Last updated: September 30, 2026
If you have feedback on this topic, contact .
# Read and Write Data from a Downloaded XLSX File
Attaching the script along with the Screenshot to follow the steps
We need 3 different Service suite scripts
- A common JS script
- Filename JS: Where we are providing the Sheet name, Path of the repository where the file is being saved
- Write JS: Here as well, we need to define the repository name and file path after making the write action, We also need to add the controller URL and AIQ username
and Password
### Test Script
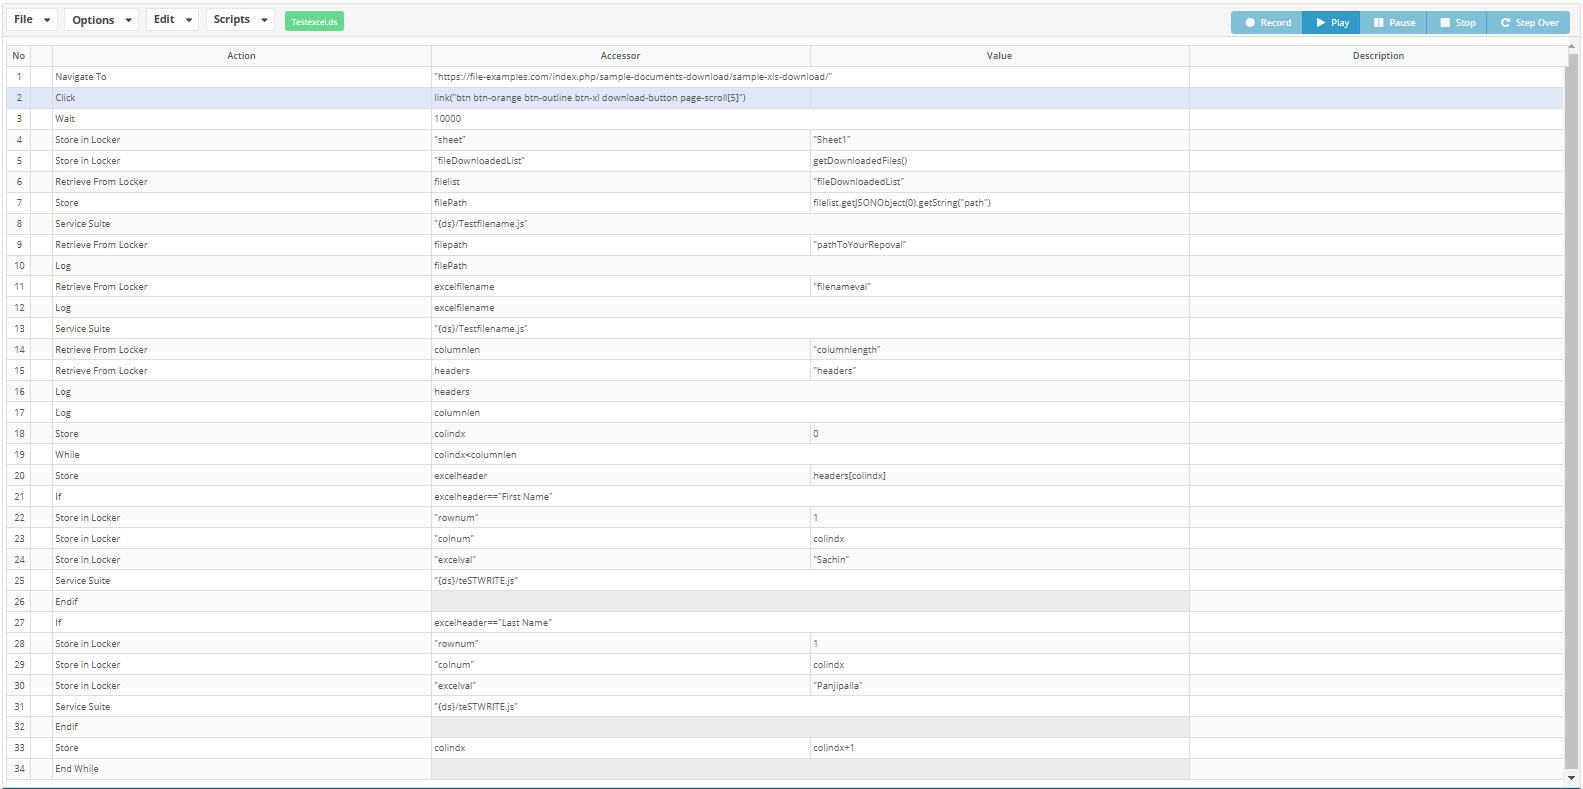Sample Script: [WriteExcel.ds](../../Resources/Scripts/WriteExcel/WriteExcel.ds)
- Testfile name: At step number 45, make sure to add the repository path and the repository name which the user cloned in the AIQ
- After clicking on download, add a step store in locker and provide the sheet name, which is there in the download file
-
- In Ds script at step 55 and 61, make sure to give the exact header name for the targetted column header
### Write JS
Write JS: Here as well, we need to define the repository name and file path after making the write action, We also need to add the controller URL and AIQ username
and Password
```
1
2
3
4
5
6
7
8
9
10
11
12
13
14
15
16
17
18
19
20
21
22
23
24
25
26
27
28
29
30
31
32
33
34
35
36
```
function writeexcel(row, col, value)
{
var $excel= readExcel(filepathval);
var $sheetname = locker.get("sheet");
log($sheetname);
//var $sheetname="Sheet1";
var $sheet = $excel.getWorkbook().getSheet($sheetname); // Get sheet as an object HSSFSheet
$excel.getWorkbook().setActiveSheet($excel.getWorkbook().getSheetIndex($sheetname));//Change active sheet to the one specified
var $headers = $sheet.getRow(0);
var $lastExistingColumn = $headers.getLastCellNum(); // Get number of colum
locker.put("columnlength",$lastExistingColumn);
log($excel);
$excel.setValueAt(row, col, value);
writeExcel($excel, filepathval);
}
var filepathval=locker.get("filenameval");
var rowval=locker.get("rownum");
var colval=locker.get("colnum");
var actualval=locker.get("excelval");
log("servicesuite "+filepathval);
writeexcel(rowval,colval,actualval);
var $boundary = "--AIQ-DS-BOUNDARY";
var $repositoryName = "Appvance"; // CHANGE FOR YOUR REPO NAME, THIS CONF MUST BE IN THE USER ACCOUNT USED TO LOGIN
var $CONTROLLER = "http://localhost:8080"; // Controller URL
var $username = "appvance"; // username used to login to aiq
var $password = "appvance"; // password used to login to aiq
var $uploadPath = "Customer/VWR/ReadWriteXLS/"; // CHANGE FOR folder in repo where the modified file should be uploaded
include("{ds}/commonFunctions.js");
if (login($CONTROLLER)) {
uploadFile(fileName, fileName);
var $resp= get($CONTROLLER+"/AppvanceServer/rest/admin/logout");
log("logout: "+$resp.getDataString());
};
```
```
```
1
2
3
4
5
6
7
8
9
10
11
12
13
14
15
16
17
18
19
20
21
22
23
24
25
26
27
28
29
30
31
32
33
34
35
36
37
38
39
40
41
42
43
44
45
46
47
48
49
50
51
52
53
54
55
```
function columnlen(filepathvalcol)
{
//var filepathvalcol=locker.get("filenameval");
var $sheetname = locker.get("sheet");
log($sheetname);
log("reading excel from "+filepathvalcol);
var $excel= readExcel(filepathvalcol);
//var $sheetname="Sheet1";
var $sheet = $excel.getWorkbook().getSheet($sheetname); // Get sheet as an object HSSFSheet
$excel.getWorkbook().setActiveSheet($excel.getWorkbook().getSheetIndex($sheetname));//Change active sheet to the one specified
var $headers = $sheet.getRow(0);
var $lastExistingColumn = $headers.getLastCellNum(); // Get number of colum
locker.put("columnlength",$lastExistingColumn);
var headersArray = []
for (var col = 0; col < $lastExistingColumn; col++) {
var cell = $headers.getCell(col);
switch (cell.getCellType().toString()) {
case "STRING":
headersArray.push(cell.getStringCellValue());
break;
case "NUMERIC":
headersArray.push(cell.getNumericCellValue());
break;
default:
headersArray.push(cell.toString());
break;
}
}
locker.put("headers", headersArray);
}
var json = locker.get("fileDownloadedList");
// [{"path":"C:\Users\Administrator\TestDesigner\NetworkProxy\execution\Chrome10383680D\EnrollmentSearch_2024022217255349.xls","name":"EnrollmentSearch_2024022217255349.xls","length":4702}]
var filePath = ""+json.getJSONObject(0).getString("path");
var fileName1 = ""+json.getJSONObject(0).getString("name");
var fileName = fileName1.replace(/\s+/g, '_')
locker.put("repofilename",fileName);
locker.put("filenameval",fileName);
filePath = filePath.replace(/\\/g,"/");
// path to your repo
var pathToYourRepo = "REPOSITORY/Appvance/Customer/VWR/ReadWriteXLS/" + fileName; // Give the path pointing to the folder that has the script
log("servicefilename val "+pathToYourRepo);
locker.put("pathToYourRepoval",pathToYourRepo);
log("file saved at: " + pathToYourRepo);
var fileContentAsBytes = java.nio.file.Files.readAllBytes(java.nio.file.Paths.get(filePath));
writeBytes(fileName, fileContentAsBytes);
log(" | downloaded file size: "+fileContentAsBytes.length);
columnlen(fileName);
```
```
```
1
2
3
4
5
6
7
8
9
10
11
12
13
14
15
16
17
18
19
20
21
22
23
24
25
26
27
28
29
30
31
32
33
34
35
36
37
38
39
40
41
42
43
44
45
46
47
48
49
50
51
52
53
54
55
56
57
58
```
function uploadFile(fileName, filePath) {
var data = createMultipartPayload(fileName, filePath);
var call = createPost($CONTROLLER + "/AppvanceServer/rest/file/uploadFile?&commitMessage=Appvance+skip+commit&path=REPOSITORY/" + $repositoryName + "/" + $uploadPath + fileName, data, "multipart/form-data", " boundary=" + $boundary);
var resp = process(call);
log(resp.getDataString())
}
function getSessionCookie() {
var $jsession = getCookieValue($CONTROLLER, "JSESSIONID");
var cookie = "JSESSION=" + $jsession;
locker.put("aiq-cookie", cookie);
addGlobalHeader("cookie", "JSESSION=" + $jsession);
}
function login() {
var $loginForm = formData();
$loginForm.put("username", $username);
$loginForm.put("password", $password);
var $resp = get($CONTROLLER+"/AppvanceServer/rest/admin/isLogged");
if ($resp.getDataString().indexOf("false")) {
var $call = createPost($CONTROLLER + "/AppvanceServer/rest/admin/logginForServices", $loginForm);
var $resp = process($call).getDataString();
if ($resp.indexOf("true") != -1) {
getSessionCookie();
log("Login successful");
return true;
} else {
log("Login was NOT successful: " + $resp)
return false;
}
} else {
getSessionCookie();
}
}
function createMultipartPayload(filename, path) {
var header = '--' + $boundary + '\n' +
'Content-Disposition: form-data; name="file"; filename="' + filename + '"\r\n' +
'Content-Type: application/octet-stream\r\n\r\n';
var headerBytes = new Array(header.length);
for (var i = 0; i < header.length; ++i) {
headerBytes[i] = header.charCodeAt(i);
}
var $data = readBytes(path);
var footer = '\r\n--' + $boundary + "--\r\n";
var footerBytes = new Array(footer.length);
for (var i = 0; i < footer.length; ++i) {
footerBytes[i] = footer.charCodeAt(i);
}
return headerBytes.concat($data).concat(footerBytes);
}
function getLastDownloadedFile(json) {
json.sort((a, b) => b.modifiedTime - a.modifiedTime);
return json[0];
}
```
```
---
Last updated: December 20, 2024
If you have any feedback on this topic, please contact us at