# 9.7 - Databases - MySQL
Databases - MySQL — Knowledge Base articles.
# Databases - MySQL Knowledge Base Articles
# Databases - MySQL Knowledge Base Articles
This page should be used as an index for AIQ MySQL database knowledge base content. Keep it focused on database maintenance, troubleshooting, upgrades, backups, retention, and safe operational procedures.
## Recommended index scope
- Installation and configuration guidance for supported MySQL versions.
- Backup, restore, retention, and storage-management procedures.
- Performance troubleshooting and result-database growth checks.
- Controlled cleanup procedures that protect reports and execution evidence.
- Upgrade notes and compatibility checks for AIQ releases.
## Maintenance guidance
Remove or consolidate duplicate database articles when they cover the same cleanup, install, or troubleshooting procedure. If a page contains risky SQL commands, keep warnings, backup requirements, and validation steps visible.
*Last updated: October 8, 2026*
# Exception: "org.appvance.hibernate.exception.GenericJDBCException: Cannot open connection"
Exception may appear in error logs within a controller while executing a Database Scenario
This topic assumes you are capable of creating sql scripts in MYSQL or other similar, as well as capable of creating Scenarios using Appvance UTP.
1. Grant all the privileges for the database user you are logged in as.
2. Execute the query below to resolve the aforementioned exception: GRANT ALL PRIVILEGES ON (database name). (table\_name) TO ‘ user’@‘localhost’ WITH GRANT OPTION;
3. In the event you are creating new database and new user, execute the query below to grant necessary privileges:
Ex:create a database "Apptest" with table name test
create a user and grant the privileges:
CREATE USER 'apctest1'@'localhost' IDENTIFIED BY 'apctest1';
CREATE USER 'apctest1' IDENTIFIED BY 'apctest1';
FLUSH PRIVILEGES;
GRANT SELECT, EXECUTE, SHOW VIEW, ALTER, ALTER ROUTINE, CREATE, CREATE ROUTINE, LOCK TABLES, UPDATE, REFERENCES, INSERT, INDEX, DROP, DELETE, CREATE VIEW, CREATE TEMPORARY TABLES ON `apctest1`.\* TO 'apctest1'@'localhost' WITH GRANT OPTION;
GRANT SELECT, EXECUTE, SHOW VIEW, ALTER, ALTER ROUTINE, CREATE, CREATE ROUTINE, LOCK TABLES, UPDATE, REFERENCES, INSERT, INDEX, DROP, DELETE, CREATE VIEW, CREATE TEMPORARY TABLES ON `apctest1`.\* TO 'apctest1'@'%' WITH GRANT OPTION;
FLUSH PRIVILEGES;
GRANT ALL PRIVILEGES ON Apptest.test TO ‘apctest1’@‘localhost’ WITH GRANT OPTION;
where
- Apptest - Database Name
- test - Table\_name
- apctest1 - User of the example database/table and user that was created.
---
Last updated: June 01, 2023
If you have any feedback on this topic, please contact us at
# How to drop a schema/database from mysql in Linux (ubuntu) machine?
- Open mysql using myql -u root -p command.
- \#To see the list of databases run below command
**show databases;**
- \#To drop a schema/database run below command
**drop database databasename;**
**EX: drop database utp;**
---
Last updated: June 02, 2023
If you have any feedback on this topic, please contact us at
# How to upgrade MySQL database ?
For upgrading MySQL from 5.6 to 5.7 version:
\*\* Windows OS only \*\*
Backup the APC database instance using workbench or through command-line steps.
\-- Stop the MySQL service:
NET STOP MySQL56
(Note: Check the exact name of the service using 'services.msc' tool)
\-- Delete the MySQL Service:
sc delete MySQL56
\-- Install MySQL57 (automatically upgrades existing MySQL56 installation)
(Note: MySQL57 installer can be downloaded from here:
[https://dev.mysql.com/downloads/windows/installer/5.7.html](https://dev.mysql.com/downloads/windows/installer/5.7.html)
---
Last updated: June 02, 2023
If you have any feedback on this topic, please contact us at
# Installing sqlplus to connect to RDS and run queries
Download Tools
Go to: (win x64) [http://www.oracle.com/technetwork/topics/winx64soft-089540.html](http://www.oracle.com/technetwork/topics/winx64soft-089540.html)
Go to: (win x86) [http://www.oracle.com/technetwork/topics/winsoft-085727.html](http://www.oracle.com/technetwork/topics/winsoft-085727.html)
Download the following packages:
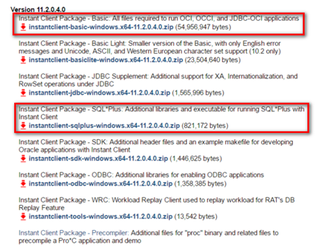
Unzip both packages in any folder say Documents.

Copy all the contents of Sqlplus download into the installclient\_11\_2 folder.
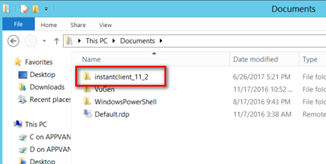
Double click folder, and copy full path from address bar:
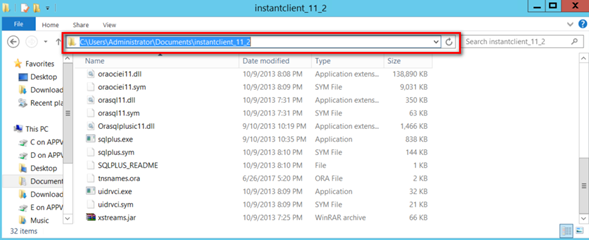
Path sample: “C:\\Users\\Administrator\\Documents\\instantclient\_11\_2”
System Configuration
Open “Control Panel” > “System and Security” > “System”.
Click “Change settings” > “Advanced” > “Environment Variable”.
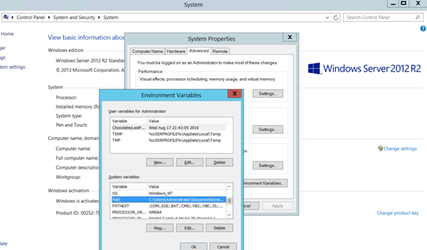
On **System variable**: ”**Click “Path**” > “**Edit**”.
Paste at the beginning of the folder path: “**\[folderlocation\]\\instantclient\_11\_2;**” (include the semicolon “**;**”)
Click OK, and to close all system windows.
Below is another file called tnsname.ora, download and place the file in the same folder "installclient\_11\_2.
[](../../Resources/Images/GeneralGraphics/tnsnames.ora)
Edit the file in any of your favourite editor:
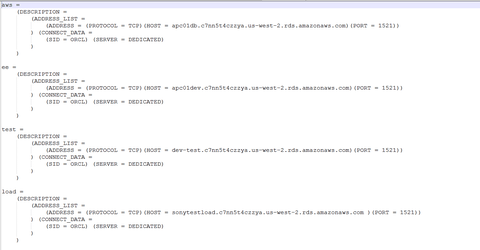
Copy one entry say 'aws' and paste below.
Change the name of aws to a desired name (say qatest) and also change the HOST to the new RDS.
Save the file.
Opening SQL Plus:
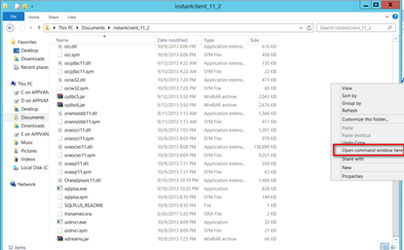
Go to folder “**\[folderlocation\]\\instantclient\_11\_2**” (where instantclient folder was unzipped)
Shift Right click, and click “Open command window here”
On command line prompt, type:
**sqlplus username/password@qatest**
**where username: is the root username of the RDS instance**
**password is the root password of the RDS instance**
**qatest is the alias name that was provided in tnsnames.ora**
To verify connection with database, type
Select \* from cat;
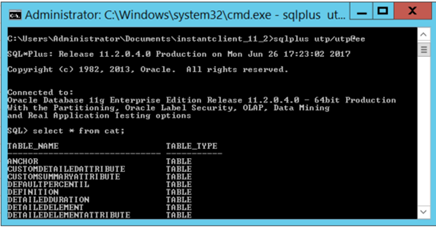
Once connected, run the OracleInitial.sql file by dragging and dropping placing an @symbol in the beginning.
Now connect again using utp/utp@qatest
Run OracleAppvance.sql file by dragging and dropping the file placing an @symbol in the beginning.
---
Last updated: July 03, 2023
If you have any feedback on this topic, please contact us at
# MySQL performance improvement
MySQL 5.7 and 5.6 performance improvement
By Default MySQL performs a flush operation per commit which is inoffensive on not demanding environments but on medium and high demanding environment, it could induce to I/O Bottleneck issues, even when the storage could be a SSD or a most sophisticated storage solution like a raid.
# AWS Database instances
For AWS MySQL Databases create a new parameter group based on the version that is running
Parameters Groups → Create Parameter Group
Finally on **Instances** choose the MySQL Database to use for UTP and **modify** it, assigning it the new parameter group and reboot the database.
# Local databases
For local database parameters setup, just add these parameter to my\*.ini configuration files on windows environment and my.cnf on Linux distros, procedure could be different depending on platform and MySQL version and release.
In windows the my.ini could be here
C:\\ProgramData\\MySQL\\MySQL Server 5.6 or here
C:\\ProgramData\\MySQL\\MySQL Server 5.7
It is not located here
C:\\Program Files\\MySQL\\MySQL Server 5.6\\my-default.ini. This is just a basic template
#### Parameters
set the following values, take care could be exceptions depending on the exact MySQL version, but in any case, this is intended only for 5.6 and 5.7 versions.
lower\_case\_table\_names=2 #Windows
max\_allowed\_packet=524288000
---
Last updated: June 02, 2023
If you have any feedback on this topic, please contact us at
# MYSQL: Drop Schema is taking way too long to drop the schema.
Solution:
Stop mysql service.
goto task manager > Go to services tab > look for MYSQL.
Right click the service and stop the service.
Again restart the same service.
Now drop the schema from MYSQL Workbench.
---
Last updated: June 02, 2023
If you have any feedback on this topic, please contact us at
# Precedence of MySQL credentials in Appvance IQ
There are 3 different ways a user can provide the MySQL credentials in Appvance IQ.
1\. Scenario Builder - Options Panel - Database logging.
2\. Options Page - Preferences - Results tab.
3\. Scenario Builder - Info Panel - Include Scenario where other scenario is included.
Here is the precedence on how AIQ picks up the data base credentials.
1\. Console Credentials in Options page (if enabled)
2\. Overridden by Include Scenario credentials (if any).
3\. Overridden by Scenario Builder - Options Panel credentials (if any).
---
Last updated: June 02, 2023
If you have any feedback on this topic, please contact us at
# Question on SQL Testing in Appvance IQ
Is there a way to check in Appvance IQ that load is actually simulated on the DB under test . Something like graphs which shows activity during the test on the DB with which we can confirm that requests are actually fired?
Checks are usually done at the server side, the way you can check that Appvance is requesting data is checking request and response, Appvance DB system only makes a request and gets a response, You cannot see what the server does internally for which you can use AppDynamics.
---
Last updated: June 02, 2023
If you have any feedback on this topic, please contact us at
# Response times in SQL Reports.
There are 2 entries in the report for response times, can you highlight the line which we are suppose to interpret as response time for query execution?
The first line is the step time, it includes the request time and the time to process the request once it comes back from the server.
The other one which actually shows the query as the request name, It is the actual request time, this is the time to execute this query.
---
Last updated: June 02, 2023
If you have any feedback on this topic, please contact us at
# Troubleshooting MySQL
Packet for query is too large
- Please change max\_allowed\_packet=1024M in my.init. For more information [MySQL performance improvement](/books/databases-mysql/page/mysql-performance-improvement)
---
Last updated: June 02, 2023
If you have any feedback on this topic, please contact us at
# Unable to connect to database - Password expired
My local machine's SQL password got expired and I did change it from Workbench, but AIQ still thinks that it is not changed, I tried restarting both AIQ and MYSQL services, but no luck.
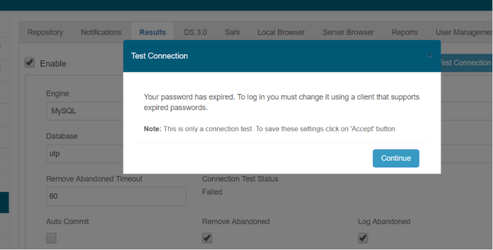
In order to reactivate the instance, You must go to the prompt or MYSQL Workbench and execute the below.
mysql -u<user> -p<password> --connect-expired-password
then
ALTER USER 'root'@'localhost' PASSWORD EXPIRE NEVER;
and
ALTER USER 'utp'@'localhost' PASSWORD EXPIRE NEVER;
inmy.cnf
It would be necessary to replace
\[mysqld\]
default\_password\_lifetime = 180
to
\[mysqld\]
default\_password\_lifetime = 0
or
issuingSET GLOBAL default\_password\_lifetime = 0;
when you are logged in as root in mysql tool, this would set this param for all the schema.
---
Last updated: June 26, 2023
If you have any feedback on this topic, please contact us at
# Windows: Unable to connect database when Running a test in a different location
If a firewall is turned on but not correctly configured, attempts to connect to SQL Server might be blocked.
To allow a SQL Server to communicate through Windows Firewall, please follow the below steps.
1\. Open Windows Firewall by clicking the Start button, and then clicking Control Panel.
In the search box, type firewall, and then click Windows Firewall.
2\. In the left pane, click Allow a program or feature through Windows Firewall.
3\. Click Change settings, If you're prompted for an administrator password or confirmation, type the password or provide confirmation.
4\. Select the check box next to the program you want to allow,
select the network locations you want to allow communication on, and then click OK.
5\. Now you can successfully run a test in a different location.
---
Last updated: June 02, 2023
If you have any feedback on this topic, please contact us at
# Manually Remove AIQ Executions from MySQL - Controlled Procedure
## High-risk maintenance guidance
Manually removing executions from the AIQ database is a high-risk maintenance action. Use supported product cleanup features first. Direct database changes should only be performed with backups, approval, and support guidance.
## Before any manual removal
- Confirm the reason for removal and the exact execution IDs or date range.
- Back up the database and verify restore capability.
- Stop or isolate affected AIQ services if required by support instructions.
- Confirm downstream impact on reports, dashboards, audits, and references.
## Validation workflow
1. Run queries in read-only mode first to confirm target records.
2. Execute only reviewed and approved cleanup statements.
3. Restart or refresh affected AIQ services if required.
4. Validate reports, execution lists, and database logs after cleanup.
*Last updated: October 7, 2026*
# Stacktrace com.mysql.jdbc.PacketTooBigException: Packet for query is too large
Caused by: com.mysql.jdbc.PacketTooBigException: Packet for query is too large (6862323 > 4194304). You can change this value on the server by setting the max\_allowed\_packet' variable.
at com.mysql.jdbc.MysqlIO.send(MysqlIO.java:3671)
at com.mysql.jdbc.MysqlIO.sendCommand(MysqlIO.java:2508)
at com.mysql.jdbc.MysqlIO.sqlQueryDirect(MysqlIO.java:2673)
at com.mysql.jdbc.ConnectionImpl.execSQL(ConnectionImpl.java:2549)
at com.mysql.jdbc.PreparedStatement.executeInternal(PreparedStatement.java:1861)
at com.mysql.jdbc.PreparedStatement.executeUpdateInternal(PreparedStatement.java:2073)
at com.mysql.jdbc.PreparedStatement.executeBatchSerially(PreparedStatement.java:1751)
... 23 more
org.appvance.hibernate.TransactionException: Transaction not successfully started
at org.appvance.hibernate.transaction.JDBCTransaction.commit(JDBCTransaction.java:100)
at com.appvance.enterprise.tmresults.DatabaseResultLogger.closeDBConnection(DatabaseResultLogger.java:830)
at com.appvance.enterprise.tmresults.DatabaseResultLogger.processTransactions(DatabaseResultLogger.java:308)
at com.appvance.enterprise.tmresults.DatabaseResultLogger.commitResultsAux(DatabaseResultLogger.java:896)
at com.appvance.enterprise.tmresults.DatabaseResultLogger$4.run(DatabaseResultLogger.java:857)
Please review
[Troubleshooting MySQL ](/books/databases-mysql/page/troubleshooting-mysql)
---
Last updated: June 02, 2023
If you have any feedback on this topic, please contact us at
# Setup SSL/TLS for MySQL community for Microsoft Windows
## OpenSSL installation.
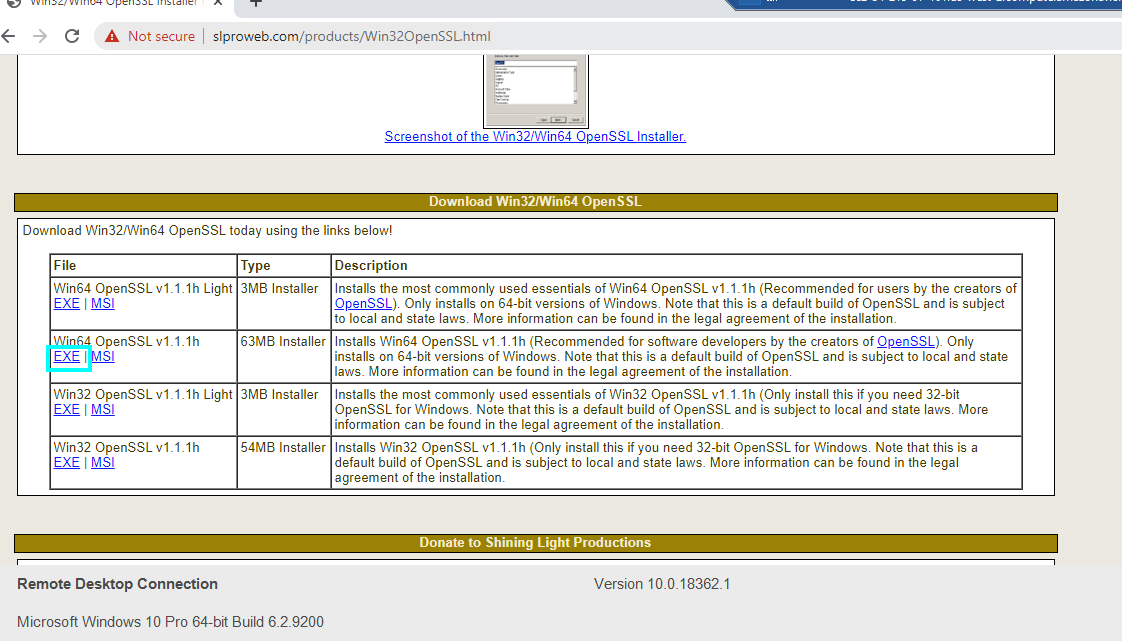
OpenSSL needs to be installed, the proper package can be found at [https://wiki.openssl.org/index.php/Binaries](https://wiki.openssl.org/index.php/Binaries) there, it could be found third party binary distributions, for our purposes any for Windows product could work but the first choice in the list will offer self-install executables.
[https://slproweb.com/products/Win32OpenSSL.html](https://slproweb.com/products/Win32OpenSSL.html)
## Environment Variable setup
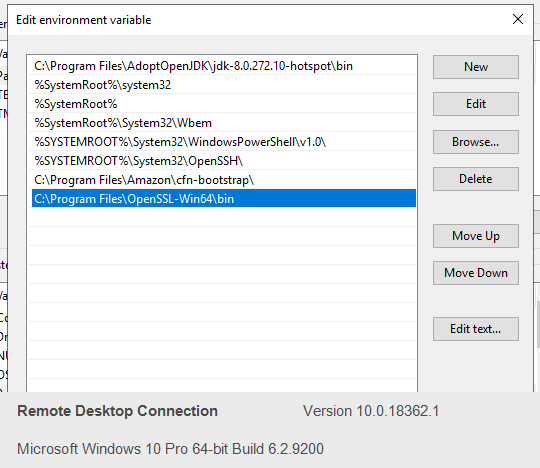
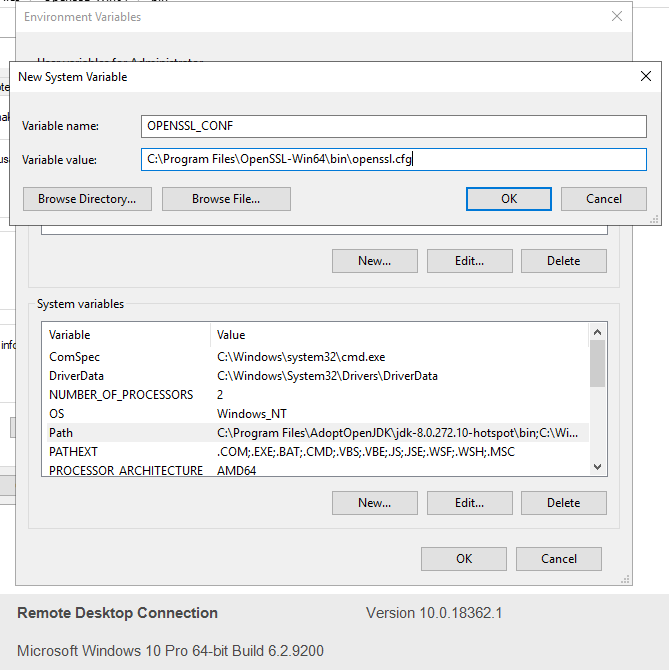
Please set up the environment variables as mentioned below.
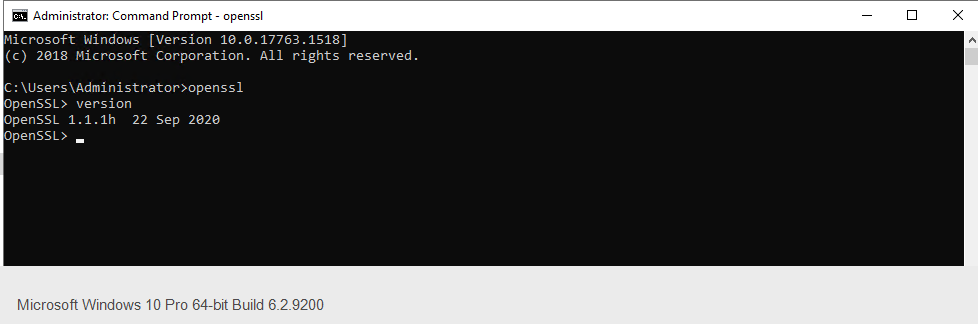
 Check if OpenSSL is installed
Open cmd and type openssl
## Creating and configuring the MySQL public certificate.
a) Open a Command prompt as administrator.
b) Move to the MySQL 8 Server’s bin folder.
c) Execute mysql\_ssl\_rsa\_setup.exe as below.
```
mysql_ssl_rsa_setup.exe --datadir="C:\ProgramData\MySQL\MySQL Server 8.0\Data"
```
```
C:\ProgramData\MySQL\MySQL Server 8.0\Data>openssl x509 -in ca.pem -text
Certificate:
Data:
Version: 3 (0x2)
Serial Number: 1 (0x1)
Signature Algorithm: sha256WithRSAEncryption
Issuer: CN = MySQL_Server_8.0.22_Auto_Generated_CA_Certificate
Validity
Not Before: Nov 3 16:28:59 2020 GMT
Not After : Nov 1 16:28:59 2030 GMT
Subject: CN = MySQL_Server_8.0.22_Auto_Generated_CA_Certificate
Subject Public Key Info:
Public Key Algorithm: rsaEncryption
RSA Public-Key: (2048 bit)
Modulus:
00:b6:40:7d:bc:53:c3:c3:43:db:0b:2e:e5:c1:0b:
53:da:0a:0d:6d:f6:ce:21:0a:34:e1:49:02:10:1d:
dc:7c:dc:92:53:1a:02:7d:4e:e1:44:89:14:26:c8:
f9:4f:6c:f5:64:b5:20:c0:2b:67:00:d9:cc:7e:f2:
be:e4:8a:03:fd:5e:37:24:b0:96:97:0e:70:cc:b4:
02:d1:75:e7:eb:18:74:5b:7f:5a:3e:4a:6b:35:a8:
ec:3a:d9:a3:60:68:cf:c6:16:11:92:2d:e9:ae:fe:
04:18:fa:9c:cf:88:4e:f7:a8:da:a4:5f:29:a0:7f:
ed:90:af:59:b0:a1:5f:1e:85:bc:d2:74:6e:d8:52:
0e:ee:4c:ac:2c:7b:d9:61:a9:13:2e:35:41:20:11:
cf:ec:db:b8:e1:d1:47:f1:e2:16:02:31:a1:ad:2f:
7d:2d:43:00:65:71:cb:11:65:e5:55:f0:ad:0d:b6:
b3:43:4c:27:91:0b:19:52:f2:e7:d0:8a:2a:56:0a:
8d:c6:38:cf:bf:8e:38:59:fe:9a:f4:f1:81:3e:93:
f4:51:f8:cc:3f:5f:ad:51:0c:2a:30:e4:1d:c9:69:
8f:07:19:de:e3:a7:e5:0d:24:7f:31:be:43:34:6b:
15:c2:32:6d:0b:02:c0:cc:2c:fa:50:f3:42:c9:c7:
5d:8d
Exponent: 65537 (0x10001)
X509v3 extensions:
X509v3 Basic Constraints: critical
CA:TRUE
Signature Algorithm: sha256WithRSAEncryption
84:33:78:03:09:bc:ac:a3:3c:41:e1:6e:a5:db:6e:7c:09:1e:
5c:83:59:70:f6:11:7e:43:04:b9:1e:bd:a7:eb:f7:b1:19:f2:
41:97:ca:52:42:ce:a8:09:a8:38:94:1d:c8:39:c6:e6:7e:fd:
39:a5:04:4b:ca:b4:5d:66:de:d7:db:0e:38:78:54:1e:3f:3a:
91:f4:27:9b:1a:7b:af:a7:73:42:26:5e:92:e0:c7:ad:ae:04:
38:3a:00:23:31:83:37:9d:98:8e:81:50:eb:e3:46:17:f2:32:
c0:6b:e0:06:25:52:6d:ec:3d:67:5c:e3:9a:29:11:e8:e9:2a:
b6:87:61:77:13:24:0a:33:4f:a7:11:67:e5:5f:77:77:db:64:
08:c7:c3:1d:b3:e3:59:67:95:7b:b0:2b:c5:c3:e8:7c:d2:c3:
d1:31:5f:89:11:0b:da:db:dc:73:74:4f:4b:80:43:37:eb:b5:
4e:41:c6:1d:43:d5:74:51:ac:76:c4:7c:00:85:9e:3d:b8:9b:
8b:45:09:df:9d:8e:1b:9f:0d:7b:f0:fc:6e:30:8b:be:b9:63:
6b:eb:4a:7d:b5:8d:48:bf:5c:07:43:0f:b0:5f:ed:24:08:1c:
61:b9:6b:d8:69:33:48:c5:9c:2a:57:23:87:63:c2:e8:32:6e:
4d:f8:10:2f
-----BEGIN CERTIFICATE-----
MIIDBjCCAe6gAwIBAgIBATANBgkqhkiG9w0BAQsFADA8MTowOAYDVQQDDDFNeVNR
TF9TZXJ2ZXJfOC4wLjIyX0F1dG9fR2VuZXJhdGVkX0NBX0NlcnRpZmljYXRlMB4X
DTIwMTEwMzE2Mjg1OVoXDTMwMTEwMTE2Mjg1OVowPDE6MDgGA1UEAwwxTXlTUUxf
U2VydmVyXzguMC4yMl9BdXRvX0dlbmVyYXRlZF9DQV9DZXJ0aWZpY2F0ZTCCASIw
DQYJKoZIhvcNAQEBBQADggEPADCCAQoCggEBALZAfbxTw8ND2wsu5cELU9oKDW32
ziEKNOFJAhAd3HzcklMaAn1O4USJFCbI+U9s9WS1IMArZwDZzH7yvuSKA/1eNySw
lpcOcMy0AtF15+sYdFt/Wj5KazWo7DrZo2Boz8YWEZIt6a7+BBj6nM+ITveo2qRf
KaB/7ZCvWbChXx6FvNJ0bthSDu5MrCx72WGpEy41QSARz+zbuOHRR/HiFgIxoa0v
fS1DAGVxyxFl5VXwrQ22s0NMJ5ELGVLy59CKKlYKjcY4z7+OOFn+mvTxgT6T9FH4
zD9frVEMKjDkHclpjwcZ3uOn5Q0kfzG+QzRrFcIybQsCwMws+lDzQsnHXY0CAwEA
AaMTMBEwDwYDVR0TAQH/BAUwAwEB/zANBgkqhkiG9w0BAQsFAAOCAQEAhDN4Awm8
rKM8QeFupdtufAkeXINZcPYRfkMEuR69p+v3sRnyQZfKUkLOqAmoOJQdyDnG5n79
OaUES8q0XWbe19sOOHhUHj86kfQnmxp7r6dzQiZekuDHra4EODoAIzGDN52YjoFQ
6+NGF/IywGvgBiVSbew9Z1zjmikR6OkqtodhdxMkCjNPpxFn5V93d9tkCMfDHbPj
WWeVe7ArxcPofNLD0TFfiREL2tvcc3RPS4BDN+u1TkHGHUPVdFGsdsR8AIWePbib
i0UJ352OG58Ne/D8bjCLvrlja+tKfbWNSL9cB0MPsF/tJAgcYblr2GkzSMWcKlcj
h2PC6DJuTfgQLw==
-----END CERTIFICATE-----
```
```
mysql> show global variables like '%ssl%';
+-------------------------------------+-----------------+
| Variable_name | Value |
+-------------------------------------+-----------------+
| admin_ssl_ca | |
| admin_ssl_capath | |
| admin_ssl_cert | |
| admin_ssl_cipher | |
| admin_ssl_crl | |
| admin_ssl_crlpath | |
| admin_ssl_key | |
| have_openssl | YES |
| have_ssl | YES |
| mysqlx_ssl_ca | |
| mysqlx_ssl_capath | |
| mysqlx_ssl_cert | |
| mysqlx_ssl_cipher | |
| mysqlx_ssl_crl | |
| mysqlx_ssl_crlpath | |
| mysqlx_ssl_key | |
| performance_schema_show_processlist | OFF |
| ssl_ca | ca.pem |
| ssl_capath | |
| ssl_cert | server-cert.pem |
| ssl_cipher | |
| ssl_crl | |
| ssl_crlpath | |
| ssl_fips_mode | OFF |
| ssl_key | server-key.pem |
+-------------------------------------+-----------------+
25 rows in set (0.02 sec)
```
```
ALTER USER 'aiq'@'localhost','aiq'@'%' REQUIRE SSL;
FLUSH PRIVILEGES;
```
```
mkdir C:\mysqlCerts
```
```
openssl genrsa 2048 > "C:\mysqlCerts\ca-key.pem"openssl req -new -x509 -nodes -days 3600 -key "C:\mysqlCerts\ca-key.pem" > "C:\mysqlCerts\ca-cert.pem"Country Name (2 letter code) [AU]:US
State or Province Name (full name) [Some-State]:CA
Locality Name (eg, city) []:SanJose
Organization Name (eg, company) [Internet Widgits Pty Ltd]:Appvance
Organizational Unit Name (eg, section) []:
Common Name (e.g. server FQDN or YOUR name) []:
Email Address []:info@appvance.com
```
```
openssl req -newkey rsa:2048 -days 3600 -nodes -keyout "C:\mysqlCerts\server-key.pem" > "C:\mysqlCerts\server-req.pem"Provide the same values as defined above.
Can give blank challenge password and optional company name
openssl x509 -req -in "C:\mysqlCerts\server-req.pem" -days 3600 -CA "C:\mysqlCerts\ca-cert.pem" -CAkey "C:\mysqlCerts\ca-key.pem" -set_serial 01 > "C:\mysqlCerts\server-cert.pem"
```
```
openssl req -newkey rsa:2048 -days 3600 -nodes -keyout "C:\mysqlCerts\client-key.pem" > "C:\mysqlCerts\client-req.pem"Provide the same values as above.
openssl x509 -req -in "C:\mysqlCerts\client-req.pem" -days 3600 -CA "C:\mysqlCerts\ca-cert.pem" -CAkey "C:\mysqlCerts\ca-key.pem" -set_serial 01 > "C:\mysqlCerts\client-cert.pem"
```
```
ssl-ca = "C:\mysqlCerts\ca-cert.pem"ssl-cert = "C:\mysqlCerts\\server-cert.pem"ssl-key = "C:\mysqlCerts\\server-key.pem"
```
```
mysql> show global variables like '%ssl%';
+-------------------------------------+-------------------------------+
| Variable_name | Value |
+-------------------------------------+-------------------------------+
| admin_ssl_ca | |
| admin_ssl_capath | |
| admin_ssl_cert | |
| admin_ssl_cipher | |
| admin_ssl_crl | |
| admin_ssl_crlpath | |
| admin_ssl_key | |
| have_openssl | YES |
| have_ssl | YES |
| mysqlx_ssl_ca | |
| mysqlx_ssl_capath | |
| mysqlx_ssl_cert | |
| mysqlx_ssl_cipher | |
| mysqlx_ssl_crl | |
| mysqlx_ssl_crlpath | |
| mysqlx_ssl_key | |
| performance_schema_show_processlist | OFF |
| ssl_ca | C:\mysqlCerts\ca-cert.pem |
| ssl_capath | |
| ssl_cert | C:\mysqlCerts\server-cert.pem |
| ssl_cipher | |
| ssl_crl | |
| ssl_crlpath | |
| ssl_fips_mode | OFF |
| ssl_key | C:\mysqlCerts\server-key.pem |
+-------------------------------------+-------------------------------+
25 rows in set (0.01 sec)
```
```
mysql.exe -uaiq -p --ssl-mode=REQUIRED
```
```
C:\Program Files\MySQL\MySQL Server 8.0\bin>mysql.exe -uaiq -p --ssl-mode=REQUIREDEnter password: ***Welcome to the MySQL monitor. Commands end with ; or \g.Your MySQL connection id is 12Server version: 8.0.22 MySQL Community Server - GPL
Copyright (c) 2000, 2020, Oracle and/or its affiliates. All rights reserved.
Oracle is a registered trademark of Oracle Corporation and/or itsaffiliates. Other names may be trademarks of their respectiveowners.
Type 'help;' or '\h' for help. Type '\c' to clear the current input statement.
mysql>
```
```
```
---
Last updated: June 26, 2023
If you have any feedback on this topic, please contact us at
# Queries on Sql Testing support in AIQ
**1.Is the Joins clause Supported in .Sql script?**
Yes, it’s supported.
**2. Can we write all sorts of SQL commands like DDL, DML, DCL, TCL, and DQL. in .sql script ? What all is possible and what are the limitations?**
The scope of usage for SQLClient includes DQL, DML sentences, TCL if it’s included in a stored procedure.
**3.If there is more data in the table, for example sql query returns more than 10000 rows of data, will the Appvance sql engine wait for all this huge data to be returned.**
This process is synchronic so the execution will wait for this process to be done.
**What would be the ideal wait period?**
No as it, but it’s possible to establish a rows extraction limit so the execution time can be customized, there are external factors that can affect database communication like latency, missing indexes for the query, insufficient temporal space, etc.
**Will the performance of the .sql script execution be affected?**
Performance would be the same than when using a database client.
**4. Currently in the locker it stores the particular row data that is provided in the .sql script for example storeInLocker=1, it stores the first row of data. Can we store the data of all the rows and pass the row data dynamically in the ds/js scripts?**
Beginning AIQ-4.8.3 there’s a new feature that allow us extracting a bunch of rows defined by a new token --limit which determine the max rows returned.
**5. Is Nested Sql query supported?**
Yes, it is.
**6. Is there an option to edit a .sql file in AIQ?**
It can be save a .js file to edit it using JS Edit & Play, once it’s uploaded in the repository it can be renamed again using the AIQ file explorer, over the file right click and rename as .sql file.
---
Last updated: June 02, 2023
If you have any feedback on this topic, please contact us at
# How to install SQL Server, MS SQL Server Studio and get connected to the Server.
- Browse the link [https://www.microsoft.com/en-us/sql-server/sql-server-downloads-free-trial](https://www.microsoft.com/en-us/sql-server/sql-server-downloads-free-trial) and click on Express Download
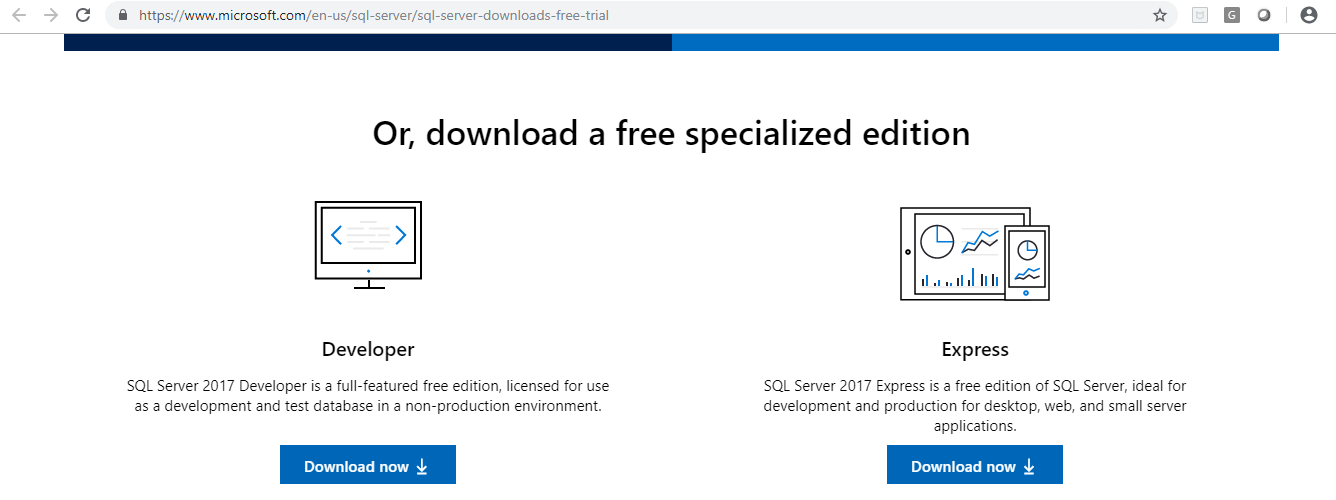
- Follow below link for the step by step installation
[https://www.sqlshack.com/step-by-step-installation-of-sql-server-2017/](https://www.sqlshack.com/step-by-step-installation-of-sql-server-2017/)
- After installing the SQL server, please follow the below link for the MSSQL Server studio. Based on the version you can click the download button.
[https://docs.microsoft.com/en-us/sql/ssms/download-sql-server-management-studio-ssms?view=sql-server-2017](https://docs.microsoft.com/en-us/sql/ssms/download-sql-server-management-studio-ssms?view=sql-server-2017)
- Connect the CISCO VPN and login with the respective User.
- Install Telnet in the machine. Gothrough the [https://www.technipages.com/windows-10-enable-telnet](https://www.technipages.com/windows-10-enable-telnet). Please follow the first solution
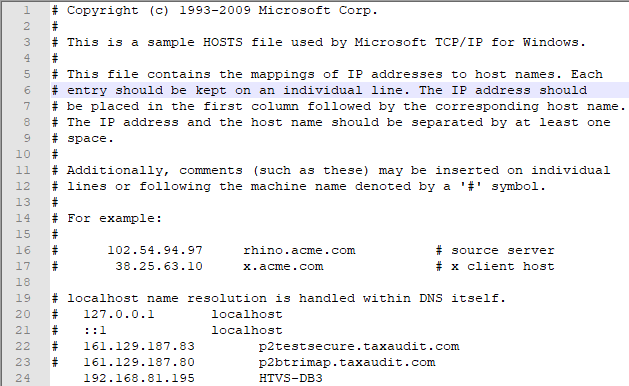
- Add the 192.168.81.195 HTVS-DB3 in the Host file (C:\\Windows\\System32\\drivers\\etc)
- 
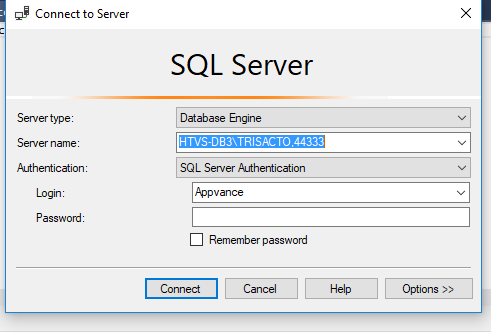
- 
---
Last updated: June 02, 2023
If you have any feedback on this topic, please contact us at
# Restore "blank" DB
**Date: 2020-09-03**
**Procedure to restore previous executions**
****Create a procedure to restore all the old (previous) data and the ability of AIQ to handle.
1. Create a backup for current and active aiq (need to be performed having aiq offline) as below.
`$ mysqldump -u root -p aiq > \currentaiq.sql`
2\. Drop aiq schema and creation of a new aiq blank schema, this needs to be addressed using MysqlWorkbench and connected as root.
`drop schema aiq;`
`create schema if not exists `aiq` default character set utf8 collate `
`utf8_general_ci;`
3\. Restore the database of previous executions to point of failure, performing as below.
`$ mysql -u root -p aiq < \aiqbq.sql`
4\. Execute as root the attached sql script **renameWindows.sql**, it'll perform the following.
a. create the **aiq\_old** schema
b. grant permissions to **aiq** user for **aiq\_old** schema
b. rename aiq's tables to aiq\_old schema
c. create views, functions, stored procedures for **aiq\_old** schema
5\. Drop aiq schema and creation of a new aiq blank schema, this needs to be addressed using MysqlWorkbench and connected as root.
`drop schema aiq;`
`create schema if not exists `aiq` default character set utf8 collate `
`utf8_general_ci;`
6\. Restore current aiq schema again using the backup created in the first step.
$ mysql -u root -p aiq < `\currentaiq.sql`
[](../../Resources/Images/GeneralGraphics/renameWindows.sql)[](../../Resources/Images/GeneralGraphics/renameLinux.sql)
---
Last updated: July 03, 2023
If you have any feedback on this topic, please contact us at
# How to write multiple queries in sql script to use with Process SQL file API and retrieve the values from locker?
In order to create a valid SQL script,below basic configuration settings is required to create a connection.
```
-- dbvendor=(MYSQL,ORACLE,MSSQL any of these one)
-- username=(User that is owner of the database objects)
-- password=(Related password)
-- host=(dns name for database host)
-- schema=(database or schema)
-- port=(Port for related database vendor or custom port)
```
```
-- dbvendor=MYSQL
-- username=aiq
-- password=pwd
-- host=localhost
-- schema=aiq
-- port=3306
-- connect
--step=Step1
SELECT * from Definition where DefinitionID = :definitionId
-- storeInLocker=
--step=Step2
SELECT * from summaryelement where Anchor ="8"
-- storeInLocker=
-- step=BeforeDisc
-- step=Disconnect
-- disconnect
```
---
Last updated: June 01, 2023
If you have any feedback on this topic, please contact us at
# Remove Executions from the Database - Controlled Procedure
# Remove Executions from the Database - Controlled Procedure
Removing executions from the AIQ database should be treated as a controlled administrative operation. Execution records can include report history, evidence, logs, and troubleshooting details that may be required later.
## Required checks
- Confirm the exact execution IDs or date range to remove.
- Verify that stakeholders no longer need the related reports or evidence.
- Create a database backup or snapshot before any delete operation.
- Use supported AIQ retention or cleanup features when available before changing database tables directly.
## Safe workflow
1. Run read-only queries first to confirm the target records.
2. Export any evidence that must be retained.
3. Perform the removal during a maintenance window.
4. Verify that current executions, reports, and dashboards still load after the cleanup.
5. Record what was removed, when it was removed, and who approved it.
**Warning:** Do not remove executions with open-ended conditions such as unrestricted dates, empty filters, or unverified IDs.
*Last updated: October 8, 2026*