Creating Blueprints
The Create Blueprint function is all about application learning. Appvance AI creates a file called Blueprint (.abp file) which contains more information than any HTTP interactions (HTTP Traffic)
In this process of creating Blueprint, Appvance AI Blueprint's the application to find out as much about it as it can, dig as far as it can. It then identifies areas for input and prompts for that input, which can be provided for example via a CSV. Using that data, or input, Appvance AI then Blueprint's further into the application and produces a Blueprint which is saved as a .abp file.
-
Serves as a map or Blueprint of the application.
-
Knows all the functionality and features, how they are used, how they are accessed, and where they are in the application.
-
Only needs initial parameters and data for the application’s text boxes, selects, checkboxes, radio buttons, and other user controls.
-
Performs Auto validations.
Blueprint Parameters
-
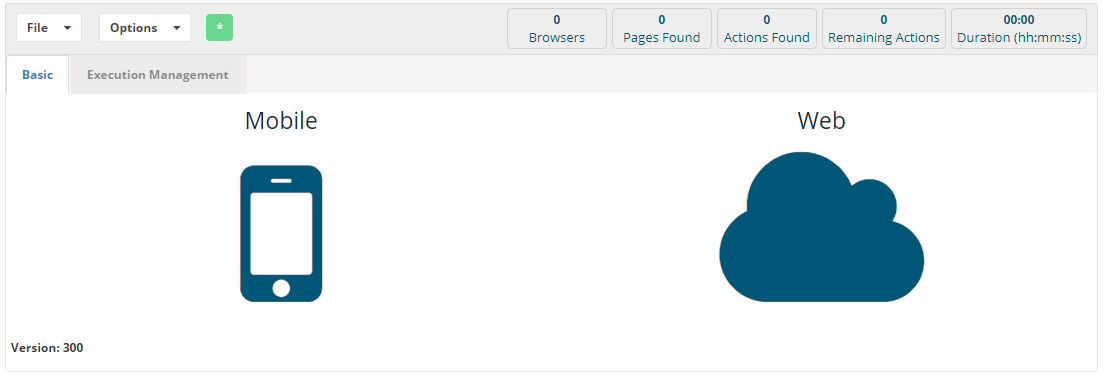
Begin with File > New to begin a new Blueprint and choose Web
-
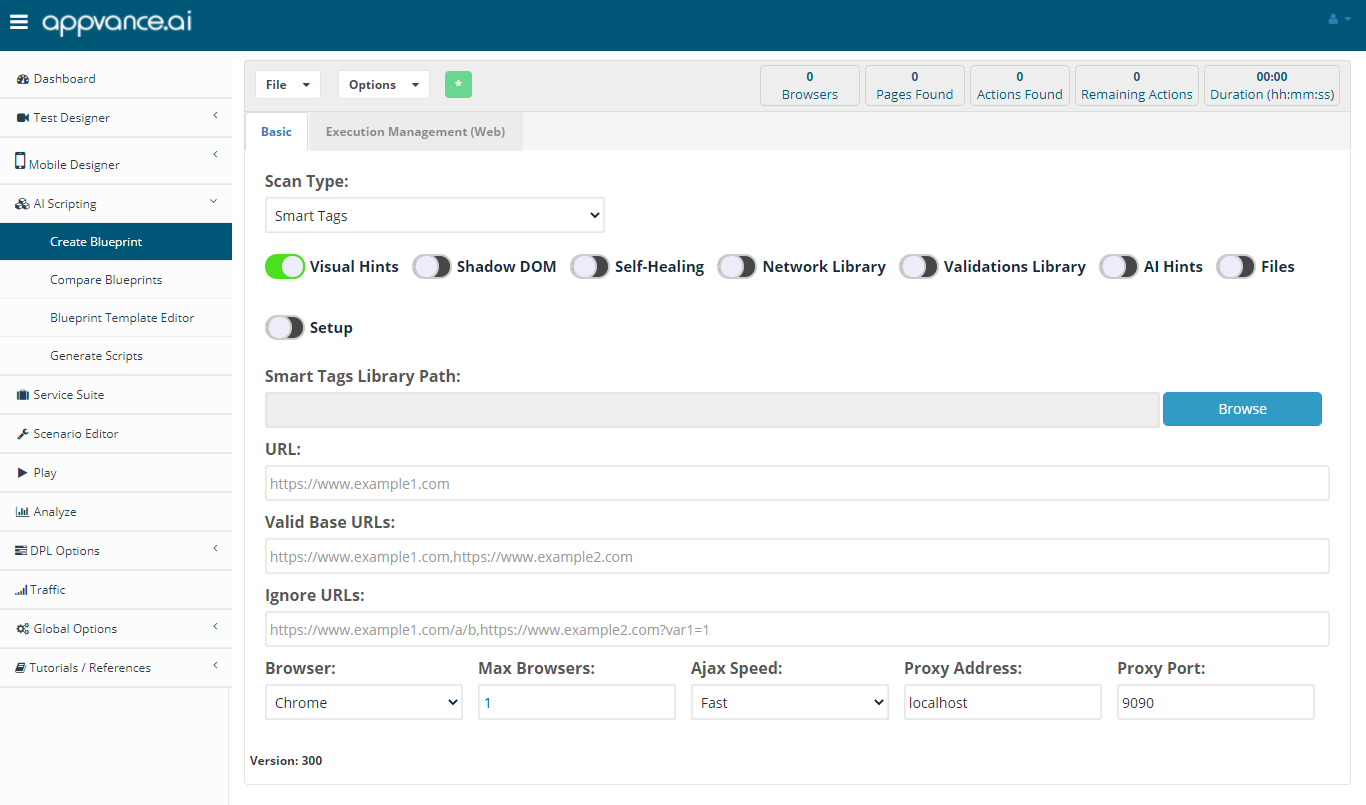
Blueprints can be created with the following Scan Types:
-
Tags - scans the application with HTML tags (Brute force: SLOW).
-
Uses Test Designer's getAllTags() function.
-
Slowest but most complete.
-
-
SmartTags - Blueprints the application with a SmartTags library that serves as meta-data (Specific: FAST). Check the SmartTags chapter for more details on how to create the SmartTags.
-
Uses Test Designer's getSmartTags() function which returns the HTML elements that match the rules defined in the SmartTags library as SmartTags.
-
Needs a .stags file that corresponds to the SmartTags library.
-
Fast, depends on the number of SmartTags and their coverage.
-
Allows Blueprinting specific portions of the application.
-
-
SmartTags + Tags - Blueprints the application with a SmartTags library and HTML tags (VERY SLOW).
-
Uses DS3 getTagsSmartTags() function.
-
Combination of Tags and SmartTags.
-
-
SmartTags + Inputs - Blueprints the application with a SmartTags library and uses INPUT, SELECT, BUTTON, SUBMIT and FORM tags (FAST).
-
Uses Test Designer's getInputsSmartTags() function.
-
Reduces the number of SmartTags in the SmartTags library.
-
Input elements that also correspond to a SmartTag is replaced by the SmartTag.
-
-
Visual Hints
Enabling this would indicate if screen-shots should be saved and displayed for the text-boxes, selects, checkboxes, radio buttons, form submit buttons, and other user controls.
Allows users to easily recognize which fields need data to be entered as you mouse hover on all the elements from the left panel.
If scan type contains SmartTags, indicates if screen-shot should be saved and displayed for SmartTags.
Shadow DOM
If the application is built using Shadow DOM, you will need to enable this option to let the Blueprint know that this is a shadow DOM-based application.
Self-Healing
When working with SmartTag-based application Blueprinting, enabling self-healing and with multiple iterations of Blueprint, this has the ability to change the importance of the rules defined in the SmartTags.
This will change the importance of the rules defined (when there are multiple rules defined) depending on how the app is changing and the importance will be increased or decreased, and when the importance goes below 10%, the rule would be removed from the SmartTags and if there are any new attributes defined for the accessors, self-healing will have the ability to add new rules as well to the defined SmartTags.
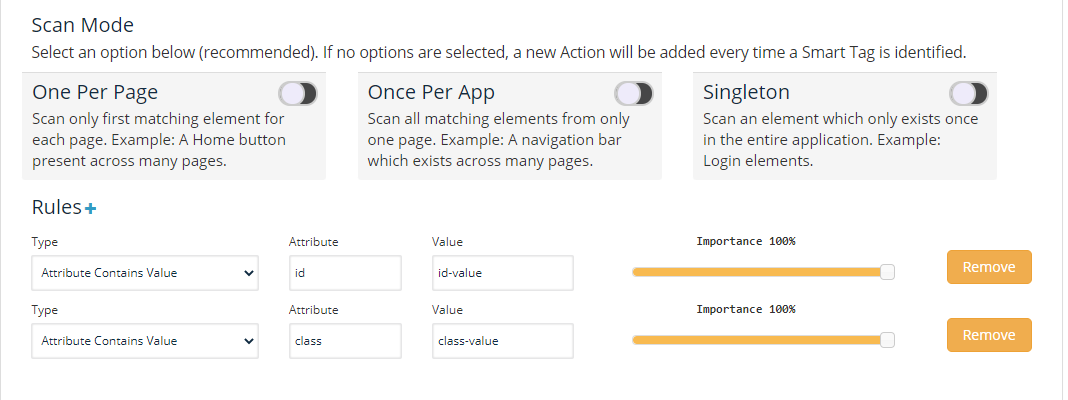
The changed SmartTags with this process can be downloaded from the file menu > Export Self-Healed SmartTags Library.
SmartTag Library Path
You could browse the SmartTag library path using the browse button, SmartTag files are created using the SmartTag workbench under Test Designer, SmartTag file will have .stags extension and if required you could change the path to relative using the 'Make Relative' button. This field will be enabled when we have the below scan types and is a required field:
SmartTags
SmartTags + Tags
SmartTags + Inputs
To learn more about SmartTags, see SmartTag Workbench.
Network Library and Network Library Path
Network Library toggle can be enabled/disabled depending on the requirement, disabled by default.
You could browse a network library file using the browse button, Network Library files are created using Network Workbench under Test Designer. It will have a .netx extension.
This is an optional field and will be enabled when we have the below scan types:
SmartTags
SmartTags + Tags
SmartTags + Inputs
This allows Blueprint to validate data coming from the back-end and displayed in the front-end.
To learn more about the Network Workbench, see the Network Workbench.
Validation Library and Validations Library path
Validation Library toggle can be enabled / disabled depending on the requirement, disabled by default.
You could browse a validation library file using the browse button, validation Library files are created using Validation Workbench under Test Designer. It will have a .valid extension.
This is an optional field and will be enabled when we have the below scan types:
SmartTags
SmartTags + Tags
SmartTags + Inputs
This allows Blueprint to validate the application based on all the definitions and decisions done based on business logic.
To know more about the Validation Workbench, please visit the Validation Workbench chapter.
AI Hints
AI Hints will make use of the already created Test Designer scripts and those scripts can be used as Hints for the Blueprint.
For example: If you already have a login script created using Test Designer, you can make use of that login script in AI Blueprinting as an AI Hint, so whenever AI goes to that page, it automatically takes in the provided script as an input and logs into the application and does further Blueprinting.
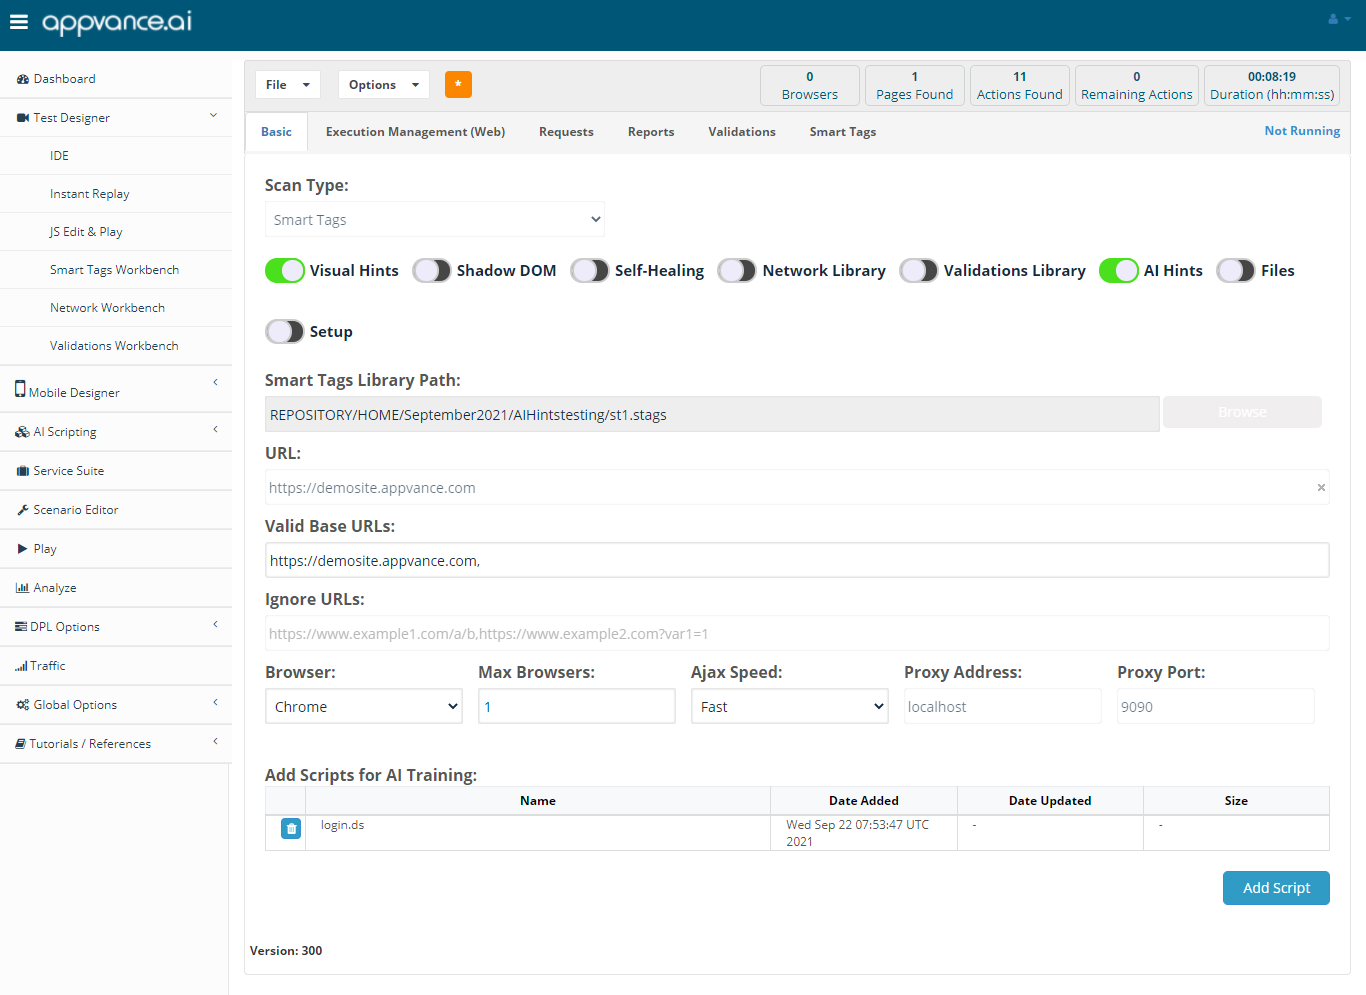
Some technical details - AI hints will start new threads even during Script execution. At the beginning of the Blueprint, one thread will be started for each Script, for example, if 5 Scripts are provided, 5 threads will be started at the beginning. As soon as each thread encounters a new pageHashCode and a new Action is added to the Blueprint, another thread will be started. When this happens, the number of running threads may be more than the number of provided Scripts and this is normal.
The reason a new thread is started is that the processes that happen after adding a new Action to the Blueprint which are saving the Visual Hint and getting all the elements can take time and in the case of getting all the elements, scroll up and down and causing Test Designer to fail to execute the next step of the Script because it cannot find the element of the next step. For this reason, another thread is started to continue the Script from where the current thread left off, while the current thread executes the processes that take a long time. This way, the Blueprint is able to execute the Script completely while also performing all processes to complete the Blueprint.
Files:
Files can be enabled when there is a need to add Files for File Uploading and SQL Processing, for some of the flows in an application it might need file uploading or SQL files that need to be processed, for which this option can be enabled and the files can be uploaded up-front for later processing of these files during Blueprinting.
Setup
The setup allows you to provide specific JavaScript code which is executed before each action, by enabling setup, the URL field would disappear like all the steps including the navigate to can be provided in the setup section itself.
The browser opens, prepares the domain with the domain of the URL and Valid Base URLs, executes SetupJS, navigates to URL, and continues with the next actions.
This is mainly used to perform the log-in operations without mapping authentication data and requires knowledge of the application’s authentication mechanism, Test Designer functions, and accessor names.
If a script has already been created using the Test Designer, the portion of the required script can be exported to JS which can be used in the setup section for the Blueprint.
URL
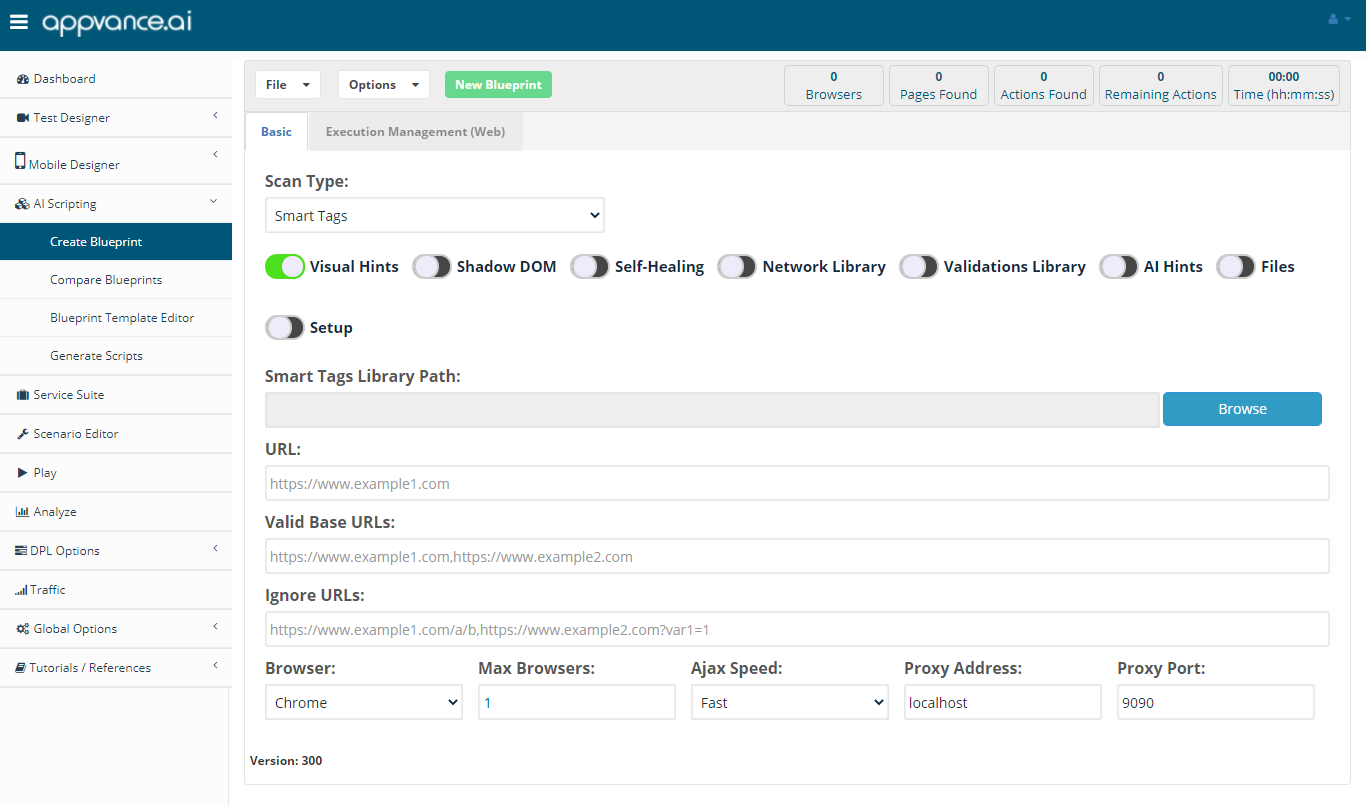
This is the place to provide your valid application URL, provide the URL and Valid Domains will be automatically populated with the domain based on the URL provided. After providing the valid URL, next button would be enabled.
Valid Base URLs
Comma-separated list of valid domains that are allowed.
The valid domain must have protocol://hostname:port. Port is needed only if it is not the default port for the protocol. Example: https://appvance.ai ,https://cloud.appvance.ai
The browser will close upon encountering a domain out of this list.
Ignore URLs
You can provide values here to ignore the URL's that Appvance AI will ignore while Blueprinting your application.
Browser
Target browser to run the Blueprint against, you can choose Edge, Chrome, Firefox, and Safari as your target browsers depending on your application or requirement.
This parameter can be dynamically changed during the Blueprint by providing a new entry and saving the Blueprint.
Max Browsers:
You can run n number of parallel browsers, this depends on the machine that you have been using, more the number of parallel browsers the faster will be the Blueprint of the application. You can run 40 to 50 parallel browsers or even more on a machine with 16 Cores and a 64 GB RAM machine.
This parameter can be dynamically changed during the Blueprinting process by changing the value and saving the Blueprint.
Ajax Speed
After each step, the browser will pause to wait for any AJAX request that the action triggered.
-
No Ajax: does not wait.
-
Fast: waits 10 seconds.
-
Medium: waits 20 seconds.
-
Slow: waits 30 seconds.
-
Very Slow: waits 40 seconds.
This parameter can be dynamically changed during the Blueprinting process by changing the value and saving the Blueprint.
Proxy Address and Proxy Port
Proxy address and proxy port can be provided if the Blueprint needs to be run on a different test node instance instead of the controller instance.
Providing all the details and clicking next will bring create an execution pop-up.
Create Execution
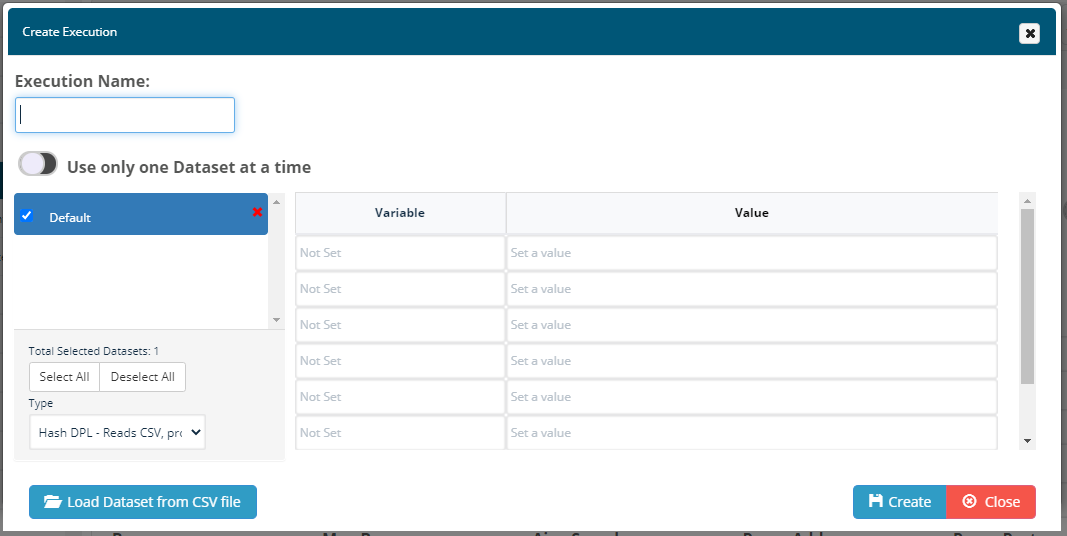
Execution Name
Provide a User-friendly name to identify execution.
Use only one Dataset at a time
If this option is checked, the number of concurrent browsers will be equal to the number of selected data sets for the execution. This is helpful when the application accepts only one use session at a time and when you will be using several browsers it is important to choose this option that way each credential is passed to a browser execution while doing the application Blueprinting.
Use previously defined bindings
Available only when creating additional executions.
If checked, new execution will use mapped fields of the selected execution
Default
Default data set could be used by checking the option and providing any inputs that are required for the application like the user names, password, search terms, etc, which could be used to map later after the application Blueprint finds the inputs.
This is something that could be entered later as well by choosing Data set Manager Button under the Execution Management tab.
Load Dataset from CSV file
If you already have data that is stored in a CSV file, those data could be browsed using this option and we could use that dataset for the application Blueprint.
Selecting a Dataset
Binds an execution with the values for the chosen dataset.
The main use case is to simultaneously scan the application with different user-profiles and roles.
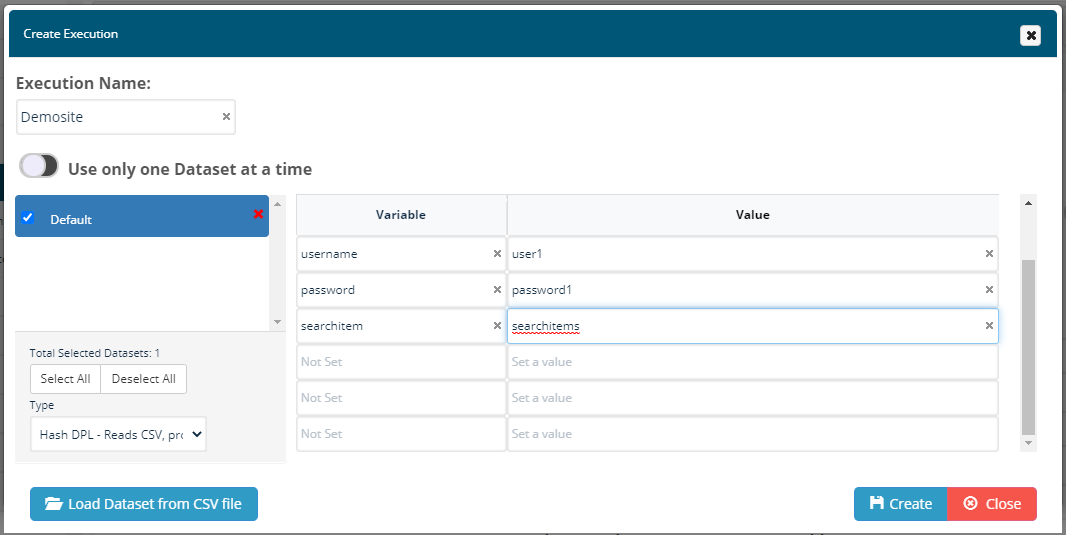
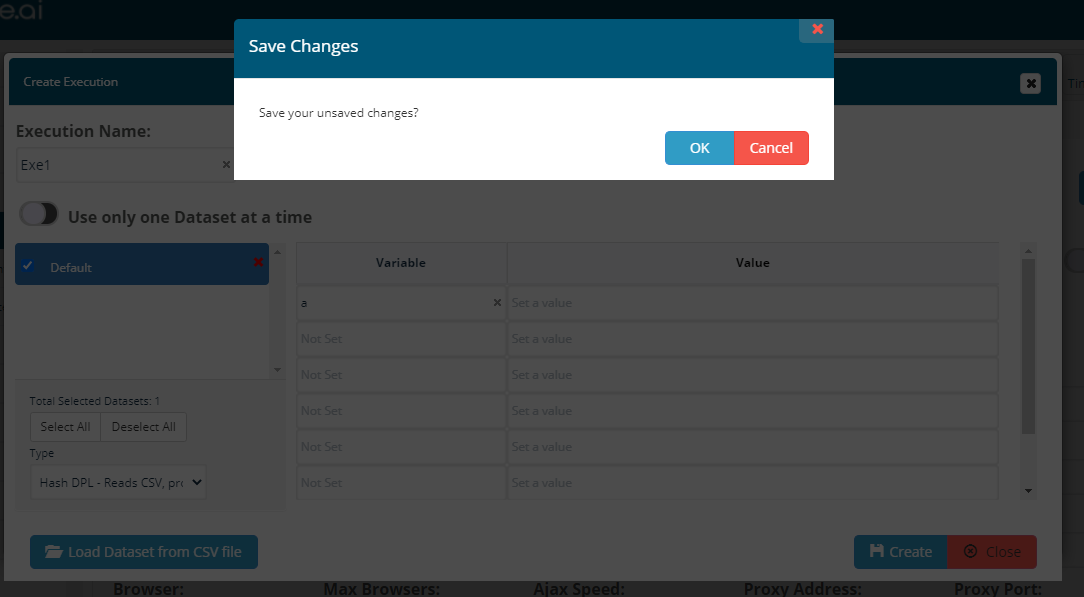
Clicking Close after making changes without saving the changes will ask for confirmation to either save or cancel the changes.
Types of DPL
-
HashDPL
-
JavaScript DPL
-
Synthetic DPL
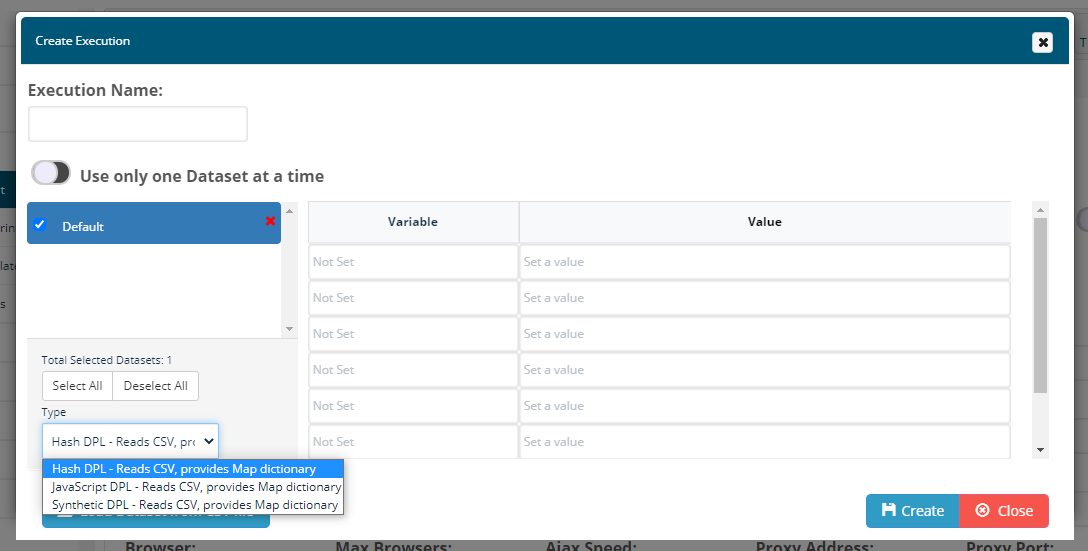
For more details about the types of DPL to be chosen, check Operational Test Data with DPL's
Click Create.
Execution Management:
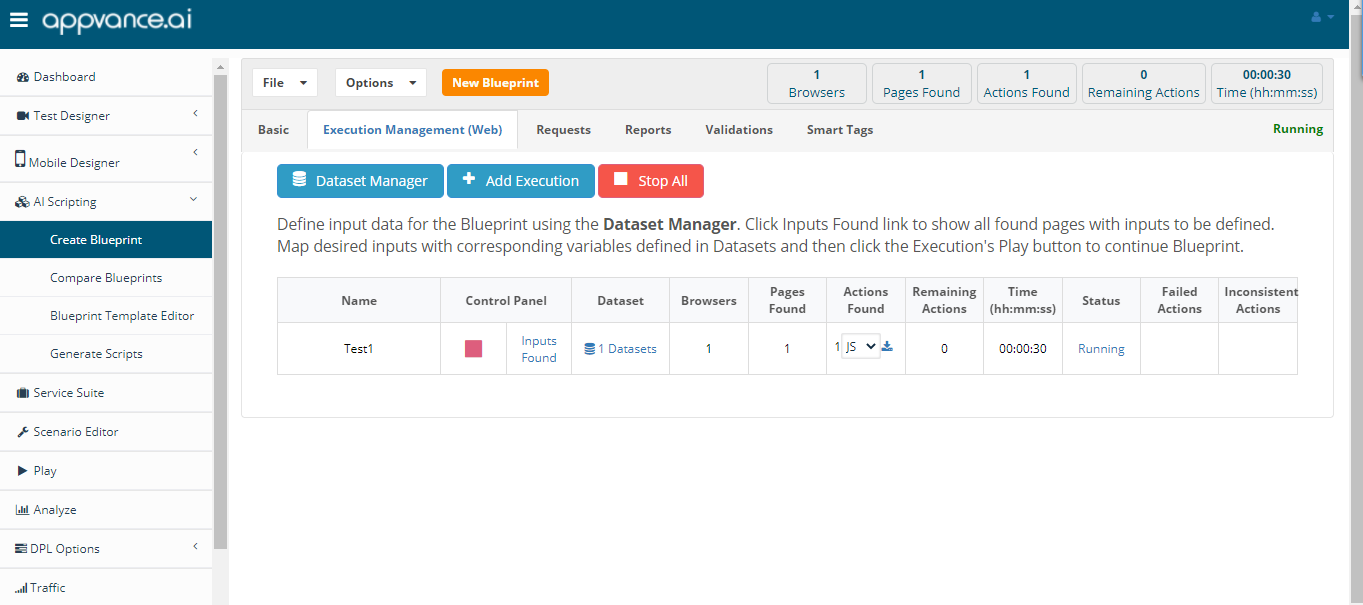
Hitting Create will begin the application Blueprint process to begin, you should be seeing the opening of the browser and performing the actions, The Status should say Running.
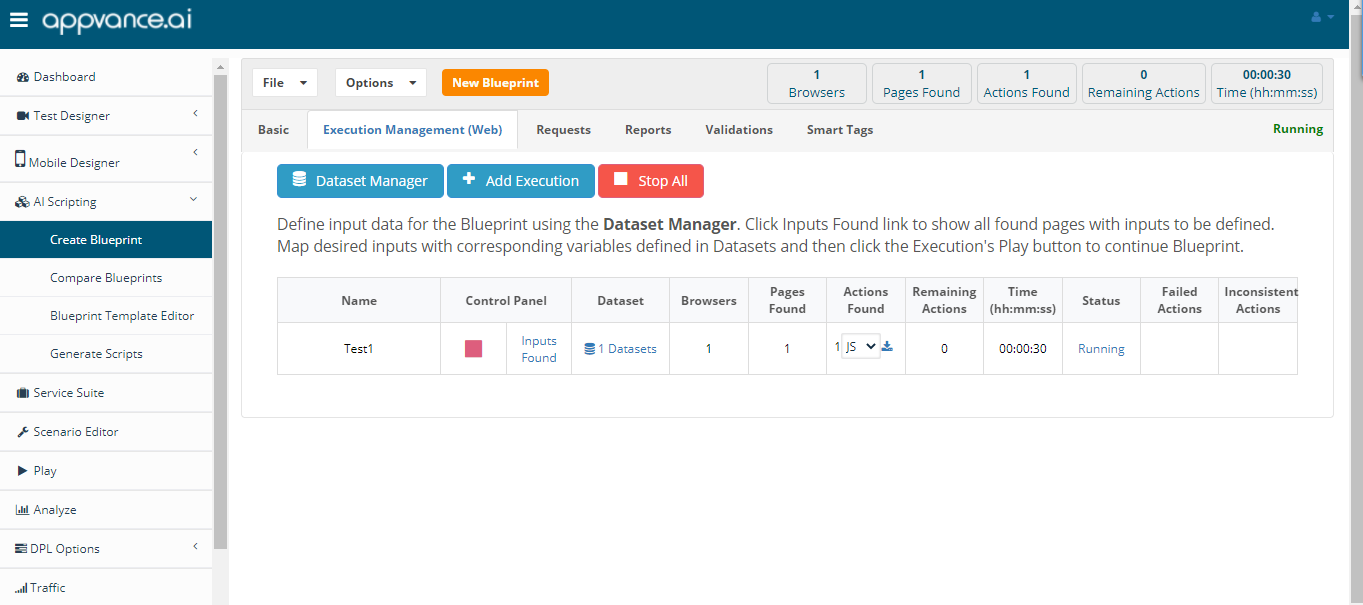
The Blueprint shall run for a while depending on the number of pages AI finds and also the number of concurrent browsers that are used to run the Blueprint.
-
On top, the number of browsers used shall be displayed
-
It also shows the number of pages found during the Blueprint
-
Actions found so far
-
Remaining actions
-
Time actively running
All the above data are live, the numbers shall keep changing as and when AI finds different pages and different actions, the remaining actions keep varying as well since it depends on different pages as well.
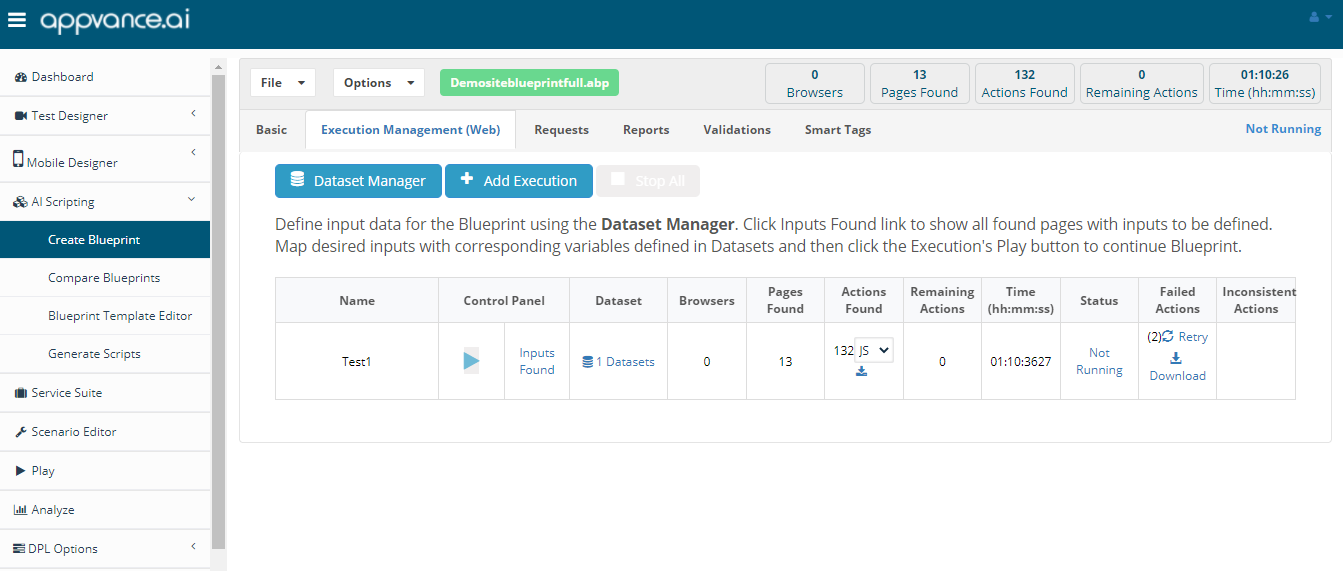
Once the "Remaining Actions" shown is 0, which means the first process of the Blueprint is completed.
It is important not to interrupt the Blueprint process, it is requested to wait till the Blueprinting says "Not running" and only then map the variables and continue Blueprinting, when mapping the variables during the Blueprint process itself it alters the remaining actions that way the Blueprinting could take much longer than expected.
Data Set Manager:
The data set manager is the place to define input data for the Blueprint using the Dataset Manager. After each Blueprint, a list will be shown of all pages found with inputs to be defined.
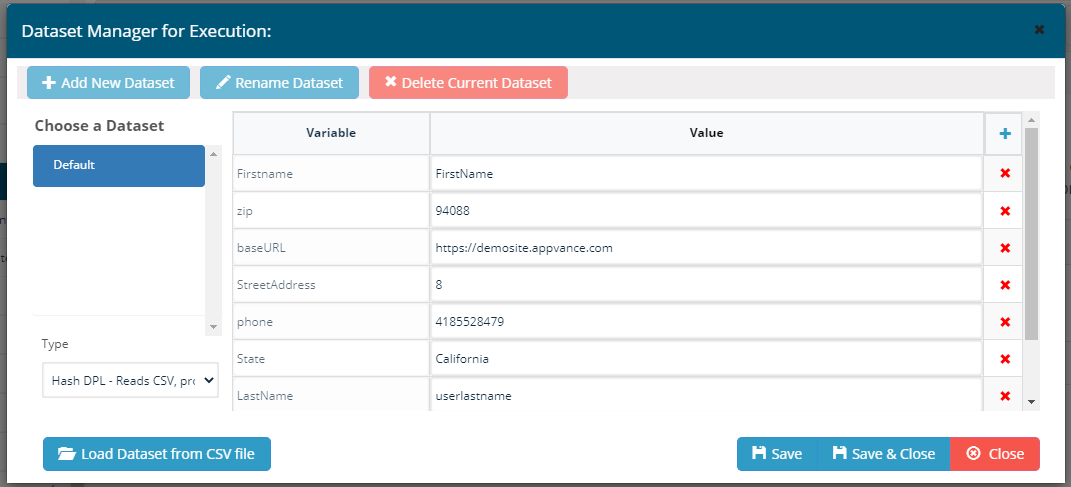
Data Set Manager is the place to define all the input data variables that is used to map to the desired elements on the web page.
Data can also be loaded from an external CSV file into this Data set manager.
Several Data sets can be created using the 'Add New Data Set' button.
DataSet sample, using two sets of variables
AdminRole
username = root
password = ABC123xyz!
domain = every_items
QAUser
username = qatesting
password = t3sting
domain = company_param_001
Data Set can also be Renamed or/and Deleted using 'Rename Data Set' and 'Delete Current Data Set' buttons.
Enter all your variable names and the corresponding values in the text fields provided, you can add more rows using the 'Add New Row' button at the bottom.
'Save and Close' can be used to save all the changes.
'Load DataSet from CSV file' can be made use when we have the data sets saved in the CSV file, the CSV file can be browsed and can be used as variables which later can be used to map to the elements after the Blueprint starts finding pages.
Once we have the first set of Blueprinting done, the control panel shall show the link with Inputs found, Clicking that link will show all the pages where the Blueprint found the inputs.
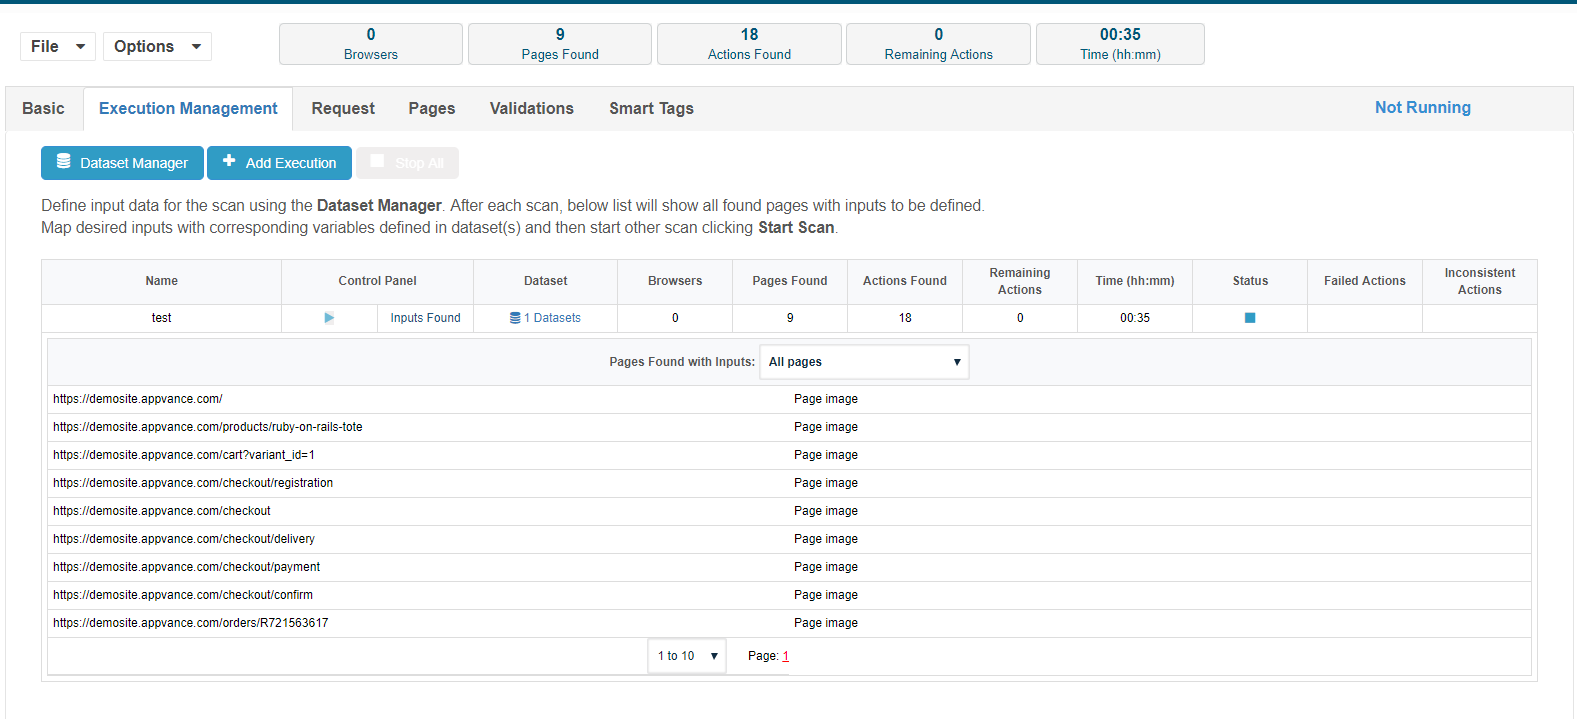
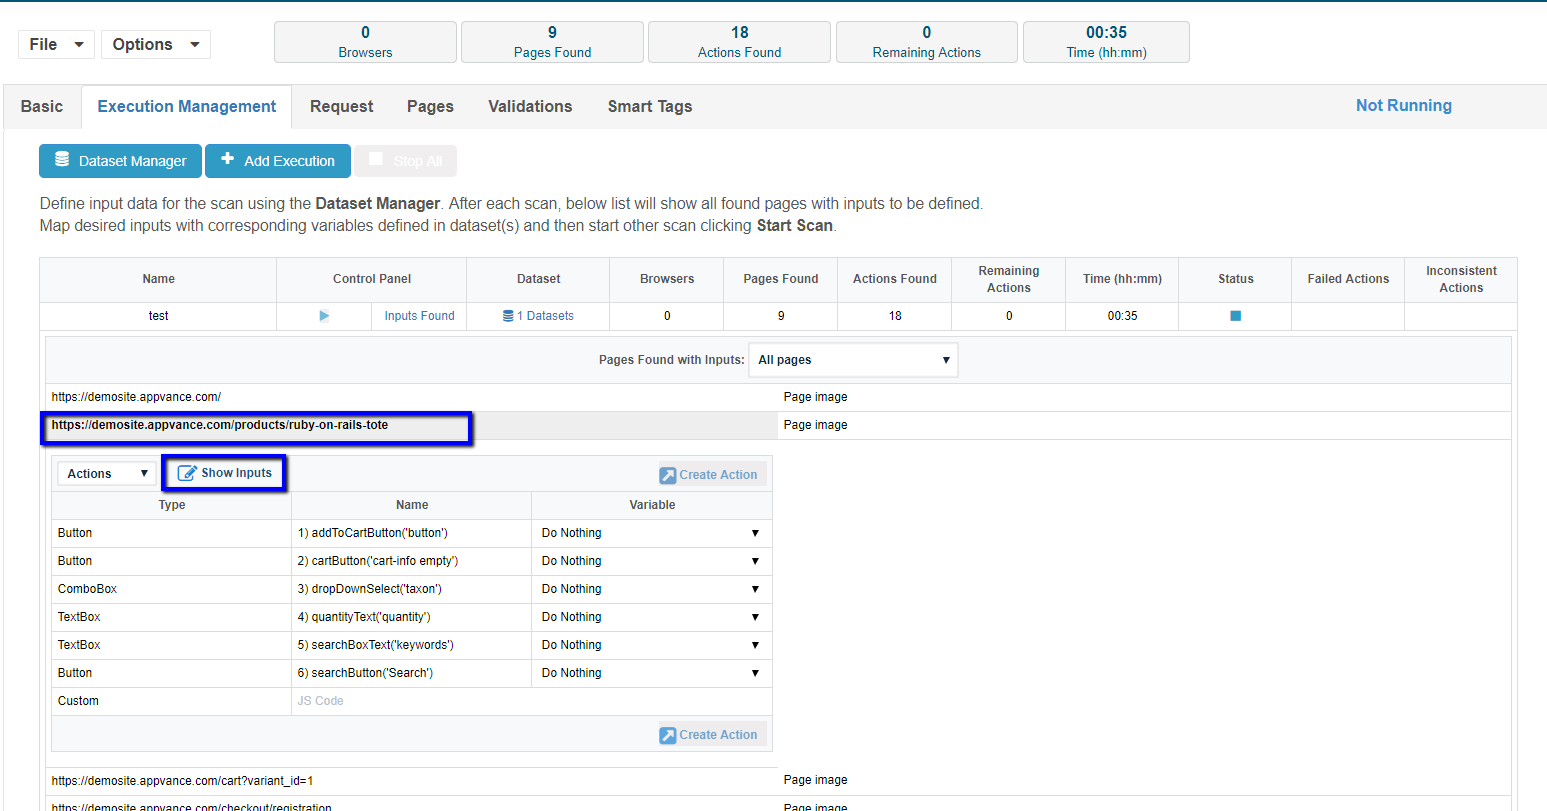
A particular page could be chosen by clicking the link and then clicking show inputs will show all the elements where you would be able to provide inputs like the texts, radio buttons, check-boxes, text area, etc.
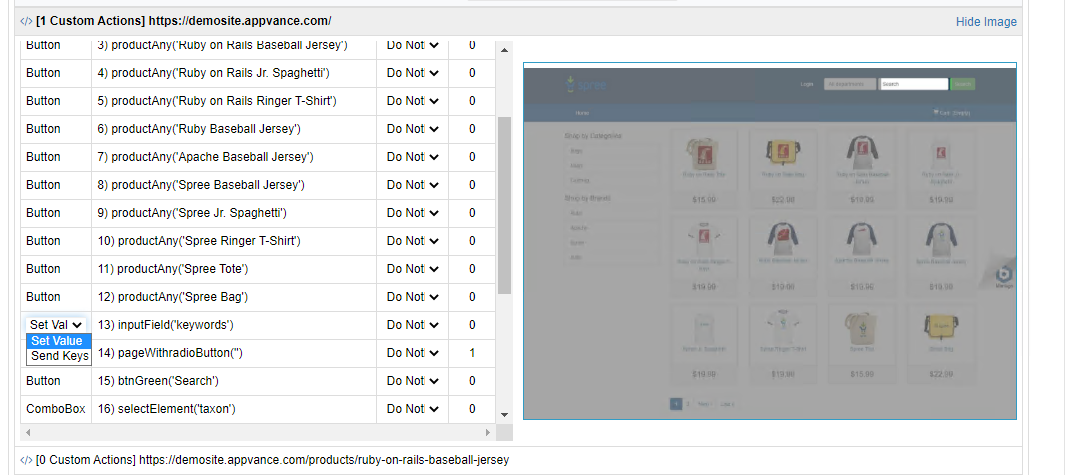
All the navigations would be shown as Custom Actions [] with the number of navigations that were already performed on that page.
Actions drop-down would also show the number of Actions that are automatically performed by the Blueprint in addition to the user-defined custom actions.
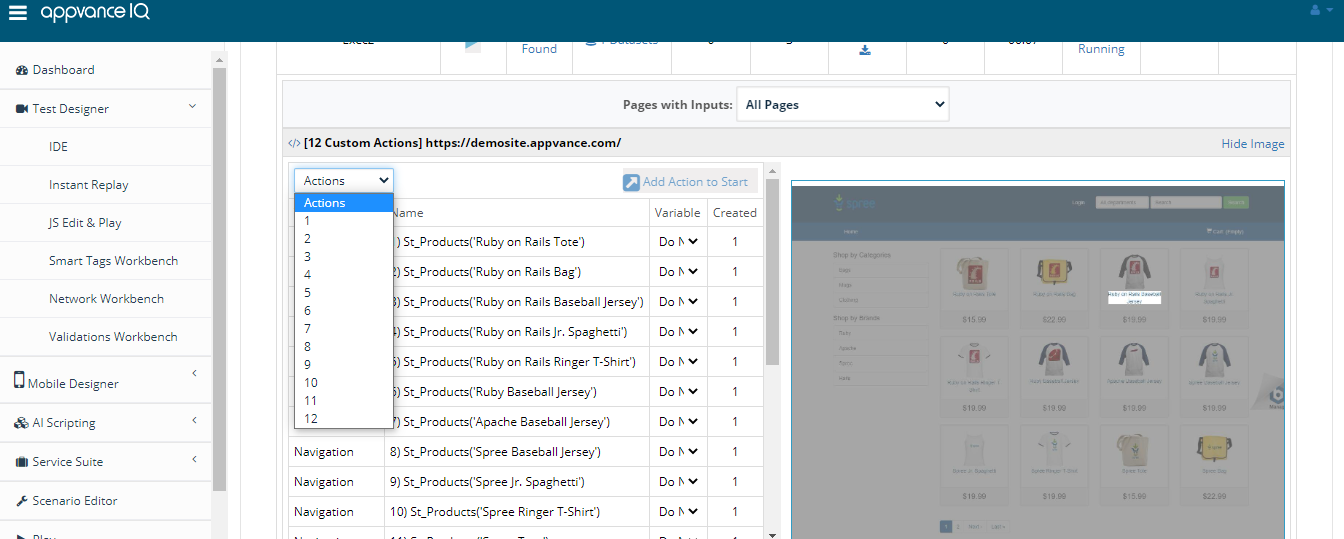
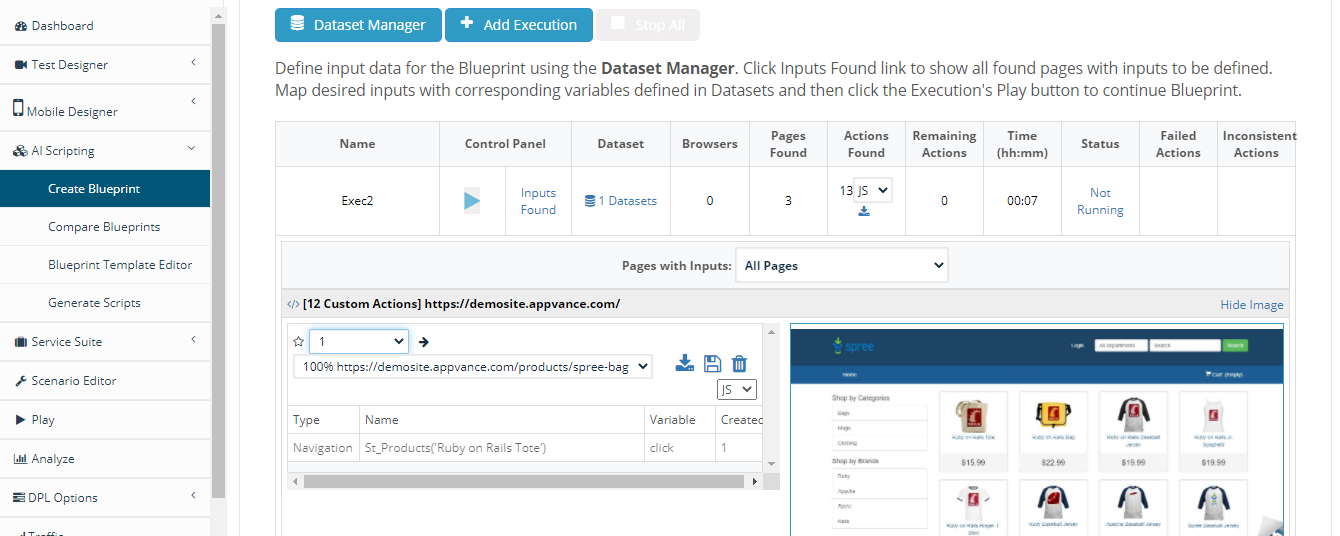
All the defined inputs for the text boxes can be chosen from the variable drop-downs.
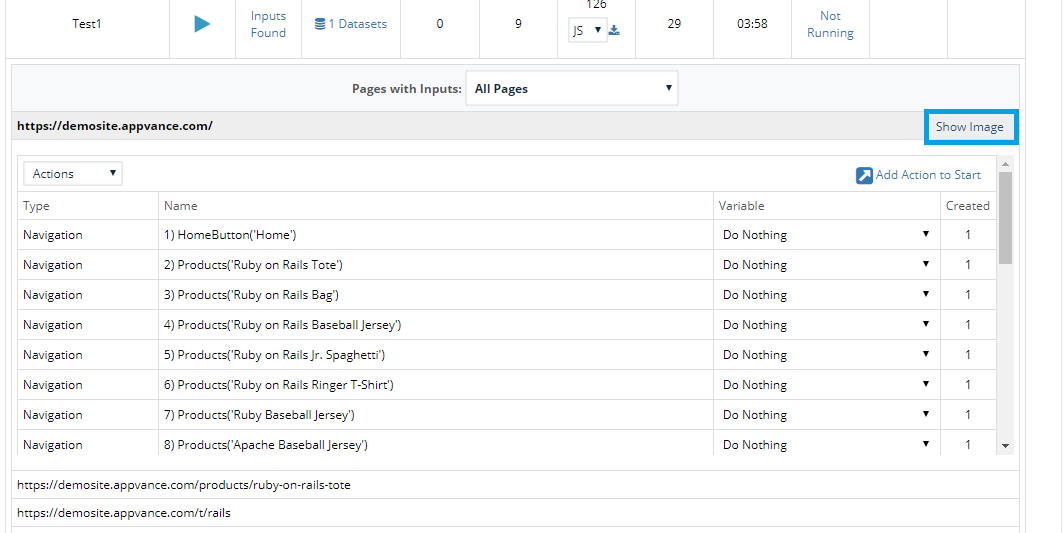
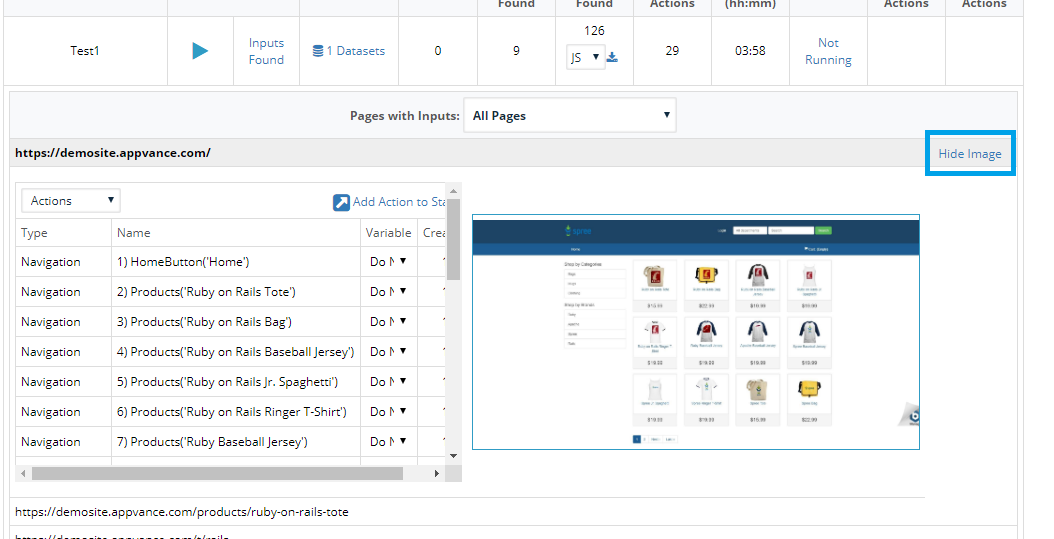
You will have options to use images for mapping the data (defined variables) and the accessors by using Show Image
The image section can also be hidden by using Hide Image
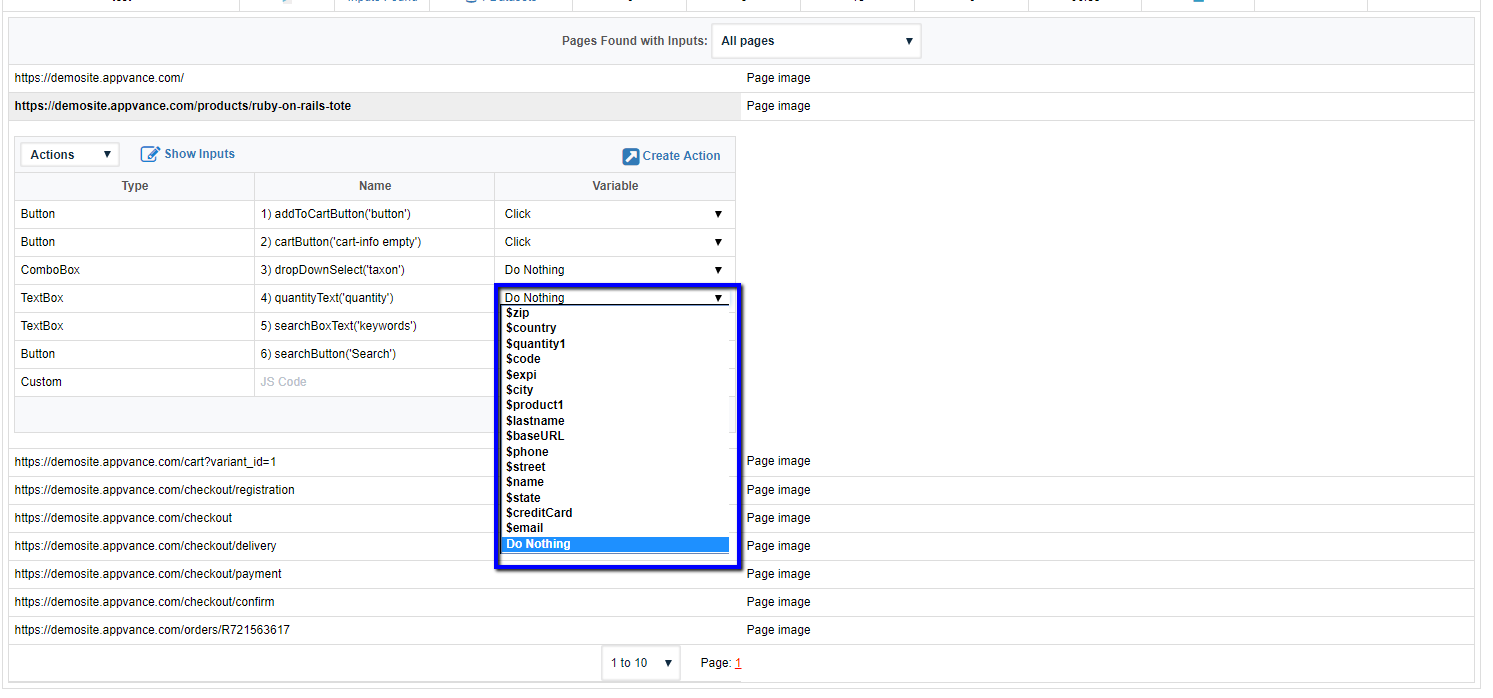
For other inputs, AI will suggest all the options say for example, for a radio button, it will show the options that we could choose from if that input is required, and for a drop-down with values, it will show all the options including an option to try all the options, etc.
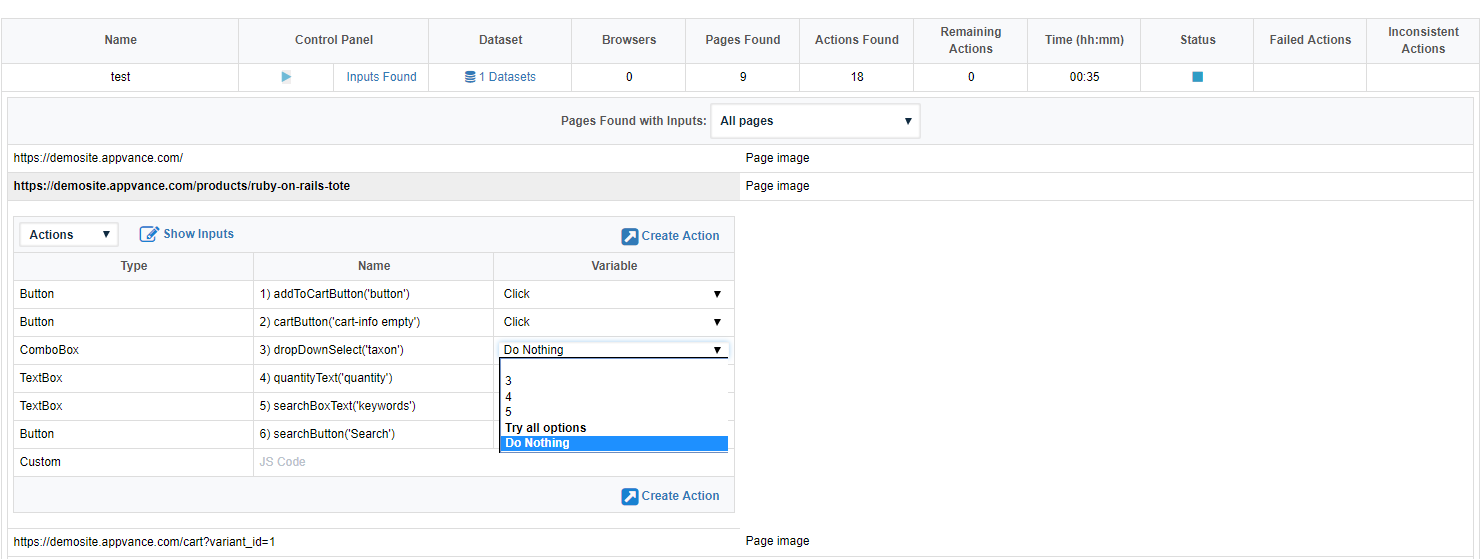
If there are any custom actions that need to be created apart from this, Custom Type could be used with the JS Code.
For example: after logging in, if you need to go to a different URL, or if we need to process something we could make use of customJS.
For text fields, you will be provided with an option to either use setvalue or sendkeys, depending on the type of the text box, either of one can be chosen from the drop-down.
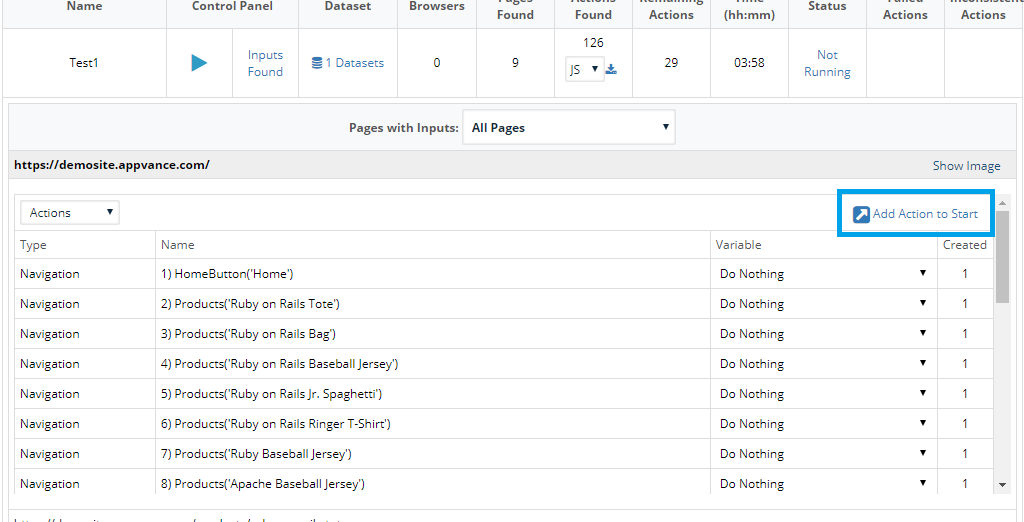
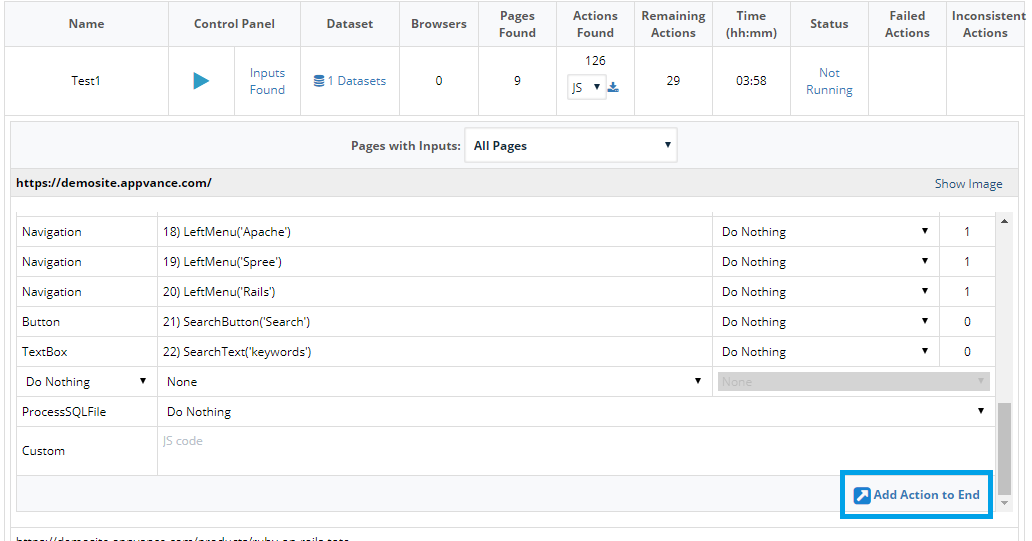
After selecting all the required inputs, as seen below, Add Action to Start and Add Action to End link shall get enabled, Clicking which will create a new action to be executed for further Blueprinting of the application.
You can choose either of the 2 options depending on where the defined action is to be added in the queue of actions.
Suppose there are 10 actions that still need to be completed and you want to add an action to the top of the queue before the execution of the pending 10 actions, Add Action to Start can be used.
If the defined action is to be executed after the 10 remaining actions, then Add Action to End to be used.
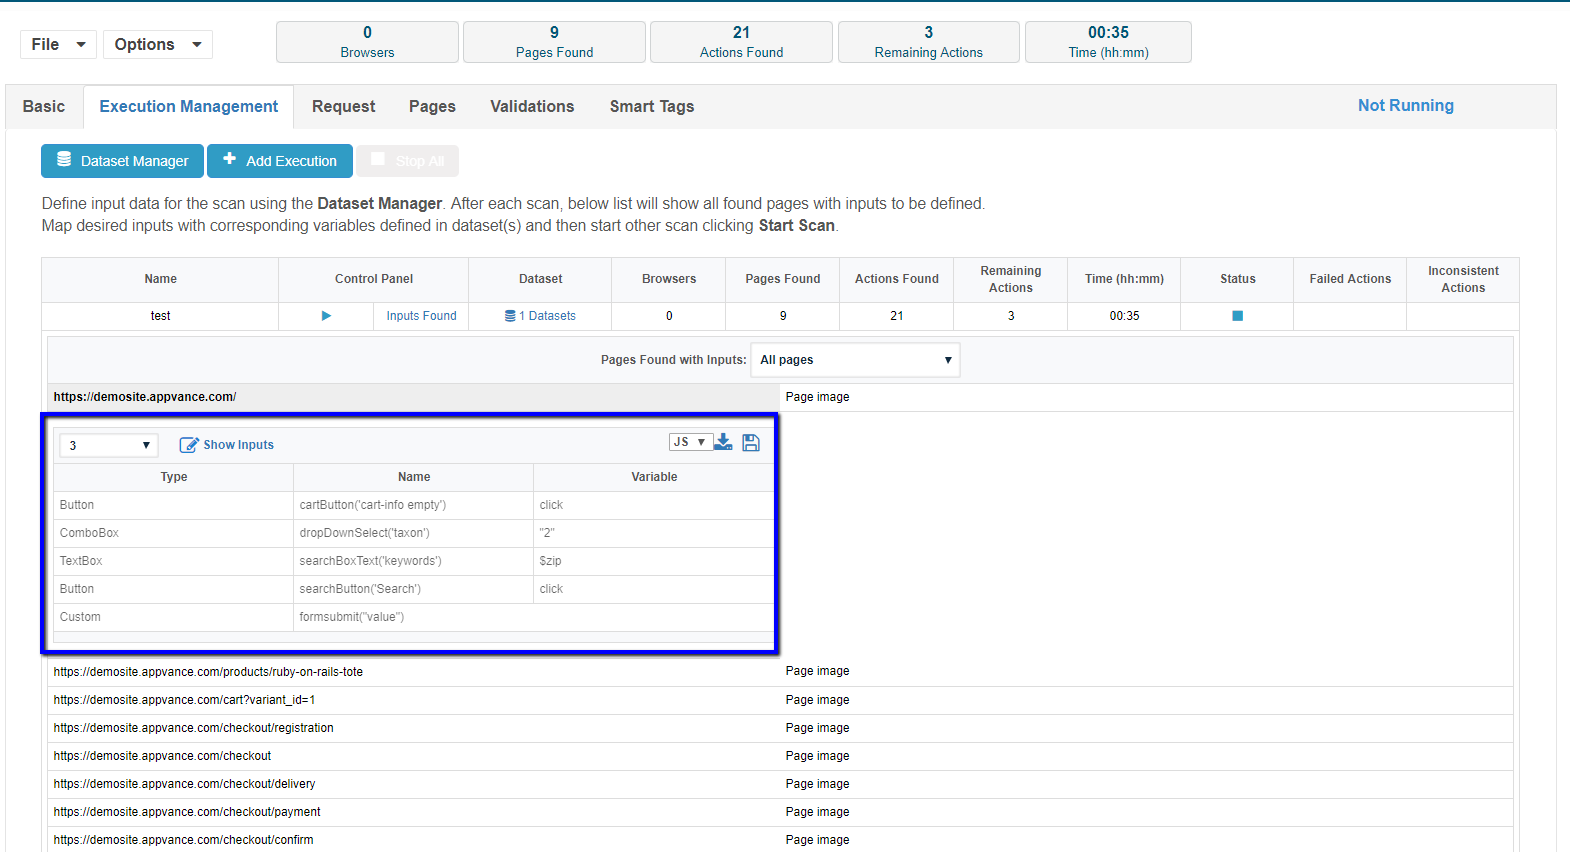
With the created actions, you could download the designer scripts and also the java scripts and also save them using the save option.
You could create actions like this for all other different pages.
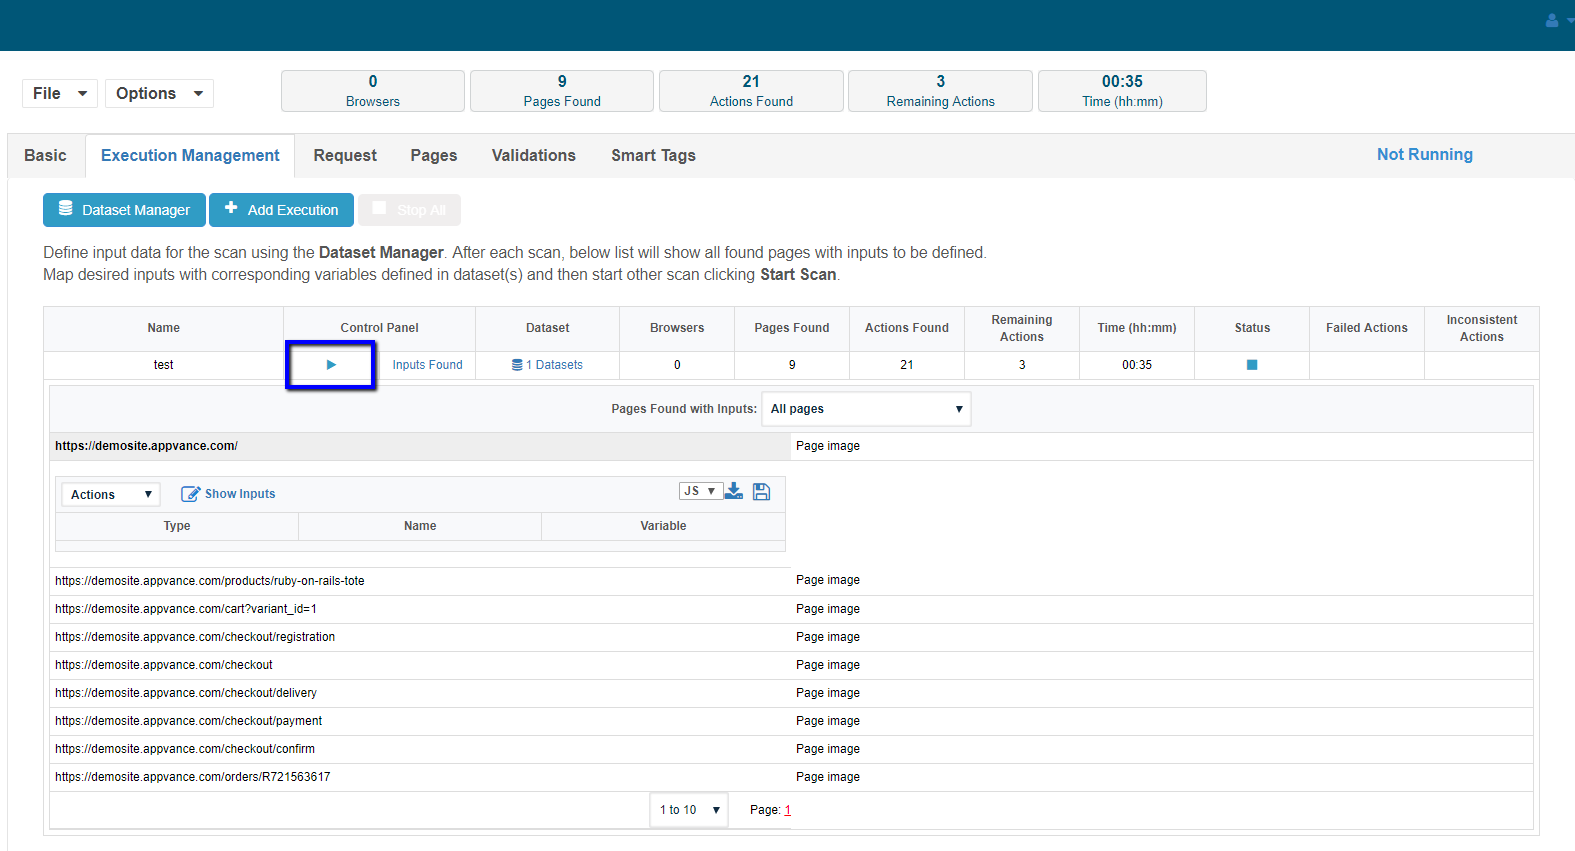
And once all those actions are created, click the play button to begin the next round of the application Blueprint using all the provided inputs and data.
Appvance AI will use the inputs provided by you and will continue Blueprinting until it finds no other actions.
Blueprint will allow users to view the source of each state found.
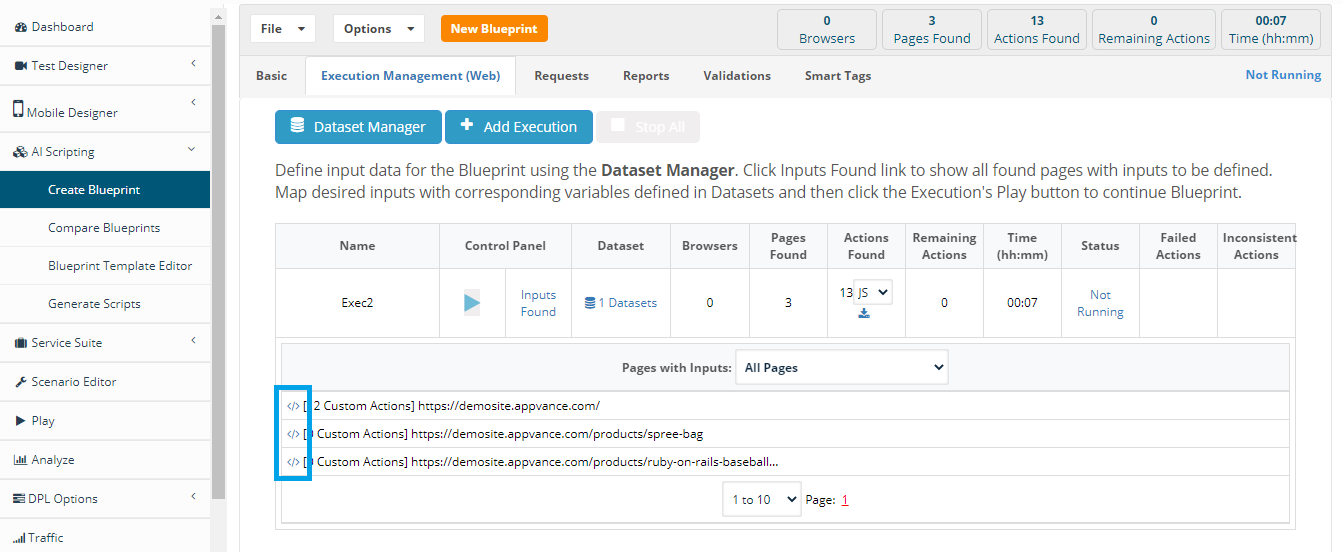
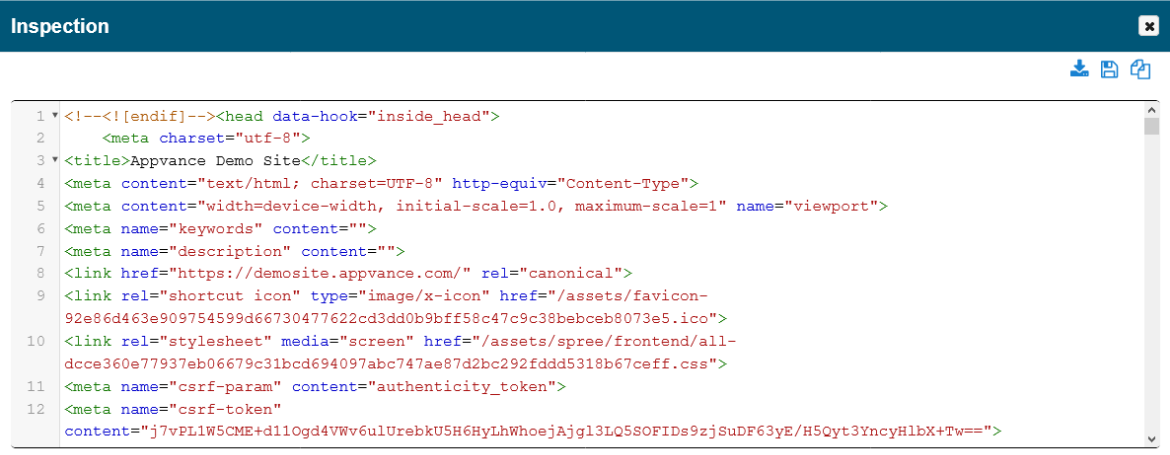
This will show the full structure of the HTML which might be helpful for developers to debug, and also verify that there are no missing elements that should have been found for the page or state (tags of SmartTags)
You also have an option to download the HTML file/copy the contents to a clipboard.
Global Options:
Global Actions allow applying the same Custom Action every time that same fields of the Custom Action are found during the Blueprint.
A star would be available next to Create Action button to determine if this Custom Action should be automatically applied (fields mapped to same variables, clicked and following the same order) if the same set of fields is found later during the Blueprint.
For example, whenever there is a search field and a search button that was previously used in a Custom Action, perform the search with the same variable and button click.
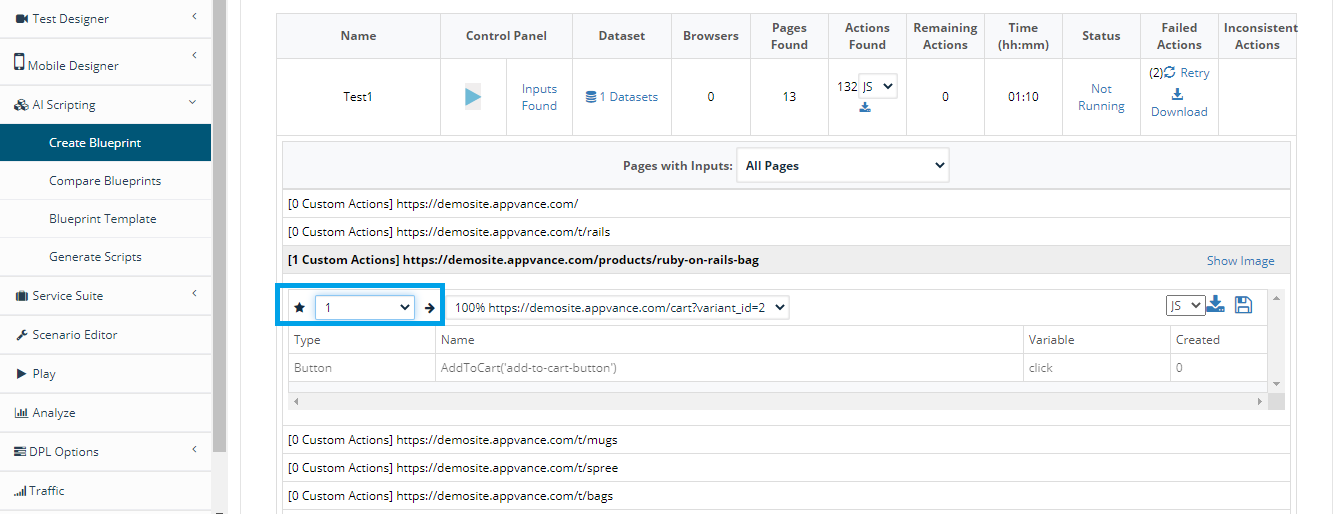
You could add more execution with different data sets by using the Add Execution option.
Deleting custom actions
You can delete the custom actions that are defined (either that are executed or not executed)
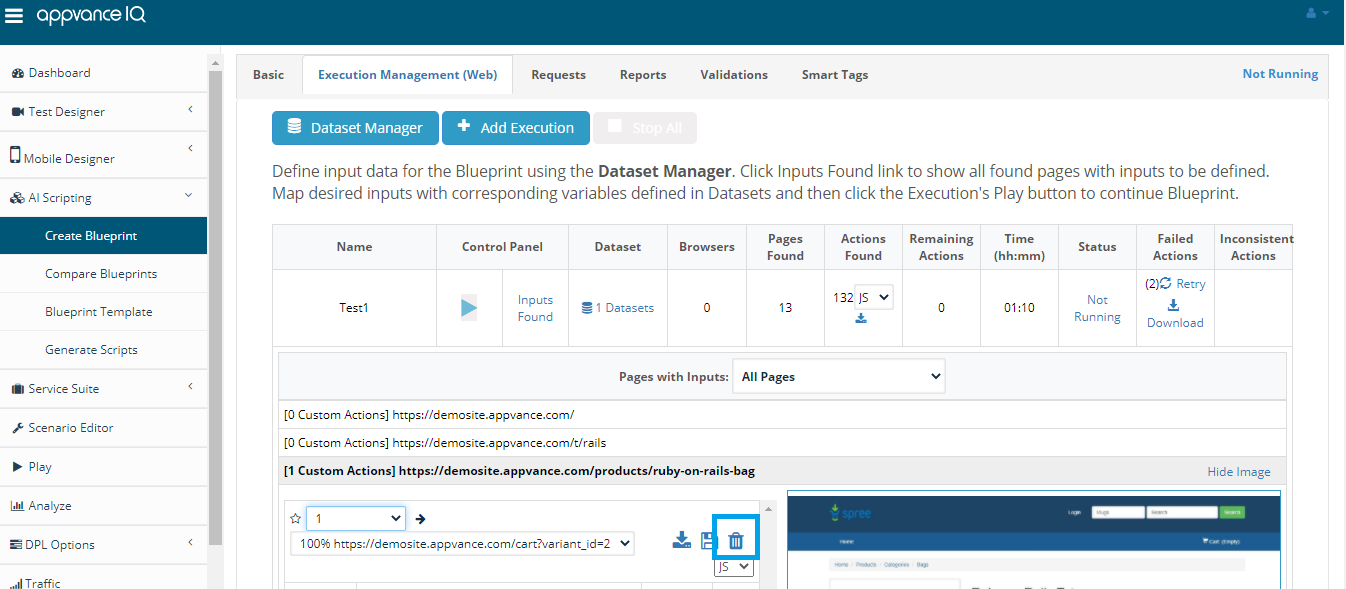
Click on the trash icon to delete the created custom actions after selecting from the drop-down.
You can notice that the number of total actions would be reduced by 1 after you delete the custom action.
If this action is leading to some other action in the upcoming pages, they would be considered an orphan, so please give it some thought in deleting the defined actions that are executed.
The current implementation for removing Actions will only tag the direct pages or first level of States that are discovered after the Action is performed and will not add the Orphan label to pages that are only reachable from the page that was tagged as Orphan. For example, there is a Custom Action that performs login. After login, the Administration site shows. After this, there is a button that allows going into the Reports system. After clicking this button, the Reports site shows. If the login Custom Action is removed, only the Administration page is tagged as Orphan, because it is the direct page after the login Custom Action is performed. Because the login Custom Action was removed, the Reports page is no longer reachable (and every other page that is discovered after login), but it is not tagged as Orphan, because the feature was implemented such that, only first level tagging will be implemented due to the complexity.
Failed and Inconsistent Actions:
For every action, you may notice Failed and inconsistent actions.
Failed Actions are the actions that caused an error during their execution, there are several different failures that could occur like the element not found in 90 seconds, network interruptions, etc.
Failed Actions will have a number of failed actions including a retry option, you could click on the retry link which loads all those actions again to see if they work, else it will still mark them as Failed Actions.
You could also download the JS scripts of the failed actions to check the failures and the reason for failures.
Inconsistent Actions are actions that lead to different pages each time they are executed, Suppose for example after a login page, the first time it navigates to Page A which we store with an ID, and the 2nd time if the path takes to a different page, say Page B, we mark an action as inconsistent action and again it will show the number of inconsistent actions with a retry option to retry all the inconsistent actions.
The stop all button at the top could be used anytime during the Blueprinting to stop the entire process.
Request Tab
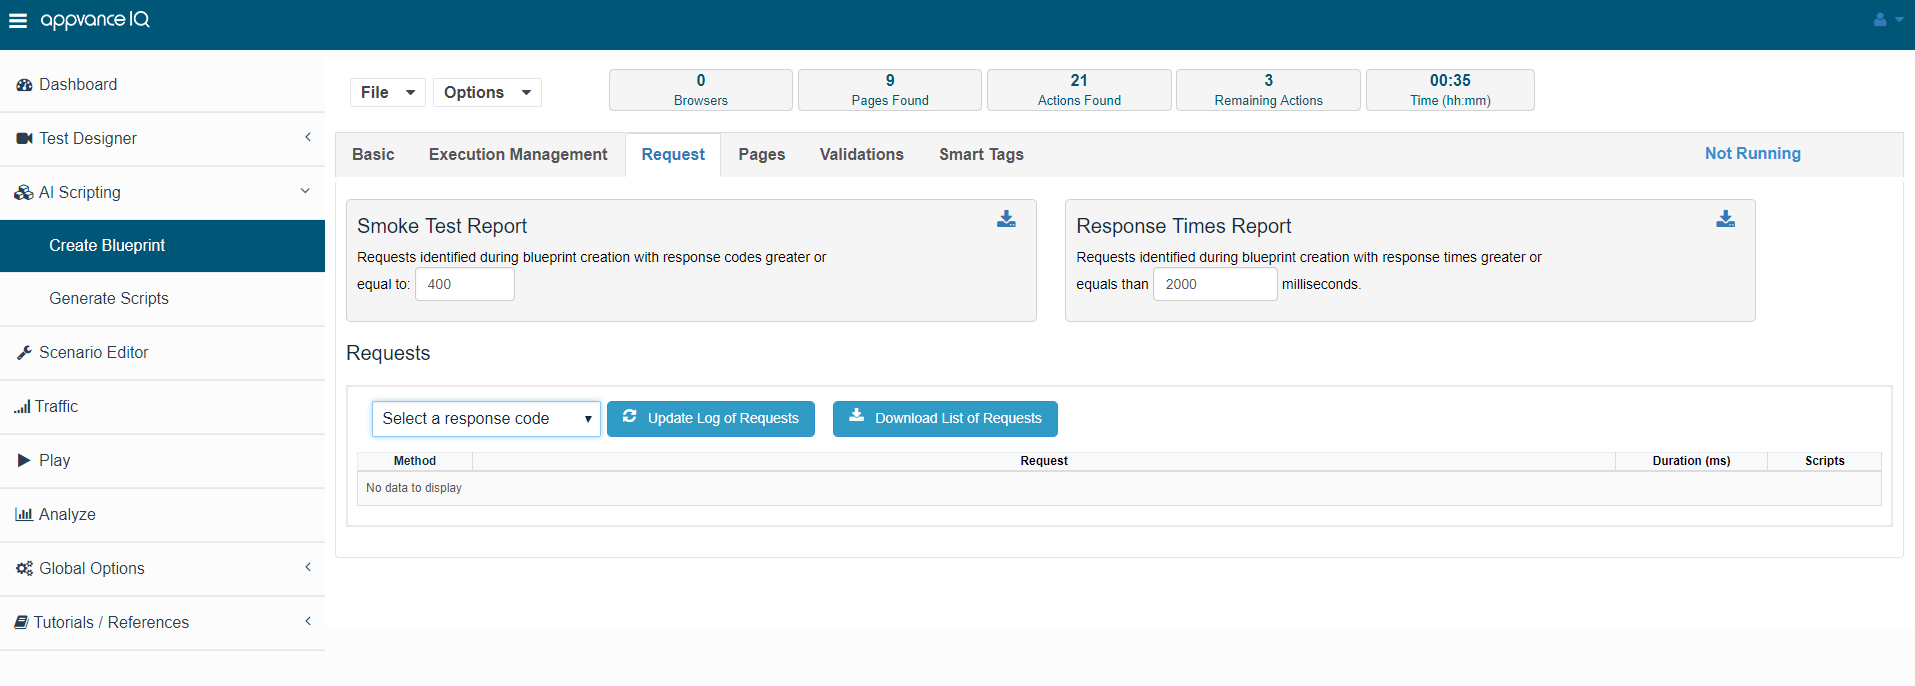
This is the section where you could download the Smoke Tests and Response Times Report after or during the Blueprint of the Application under test.
Smoke Test Report: Requests identified during Blueprint creation with response codes greater than or equal to 200 could be downloaded.
Provide the value in the text field and click on the download button to download the smoke test reports.
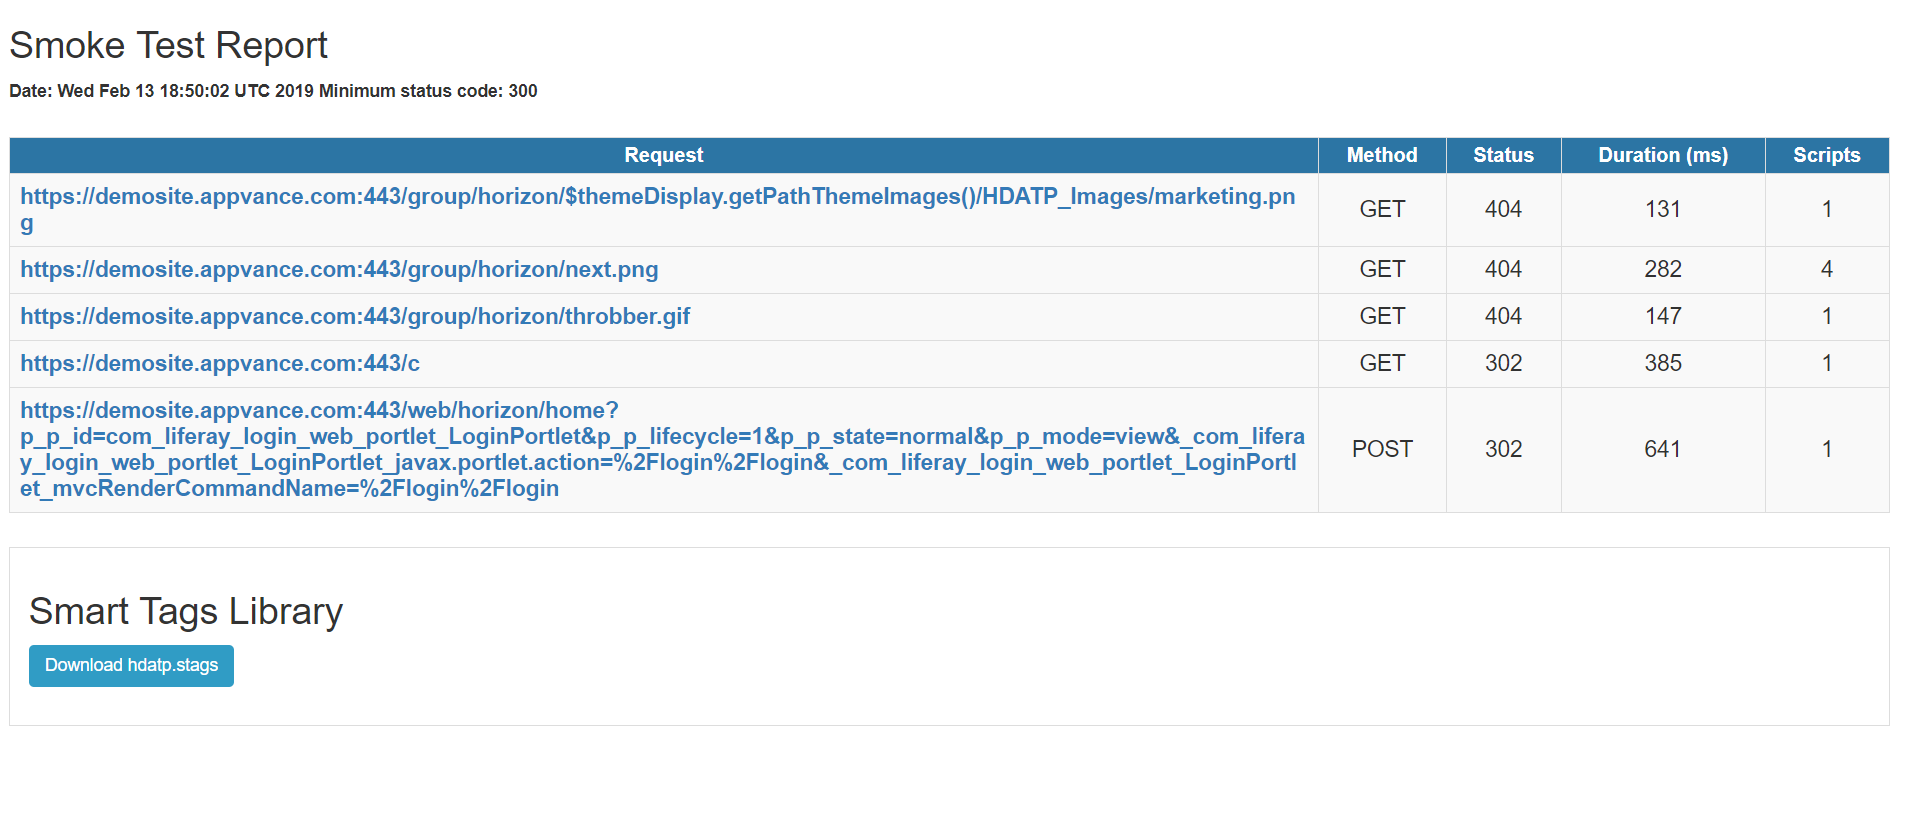
As seen in the above screenshot, based on the report that you generated (in the above case it is the smoke test for response codes > 300) you will get all the requests whose response codes are greater than the specified number along with the duration and the method.
It also shows the number of scripts where this request was seen.
If you click on the link for the request, it will show all the scripts where this request was found.
At the bottom, there will be a button to download the SmartTag library file that was used to generate this smoke test report.
Response Times Report:
Similarly, response times reports could be generated by providing the response time duration.
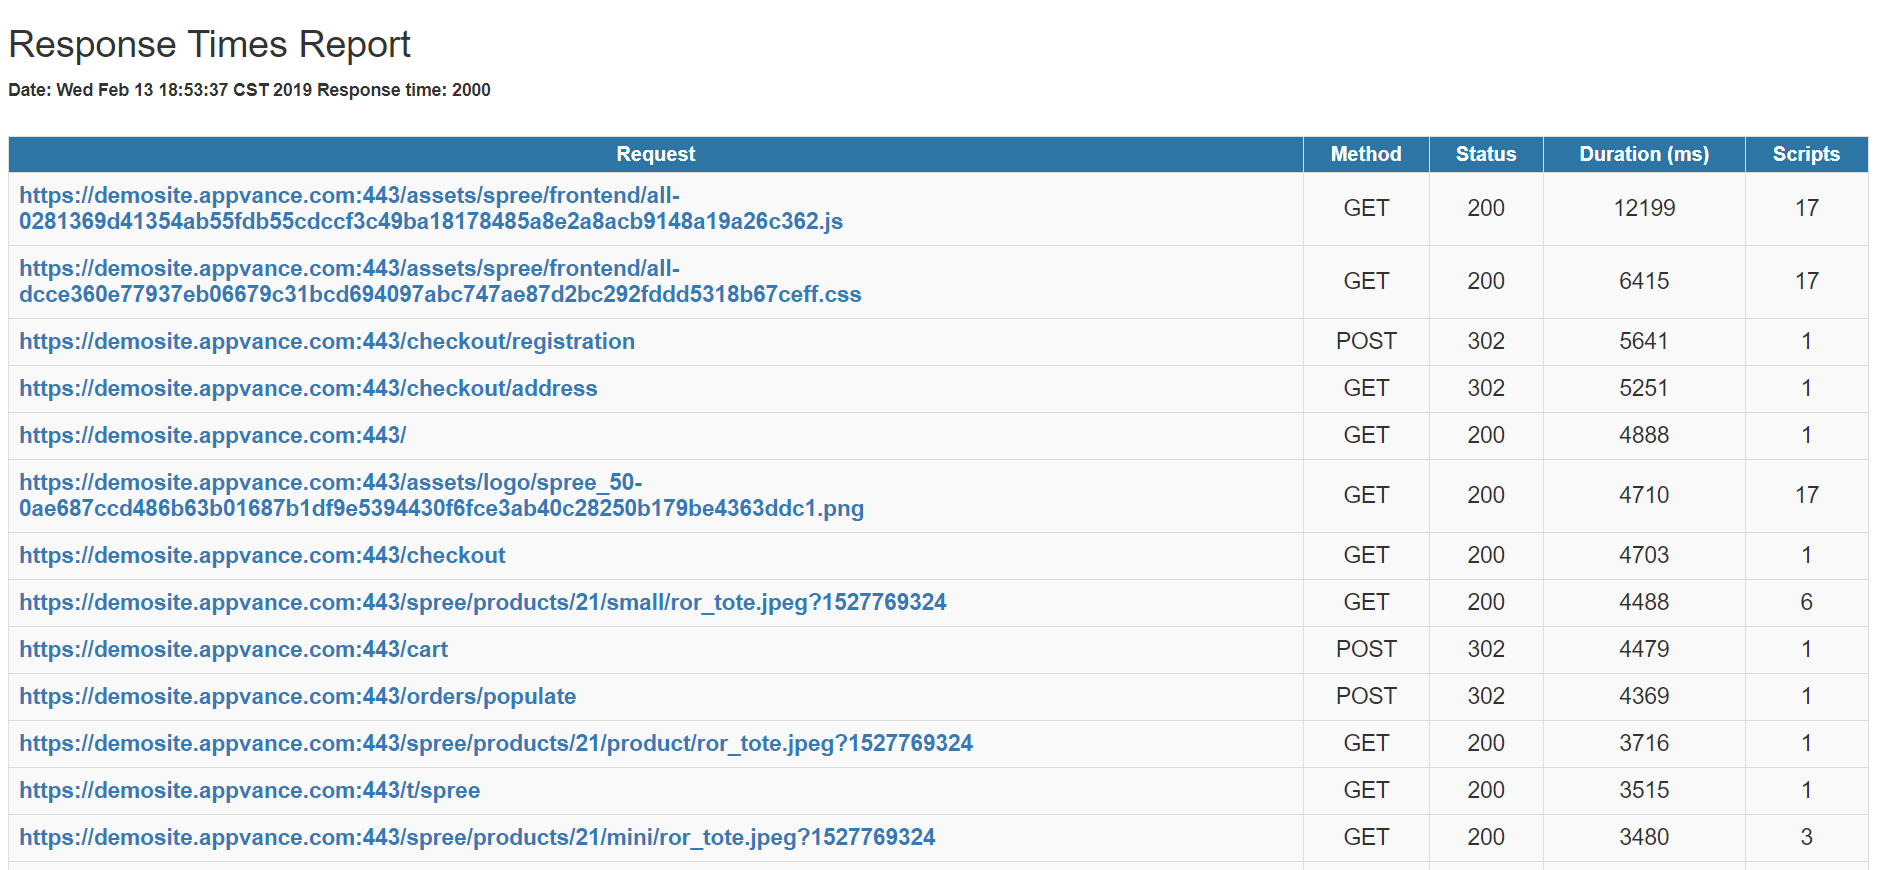
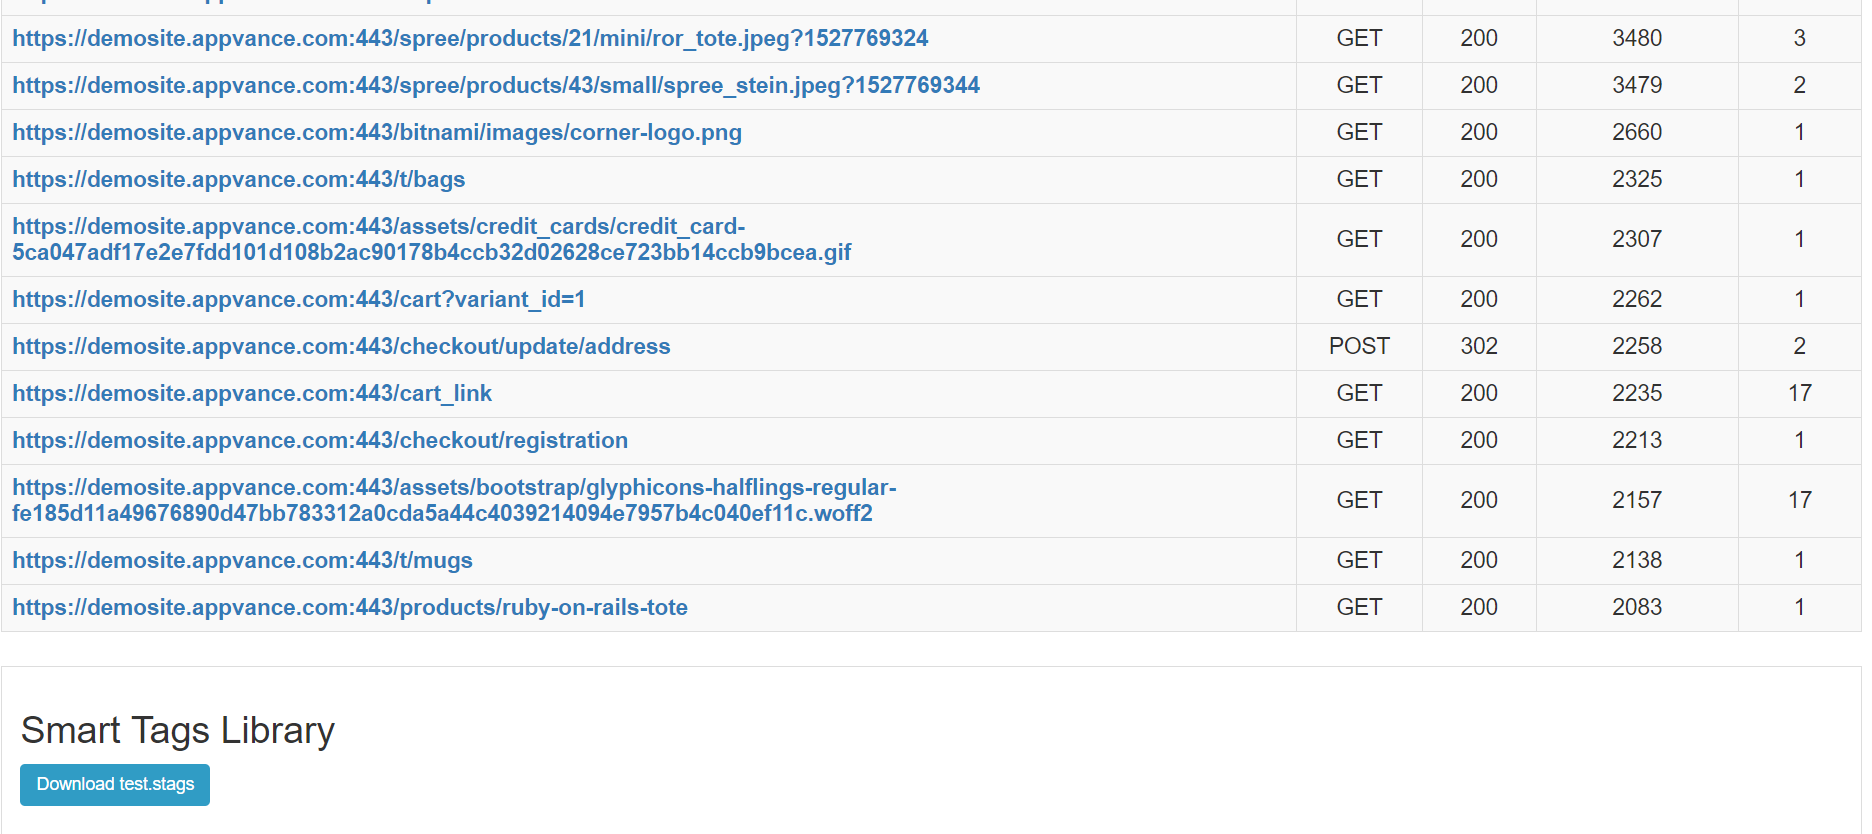
Generating the report (2000 msecs in the above example), will list out all the requests which took more than 2 secs to execute and will have a method, Status code, duration, and the number of scripts for each of the requests that occurred.
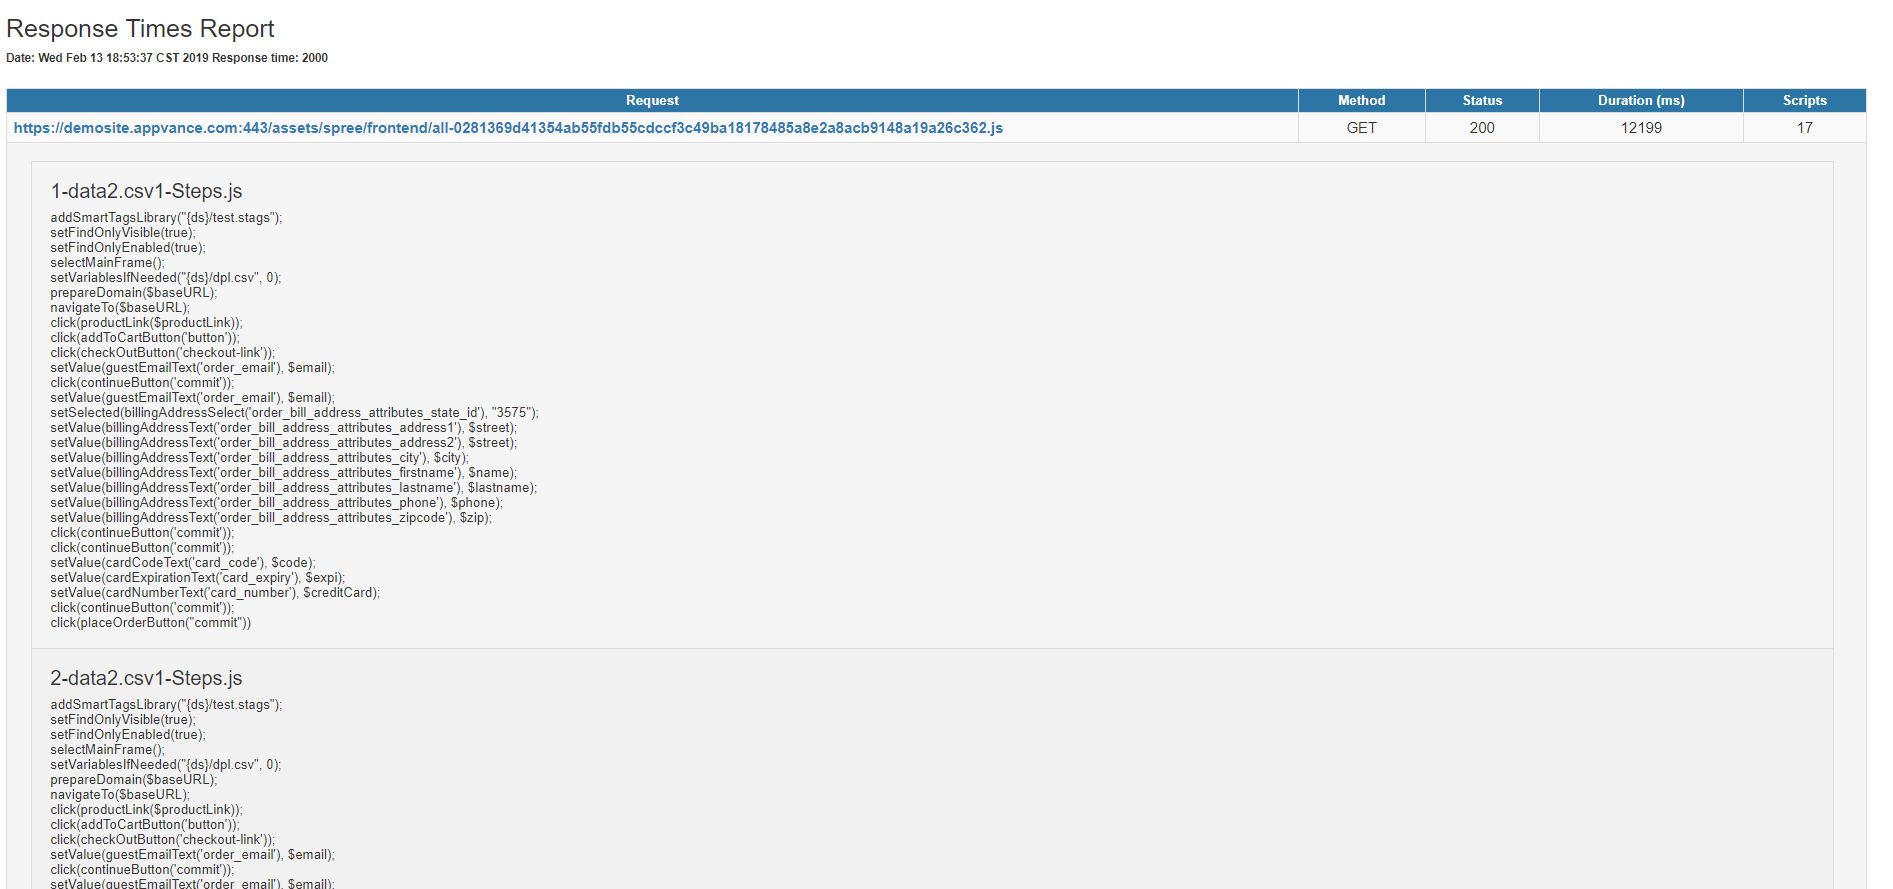
Just like Smoke Test Reports, If you click on the link for the request, it will show all the scripts where this request was found.
At the bottom, there will be a button to download the SmartTag library file that was used to generate this smoke test report.
Below the Smoke and Response times, you will have a filter to Select a response code that is dynamic, the data would be populated based on the response codes that the Blueprint receives, and all these are updated in real-time.
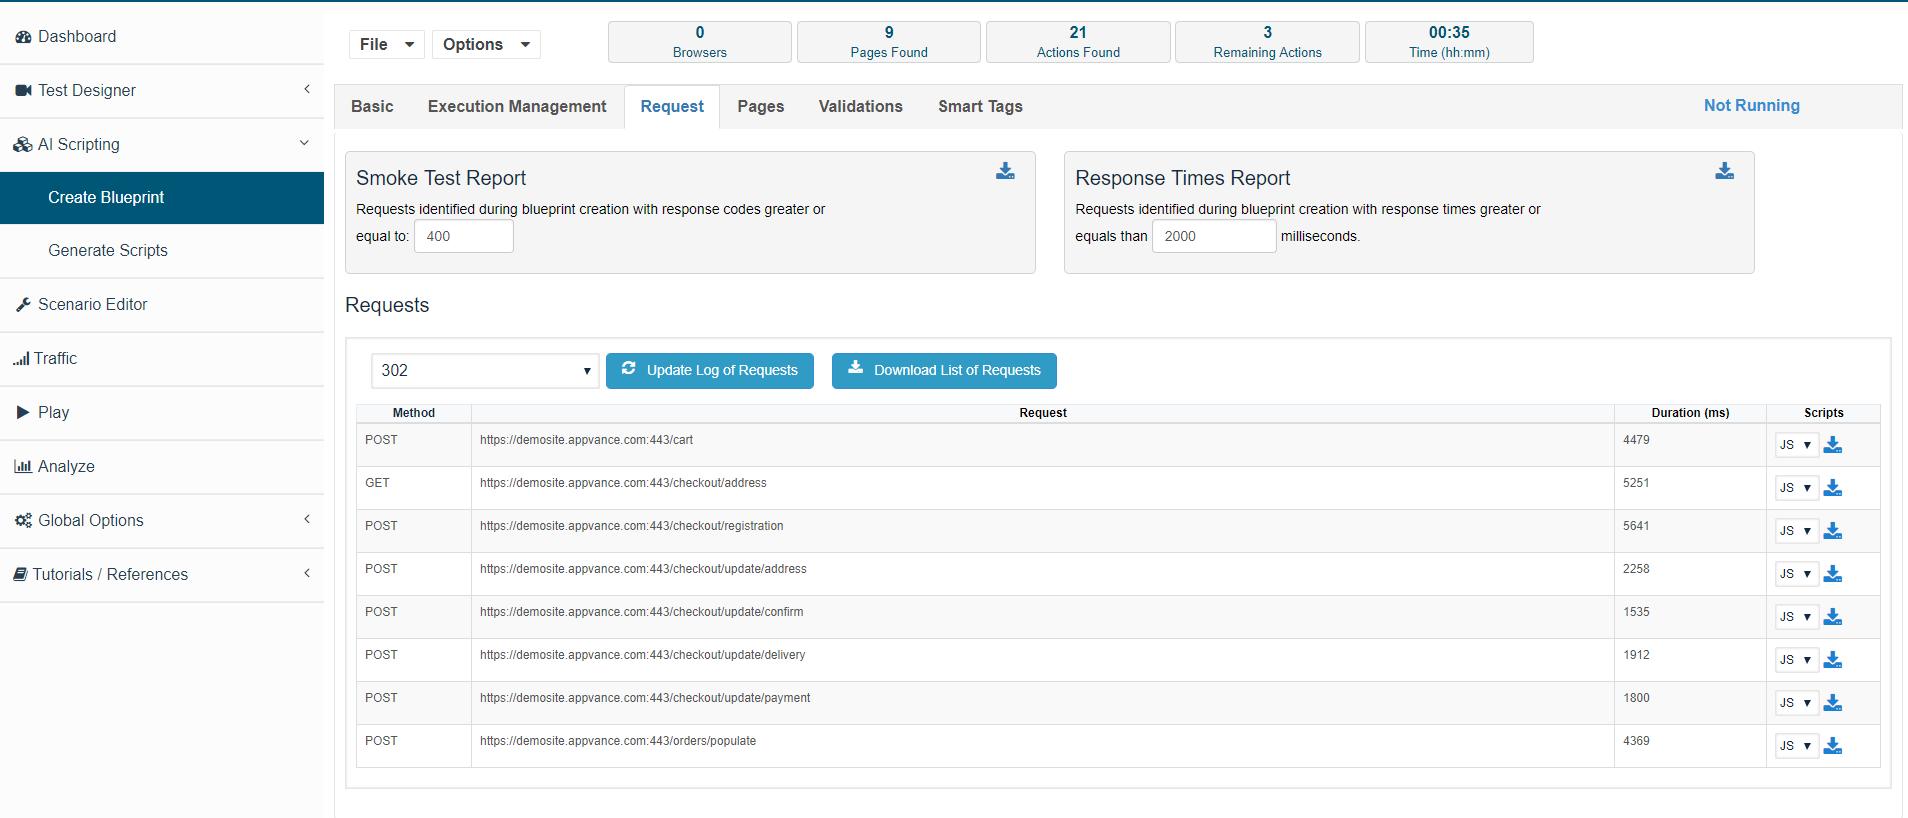
After the selection, you could download the list of requests, which gets downloaded to an excel sheet, and also per request, JS or DS scripts could be downloaded which downloads all the scripts where that particular request occurred.
Validations Tab
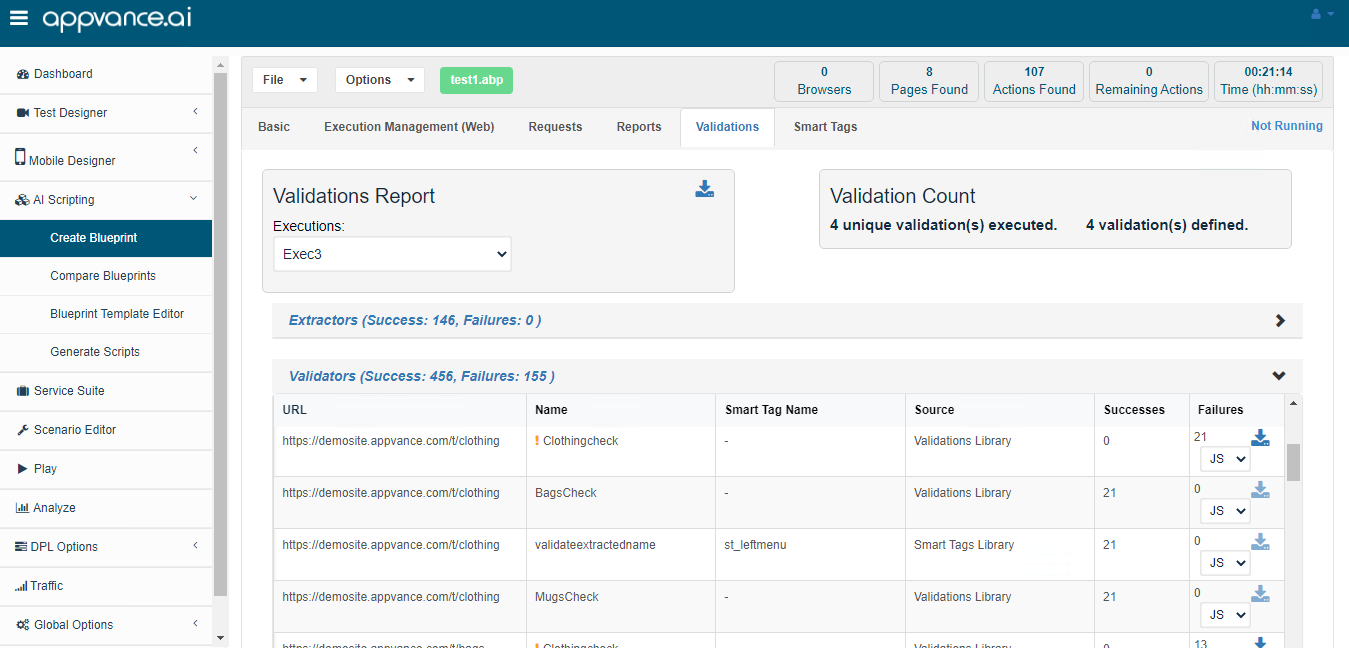
Validations tab shows all the different validations (Extractors, Validators, Network validations) Results on one page per execution.
The details like URL, Validation Name: SmartTag Name, Source, Successes, Failures will be displayed.
Success / Failures shows the number of successes/failures or each of the URLs with what SmartTag it was executed and the validation name.
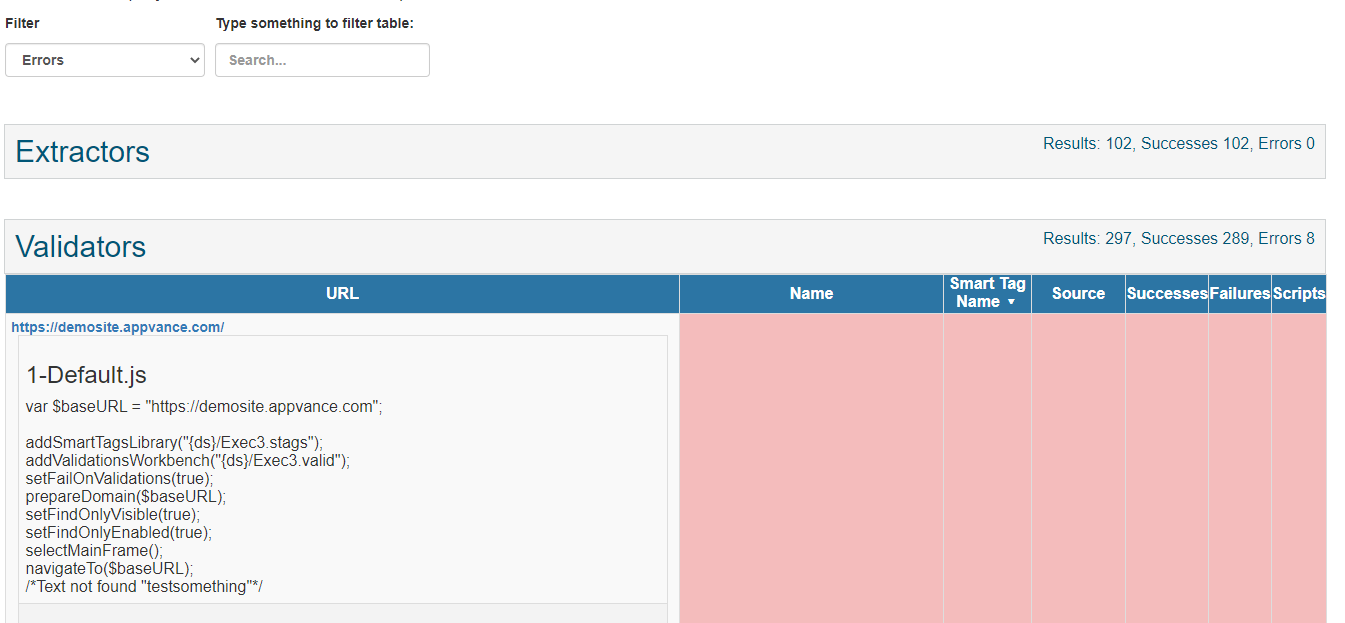
JS or DS script could be downloaded for those validations that failed to check the reason.
If there were 3 failures, 3 different scripts would be downloaded to check all the 3 different flows.
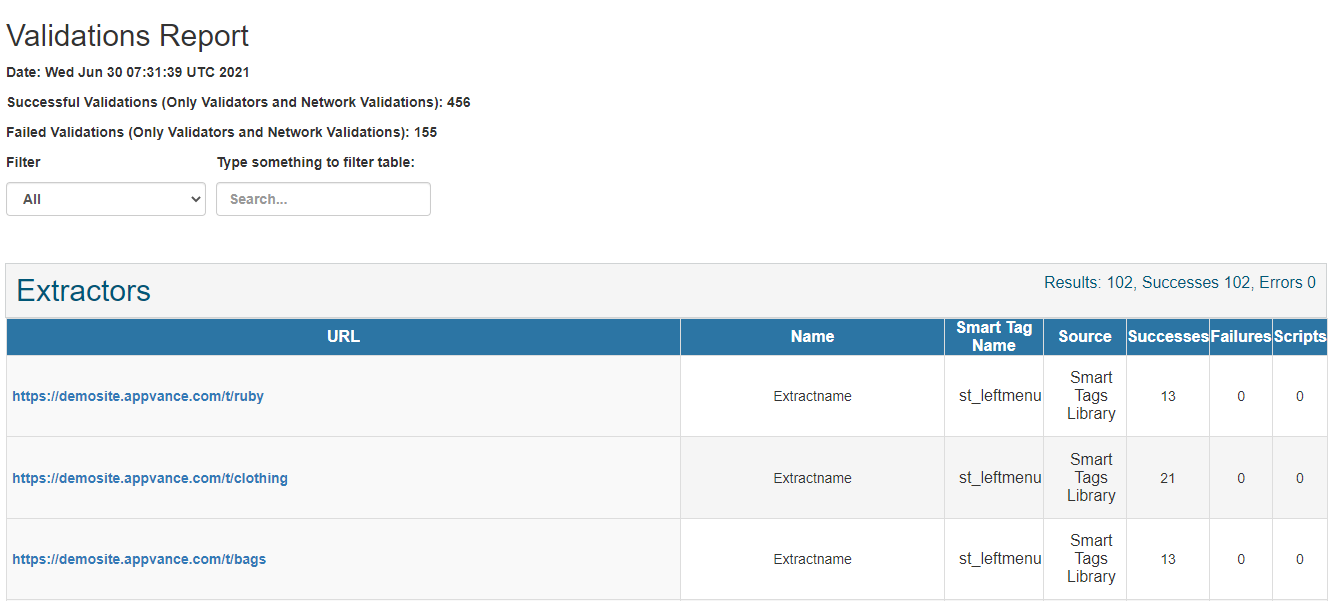
Next to the execution name, you could click on the download button, which downloads the entire validation report in an HTML format.
For the failed validations, you could click on the entry to see the list of scripts where the failure occurred.
SmartTags Tab
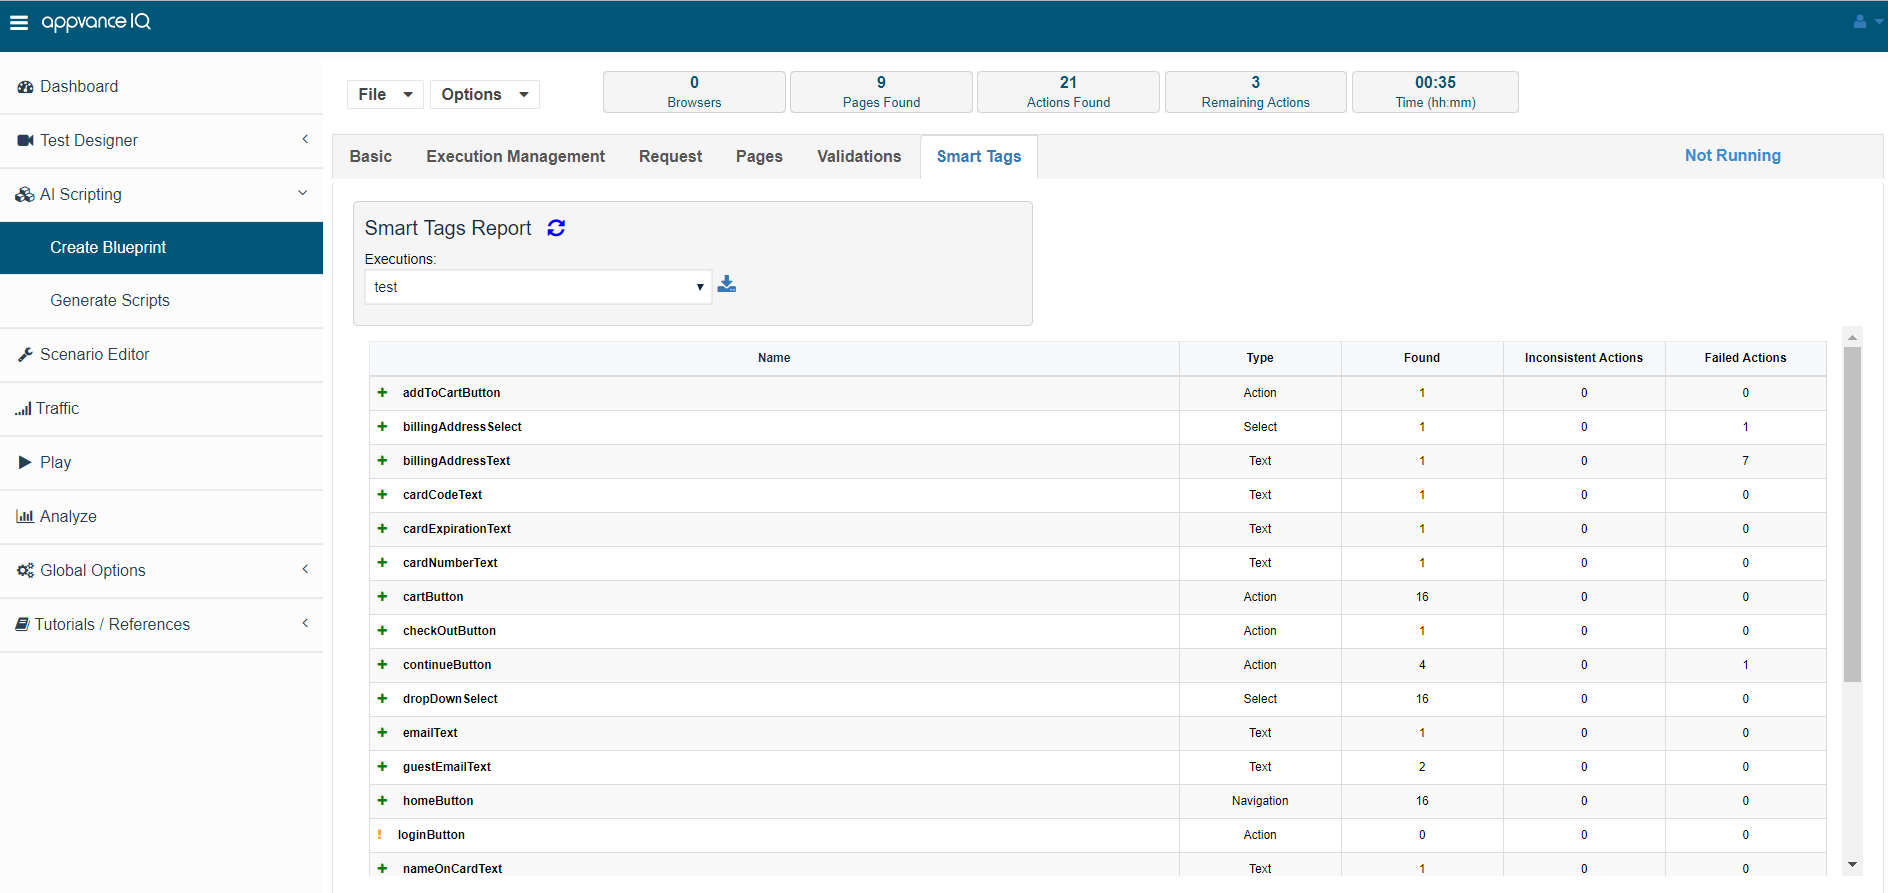
This is again a real-time report that lists all the SmartTags and the usage of SmartTags. This is an important report to check if all the defined SmartTags were used during the application Blueprint.
If you notice the above screenshot, all the SmartTags have a + symbol with a green color which means those SmartTags were used during the application Blueprint, with type.
The found column shows the number of times the SmartTag was used during the Blueprint process.
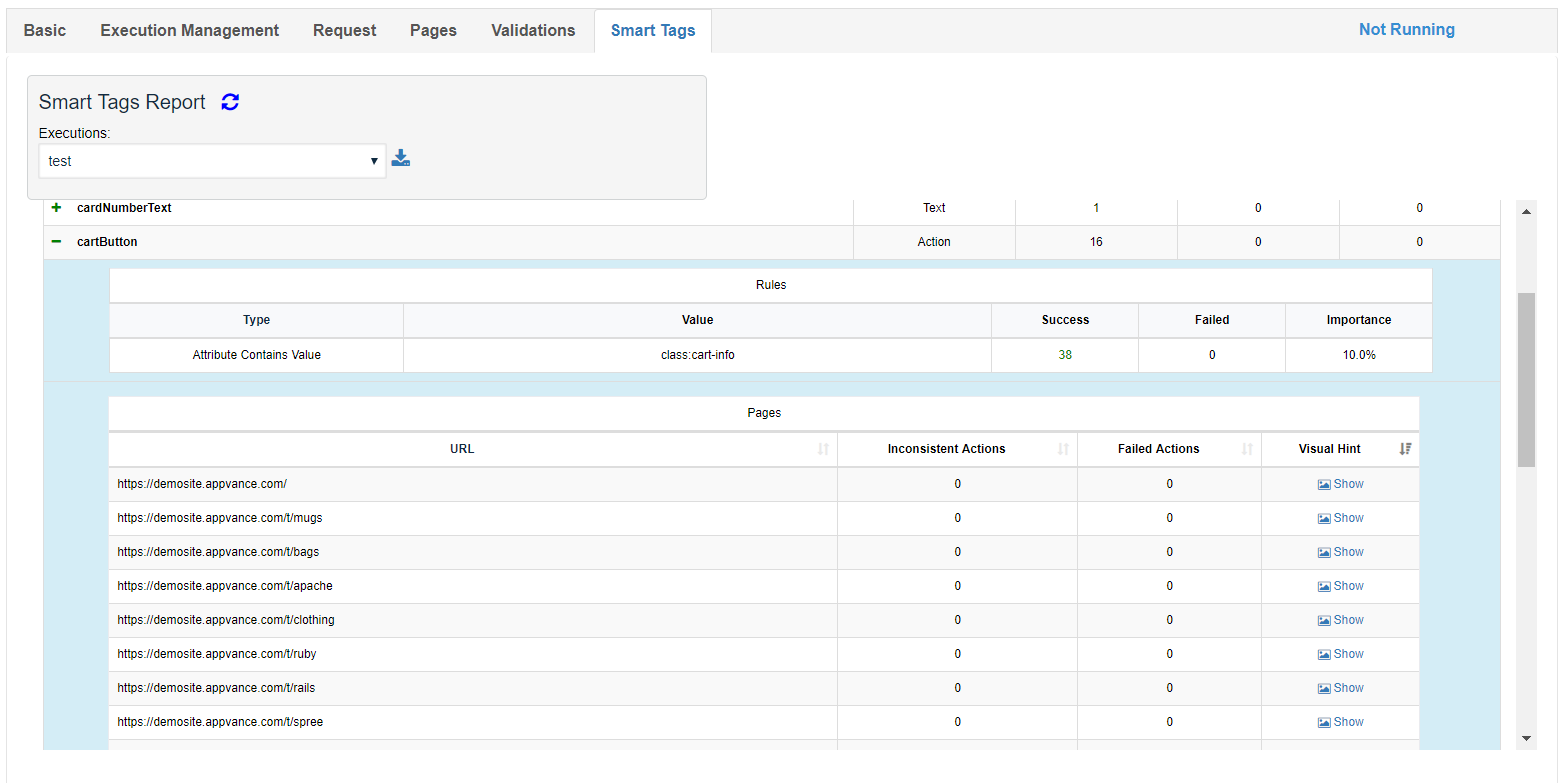
You could click on the + mark for each of these SmartTags which will show the details of the defined SmartTags, success and failure, and the defined importance for the rule of that SmartTag.
Below which you will see all the URLs where the SmartTag was used and any inconsistent or failed actions including a snap-shot of the application of that particular URL.
For the SmartTags that are not used, you will see a ! symbol next to the SmartTag.
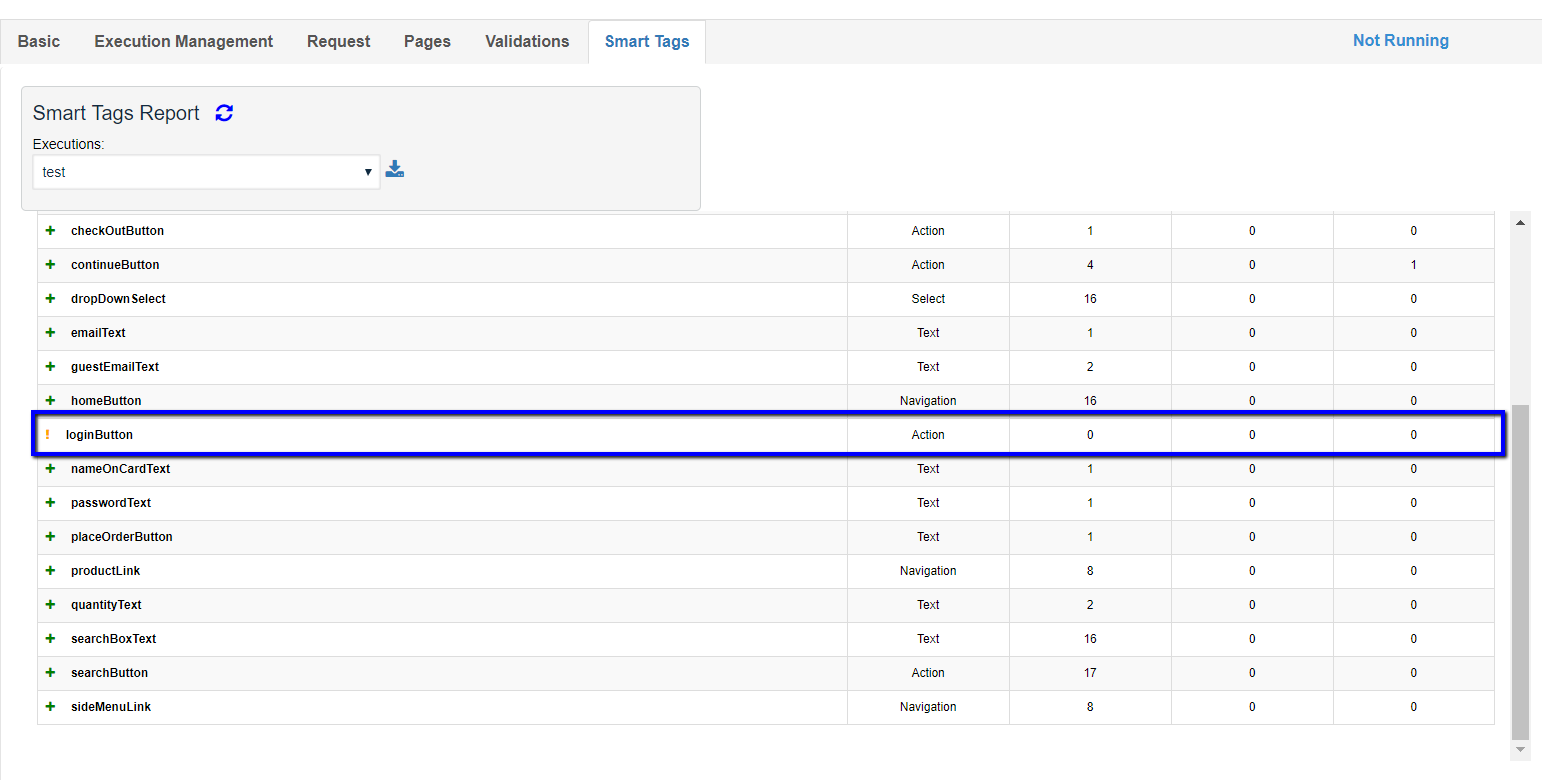
You could go and re-visit the SmartTag to check if it was defined properly and make necessary changes for the SmartTag to work as expected.
-
Found column corresponds to the number of States (pages), identified by URL, in which the SmartTag was found.
-
Failed Actions corresponds to the sum of all failures that occurred in all URLs in which the SmartTag was found.
-
In the rules section, Successes corresponds to the number of times this rule was successful when trying to find the SmartTag. This value is a global count, it is not viewed by URL.
-
In the rules section, Failures corresponds to the number of times this rule failed when trying to find the SmartTag. This value is a global count, it is not viewed by URL.
-
In the pages section, Failed Actions corresponds to the number of Blueprint Failed Actions that were caused by this SmartTag for this URL. The sum of Failed Actions counts of all URLs in this section should correspond to the Failed Actions count of the SmartTag row.
File Menu Options
-
File > New - is to create a new Blueprint file
-
File > Open - to open any existing Blueprint files
-
File > Save - To save the Blueprint file
-
File > Save As - To save the Blueprint file with a different name
-
File > Export Template - After all the Blueprinting of the application is done, you could save a template of the file. This template file is used when running a Blueprint using CI-CD
-
File > New from template - You could open a saved template file and continue to Blueprint the application from that point
-
File > Export SmartTag library - The SmartTag library used could also be exported using the Export SmartTag library option
-
File > Export Self Healed SmartTag library

Blueprint can be run by enabling self-healing.
Self-Healing is one of the great features of Appvance AI, SmartTags are basically created based on rules and you provide importance to each of those rules, when self-healed, the importance of those rules gets changed.
SELF-HEAL PROCEDURE:
We first check if the old rules of the SmartTag still apply. Rules that are still found will be marked as successes (successes: 1, failures: 0) and rules that were no longer found will be marked as failures (successes: 0, failures: 1). In the case of SmartTags with the onePerPage modifier, the rule will be checked in every single occurrence of the SmartTag, and then we add up the results and report the number of successes and failures (for example successes: 10, failures: 4).
Once we have the number of successes and failures, we proceed to update the weight of the rule. In our self-healing algorithm, weights will be updated in the following way:
-
the weight of a successful rule will be doubled and a small additional weight of 10 will be added.
-
the weight of a failed rule will remain the same.
Then the new weights will be normalized to 1000.
For example: let's suppose rule A has an initial weight of 750 and rule B an initial weight of 250, and rule A was successful but rule B failed. So the new weight of A will be 1510 while the new weight of B will still be 250. Then we normalize to 1000 and we obtain a final normalized weight of 85 f8or A and 142 for B.
A: 750 + 750 + 10 -> 1510 -> 858
B: 250 + 0 -> 250 -> 142
In the case of onePerPage SmartTags with a number of successes and failures greater than 0 or 1, weights will be calculated as in the following example. Suppose rule A has an initial weight of 600 and B an initial weight of 400, and rule A got 4 successes and 1 failure, and rule B got 2 successes and 3 failures. So for A we add 600*4 + 10*4 to the original 600 and for B we add 400*2 + 10*2 to the original 400, to get a new weight of 3040 for A and a net weight of 1220 for B. Then we normalize to 1000 and obtain a final normalized weight of 714 for A and 286 for B.
A: 600 + 600*4 + 10*4 -> 3040 -> 714
B: 400 + 400*2 + 10*2 -> 1220 -> 286
If the SmartTag contains less than 5 rules, we can detect new rules and add them to them. Example: Let's suppose we originally only have rule A with a weight of 1000. Then we find that rule A was successful and a new rule B was also successful. Rule A will double its weight to 2000 and rule B will start with a weight of 100. Then we normalize.
A: 1000 + 1000 + 10 -> 2010 -> 948
B: 0 + 100 + 10 -> 110 -> 52
For onePerPage SmartTags, we multiply by the number of successes. For example, let's suppose the original rule A got 2 successes and 1 failure, and the new rule B got 3 successes and no failures. Then their weights will be recalculated in the following way:
A: 1000 + 1000*2 + 10*2 -> 3020 -> 901
B: 0 + 100*3 + 10*3 -> 330 -> 99
Finally, we will remove rules whose weight is less than 10 (or 1%). Renormalize after removing rules.
-
Export Auto validations -
As you should be aware that the validations can be created using Validation Workbench, but when creating the Blueprint, AI has the ability to automatically create validations as it navigates through the pages.
Based on the first element that is seen on a page, auto validations are written keeping that element into a reference to keep all the other elements of the page.
This file that is created as part of the initial Blueprint can be downloaded using the file menu option > Export auto validations.
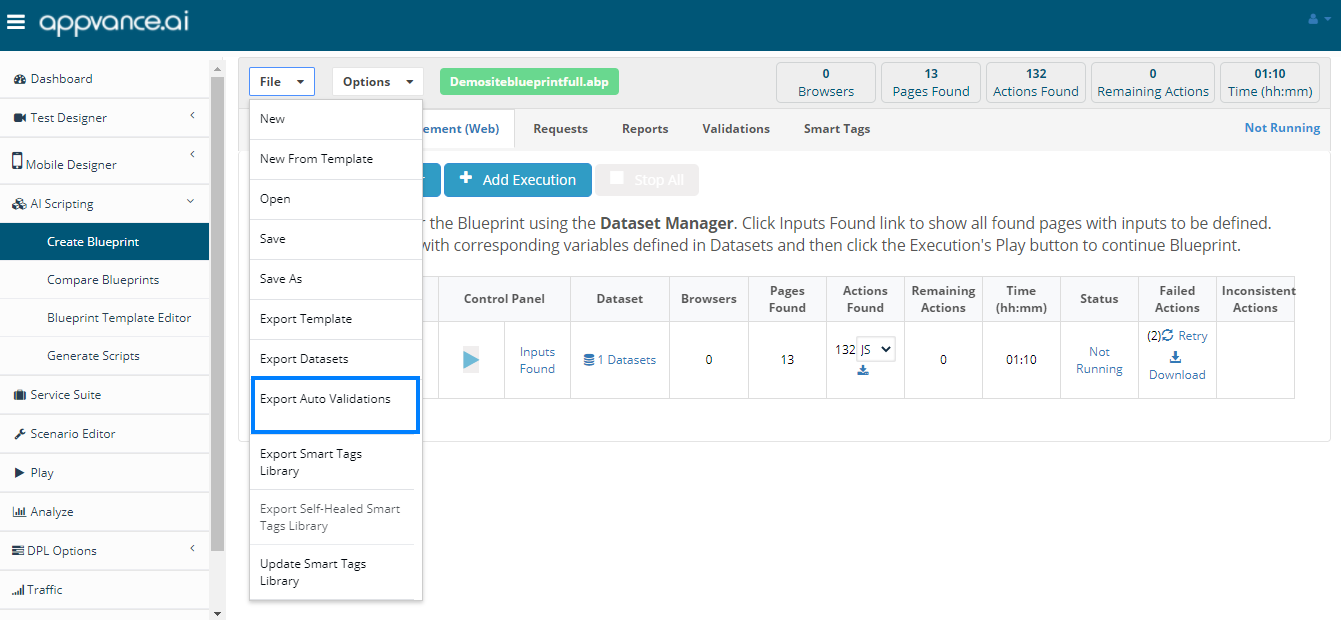
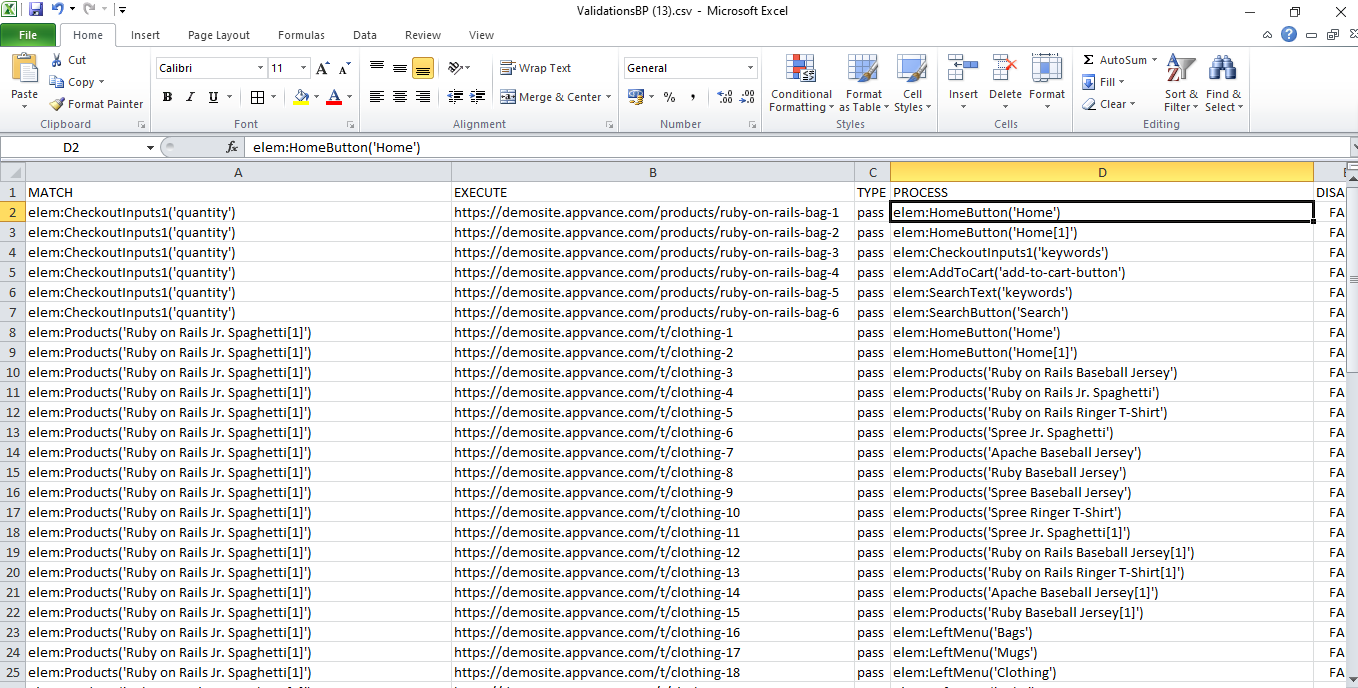
This CSV file can be imported into the Validation Workbench, to convert the created CSV into JSON format.
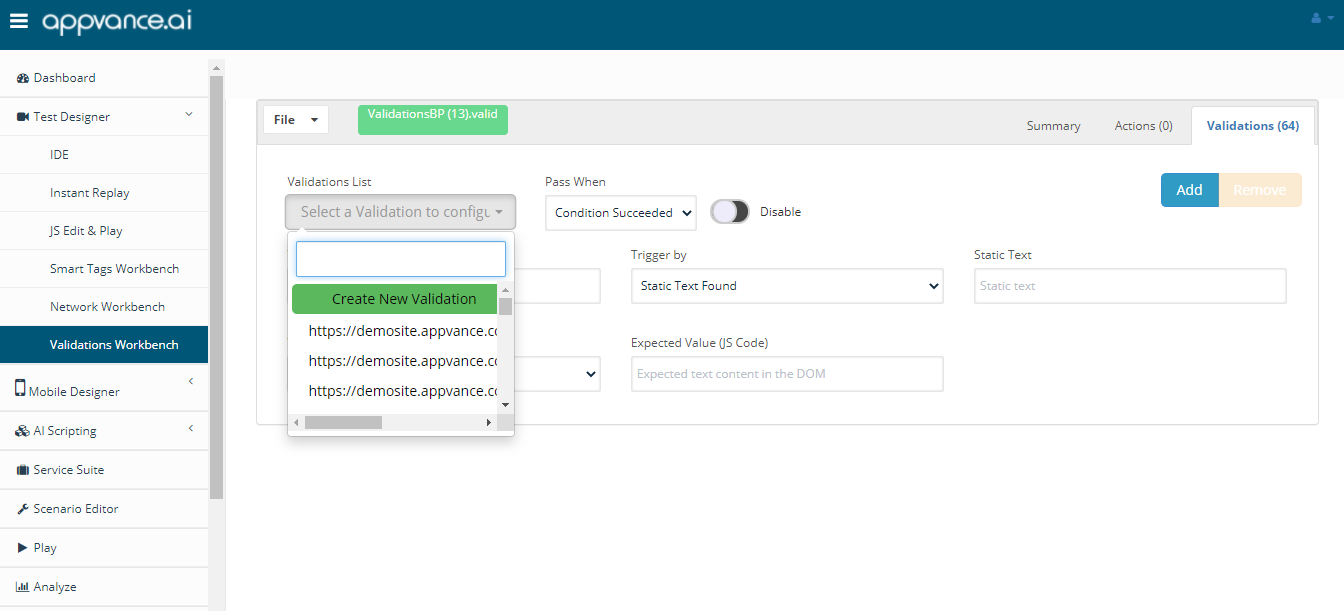
This auto validation file that was created automatically by the Blueprinting process can be used in Test Designer if required.
This auto validation file can be used in the next version of Blueprinting by following the below steps
From the File menu of the Blueprint, click Export template
Open the exported template in the Blueprint template editor
Go to the UI validation section, and add the auto-created Validation Workbench file.
Save the template
Create the Blueprint by using New from the template, the auto validations created would be used in the new version of the Blueprint that is going to be created.
-
Update SmartTags Library
This option will let you browse a new SmartTag library that was created after a Blueprint has been created.
Suppose there is a Blueprint for an application that was already created with build X and there were some new fields that were added in build Y and if we want to incorporate those new SmartTags, the new SmartTags can be added to the existing SmartTag library and use this option "Update SmartTags Library" to take those new SmartTags into account.
This process will create a template and ask the user to update the new SmartTag library and recreate the Blueprint with the template created and the new updated SmartTag library.
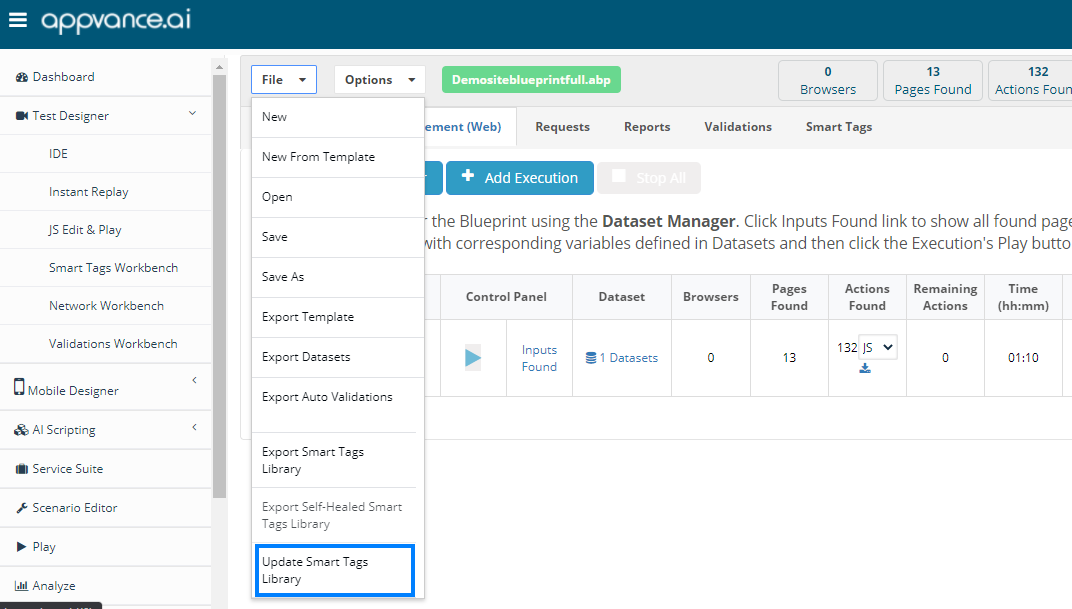
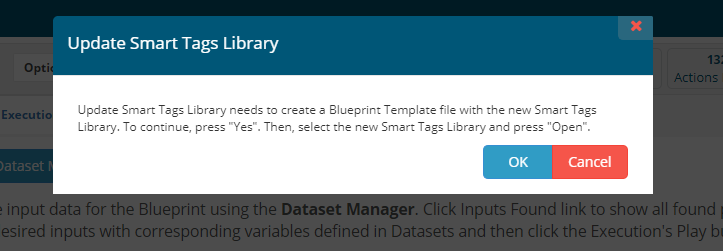

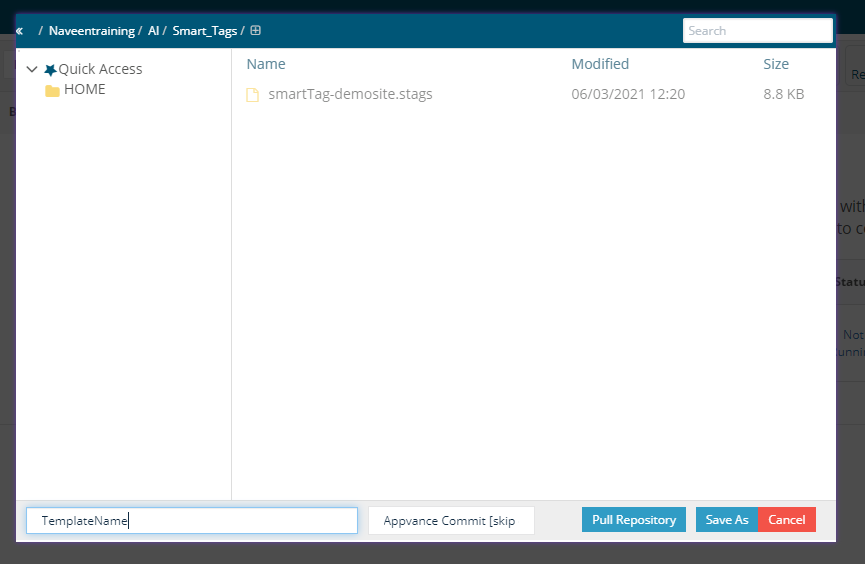
Once the Blueprint creation process has started, check the SmartTag tab to check the new SmartTags created.