
Running SoapUI scripts as a Performance test
Recommended
Appvance guidanceIQ
Runis a platform that supports to run SoapUI scripts. Here are the steps that we need to follow to run the SoapUI scripts asfrom performanceAppvance testsIQ.
SoapUI whensupport was removed in release 5.2.0 of AIQ.
SoapUI Performance test
Navigate to Appvance IQ Home screen and click Build. Click File >New to create a new scenario. Select Performance Test from the
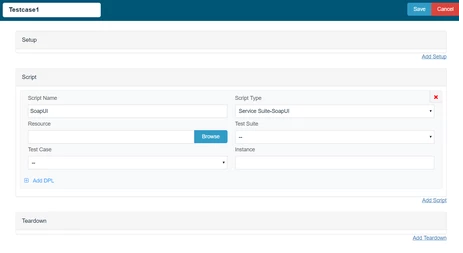
9. Click Browse and browse the Soap UI file and then the Test Suite orand nativethen AIQthe performanceTest assetsCase. canSave providethe atest cleanercase. current workflow.
Performance
considerations10.
SoapUIBrowsescript efficiency, setup/teardown behavior, and thread safety.Data uniqueness, account pools, cleanup, and external service rate limits.Load generator capacity, monitoring, and artifact size.Clear TPS, response-time, error-rate, and duration targets.
Validation workflow
Run a single-thread validation before adding load.Increase concurrency gradually and monitor both AIQ and target systems.Separatethe SoapUI scriptbottlenecksthe xml file and save the test case.11. Enter 100 in User box. Click Set (Run Time):
12. Ramp up 10 users every 10 second Maximum ramp up time 100 second and save Run Time option.
13. Click Locations tab.
14. Enter Name: localhost and URL:http://localhost:8080/TMServer/ws/TestNode (Should be added by default).
16. Also make sure the resources are added with Name, Type and the correct path of the jmx file.
18. Click check box Custom Database Credentials (Database Logging) and make the following settings:
Database Type: MySQL
Driver: com.mysql.jdbc.Driver
URL: jdbc:mysql://localhost:3306/utp?useSSL=false
Default Schema: utp
Username: utp
Password: utp19. Click File >Save to save new scenario.
20. Click Play Scenario from
applicationthebottlenecks.Documenttopresults,navigationlimitations,bar.21. Controller window will open in a new tab which displays the tests running and
migrationwilloptions.
22. Left part shows the steps and the duration in milliseconds and right side shows the test run status under Output tab.
23. On The transactions tab we can find the request / response and an error tab to drill down further.
24. Click Click here link to get to the list of reports that Appvance IQ supports.
Last updated: OctoberJuly 6,25, 20262024
If you have any feedback on this topic, please contact us at documentation@appvance.ai