
Getting Started with iOS Testing in AIQ
Last
Requirements
September Mac OS XAtUse this time Catalina 10.15.3 required. This is to evolvepage as Maca OSstarting Xpoint evolves.for validating iOS workflows with AIQ mobile testing capabilities.
Recommended guidance
- Confirm
supported iOS
Simulatorversions,compatibledevices,App file
AIQ Controller locally installed on Mac
Setup
Installsimulators, and Setup Xcode
Download, install and open Xcode for first time.
Make sure to accept the End User License Agreement.
Make sure to install additional components.
To view installed Simulators or connected physical iPhones
Open Xcode, select Window > Devices and Simulators
Click Simulators and select any model
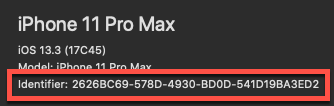
Note the iOS version number, Identifier value and Model name for later use. These correspond to platformVersion, udid and deviceName capabilities.For example:
Sign into your Apple account (Required if test will use physical iPhones. Skip this step if test uses Simulators)
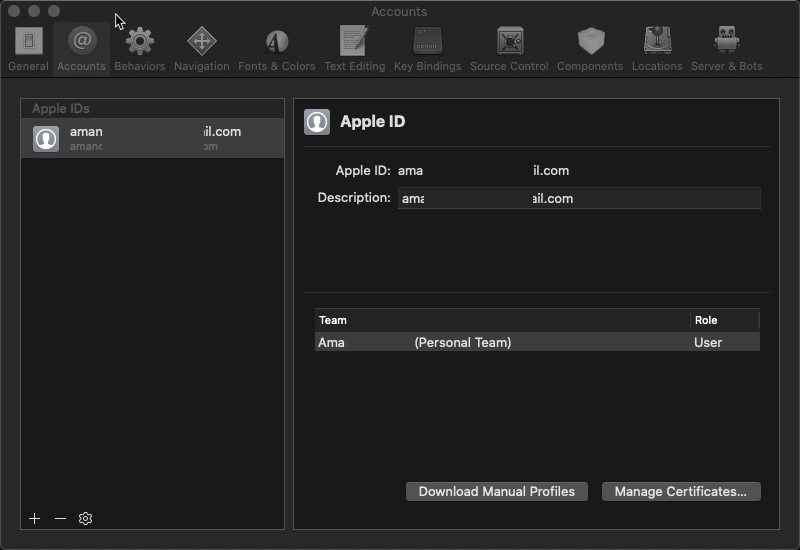
Select Xcode > Preferences > Accounts
Click +
Select Apple ID and click Continue
Enter your Apple ID (must be a paying Account so Team ID value is assigned to Membership) and follow prompts until account appears in Accounts list
Create a new Xcode Project (This step is only to test connection between Mac and Simulator or physical iPhone. Can be skipped)
Open Xcode > File > New > Project
Select iOS > Single View App and click Next
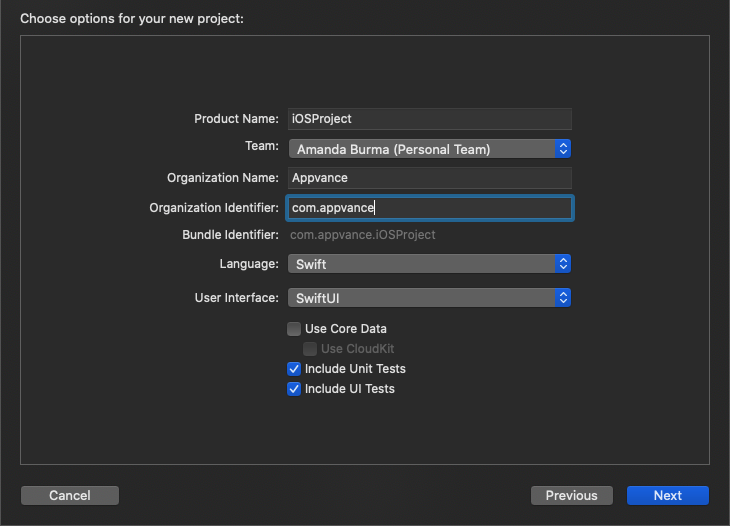
Enter a name in the Project Name box
Select a Team
Enter a name in the Organization Name box
Enter com.<anything> in the Organization Identifier box (I used com.appvance)
Bundle identifier appears as com.appvance.ProductName
Leave the remaining options as default
Click Next
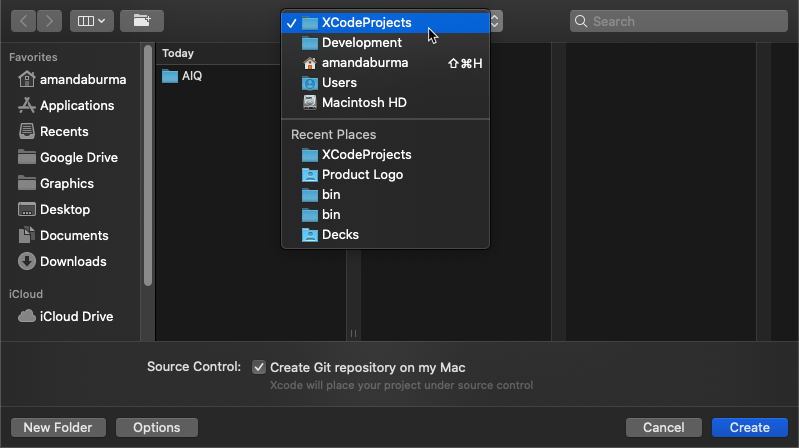
Specify the location to save the Project and click Create
Press Play and confirm the Application launches in the Simulator or physical iPhone and displays your Hello World! app. You can change the Simulator or physical iPhone by clicking on the device name.

Drag and drop any iOS Application file (have .app extension) to install to the Simulator
Confirm just installed Application runs successfully
Press Command + Q to stop the Simulator
Press Command + Q to close Xcode
Install Homebrew
Open Terminal
Run the following command
/bin/bash -c "$(curl -fsSL https://raw.githubusercontent.com/Homebrew/install/master/install.sh)"
More details about Homebrew and installation: https://brew.sh/
Appium Pre-requisites and Install
Open Terminal
Run the following commands in the order listed below
brew update
brew install libimobiledevice
brew install ios-deploy
brew install carthage
brew install appium
More details about Appium installation: https://appiumpro.com/editions/40
Configure your Appium Server Simulator configuration file
The Appium Server Simulator configuration file must be updateddrivers for your specificAIQ environmentversion.
Validation workflow
- Review the current AIQ mobile testing prerequisites.
- Prepare the iOS device or simulator and verify it is
areachableJSONfromfilethethattestcontainsnode. - Install
anorarrayconfigureoftheobjects.applicationEachunderobjecttestcorrrespondsusingtothe approved method. - Run a
machinesmallwhichsmokehas Appium running and the Simulator installed. The required keys and values of each object are:{ “serverURL”: “http:/example.com:4723/wd/hub, URL in which Appium runs”, “proxyURL”: “http://example.com:9090, optional, URL in which Test Designer runs”, “capabilities”: { “platformVersion”: “13.1, must correspond to one of installed Simulators”, “udid”: “some identifier, must correspond to one of installed Simulators”, “wdaLocalPort”: “8100 - 8199, to automate multiple Simulators or physical iPhones”, “deviceName”: “iPhone 8, must correspond to one of installed Simulators” }, “app”: “Absolute path to where .app file is in local file system or URL of .app file, needed if value for bundleId is empty”, “bundleId”: “Bundle ID of AUT, needed if value for app is empty, otherwise is optional if value for app is not empty” }0. Download theios-simulator.jsonfile and open it in an editor Update theplatformVersionto match the version of the Simulator.
Replace the udid value in the template with the Identifier number noted during the Xcode setup.
Update the bundleId to match your Application’s bundleId.How to find the Bundle ID?
Right-click .ipa file and select Show Package Contents
Look for a file ending in .plist
Open the located file with a text editor
Locate the Bundle ID, often a key containing the string BundleID or BundleIdentifier
Locate a string tag similar to com.companyname.Appname
Rename the configuration file to an app-specific name and save Save it someplace you’ll remember, for example with AIQ assets.
Configure your Appium Server physical iPhone configuration file
The Appium Server Simulator configuration file must be updated for your specific environment and Application. This is a JSON file that contains an array of objects. Each object corrresponds to a machine which has Appium running and the physical iPhone connected. For iOS physical devices 3 additional capabilities are needed:
xcodeOrgId
String representing Apple developer team identifier. The Team ID is a unique 10-character string generated by Apple that is assigned to your team. You can find your Team ID using your developer account. Sign in to developer.apple.com/account, and click Membership in the sidebar. Your Team ID appears in the Membership Information section under the team name. You can also find your Team ID listed under the "Organizational Unit" field in your iPhone Developer certificate by opening Keychain Access app, click My Certificates in Category section and clicking appropriate certificate to show its details.
xcodeSigningId
String representing a signing certificate. This is usually just ‘iPhone Developer’ without quotes.
updatedWDABundleId
String representing Bundle ID to update WDAscenario before building andbroader launchingcoverage.
The required keyslogs and values of each object are:
{ “serverURL”: “http:/example.com:4723/wd/hub, URL in which Appium runs”, “proxyURL”: “http://example.com:9090, optional, URL in which Test Designer runs”, “capabilities”: { “platformVersion”: “13.1, must correspond to one of connected physical iPhones”, “udid”: “some identifier, must correspond to one of connected physical iPhones” “wdaLocalPort”: “8100 - 8199, to automate multiple Simulators or physical iPhones”, “deviceName”: “iPhone 8, can be whatever name”, “xcodeOrgId”: “Team ID”, “xcodeSigningId”: “iPhone Developer”, “updatedWDABundleId”: “com.facebook.WebDriverAgentRunner” }, “app”: “Absolute path to where .ipa file is in local file system or URL of .ipa file, needed if valuescreenshots forbundleId is empty”, “bundleId”: “Bundle ID of AUT, needed if value for app is empty, otherwise is optional if value for app is not empty” }
Note: 0.Mobile Downloadtooling changes frequently; validate this page against the ios-physical.jsoncurrent fileAIQ andrelease open it in an editor
Update the platformVersion to match the version of the physical iPhone.
Replace the udid value in the template with the Identifier number notednotes during thefuture Xcode setup.reviews.
Update the bundleId to match your Application’s bundleId.How to find the Bundle ID?
Right-click .ipa file and select Show Package Contents
Look for a file ending in .plist
Open the located file with a text editor
Locate the Bundle ID, often a key containing the string BundleID or BundleIdentifier
Locate a string tag similar to com.companyname.Appname
Rename the configuration file to an app-specific name and save Save it someplace you’ll remember, for example with AIQ assets.
Create iOS AISG
Open Terminal
Enter appium and press Enter

Start AIQ services if not already running
Log into AIQ and go to AI Scripting > Create AISG
Click MobileIf Mobile is disabled, request an updated AIQ license
Select iOS in the Platform box
Select Bundle Id in the Source box
Select Tags in the Scan Type box (SmartTags not yet supported for Mobile)
Confirm Visual Hints are enabled
Click Browse in the Appium Servers box
Select the Appium Server Simulator description file created earlier in the setup
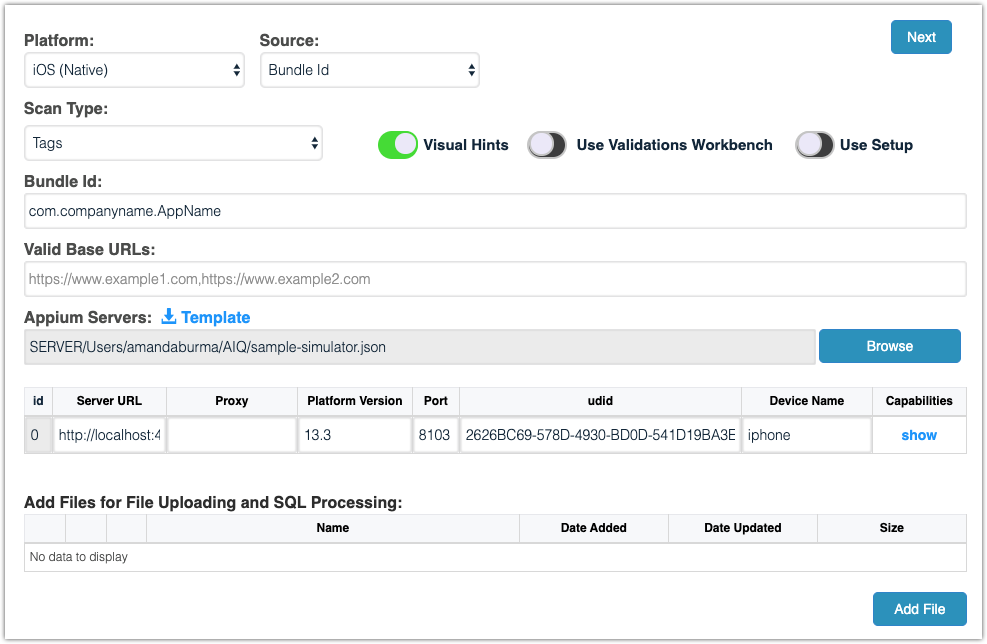
Click Next
Proceed with the AISG creation as you would with any other AISG
Enter a name in Execution Name box
Click Load a Dataset from CSV file and check the file in the list or check Default and enter variables and values
Click Create
The Simulator launches, starts the Application and begins walking through the Application
As Inputs Found updates, map any Custom Actions until reach the desired end point in the Application
Download scripts in JS format (DS not yet supported for Mobile) to run in JS Edit & Play or in a Scenario
Notes
Appium starts up the Simulator that matches provided platformVersion, udid and deviceName capabilities.
If capability “app”: “absolute path or URL of .ipa or .app file” is provided, Appium will try to install Application if not installed. Generally, if file has .ipa extension, this means Application was compiled for ARM and will only work with physical iPhones. If file has .app extension, this means Application was compiled for x86 and will only work with Simulators.
After connecting iPhone to computer, Trust this computer dialog may show, click Accept button.
First time testing Application in physical iPhone will show Untrusted Developer dialog. Close dialog, go to Settings, tap General, tap Device Management and tap blue link to trust certificate.
First time installing WDA takes a long time and is normal for Appium logs to freeze. Afterwards it will show many ECONNRESET messages, the capabilities and finally start the AUT.
Last updated: JulySeptember 05,22, 20232026
If you have any feedback on this topic, please contact us at documentation@appvance.ai.