
CI/CD FAQ for AIQ Integrations
CI/CD
FAQ for AIQ IntegrationsHowLast to add multiple scenarios to build.xml file to run them in series?
How to schedule jobs in GitLab.
How to schedule pipelines sequentially in GitLab.
what is the difference between these 2 files - creds.json and consoledetails.json?
How to add multiple scenarios to build.xml file to run them in series?reviewed:
September There21, is an option to run multiple scenarios using build.xml file, and they could be run in series or in parallel.2026
Below is one example of executeScenario ant snippet of multiple scenarios defined and running in Sequential.
We can run the defined 2 scenarios in parallel as well just by un-commenting the parallel tags that are commented.
Note: Make sure you make changes both in executeScenario and fetchScenarioResults definitions.
<target name="executeScenario" depends="deps">
<taskdef name="executeScenario" classname="com.appvance.ci.ExecuteScenario">
<classpath refid="RestClientLibPath" />
</taskdef>
<!-- <parallel>-->
<executeScenario aiqCreds="${aiqCreds}" dir="${dir}" scenario="AMS/Scenario1.scenario" consoleDetails="${consoleDetails}" resultsFolder="${scenarioResults}" />
<executeScenario aiqCreds="${aiqCreds}" dir="${dir}" scenario="AMS/Scenario2.scenario" consoleDetails="${consoleDetails}" resultsFolder="${scenarioResults}" />
<!--</parallel>-->
<taskdef name="fetchScenarioResults" classname="com.appvance.ci.FetchScenarioResults">
<classpath refid="RestClientLibPath" />
</taskdef>
<!-- <parallel>-->
<fetchScenarioResults aiqCreds="${aiqCreds}" consoleDetails="${consoleDetails}" resultsFolder="${scenarioResults}" scenario="AMS/Scenario1.scenario" stopOnFailure="${stopOnFailure}" />
<fetchScenarioResults aiqCreds="${aiqCreds}" consoleDetails="${consoleDetails}" resultsFolder="${scenarioResults}" scenario="AMS/Scenario2.scenario" stopOnFailure="${stopOnFailure}" />
<!-- </parallel>-->
</target>
How to schedule jobs in GitLab
Go to your Project
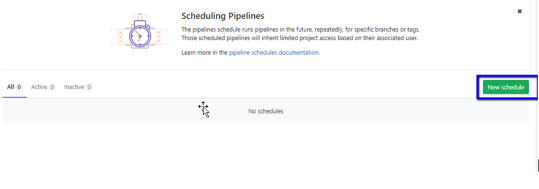
Click CICD->Schedules
Click New Schedule
Provide a description
From the Cron Timezone select the Timezone user is familiar with
Enters the interval pattern i.e the schedule the user wants to run jobs on
Then click Save Pipeline
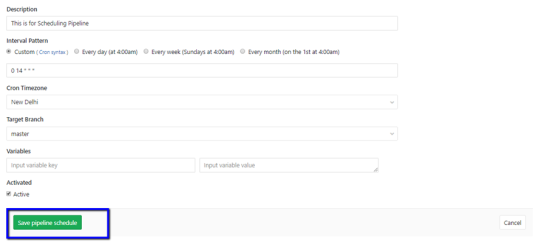
Once you click save pipeline, the job will be scheduled
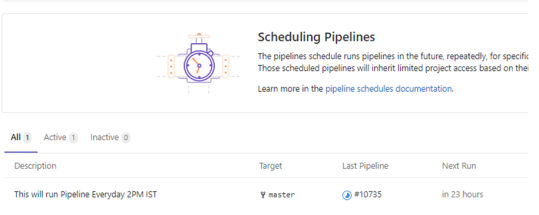
How to schedule pipelines sequentially in GitLab
This SetFAQ upsummarizes iscommon usefulquestions whenfor running AIQ tests from CI/CD pipelines. Use current integrations such as Jenkins, GitHub Actions, and command-line execution.
When to use this guidance
- You are wiring AIQ tests into a build or release pipeline.
- You need to pass parameters, trigger executions, and collect results.
- You are replacing older CI references with current terminology.
Recommended approach
- Decide which pipeline system will trigger AIQ and what environment it targets.
- Store AIQ credentials or tokens in the
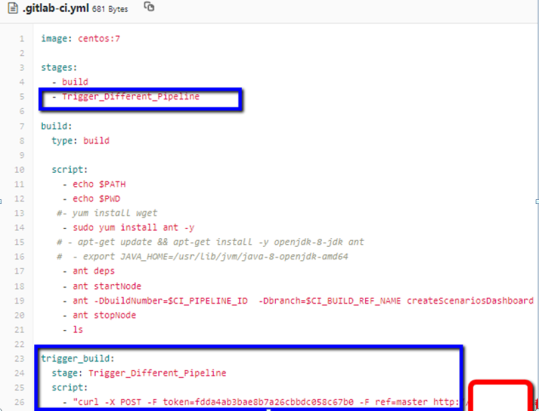
subsequent project needs to be run after the first project Copy the Trigger Token of the project that needs to be executed once the main pipeline is completed by navigating to Settings - >CI/CDCopysecretthestore.- Pass
Triggerproject,tokenscenario,dataset,
and threshold parameters explicitly.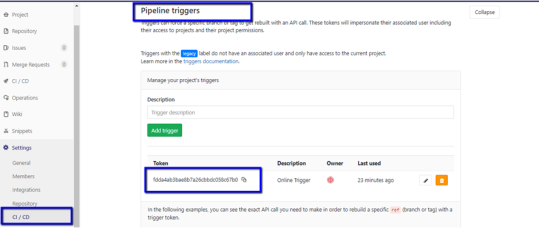
- Publish
- execution
InIDs,thereports,Triggerandpagefailureitself,summariesthe command to be addedback to the.ymlpipeline. - Use
willexitbecodesgivenorbelowquality gates so failed tests block releases when appropriate.
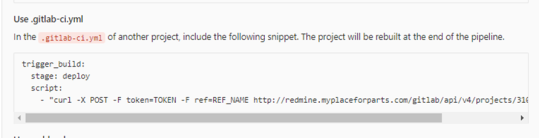
Please replace TOKEN with Triggern token value
Ref_Name – refers to the branch which will be executed
Add the cURL in the .yml file and click run Pipeline
What is the difference between these 2 files - creds.json and consoledetails.json?Note:
Retire consoledetails.jsonduplicate isCI writtenpages afterwhen runningthey fromrepeat instanceIdthis (startNode)FAQ without adding tool-specific steps.
creds.json has all the credentials to use existing ec2 consoledetails.json
{
"instanceId":"i-00d97858290605e2e",
"url":"http://ec2-xxx-xx-x.us-west-2.compute.amazonaws.com:8080/TMServer/ws/TestNode"}
creds.json
{
"controller": {
"url":"http://localhost:8080",
"ec2Creds": "ec2.creds",
"timeOut": 60,
"username":"appvance",
"password":"appvance",
"workFolder":"C:/Builds/Resources"
}
}
Last updated: JuneSeptember 28,21, 20232026
If you have any feedback on this topic, please contact us at documentation@appvance.ai.