
Elasticsearch and OpenSearch Integration
TheUse ElasticSearch/OpenSearchthis integrationarticle allowswhen youconfiguring toor sharemaintaining AIQ integrations that send, read, or validate data through Elasticsearch or OpenSearch.
What changed in this article
- Normalized the
informationtitleof steps and/or requests execution during a scenario execution with an AWS OpenSearch managed service or an ElasticSearch 7.x server.For an in-depth comparison of Amazon OpenSearchspacing andElasticSearchclarifiedseethatOpenSearch vs.both Elasticsearch- Dattell.This integration allows you to leverage Kibanaand OpenSearchDashboardsmay be in scope. - Added checks for
performanceendpointanalysisownership,onversionsteps/requestscompatibility,durationsauthentication,executedindexbynaming,anretention,AppvanceIQTLS,scenario.networkaccess,
query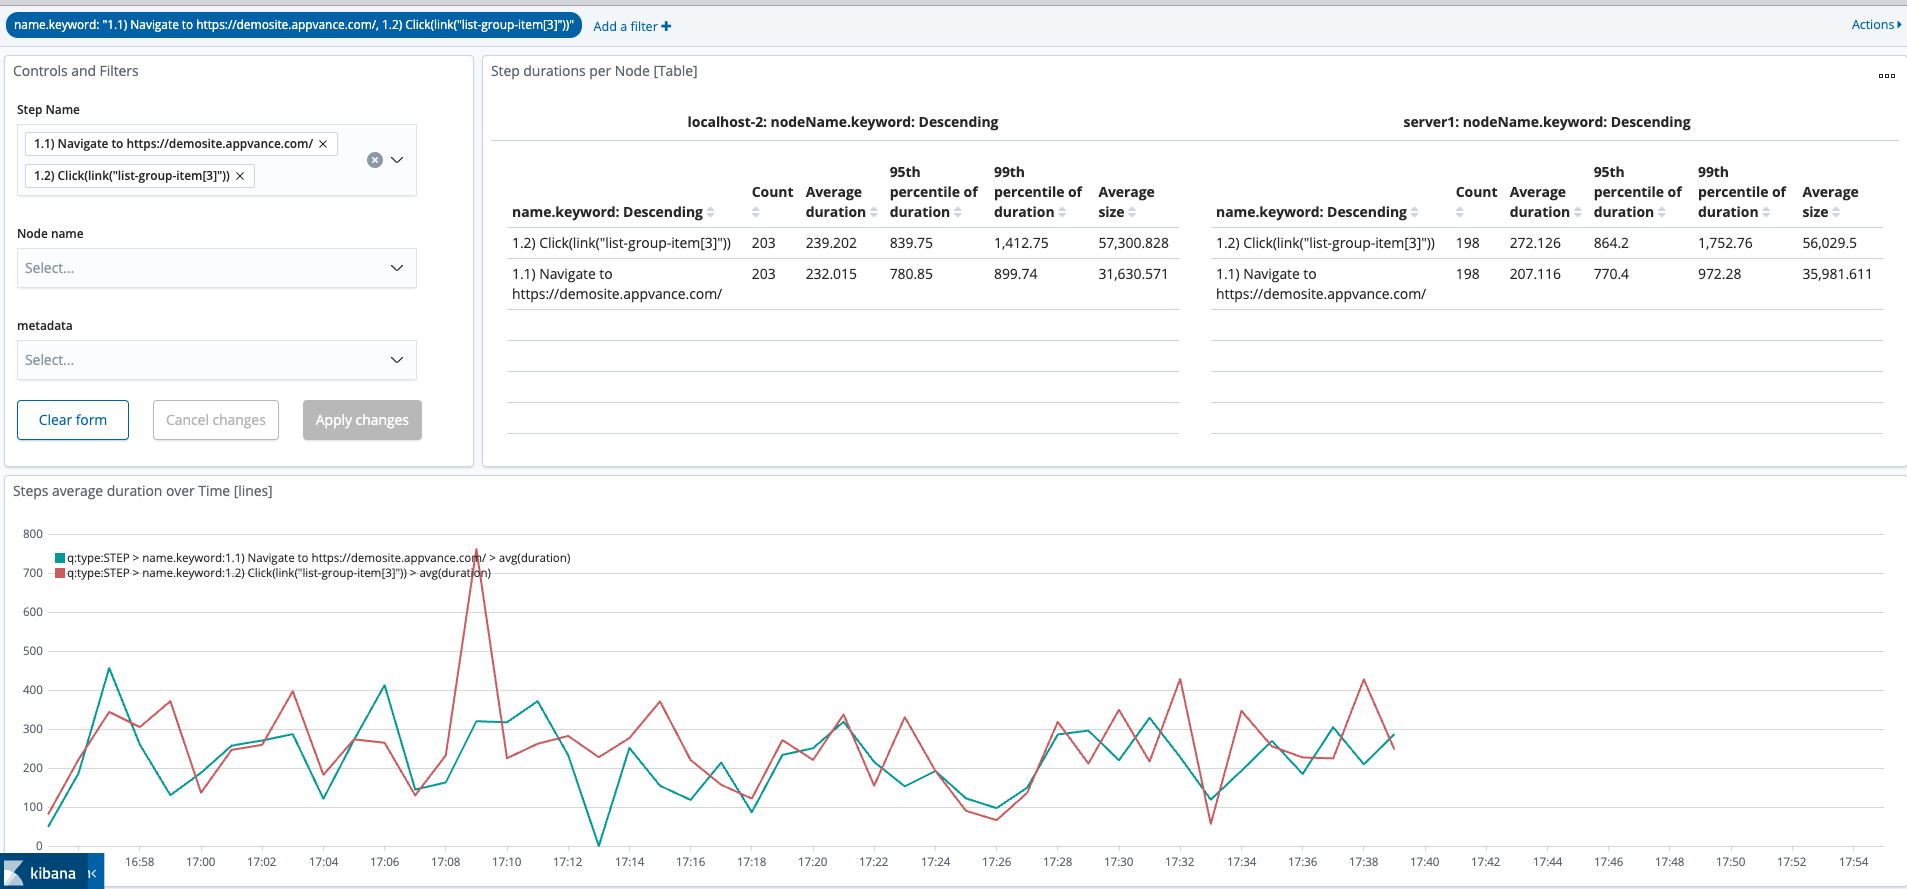
Thisvalidation. - Added
integration has two different waysguidance toconnectavoidandloggingsend data: Using a REST Header Authentication
Using AWS Authentication Protocol
Using a REST Header Authentication
The integration relies on sending results data to a RESTFUL API endpoint and a tokencredentials or apikeysensitive exposedindexed by the search service.
This mode of connection is availabledata in AIQ 4.9.2outputs.
Validation above.workflow
This
- Confirm
modewhetherrequiresthethatenvironmentyouuseswillElasticsearch,also create an Authorization tokenOpenSearch, orapikey(apikey you will use when connecting to an ElasticSearch or Elk Stack services, and for AWS OpenSearch you will need the token)
compatibleTo create the basic authentication token you must to createauser.AuthenticationmanagedExampleHere is a simple basic authentication approach using Kibana’s internal user database.
Click Internal User Database and create a new user by typing a user name and password. You can limit the role of the user created in the Role Mappings option.
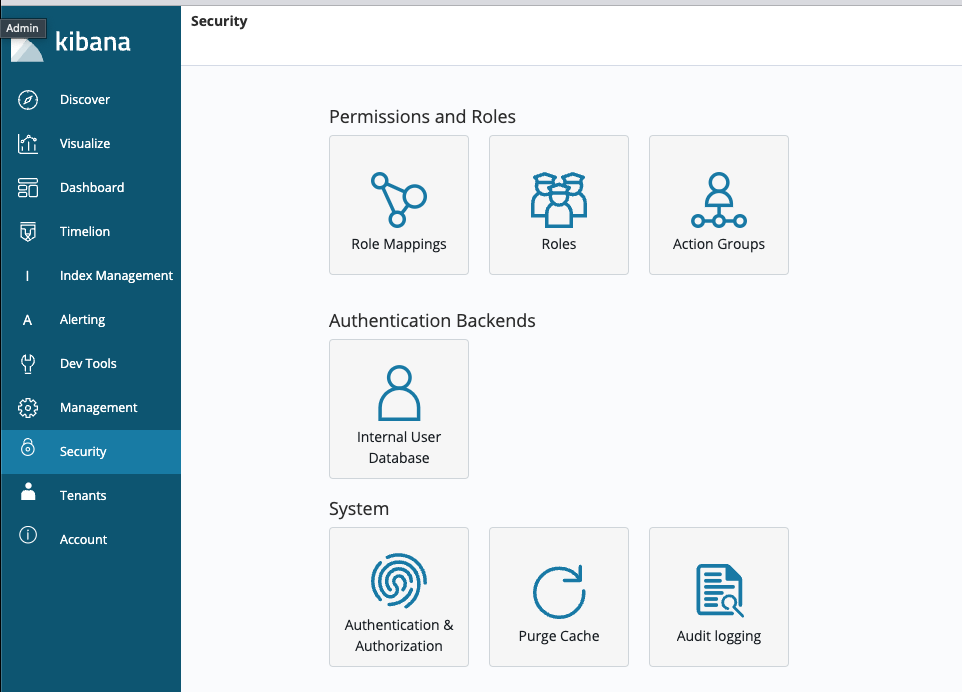
A basic authentication token can be created by appending the kibana’s user name + “:” + password and then converting that string to a Base64 encoded string. You can do this with Chrome’s JS Console.
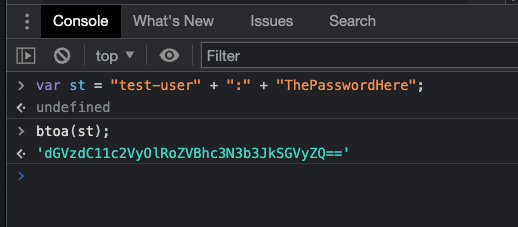
For the basic authentication scheme you will need above string but with the prefix 'Basic '.
So final token will be similar to this:
Basic dGVzdC12c2VyOlRoZVChc3N3b3JkSGVyZQ==
Above is just for using Kibana internal user database. Using a cloud-based Kibana you will need an APIKEY that can be created using the steps in this document and will have a format similar to: ApiKey aVZlLUMzSUJuYndxdDJvN0k1bU46aGxlYUpNS2lTa2FKeVZua1FnY1VEdw==
Setting up Search Integration in Scenario Editor for REST authorization header option
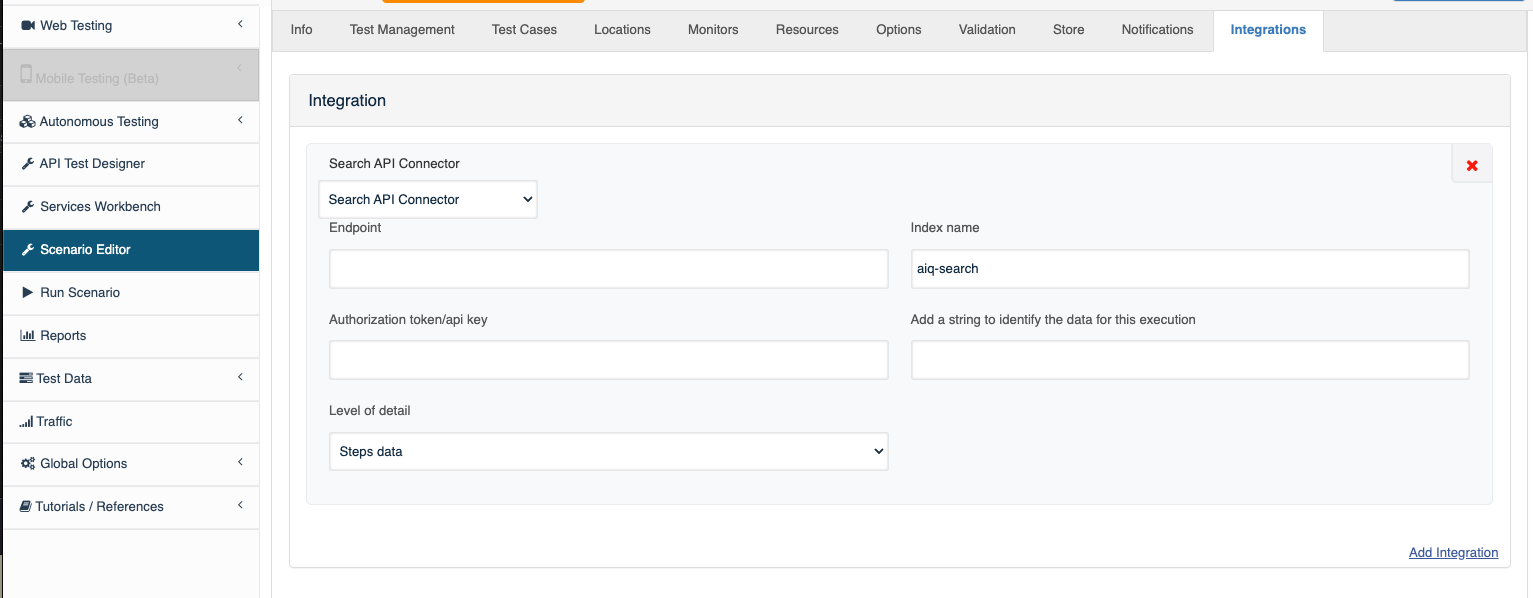
Open your scenario using the Appvance IQ Scenario Editor and select the Integrations tab. You can only have one integration configured per scenario.
Click on the Add Integration link and select the “Search API Connector” integration in the dropdown.
Enter theValidate endpoint URL, theTLS, authentication, index name,pattern, permissions, and thenetwork authorizationreachability.
controlled 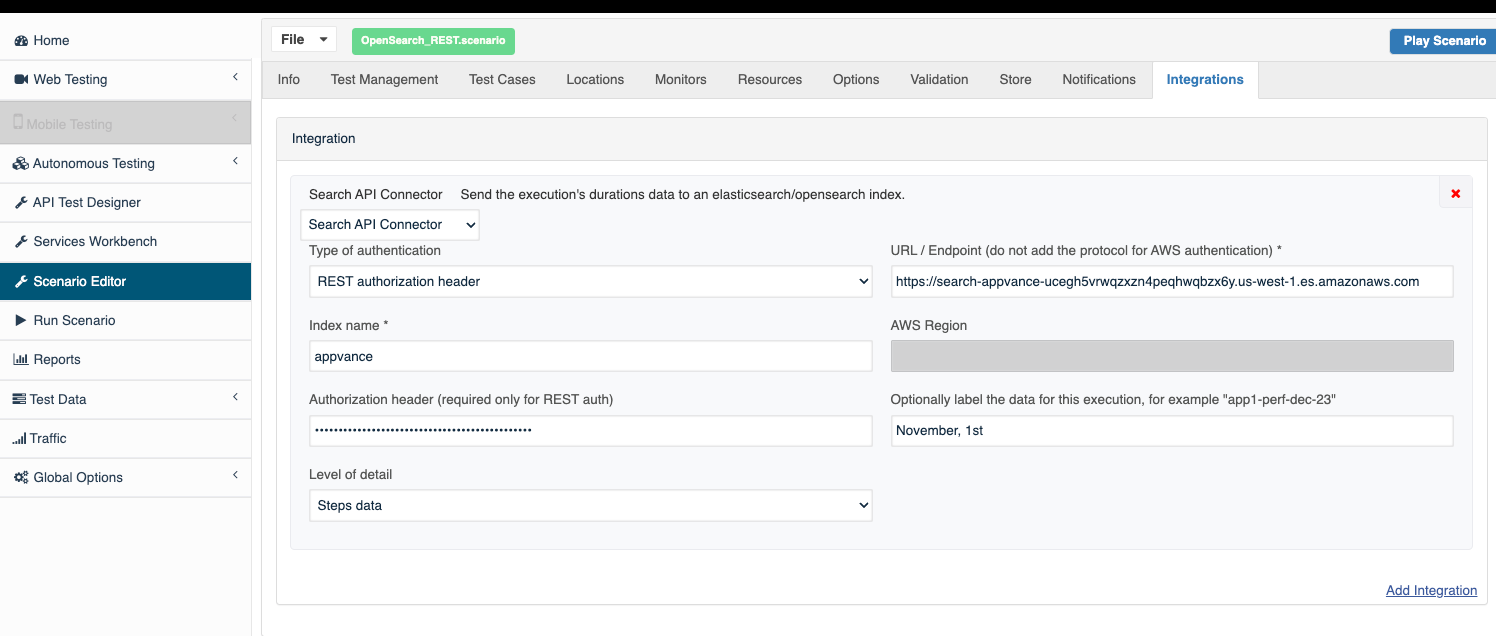
In the dropdown select the level of detail that you need to send to the search service (STEPSquery or REQUESTS).
YouReview cannote: useThis thepage Addnow focuses on safe integration maintenance rather than a stringbare to identify the data for this execution field as metadata to identify the scenario product-name in the data sent to elastic search.reference.
Using AWS Authentication Protocol
This connection mode uses the AWS Java SDK protocol for authentication. The connection will first attempt to use environment variables with access credentials, but if they are not present it will try to use other methods provided in the AWS authentication protocol.
This mode of connection is only available in AIQ version 4.10.4 and above.
The recommended method for configuring your Appvance IQ system is through an Instance Identity Role. With this mode temporary credentials are provided by the ec2 instance’s metadada and assigned to an ec2 user case role.
This method requires to be able to access the Instance Metadata Service (IMDS) which provides temporary access credentials an a token to the requesting connection.
For more information see: Instance identity roles - Amazon Elastic Compute Cloud in the Amazon documentation.
The setup is detailed in the following two sections, which shows how to create an ec2 use case role and how to apply it to an ec2 instance.
Create a ec2 use case role with permission to index records to the Amazon OpenSearch service
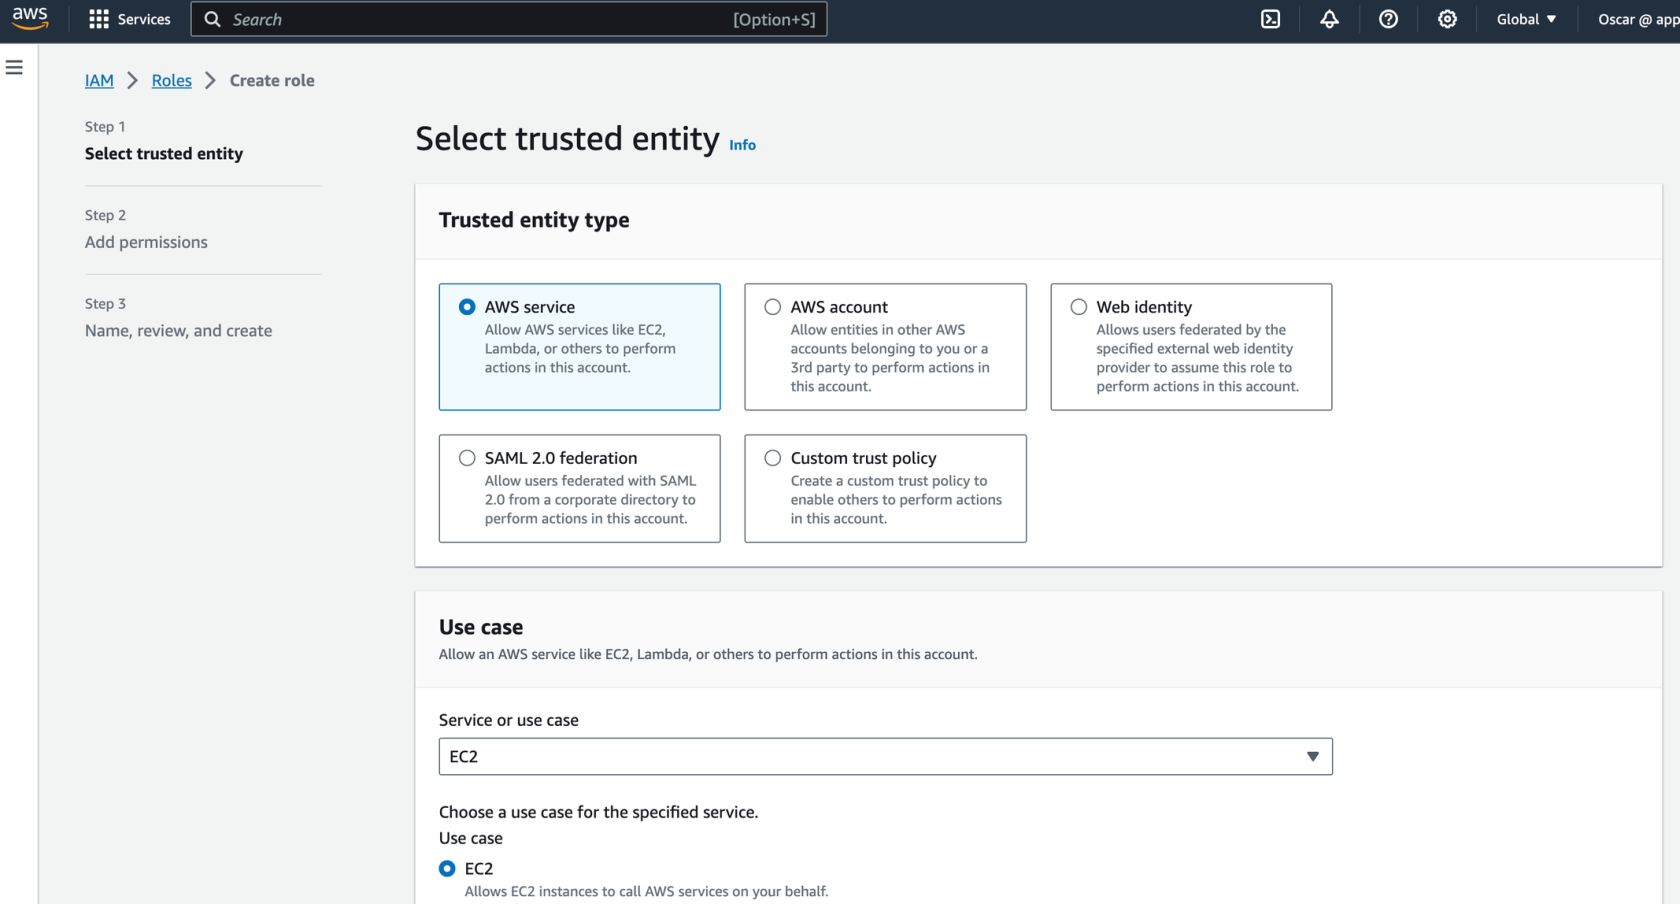
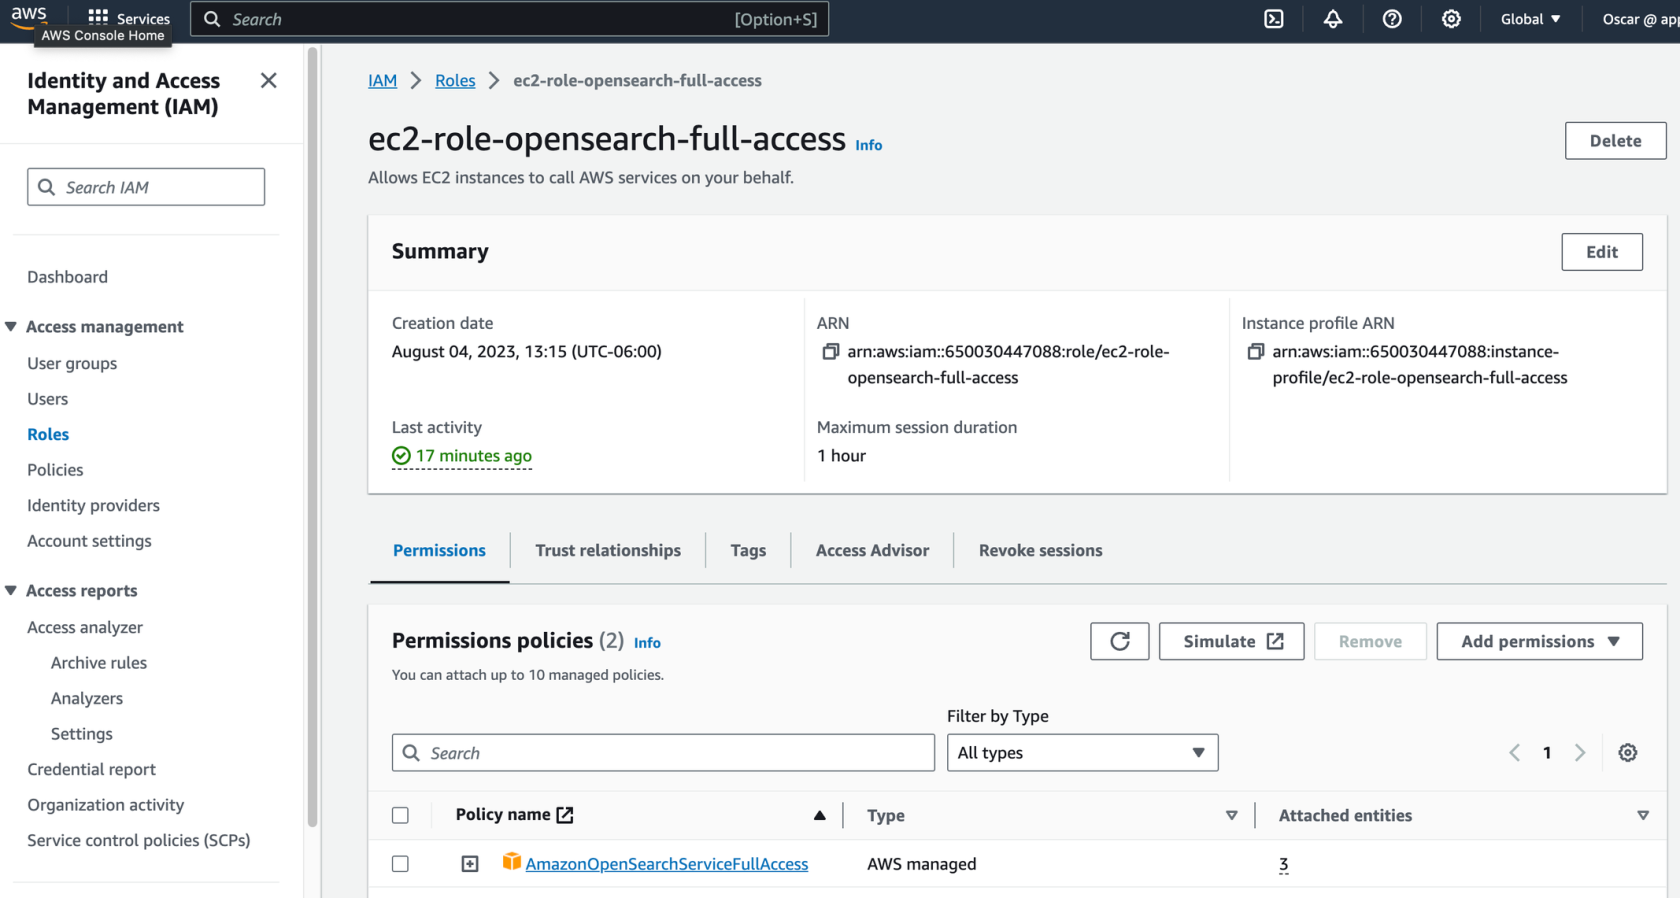
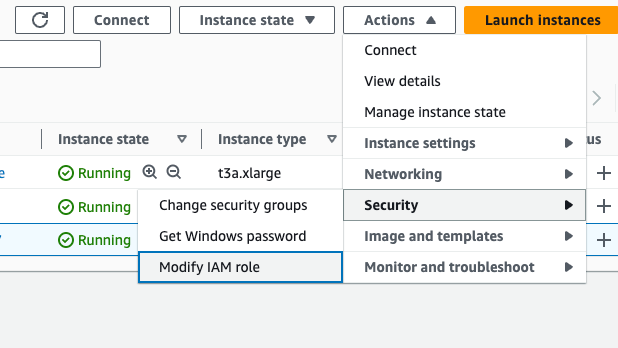
Assign the role to the EC2 machine where the AppvanceIQ controller is hosted.
Select your Appvance IQ controller instance in the AWS EC2 console and select the Actions > Security > Modify IAM Role option.
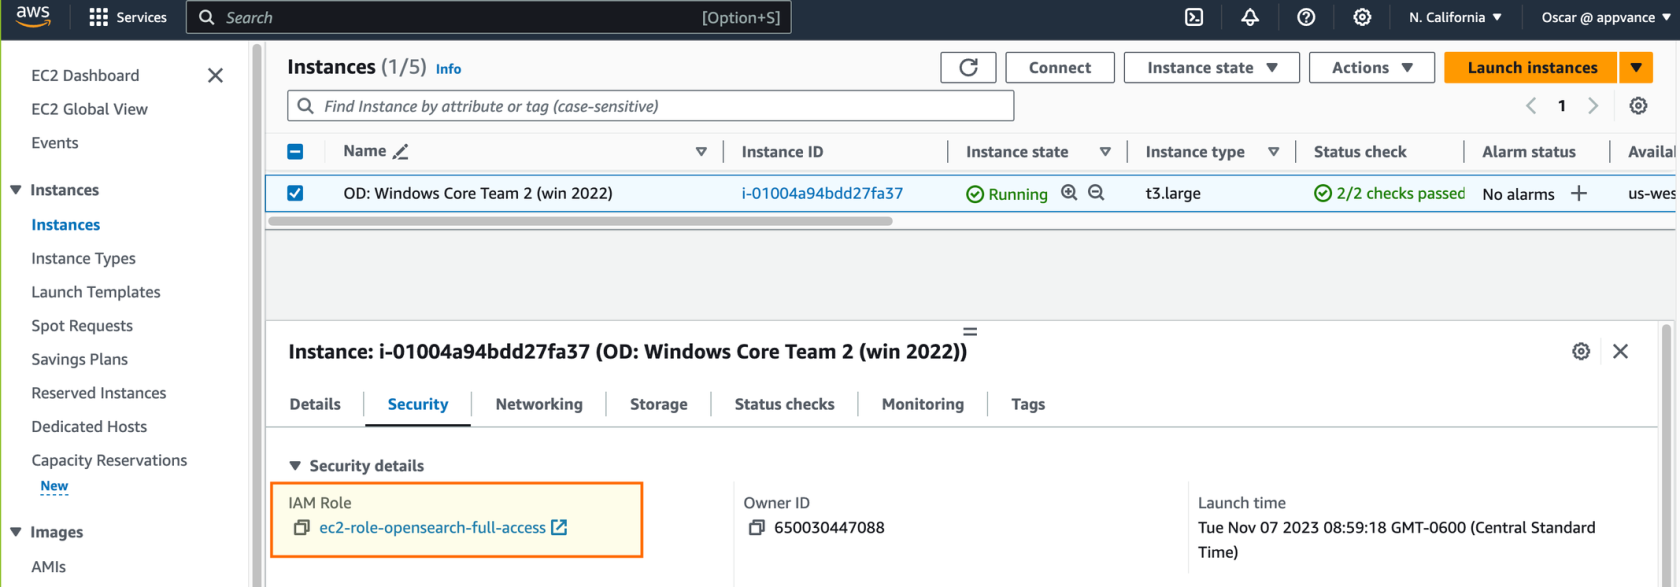
This authentication protocol requires that the EC2 where Appvance IQ is running has the instance metadata service active which can be tested by connecting to the EC2 server and navigating to the following URL: http://169.254.169.254/latest/meta-data/
The response should be similar to the following:
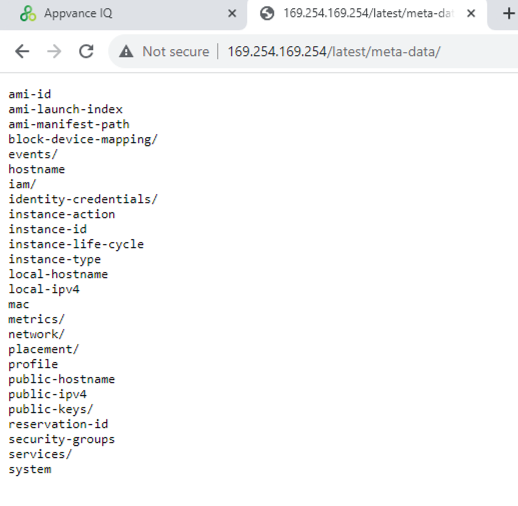
If the metadata URL does not respond means that you need to restore the Instance metadata service or create a new EC2 instance from an Amazon provided AMI. In the case you get 'Waiting for the metadata service' message please follow the steps here in the Amazon documentation.
For more information on instance metadata see: Retrieve instance metadata - Amazon Elastic Compute Cloud
Configuring the integration in Scenario Editor
To use the ec2 instance role mode just select the 'AWS Authentication' in the Type of authentication select option in the Integration tab in the Scenario Editor.
Setting up an Amazon OpenSearch Service
OpenSearch is an open-source, distributed search and analytics suite derived from Elasticsearch supporting up to the 7.1 version, along with OpenSearch dashboards and Kibana.
To create your Amazon OpenSearch domain, see the "Creating and managing Amazon OpenSearch Service domains" documentation in the Amazon OpenSearch Developer Guide.
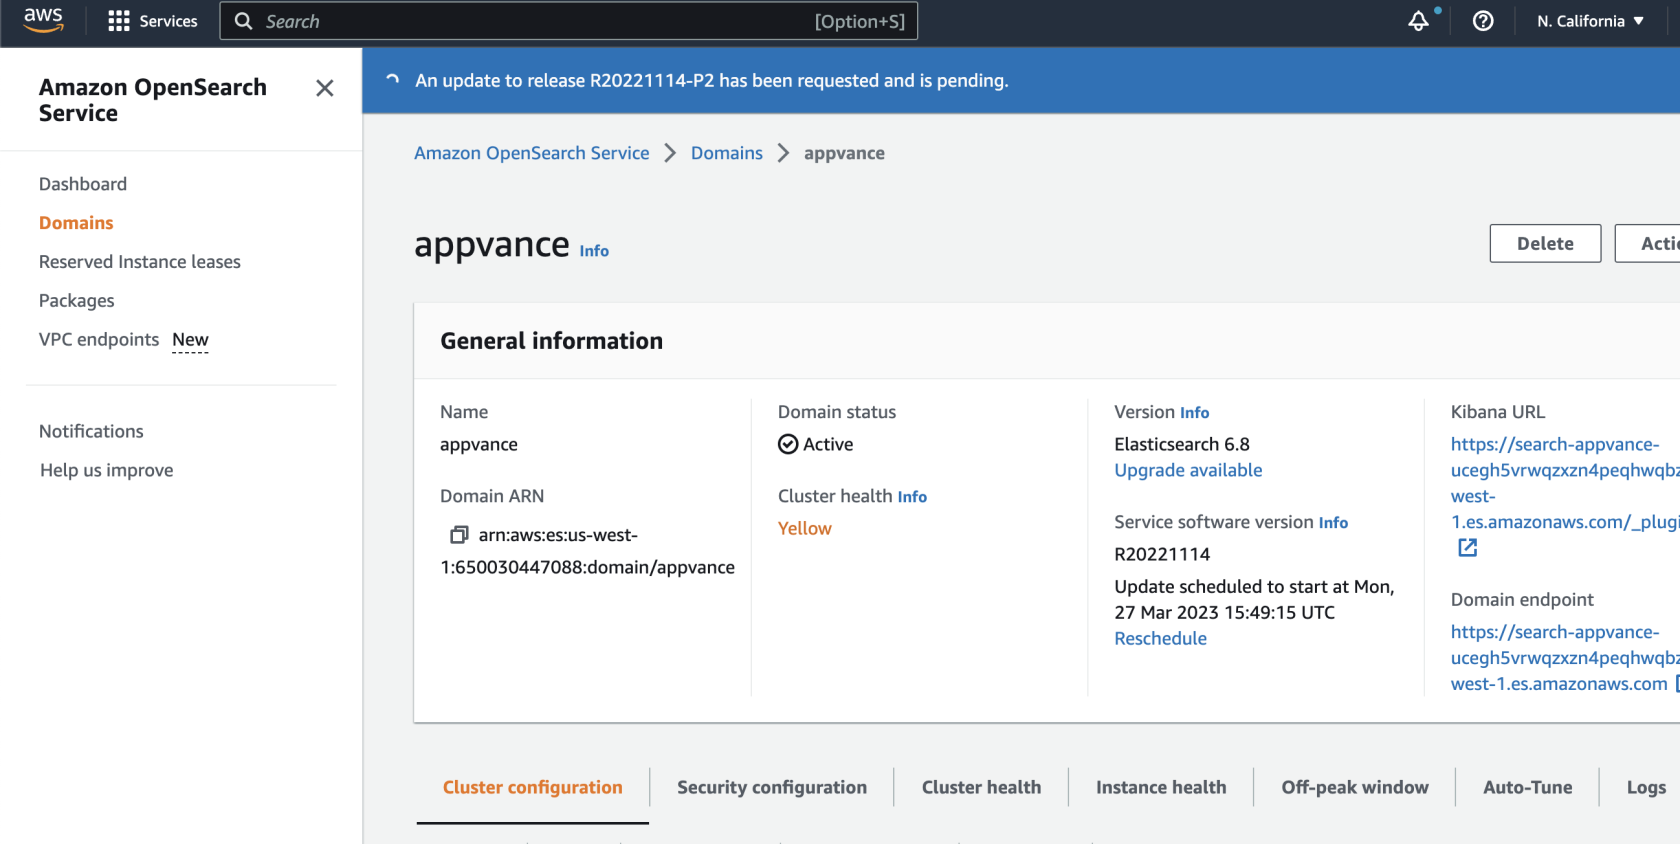
Once you have created the domain, you will have a Kibana URL that you will use to create your visualizations and dashboards, and a domain endpoint that you will need to configure your AppvanceIQ scenario editor integration.
Refer to the following Amazon documentation for other safe authentications options that you can configure. These are not covered in this topic.
Configuring Amazon Cognito authentication for OpenSearch dashboardHow to enable secure access to Kibana using AWS IAM Identity CenterConfigure SAML single sign-on for Kibana with AD FS on Amazon Elasticsearch Service
Importing a Sample Set of Visualizations, Dashboard and Index
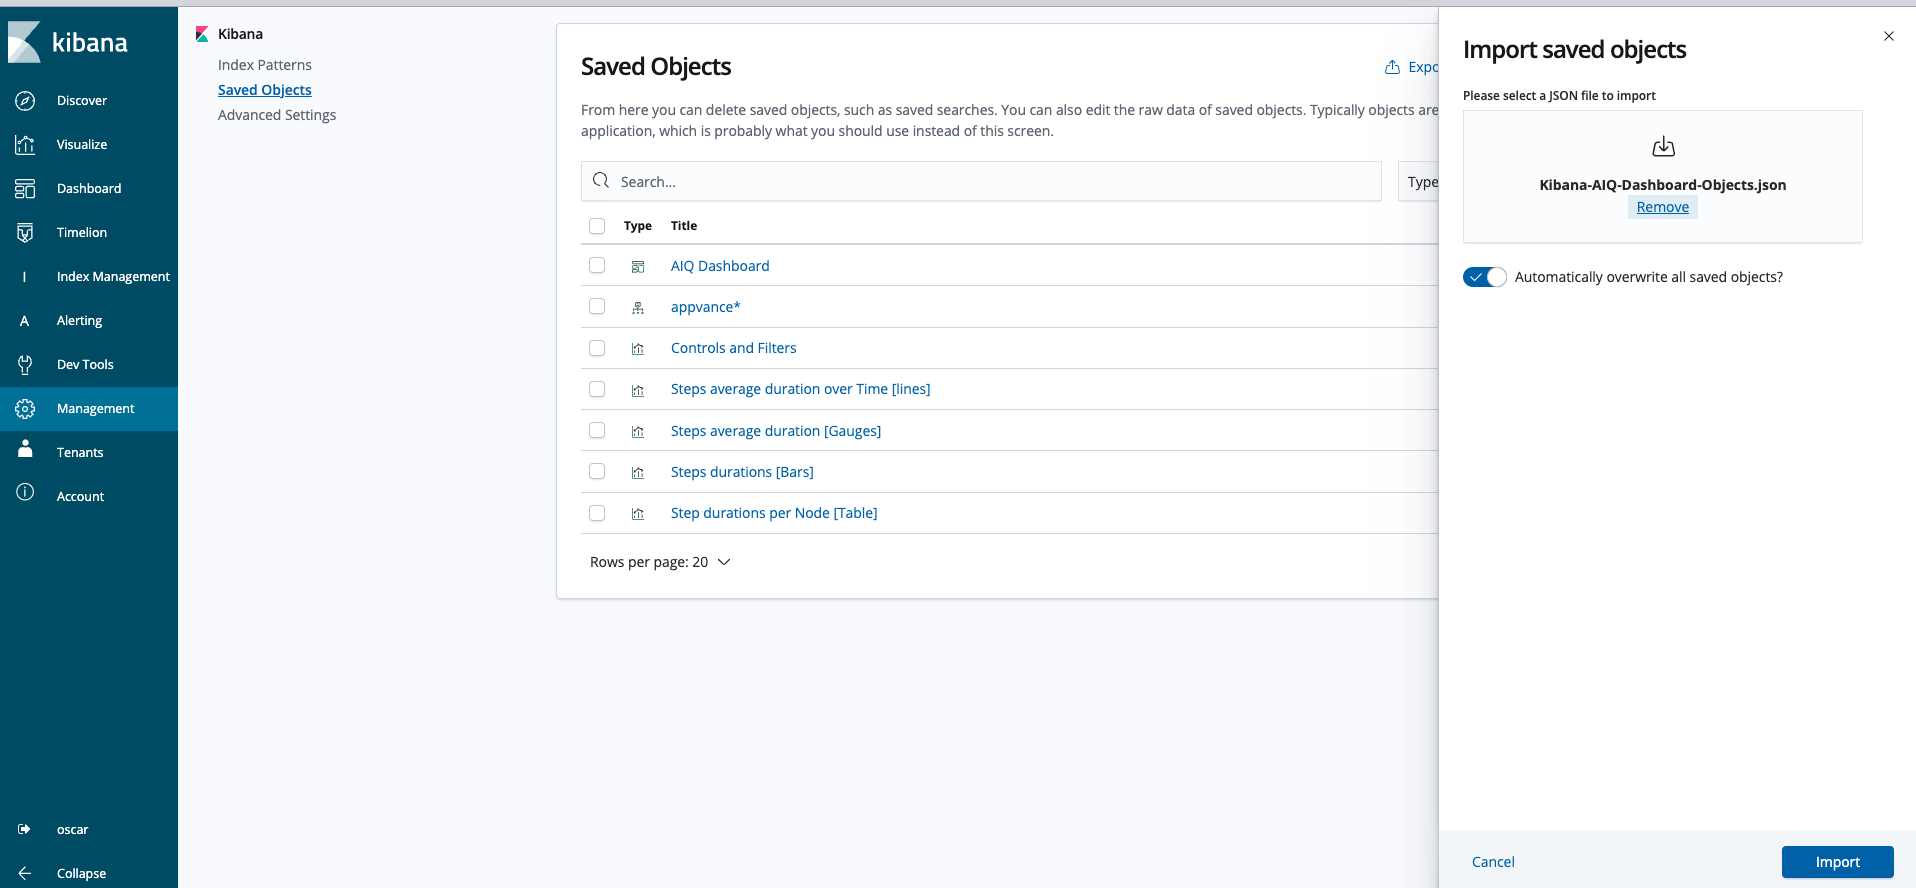
As a starting point to visualize your AIQ data within Kibana you can import a JSON file that contains sample visualizations and a proposed dashboard using the attached scripts.
Kibana-AIQ-Dashboard-Objects.json
Kibana-AIQ-Dashboard-Objects-With-Sample-Index.json
In Kibana, import the JSON file using the option in Management > Saved Objects > Import.
Customizing Data Sent from AIQ to OpenSearch
You can use the metadata for the test scenario to display the JSON to display in a dashboards. This can be accomplished using the test scenario name which is the metadata content defined in the Add a string to identify the data for this execution field when setting up the integration in the Scenario Editor.
Last updated: NovemberOctober 29,2, 20232026
If you have any feedback on this topic, please contact us at documentation@appvance.ai.