
Installing sqlplus to connect to RDS and run queries
LastDownload reviewed: September 22, 2026Tools
UseGo thisto: page(win whenx64) SQL*Plushttp://www.oracle.com/technetwork/topics/winx64soft-089540.html
Go to: (win x86) http://www.oracle.com/technetwork/topics/winsoft-085727.html
Download the following packages:
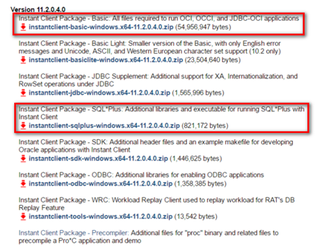
Unzip both packages in any folder say Documents.

Copy all the contents of Sqlplus download into the installclient_11_2 folder.
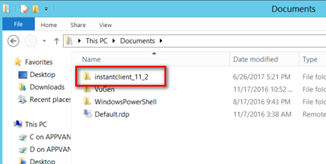
Double click folder, and copy full path from address bar:
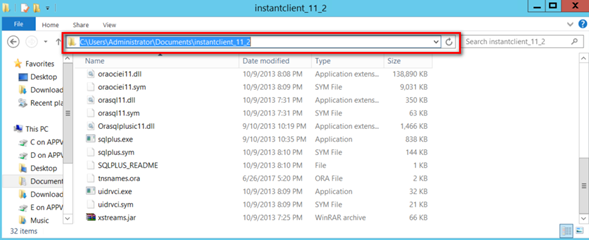
Path sample: “C:\Users\Administrator\Documents\instantclient_11_2”
System Configuration
Open “Control Panel” > “System and Security” > “System”.
Click “Change settings” > “Advanced” > “Environment Variable”.
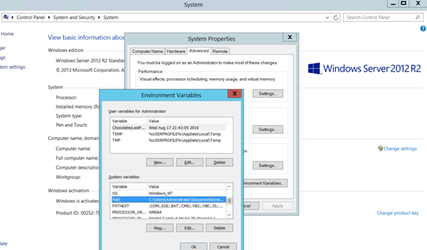
On System variable: ”Click “Path” > “Edit”.
Paste at the beginning of the folder path: “[folderlocation]\instantclient_11_2;” (include the semicolon “;”)
Click OK, and to close all system windows.
Below is neededanother file called tnsname.ora, download and place the file in the same folder "installclient_11_2.
Edit the file in any of your favourite editor:
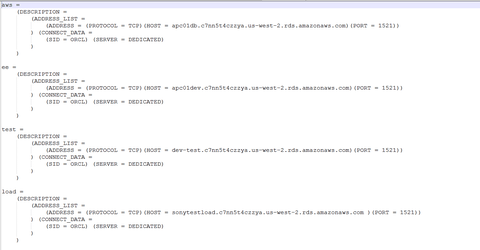
Copy one entry say 'aws' and paste below.
Change the name of aws to validatea Oracle-compatibledesired name (say qatest) and also change the HOST to the new RDS.
Save the file.
Opening SQL Plus:
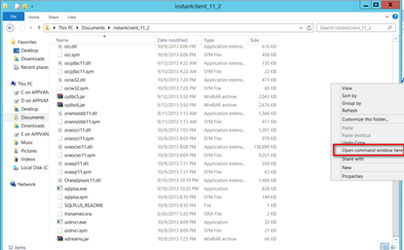
Go to folder “[folderlocation]\instantclient_11_2” (where instantclient folder was unzipped)
Shift Right click, and click “Open command window here”
On command line prompt, type:
sqlplus username/password@qatest
where username: is the root username of the RDS connectivityinstance
or
password is the root password of the RDS instance
qatest is the alias name that was provided in tnsnames.ora
To verify connection with database, type
Select * from cat;
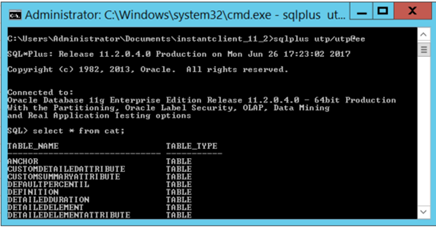
Once connected, run approvedthe diagnosticOracleInitial.sql queriesfile forby AIQ-relateddragging environments.
Recommendeddropping guidance
placing Confirman @symbol in thedatabasebeginning.engineNow
isconnectOracle-compatible beforeagain usingSQL*Plus.Useutp/utp@qatestapprovedRun
clientOracleAppvance.sqlsoftwarefile by dragging andleast-privilege database accounts.Never paste database passwords or connection strings with secrets into documentation.
Validation workflow
Confirm hostname, port, service name/SID, network access, and security group rules.Installdropping theapprovedfileOracleplacingclientanor@symbolSQL*Plus package forin theadminbeginning.workstation or host.Test connectivity with a least-privilege account.Run only approved read-only diagnostic queries unless a change window authorizes updates.Record results without including credentials.
Note: This article is not MySQL-specific despite its current book location; consider moving or consolidating if database books are reorganized.
Last updated: SeptemberJuly 22,03, 20262023
If you have any feedback on this topic, please contact us at documentation@appvance.ai.