
Update an Expired AIQ Certificate
Update an Expired AppvanceAIQ Certificate
Use this procedure when an AIQ certificate has expired or is about to expire. Certificate changes should be planned because they can affect browser access, integrations, load balancers, test nodes, and API clients.
Preparation checklist
This
- Confirm
processwhichwillcertificateletexpired:youAIQmanuallyapplication,updateload balancer, repository, database, or integration certificate. - Collect the
AppvancenewCertificatecertificate,onprivateankey, intermediate chain, hostname, expiration date, and owner. - Back up the existing
buildcertificate files and configuration before replacing them. - Schedule a maintenance window if AIQ services, proxy services, or load balancer rules must restart.
- Notify users and integration owners when the
Certificatecertificateischangeexpired.affectsThisexternalprocessaccess.
Validation onlyworkflow
- Install the
5.2.5.1renewedrelease of AIQ which contains an updated certificate.Requirements Contact Appvance customer support to obtain the following files:appvance.jks (only needed for Controllercertificate andTestfullNodes)
For the 2025 Certificate upgrade, the files are attached below.
Controller Access: You will need access to the AIQ Controller via RDP or SSH to replace some fileschain in the Controller.
End Users/Testers will need to modify their local installations ofonly the Webservices Designer client.
Stepsrequired for End Users
These steps will allow testers to continue working with their scripts using the same AIQ build that has an expired certificate.
Remove the contents of the ca folder located at $HOME/Web Designer/NetworkProxy/NetworkProxy/certgen/X509CA/ca and replace them with the files inside the ca.zip file.
Remove the contents of the certs folder located at $HOME/Web Designer/NetworkProxy/NetworkProxy/certs
Add the certificate new_ca.cer to thetake endeffect.
The new_ca.cer certificate is contined in the ca.zip file. You can also download it from https://aiq-certificate.s3.us-west-1.amazonaws.com/2025/new_ca.cer.
Windows: Double-click on new_ca.cer and install the certificate in the Trusted Root Certificates folder.
Mac OS: Double click on new_ca.cer and install the Appvance 2025 certificate in KeychainAccess app.
AIQ Controller Test Nodes
When connecting to the AIQ Controller you will have to accept the security warning displayed by the browser. A red message will display in left of the browser’sload-balanced URL.
This update is only requiredlogs for AIQTLS, versionshostname, prior to AIQ 5.2.5.1. If you have AIQ 5.2.1trust-chain, or later installed, you do not need to perform this update.
Connect to the AIQ Controller and replace the appvance.jks file located at aiq_distribution/TestNode/etc/appvance.jks.
If you have Test Nodes, replace this file in the Test Nodes as well.
Connect to the AIQ Controller and replace the localhost.jks file located at aiq_distribution/NetworkProxy/config/localhost.jks.
If you have Test Nodes, replace this file in the Test Nodes as well.
Connect to the AIQ Controller and remove the contents of the ca folder located at aiq_distribution/NetworkProxy/certgen/X509CA/ca, and replace them with the files inside the ca.zip file.
If you have Test Nodes, update this folder in the Test Nodes as well.
Connect to the AIQ Controller and remove the contents of the certs folder located at aiq_distribution/NetworkProxy/certs.
Add the expired-certificate (new_ca.cer) to the AIQ Controller operating system and trust it. This file is located in the ca.zip file.
Windows: Double-click on new_ca.cer and install the certificate in the Trusted Root Certificates folder.
Mac OS: Double click on new_ca.cer and install the Appvance 2025 certificate in KeychainAccess app.
If you have Test Nodes, add and trust the certificate in the Test Nodes as well.
Recreate the Controller domain certificate.
Log in to AIQ and navigate to Admin Options > Certificate.
Provide the DNS or IP of your Controller (for example ec2-18-144-104-71.us-west-1.compute.amazonaws.com) so the domain certificate is properly signed withRecord the new cacertificate.
This will reboot the AIQ controller, so your team should be notified about this before you proceed.
Upgrading using Lab Management
If you are upgrading from a version less equals or less than 5.2.5 to an AIQ version with new certificate, you must deselect the “Keep keystore (appvance.jks)” option in the Upgrade Appvance IQ dialog in Lab Management.
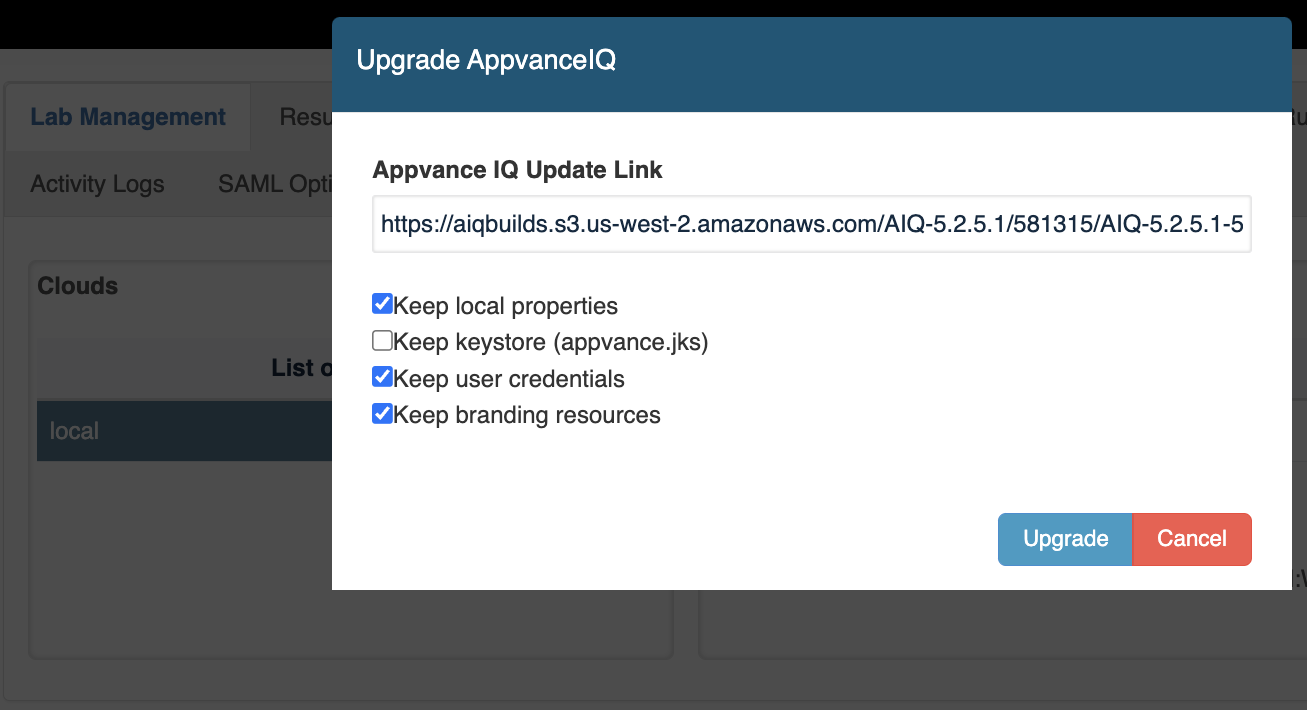
If you do not deselect this option, the new certificate will not be installed in the Controller’s appvance.jks. You will receive “unsecure” error messages and warnings from the browser when navigating to that Controller even after recreating the Certificate.
Using AWS Console
If you do not have access to RDP you can also install the new Appvance certificate using the AWS console.
Connect to the node.
Open a powershell terminal.
Paste the following commands:
# Define the path to the certificate
$certPath = "C:\AIQ\aiq_distribution\NetworkProxy\certgen\X509CA\ca\new_ca.crt"
# Install the certificate
$cert = New-Object System.Security.Cryptography.X509Certificates.X509Certificate2
$cert.Import($certPath)
$store = New-Object System.Security.Cryptography.X509Certificates.X509Store("Root", "LocalMachine")
$store.Open("ReadWrite")
$store.Add($cert)
$store.Close()
This will install and trust the AIQ certificate.
File Download Links
Here are the required files for the 2025 AIQ Certificate upgrade:
Last updated: MarchOctober 04,9, 20252026
If you have any feedback on this topic, please contact us at documentation@appvance.ai