
AIQ Jira Integration (Jira Server)
Appvance IQ supports integration with Jira Cloud and Jira hosted on a server. The sections details how to host Jira and and how to configure Appvance IQ Global Options.
Prerequisites
System Requirements
Minimum requirements for third-party software installations:
Java; Appvance is using GraalVm 21.3
OpenSSL; is included on Mac and Linux, but will need to be installed on Windows
Jira Server
Minimum requirements for your hosted Jira instance:
A Jira Server must be installed, configured and ready to use.
For Jira installation instructions, see Installing Jira Applications on Atlassian’s website.
For example, a Jira Server site is running at localhost:8800.
For an example of OAuth authentication, see the Jira developer documentation Jira REST API Example - OAuth authentication.
A user that has permission to browse a project. For more information, see the Atlassian documentation on Managing Project Permissions.
Configuring the AIQ Integration with Jira
These are the steps for configuring the AIQ integration with Jira server:
Configuring Jira
Creating the Client
Authorize
Configure AIQ
Configuring Jira
In Jira, OAuth consumers are represented by application links. Application links use OAuth with RSA-SHA1 signing for authentication. This means that a private key is used to sign requests, rather than the OAuth token secret/consumer secret. In the following steps, you’ll generate an RSA public/private key pair, then create a new application link in Jira that uses the private key.
Generating an RSA public/private key pair:
In the terminal, run the following OpenSSL commands. You can do this anywhere in your file system, but note that this is where the files will be created (OpenSSL is available inside the git installation directory).
Generate a 1024-bit private key: OpenSSL genrsa -out jira_privatekey.pem 1024
Create an X509 certificate: openssl req -newkey rsa:1024 -x509 -key jira_privatekey.pem -out jira_publickey.cer -days 365
Note: some additional inputs can be requested, follow terminal instructions.
Extract the private key (PKCS8 format) to the jira_privatekey.pcks8 file: OpenSSL pkcs8 -topk8 -nocrypt -in jira_privatekey.pem -out jira_privatekey.pcks8
Extract the public key from the certificate to the jira_publickey.pem file: OpenSSL x509 -pubkey -noout -in jira_publickey.cer > jira_publickey.pem
Optional. Copy the content of the files jira_privatekey.pcks8 and jira_publickey.pem to a single text file.
Creating an application link:
In Jira Server, navigate to Jira settings (cog icon) > Applications > Application links.
Click Create link.
Select External application as the Application Type.
Select Incoming as the Direction.
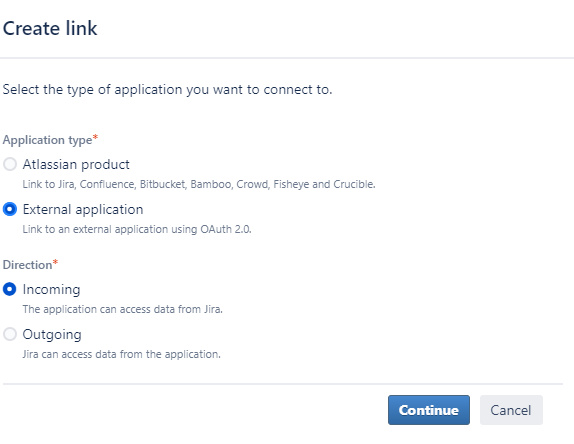
Click Continue.
On the Configure an incoming link page, enter the following information:
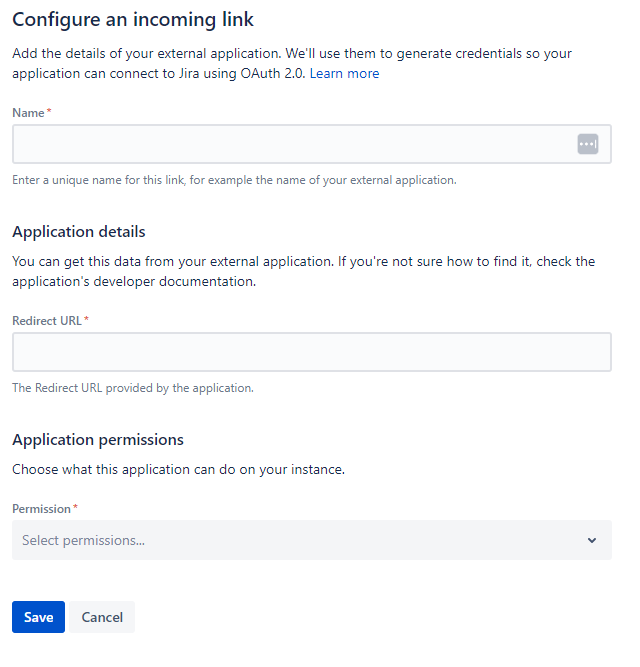
Name - Enter the name of your link.
Redirect URL - Enter the Redirect URL provided by the application.
Permission - Write
On the Credentials page, enter the following information:
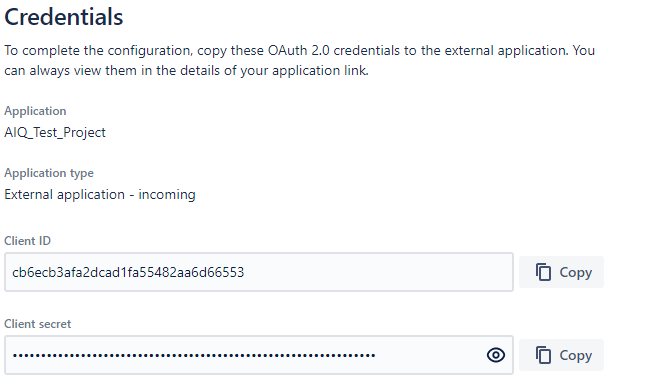
On the next screen of the Link applications dialog, enter the consumer details for the sample client:
Consumer key = OauthKey
Consumer name = Example Jira app
Public key = Copy the public key from the jira_publickey.pem file you previously generated and paste it into this field (for example: dv5y+mjc4fZHHoLAwg...).
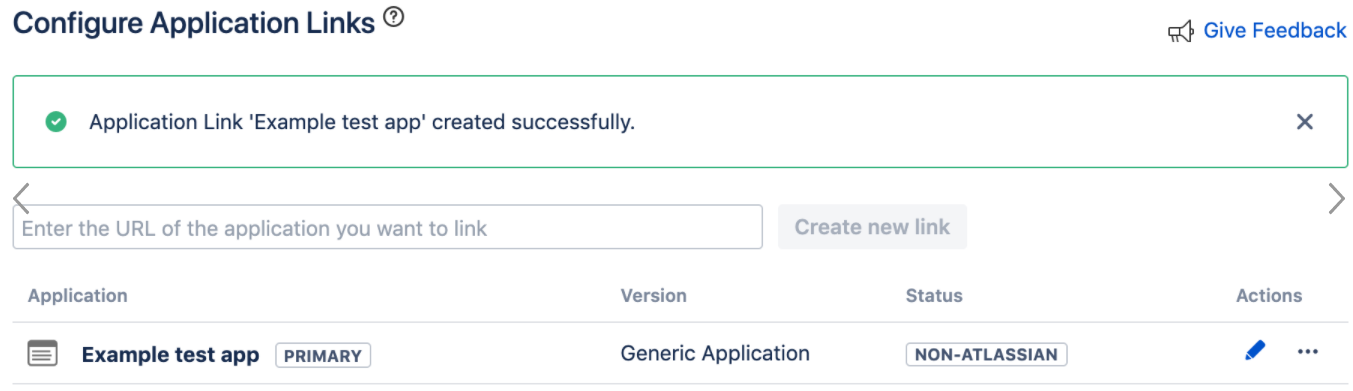
Click Continue. The application link that you created will display.
Creating the Client
Next, create the sample client, which is the consumer.
Clone the client code from the Bitbucket repository. See the Bitbucket documentation on atlassian-oauth-examples for more information.
Within the cloned project, navigate to the java directory, open a terminal, and build the client by running the following command: mvn clean compile assembly:single
A message similar to this will display in the terminal when the client is built:[INFO] --------------------------------------[INFO] BUILD SUCCESS[INFO] --------------------------------------[INFO] Total time: 2.995 s[INFO] Finished at: 2019-03-27T15:43:45+11:00[INFO] Final Memory: 25M/588M[INFO] --------------------------------------
Authorize
In the terminal, open the target folder of the sample OAuth client project.
Run the following command: java -jar OAuthTutorialClient-1.0.jar requestToken
Note: this will fail the first time, but it is expected.
Open with a text editor the file config.properties and modify the following:
a. jira_home: Jira URL (remember to scape the colon, example: http\://localhost\:8800 )
b. consumer_key: OauthKey
c. private_key: add the jira_privatekey.pcks8 (in a single line, remove the dashed lines)
Run the following command: java -jar OAuthTutorialClient-1.0.jar requestToken
This command requests an unauthorized request token from your Jira instance. The output shows with the details of your new request token.
Example:
Token: ec3dj4byy.........99obAlo
Token Secret: OhON.......7Dmxjy0d
Retrieve the request token. Navigate to to https://[Jira URL]/plugins/servlet/oauth/authorize?oauth_token=[token] to authorize it
Note: The request token will persist for 10 minutes. If it expires, you will need to request a new one.
In your browser, go to the URL specified in the terminal output. You'll see the following screen:
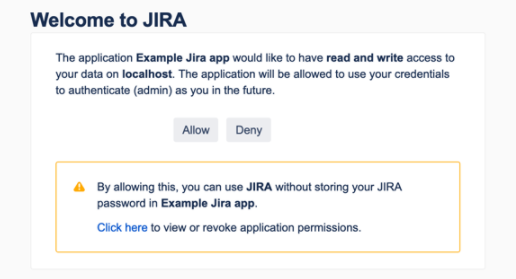
Click Allow. This will authorize the request token.
You'll see the following output in your browser:
Access Approved You have successfully authorized the 'Example JIRA app'.
Your verification code is 'q.....Pi'.
You will need to enter this exact text when prompted. Copy your verification code to use in the next step.
In the terminal, run the following command, replacing the example verification code (q....Pi) with your own verification code from the previous step:
java -jar OAuthTutorialClient-1.0.jar accessToken q.....Pi
You'll see the following output in the terminal, with your access token:
Access Token: W1jjOV4s.....gbjtKc2ye
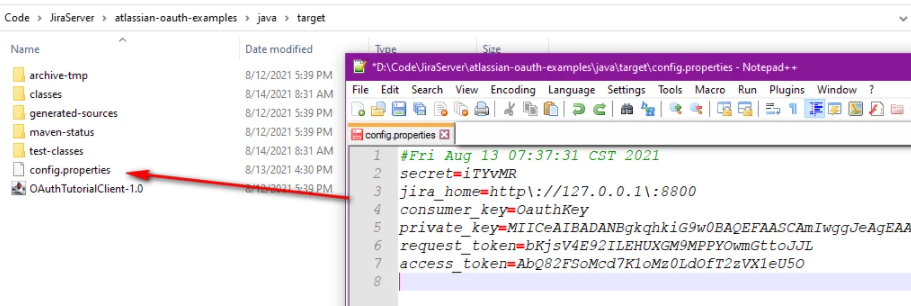
Note: To get the access token in OAuth, you need to pass the consumer key, request token, verification code, and private key. However, in the sample client, information like the consumer key, request token, private key, and so on, are stored in the config.properties file when they are generated. (You can look at it as you complete this tutorial and you will see the new values added). You probably don't want to do this for production implementation, but this makes the sample client easier to use for this example.
Navigate to the target folder where the OAuthTutorialClient-1.0.jar is located and copy the parameters in the config.properties file in order to configure AIQ with Jira Server.
Configuring AIQ
The Integration between Appvance IQ and Jira allows you to configure what project to use, what issue type to automatically create and how to add tickets automatically when a scenario fails.
Prerequisites
You must have a valid Atlassian Jira account.
Admin/Owner permissions in AIQ are required to configure the integration.
Configuration Process
The process is the same as that for the Jira Cloud configuration. The following sections in the Jira Cloud documentation detail configuring the AIQ integration with Jira:.
href="https://docs.appvance.net/Content/AIQ/Integrations/AtlassianJira/AIQ_Jira_Integ_ConfigOptions.htm"Configuring Jira Global Options
href="https://docs.appvance.net/Content/AIQ/Integrations/AtlassianJira/AIQ_Jira_Integ_ViewTickets.htm"Viewing Jira Tickets Created by the Integration
href="https://docs.appvance.net/Content/AIQ/Integrations/AtlassianJira/AIQ_Jira_Integ_ErrorMessages.htm"Viewing Jira Error Messages
href="https://docs.appvance.net/Content/AIQ/Integrations/AtlassianJira/AIQ_Jira_Integ_ScenarioSettings.htm"Scenario Editor Jira Settings
href="https://docs.appvance.net/Content/AIQ/Integrations/AtlassianJira/AIQ_Jira_Integ_Behavior.htm"AIQ Jira Integration Behavior
Last updated: August 02, 2023
If you have any feedback on this topic, please contact us at documentation@appvance.ai